
There’s a special kind of kitchen heartache that comes from spending hours lovingly crafting a cheesecake, only to see it emerge from the oven with a giant crack splitting its surface or a noticeable dip right in the center. It’s frustrating, disappointing, and feels like a dessert disaster! But what if I told you that achieving a perfectly level, beautifully unblemished cheesecake doesn’t require a culinary degree or some elusive magic trick?
Today, I’m sharing my absolute favorite Orange Crumble Cheesecake recipe, and yes, it includes the simple secret to saying goodbye to those dreaded cracks and sinks forever. This isn’t just any cheesecake; it’s a vibrant celebration of citrus, featuring a sunny orange layer nestled within a creamy, dreamy filling, all topped off with a delightful crunchy crumble. Ready to make cheesecake perfection?
Why You’ll Fall Head Over Heels for This Orange Crumble Cheesecake
Aside from the triumphant feeling of baking a cheesecake that looks as good as it tastes, this Orange Crumble Cheesecake offers a multitude of reasons to make it your go-to dessert:
- Say Goodbye to Cracks: The revolutionary cooling method I’ll share ensures a smooth, level surface without the stress of a water bath (though that’s another great technique!).
- Bright, Zesty Flavor: The combination of orange zest and juice throughout the filling and a dedicated orange layer delivers an explosion of fresh citrus flavor.
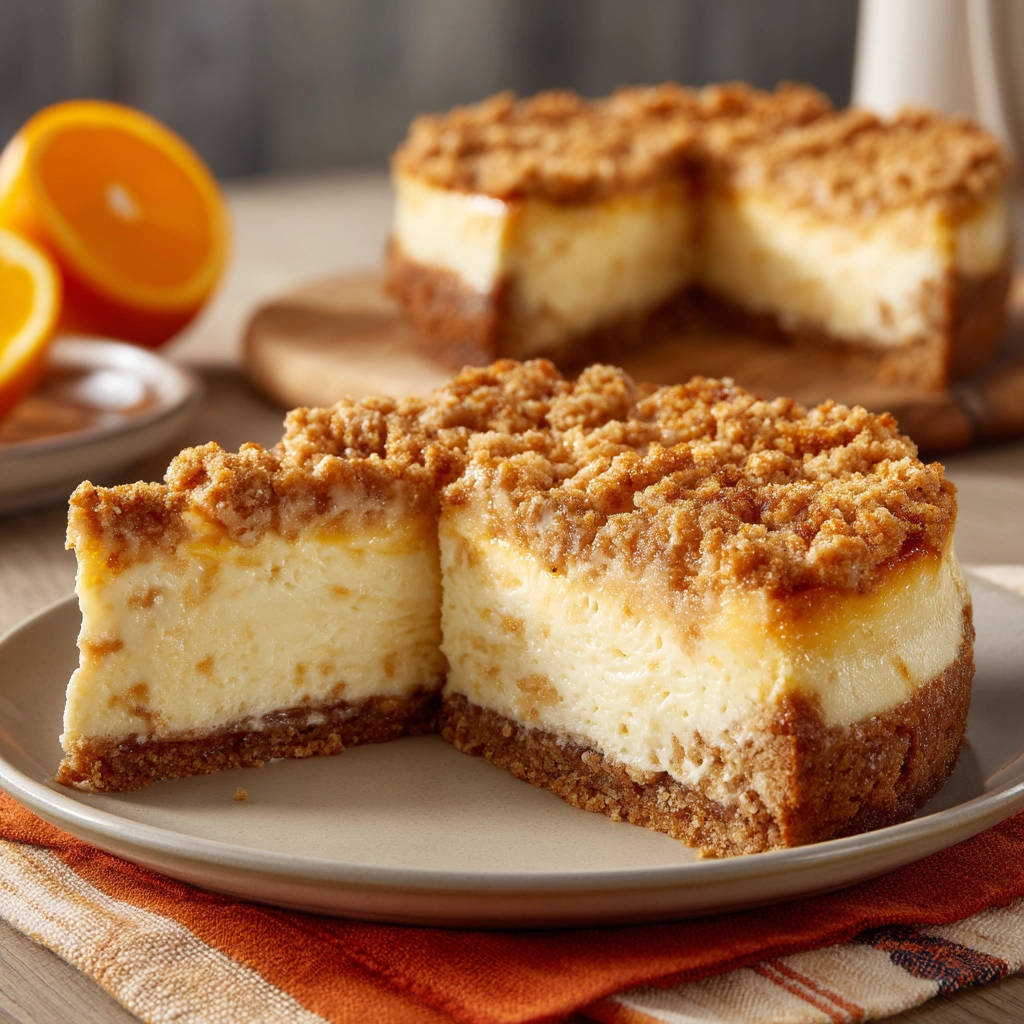
- Irresistible Textures: You get the classic crunchy graham cracker crust, the incredibly smooth and creamy cheesecake filling, a slightly tangy and soft orange layer, and the sweet, buttery crunch of the crumble topping. It’s a textural masterpiece!
- Showstopper Status: This dessert is beautiful! It’s perfect for holiday gatherings, dinner parties, or just a special treat for yourself and your loved ones.
- Reliable Results: Once you master the simple cooling trick, you’ll have consistently perfect cheesecakes. It builds baking confidence!
This Orange Crumble Cheesecake is more than just a recipe; it’s a foolproof guide to cheesecake bliss.
Gathering Your Ingredients for This Sunny Dessert
Crafting this spectacular Orange Crumble Cheesecake requires a few key components, each playing a vital role in achieving that perfect balance of flavor and texture. Think of these ingredients as your building blocks for dessert success.
Let’s break down what you’ll need:
For the Foundation: The Graham Cracker Crust
A classic cheesecake starts with a solid base. Graham cracker crumbs provide that universally loved sweet and slightly spiced flavor. We bind them together with granulated sugar for a touch more sweetness and melted unsalted butter, which acts as the glue, ensuring the crust is sturdy yet crumbly, not greasy or too hard. Using unsalted butter gives you control over the saltiness, allowing the other flavors to shine.
- 1 and 1/2 cups graham cracker crumbs (about 10-12 full graham crackers, finely crushed)
- 1/4 cup granulated sugar
- 1/2 cup unsalted butter, melted
For the Heart: The Creamy Filling
The soul of any cheesecake is its filling, and this one is rich, smooth, and infused with vibrant orange. Softened cream cheese is paramount here – make sure it’s at room temperature! This is crucial for achieving a lump-free, velvety texture. Granulated sugar sweetens the deal, while sour cream adds a touch of tang and helps create that signature creamy consistency. Vanilla extract is a classic flavor enhancer, and large eggs are necessary binders, giving the cheesecake structure and richness. Finally, the star citrus flavors come from fresh orange zest (where most of the aromatic oils are!) and fresh orange juice, adding brightness and a lovely citrusy depth.
- 3 packages (8 ounces each) cream cheese, softened
- 1 and 1/4 cups granulated sugar
- 1/4 cup sour cream
- 1 teaspoon vanilla extract
- 3 large eggs
- Zest of 1 large orange (make sure to only zest the orange part, avoiding the bitter white pith)
- 1/4 cup fresh orange juice (preferably freshly squeezed for the best flavor)
For the Burst of Citrus: The Orange Layer
This vibrant layer is what sets this Orange Crumble Cheesecake apart, adding an extra punch of sweet and tangy orange flavor. Orange juice is the base, thickened with cornstarch to create a glossy, Spoonable sauce. A little more granulated sugar balances the tartness of the juice.
- 1/2 cup orange juice (again, fresh is best!)
- 2 tablespoons granulated sugar
- 1 tablespoon cornstarch
For the Golden Crown: The Crumble Topping
Every great crumble cheesecake needs a fantastic crumble topping! This one is simple yet effective, providing a delightful textural contrast to the smooth filling. All-purpose flour and granulated sugar form the dry base, and cold unsalted butter is cut in to create those signature coarse crumbs that bake up golden and crisp. Using cold butter is key here, as it melts slowly in the oven, creating flaky pockets in the crumble.
- 1/2 cup all-purpose flour
- 1/4 cup granulated sugar
- 1/4 cup unsalted butter, cold and cut into small pieces
Gathering all your ingredients before you start is always a good practice in baking. It ensures you won’t be halfway through the process and realize you’re missing something essential!
Crafting Your Perfect Orange Crumble Cheesecake: Step-by-Step
Ready to turn these wonderful ingredients into a show-stopping dessert? Follow these steps carefully, paying special attention to the details – especially that crucial cooling method! Transforming simple steps into baking magic is all about understanding the ‘why’ behind each action.
- Prepare Your Workspace: Start by preheating your oven to 350 degrees F (175 degrees C). This initial higher temperature is just for baking the crust. Get your 9-inch springform pan ready. Lightly greasing it helps ensure the crust doesn’t stick, making it easier to remove the finished cheesecake later.
- Build the Flavorful Base: In a medium bowl, combine your graham cracker crumbs and the 1/4 cup of sugar for the crust. Pour in the melted butter and stir it with a fork or spoon until all the crumbs are moistened and look like wet sand. This is the point where the butter is evenly distributed, ready to hold the crust together. Press this mixture firmly and evenly onto the bottom of your prepared springform pan. You can use the bottom of a glass or a flat measuring cup to get a compact, level layer. Bake this crust for just 8-10 minutes, until it smells fragrant and is lightly golden around the edges. This pre-baking helps set the crust so it doesn’t get soggy when the filling is added. Remove the crust from the oven and set it aside to cool slightly while you prepare the other components. Don’t forget to reduce your oven temperature down to 325 degrees F (160 degrees C) now – this lower temperature is ideal for baking the delicate cheesecake filling.
- Create the Bright Orange Layer: In a small saucepan, whisk together the 1/2 cup orange juice, 2 tablespoons sugar, and the cornstarch until the mixture is smooth and there are no lumps of cornstarch visible. Place the saucepan over medium heat. Cook this mixture, stirring constantly with your whisk, until it thickens considerably and starts to bubble. This thickening happens as the cornstarch activates. Once thickened and bubbly, remove the saucepan from the heat and let the orange mixture cool slightly. It doesn’t need to be cold, just not piping hot when it goes into the filling.
- Whip Up the Silky Filling: Grab a large bowl and your electric mixer. Beat the softened cream cheese (remember, room temperature is key for smoothness!) and the 1 and 1/4 cups of sugar together on medium speed until the mixture is completely smooth and wonderfully creamy. This step is about achieving a uniform texture. Be careful not to overmix the cream cheese at this stage, as incorporating too much air can lead to issues later. Next, beat in the sour cream and vanilla extract just until they are combined. Now, add the eggs, but do this one at a time. After adding each egg, beat on low speed just until that egg is incorporated into the batter. Adding them slowly and mixing on low minimizes the amount of air you beat into the filling, which also helps prevent cracking and sinking. Finally, gently stir in the fresh orange zest and the 1/4 cup orange juice. A spatula is great for this, folding them in just until evenly distributed. You don’t want to beat the batter anymore after the eggs are in.
- Assemble the Layers: Pour approximately half of your smooth cream cheese filling over the slightly cooled graham cracker crust in the springform pan. This creates the base layer for the orange swirl. Next, carefully drizzle spoonfuls of the cooled orange layer mixture over the surface of this first cream cheese layer. Try to distribute it somewhat evenly, but don’t worry about perfection – a little swirling is lovely. Finally, gently spoon the remaining cream cheese mixture over the orange layer. Take your time here and spread it carefully, trying not to disrupt the orange layer too much underneath. You can gently smooth the top with an offset spatula.
- Prepare the Crumbly Top: In a medium bowl, combine the 1/2 cup all-purpose flour and the 1/4 cup sugar for the crumble topping. Add the cold butter pieces. Use a pastry blender, two forks, or even your fingertips to cut the cold butter into the dry ingredients until the mixture resembles coarse crumbs. Some larger pieces are okay – they will bake up extra crispy! Sprinkle this crumble topping evenly over the top of the assembled cheesecake.
- Bake with Care: Place the cheesecake in your preheated 325 degrees F (160 degrees C) oven. Bake for 60-75 minutes. How do you know when it’s done? The edges should appear set, maybe even slightly puffed, but the very center (about a 2-3 inch circle) should still have a slight wobble or jiggle when you gently nudge the pan. This slight jiggle is your signal that the cheesecake is perfectly cooked through but still moist in the center. Overbaking is a common cause of dry, cracked cheesecakes, so err on the side of slightly underbaked rather than overbaked at this stage.
- The Magic Cooling Step (Prevents Cracks!): THIS is the secret! Once your cheesecake has finished baking and has that perfect slight jiggle in the center, turn the oven OFF immediately. DO NOT open the oven door fully. Instead, prop the oven door open about 2-3 inches using a wooden spoon or an oven mitt placed securely in the door frame. Leave the cheesecake inside the gradually cooling oven for at least 1 hour, or even longer. This slow, gentle cooling process allows the cheesecake to firm up without experiencing a drastic temperature change, which is the main culprit behind cracks and sinking centers. It mimics the steady temperature of a water bath without the hassle!
- Cool Completely and Chill: After its slow cool-down in the oven, carefully remove the cheesecake from the oven and place it on a wire rack to cool completely at room temperature. This can take another 2-3 hours. Once it’s completely cool to the touch, cover the cheesecake tightly (plastic wrap followed by foil works well) and transfer it to the refrigerator. It absolutely must chill for at least 4 hours, but preferably overnight. This prolonged chilling time is essential for the cheesecake to fully set, making it firm and easy to slice cleanly. Rushing this step can result in a messy cheesecake.
- Unmold and Slice: Once the cheesecake is thoroughly chilled, you can carefully remove the sides of the springform pan. Run a thin knife around the edge of the cheesecake first, just to ensure it hasn’t stuck anywhere. Then, release the latch and lift the ring straight up. Now your beautiful, crack-free Orange Crumble Cheesecake is ready to be admired and sliced! Use a sharp knife, wiping the blade clean with a hot, damp cloth between slices for the cleanest cuts.
Essential Tips for Perfect Orange Crumble Cheesecake
Making a truly glorious Orange Crumble Cheesecake involves a few key practices that go beyond just following the steps. These pro tips will help ensure your success every time.
- Temperature Matters: Make sure your cream cheese and eggs are at room temperature before you start mixing the filling. This allows them to combine smoothly and evenly without lumps, resulting in that perfect creamy texture.
- Don’t Overmix the Filling: Beat the cream cheese and sugar until smooth, but once you add the eggs, mix only on low speed and just until they are incorporated. Overmixing incorporates too much air, which can cause the cheesecake to puff up excessively while baking and then fall and crack as it cools.
- Use Fresh Citrus: For the best flavor, use fresh orange zest and juice. Bottled juice works, but fresh offers a brighter, more intense citrus punch. Zest the orange before you juice it!
- Proper Springform Pan Prep: While greasing is sufficient for this recipe’s crust, some bakers like to wrap the bottom of their springform pan in foil, even when not using a water bath, as an extra precaution against leaks, especially if your pan is older.
- Trust the Jiggle: It feels counterintuitive to take something out of the oven when the center still jiggles, but for cheesecake, it’s the correct doneness indicator. The residual heat will continue to cook the center as it cools.
- Embrace the Slow Cool: Seriously, the oven cooling method is a game-changer. Don’t skip or rush this step if you want to avoid cracks and sinking.
- Chill Patience: Chilling is non-negotiable for a firm, sliceable cheesecake. Plan ahead and give it ample time in the refrigerator.
- Clean Slices: For those bakery-worthy slices, use a sharp knife and dip it in hot water, then wipe it clean between each cut.
What to Serve With Your Delightful Cheesecake
This Orange Crumble Cheesecake is certainly rich and satisfying on its own, but a few accompaniments can elevate the experience:
A simple dollop of freshly whipped cream or a dusting of powdered sugar adds a touch of elegance. For an extra layer of orange flavor, you could top slices with thinly sliced candied oranges (a separate recipe!). If you love a crumble topping as much as I do, you might also enjoy exploring other desserts with similar crunchy textures, like our Classic Peach Crumble or even Apple Cinnamon Crumb Cake.
For beverages, think about refreshing options that complement the citrus without overwhelming it. A glass of cold milk, a sparkling citrus soda, or a freshly brewed cup of coffee or tea would all be excellent choices.
Your Orange Crumble Cheesecake Questions Answered (FAQ)
Baking cheesecake can sometimes feel intimidating, but it doesn’t have to be! Here are answers to some common questions you might have about this recipe, especially about achieving that flawless finish.
Why did my cheesecake crack or sink even with the slow cooling method?
While the slow oven cooling is highly effective, cracks and sinks can still happen if other factors are off. The most common culprits are overmixing the batter (incorporating too much air, especially after adding eggs) and overbaking (cooking it past that slight jiggle stage). Ensuring your ingredients are at room temperature and resisting the urge to open the oven door repeatedly while it’s baking are also important steps in preventing issues. If you’ve struggled with cheesecake before, exploring different methods or even starting with smaller formats like Mini Cheesecakes can help you get a feel for the process.
Can I make this cheesecake ahead of time?
Absolutely, and you should! Cheesecake benefits greatly from ample chilling time. You can bake and cool it a day or two in advance and keep it covered in the refrigerator. This allows the flavors to meld and the texture to become perfectly firm.
How long does this cheesecake last and how should I store it?
Properly stored, your Orange Crumble Cheesecake will last for 4-5 days in the refrigerator. Make sure it’s tightly covered with plastic wrap or placed in an airtight container to prevent it from drying out or absorbing odors from other foods.
Can I freeze leftover cheesecake?
Yes! Cheesecake freezes quite well. For the best results, freeze individual slices or the whole cheesecake (without the springform pan sides) by wrapping it tightly first in plastic wrap, then in a layer of aluminum foil. Frozen cheesecake can last for 1-2 months. Thaw it in the refrigerator overnight before serving.
Can I use a different type of crust?
Certainly! While graham cracker is classic and pairs beautifully with orange, you could use a shortbread cookie crust, vanilla wafer crust, or even a gingersnap crust for a spicier kick. Simply follow the same proportions of crumbs, sugar, and melted butter, adjusting slightly if needed for texture.
Is it possible to make this gluten-free?
Yes, you can adapt this recipe to be gluten-free. Use certified gluten-free graham cracker crumbs or a different type of gluten-free cookie for the crust. Ensure the all-purpose flour for the crumble topping is replaced with a gluten-free all-purpose flour blend that contains xanthan gum for best results.
What if I don’t have a springform pan?
A springform pan is ideal because it allows you to easily release the sides without inverting the delicate cheesecake. While you could theoretically make this in a regular cake pan lined with parchment paper (leaving overhang to lift it out), it would be very difficult to remove cleanly, especially with the crumble topping. A springform pan is highly recommended for cheesecake.
Enjoy Your Homemade Orange Crumble Cheesecake!
There’s nothing quite like the satisfaction of pulling a perfect, crack-free cheesecake from your oven. This Orange Crumble Cheesecake, with its bright citrus layers, creamy filling, and crunchy topping, is a guaranteed crowd-pleaser. It’s proof that with the right technique – that simple, magical slow cool-down – you can conquer cheesecake baking challenges and create something truly spectacular.
Give this recipe a try and share your baking triumphs! I’d love to hear how your beautiful cheesecake turns out. Leave a comment below and let me know what you think!
Orange Crumble Cheesecake

Ingredients
- For the Crust
- 1 and 1/2 cups graham cracker crumbs
- 1/4 cup granulated sugar
- 1/2 cup unsalted butter, melted
- For the Filling
- 3 packages (8 ounces each) cream cheese, softened
- 1 and 1/4 cups granulated sugar
- 1/4 cup sour cream
- 1 teaspoon vanilla extract
- 3 large eggs
- Zest of 1 large orange
- 1/4 cup fresh orange juice
- For the Orange Layer
- 1/2 cup orange juice
- 2 tablespoons granulated sugar
- 1 tablespoon cornstarch
- For the Crumble Topping
- 1/2 cup all-purpose flour
- 1/4 cup granulated sugar
- 1/4 cup unsalted butter, cold and cut into small pieces
Directions
- Preheat oven to 350 degrees F (175 degrees C). Lightly grease a 9-inch springform pan.
- Make the crust: In a bowl, combine graham cracker crumbs and 1/4 cup sugar. Stir in melted butter until crumbs are moistened. Press mixture firmly onto the bottom of the prepared springform pan. Bake for 8-10 minutes, until lightly golden. Set aside to cool slightly. Reduce oven temperature to 325 degrees F (160 degrees C).
- Make the orange layer: In a small saucepan, whisk together orange juice, 2 tablespoons sugar, and cornstarch until smooth. Cook over medium heat, stirring constantly, until thickened and bubbly. Remove from heat and let cool slightly.
- Make the filling: In a large bowl, beat softened cream cheese and 1 and 1/4 cups sugar with an electric mixer on medium speed until smooth and creamy. Be careful not to overmix. Beat in sour cream and vanilla extract. Add eggs, one at a time, beating on low speed just until combined after each addition. Stir in orange zest and 1/4 cup orange juice gently.
- Pour about half of the cream cheese mixture over the cooled crust. Drizzle the cooled orange layer over the filling in the pan. Gently spoon the remaining cream cheese mixture over the orange layer, spreading carefully.
- Make the crumble topping: In a medium bowl, combine flour and 1/4 cup sugar. Cut in cold butter using a pastry blender or your fingers until the mixture resembles coarse crumbs. Sprinkle the crumble topping evenly over the top of the cheesecake.
- Bake the cheesecake for 60-75 minutes, or until the edges are set and the center is just slightly jiggly. This is crucial: do not overbake. The very slight jiggle means it’s still moist inside.
- This is the pain point solution step: Once baking time is complete, turn off the oven. Propping the oven door open slightly (about 2-3 inches) using a wooden spoon or oven mitt, let the cheesecake cool gradually inside the oven for at least 1 hour. This slow cooling prevents drastic temperature changes that cause cracking and sinking.
- Remove the cheesecake from the oven and let it cool completely on a wire rack. Once cool, cover and refrigerate for at least 4 hours, or preferably overnight, before carefully removing the sides of the springform pan and slicing.