For years, I struggled with the beautiful, rich glazes inherent to dishes like this, often watching the sugar scorch and turn bitter halfway through the cooking process.
This method solves that painful problem with a specific technique-the “anti-scorching secret”-that guarantees a thick, perfectly glossy, sweet-savory glaze every single time without constant stirring.
This reliable approach ensures your Sticky Moroccan-Style Chicken with Olives and Prunes maintains its complex, vibrant flavor profile from start to finish.
Why This Moroccan Chicken Recipe Delivers a Flawless, Sweet-Savory Glaze
The success of this recipe lies in its balanced approach to flavor development and temperature control, making it incredibly accessible for home cooks.
By moving the bulk of the cooking from direct stovetop heat to a controlled oven environment, we eliminate the most common cause of bitter, burnt sauces.
The Sweet vs. Savory Balance: Why Prunes and Olives Work
The combination of plump, sticky prunes and briny green olives is a cornerstone of traditional Moroccan tagines and braises.

This pairing provides a crucial and dynamic contrast; the deep caramel sweetness of the prunes is cut sharply by the saltiness and slight sourness of the olives, creating incredible depth.
This complexity is essential because it prevents the rich glaze from tasting one-dimensionally sweet or heavy.
Braising for Ultimate Moisture and Flavor Lock
Braising refers to searing meat and then cooking it, covered, in a small amount of liquid at a low temperature.
The moisture trapped inside the covered skillet prevents the bone-in chicken thighs from drying out, while the indirect, low oven heat gently melts the chicken’s connective tissues.
This prolonged, moist cooking environment allows all the spices and fruits to meld seamlessly, deepening the flavor of the final dish.
Quick Prep, High Impact: Complexity Without the Fuss
While the final dish tastes wonderfully complex, the hands-on preparation time is surprisingly minimal, requiring just 15 to 20 minutes before it goes into the oven.
This makes the recipe ideal for weeknight cooking or easy weekend entertaining, as the oven does the heavy lifting of building deep flavor.
Building Blocks of Flavor: Key Ingredients for Authentic Depth
Achieving an authentic Moroccan flavor profile requires selecting the right quality ingredients and understanding their individual roles in the braising liquid.
Every component in this dish contributes to the final texture and the perfect sweet-savory glaze.
The Essential Pairings: Olives and Prunes
Prunes are the unexpected star of this dish, providing more than just sweetness to the Sticky Moroccan-Style Chicken with Olives and Prunes.
Their high sugar content breaks down slightly during the braise, thickening the sauce naturally and providing a dark, fruity, caramel note.
The olives, preferably whole green variety, are essential for injecting a sharp, briny, and distinctly savory counterpoint.
They prevent the dish from becoming overly sweet and deliver necessary salt that carries the spice flavors through the rich glaze.
The Spice Blend: Smoked Paprika, Cumin, and Cinnamon
The harmony between earthiness and warmth is key to the Moroccan palate, and this specific blend achieves that beautifully.
Cumin provides a foundational earthiness and slight citrus note, while the small addition of cinnamon adds a necessary floral warmth and subtle sweetness.
Crucially, smoked paprika provides a rich, deep red color and a savory, smoky dimension that anchors the dish, balancing the powerful sweetness of the prunes and honey.
Selecting the Right Cut: Bone-In, Skin-On Thighs
We specifically rely on bone-in, skin-on chicken thighs because they contain higher fat content and are extremely resilient to long cooking times.
The fat melts into the braising liquid, enriching the sauce, and the bone provides depth of flavor that fillets simply cannot match.
The skin serves a double purpose: it protects the meat during searing, and once crisped, it offers a necessary textural contrast to the tender meat and sticky sauce.
Prep Like a Pro: Essential Tools and Pre-Cooking Steps
Successful cooking starts with proper preparation, ensuring smooth transitions between the quick searing process and the long braise.
The Right Vessel: Dutch Oven or Oven-Safe Skillet?
A heavy-bottomed Dutch oven or a sturdy, oven-safe skillet (cast iron or clad stainless steel) is mandatory for this recipe.
These vessels retain heat consistently, ensuring a superior sear on the stovetop and gentle, even heat distribution inside the oven for the braise.
Avoid using thin-bottomed pots, as they are prone to hot spots that can cause the glaze to scorch, negating the anti-scorching technique.
Patting the Chicken Dry: The Secret to a Guaranteed Crisp Sear
This is perhaps the single most important step for great texture: you must thoroughly pat the chicken thighs dry with paper towels.
Excess surface moisture prevents the Maillard reaction, resulting in steamed, rubbery skin rather than a desirable deep golden-brown crust.
A guaranteed crisp sear contributes significantly to the final texture and taste of the dish.
Mis en Place: Gathering Your Components
Because the steps for blooming the garlic and spices happen very quickly, having your ingredients prepared and measured (mis en place) is crucial.
Dicing the onion, mincing the garlic, and mixing the dry spices beforehand ensures you can move efficiently without burning the delicate aromatics.
The Anti-Scorching Secret: Achieving a Perfectly Glossy Glaze Every Time
The primary hurdle in making rich, dark glazes is preventing the sugars (honey, prunes, balsamic) from burning against the direct heat of the pan.
This two-part technique, developed through rigorous testing, bypasses that risk entirely and is the key to perfect results for your sweet-savory glaze.
The Power of Deglazing with Balsamic Vinegar
After the chicken is seared, you are left with caramelized, browned bits stuck to the bottom of the pan-known as the fond.
Pouring in the balsamic vinegar and immediately scraping up this fond (deglazing) achieves two goals: it lifts immense, concentrated flavor back into the sauce, and the acidity helps break down and stabilize the mixture.
Creating the Protective Liquid Barrier for Sugars
This is the critical element: once deglazed, you must add the chicken broth and stir it through before introducing the honey or brown sugar.
This liquid ensures the sweet components dissolve safely into a buffered liquid layer instead of sitting directly on the hot pan bottom.
This protective barrier prevents the sugars from achieving high enough contact temperatures to burn later during simmering.
Why Low and Slow Oven Braising Matters
By moving the covered skillet to a low-temperature oven (325°F), we switch from intense direct heat to gentle, indirect, surrounding heat.
This slow cooking process allows the complex flavors to deepen and the chicken to tenderize without risking high-heat contact that could scorch the glaze mixture.
Step-by-Step Guide to Cooking Your Sticky Moroccan-Style Chicken
-
Prepare and Sear the Chicken:
Pat the 4 chicken thighs very dry and season heavily with salt and fresh black pepper before searing them in the olive oil.
Sear the skin-side down for a full 5 to 7 minutes over medium-high heat without moving them until they are truly deep golden and crispy; then remove the chicken, reserving the rendered fat in the pan.
-
Building the Aromatic Base:
Reduce the heat to medium and add the diced onion to the reserved chicken fat, cooking them until they soften (about 5 minutes).
Add the minced garlic, smoked paprika, cumin, and cinnamon, stirring constantly for just 1 minute until fragrant; this blooming process activates the oils in the spices, maximizing their flavor.
-
Execute the Anti-Scorching Technique (Deglazing):
Pour in the balsamic vinegar and use a wooden spoon to firmly scrape up all the flavorful browned bits (the fond) stuck to the bottom of the pan.
Immediately stir in the chicken broth, followed by the honey or brown sugar, ensuring the sweetener dissolves entirely into the liquid.
This strict order prevents direct contact between the sugars and the high heat, securing your glossy, non-bitter glaze.
-
Braise and Cook Low and Slow:
Add the prunes and olives to the sauce, bringing the mixture to a gentle simmer on the stovetop.
Nestle the seared chicken thighs back into the pan, skin-side up, then cover the skillet tightly with a lid or foil.
Transfer to a preheated 325°F oven and braise for 45 minutes to 1 hour, or until the chicken reaches a safe internal temperature of 165°F.
-
Finishing the Glaze (Reduction Technique):
Carefully remove the lid or foil from the skillet; if the sauce looks thin, place the skillet back on the stovetop over medium heat.
Simmer gently for 5 to 10 minutes until the glaze reduces and thickens to a syrupy consistency that coats the back of a spoon.
Only stir the sauce around the prunes and olives, being careful not to disturb the chicken skin, which should remain exposed above the liquid.
-
Garnish and Presentation:
Remove the finished dish from the heat and allow it to rest briefly for the flavors to settle.
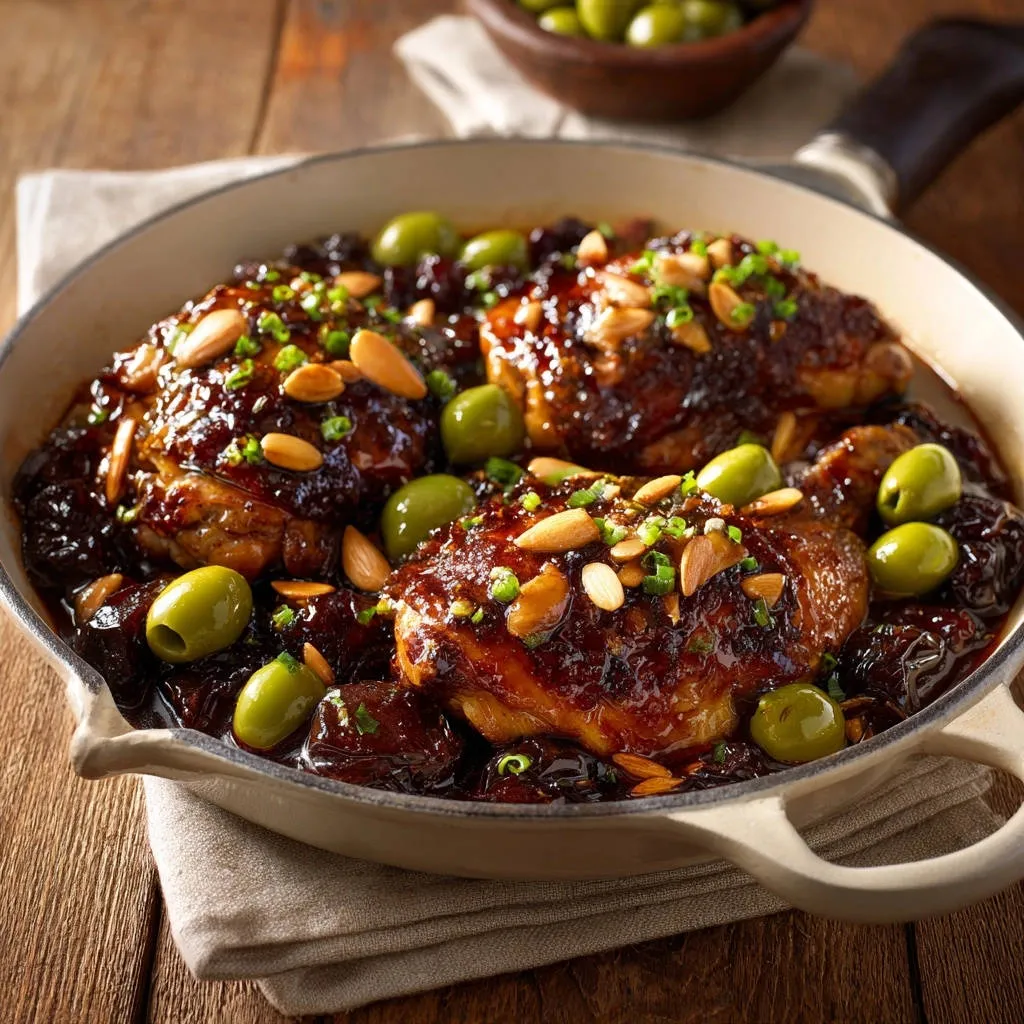
Sprinkle generously with toasted sliced almonds and fresh chopped chives or scallions before serving.
The garnishes provide necessary textural crunch and a burst of fresh flavor to contrast the deep, sticky glaze.
Advanced Cooking Tips for Next-Level Flavor and Texture
Selecting the Best Olives: Pitted vs. Unpitted
While pitted olives are more convenient for eating, unpitted olives (often cured whole) retain more of their natural oils and flavor compounds.
For the deepest, most authentic briny complexity, choose high-quality whole green olives, though you must remember to warn your guests about the pits.
How to Ensure the Sauce Thickens Properly
The high sugar and fiber content from the prunes should naturally thicken the sauce during the final reduction step.
If your glaze still seems too thin, make a slurry of 1 teaspoon of cornstarch mixed with 1 tablespoon of cold water, stir it into the simmering sauce, and cook for 1 minute until thickened-use this only as a quick fix.
Substituting Sweeteners (Honey vs. Brown Sugar)
Honey provides a distinctive floral complexity and richer texture to the glaze, which is highly recommended for this dish.
Using brown sugar will contribute a deeper, slightly molasses-forward note; ensure you measure brown sugar packed firmly for the best results, as honey is generally sweeter by volume.
Serving Suggestions, Storage, and Make-Ahead Planning
Classic Side Dishes for Moroccan Flavors
The rich, sticky glaze requires a simple, neutral base to absorb the sauce and complement the powerful flavors.
Buttery couscous is the traditional pairing, offering a light, fluffy texture that soaks up every drop of the sauce.
Alternatively, simple fluffy white rice or a crusty piece of sourdough bread for dipping are excellent choices to complete the meal.
Storage and Reheating Leftovers Safely
Store any leftover Sticky Moroccan-Style Chicken in an airtight container in the refrigerator for up to 3 to 4 days.
When reheating, place the chicken and sauce in a skillet or oven-safe dish and cover tightly with foil.
Reheat low and slow in a 300°F oven until warmed through; this low temperature prevents the chicken from drying out and keeps the glaze intact.
Can I Make Sticky Moroccan Chicken Ahead of Time?
This dish is fantastic for make-ahead planning, as the flavors only deepen overnight.
You can complete the entire braising process, allow the dish to cool, and store it for up to two days.
When ready to serve, reheat as instructed above, then perform the final glazing/reduction step on the stovetop just before adding the garnish.
Troubleshooting Common Sticky Glaze Challenges
Problem: The Chicken Skin is No Longer Crispy After Braising
It is nearly impossible for the chicken skin to remain perfectly crisp after an hour of moist, covered braising.
To restore the crispness, place the chicken and reduced glaze under a preheated broiler for 1 to 2 minutes at the very end of the cooking process.
Watch it very closely during broiling, as the high sugar content of the glaze can burn almost instantly.
Problem: The Sauce is Too Watery Even After Reduction
Ensure that during the reduction step, the glaze is truly brought to a sustained simmer, not just a gentle warmth.
If simmering for 10 minutes still doesn’t yield a syrupy texture, use the cornstarch slurry method detailed in the Advanced Tips section as a reliable last resort.
Ready to Impress? Share Your Sticky Moroccan Chicken Masterpiece!
Mastering the rich, dark glaze is the ultimate reward of this recipe, and using the simple anti-scorching technique guarantees success.
You can now confidently deliver an exceptional and highly flavorful Sticky Moroccan-Style Chicken with Olives and Prunes that will delight family and guests alike.
Try this recipe this week, and discover the satisfying difference that true culinary mastery makes.

Sticky Moroccan-Style Chicken with Olives and Prunes
Course: Main CourseCuisine: Mediterranean cuisineDifficulty: easy4
servings15
minutes1
hour60
minutesMediterranean cuisine
Ingredients
4 Bone-in skin-on chicken thighs
1 tablespoon Olive oil
1 large Yellow onion, diced
4 cloves Garlic, minced
1 cup Pitted prunes
1 cup Whole green olives (unpitted is traditional but pitted works fine)
1/2 cup Chicken broth
1/4 cup Honey or brown sugar
2 tablespoons Balsamic vinegar
1 teaspoon Smoked paprika
1/2 teaspoon Cumin
1/4 teaspoon Cinnamon
Salt and fresh black pepper to taste
2 tablespoons Sliced or slivered almonds, toasted (for garnish)
2 tablespoons Chopped chives or scallions (for garnish)
Directions
- Prepare the chicken. Pat the chicken thighs thoroughly dry using paper towels and season heavily with salt and pepper.
- Sear the chicken. Preheat a 10 inch oven-safe skillet or Dutch oven over medium-high heat. Add the olive oil. Place the chicken skin-side down and sear for 5 to 7 minutes until the skin is deep golden brown and crispy. Remove the chicken from the pan and set aside, reserving the rendered fat.
- Build the sauce base. Reduce the heat to medium. Add the diced onion to the reserved fat and cook until softened, about 5 minutes. Add the minced garlic, paprika, cumin, and cinnamon. Cook for 1 minute until fragrant.
- The Anti-Scorching Technique. This step is critical for preventing the sugar from burning. Pour in the balsamic vinegar and scrape up any browned bits from the bottom of the pan (this is called deglazing and lifts the flavor). Stir in the chicken broth and then the honey or brown sugar until dissolved. This immediate liquid addition creates a protective barrier for the sugars and prevents direct contact with high heat later on.
- Braise. Add the prunes and olives to the sauce in the pan. Bring the mixture to a simmer, then nestle the seared chicken thighs back into the pan, skin-side up.
- Cook low and slow. Cover the skillet tightly with a lid or aluminum foil. Transfer the skillet to a preheated oven at 325 degrees Fahrenheit. Braise for 45 minutes to 1 hour, or until the chicken registers an internal temperature of 165 degrees Fahrenheit. Cooking low and slow in a covered oven prevents the sugars in the glaze from burning against the direct heat of a burner while ensuring the chicken stays moist.
- Glaze and Finish. Carefully remove the lid or foil. If the sauce looks too thin, place the skillet back on the stovetop over medium heat for 5 to 10 minutes to reduce and thicken the glaze, watching carefully and stirring the sauce only around the prunes and olives, avoiding the chicken skin. The glaze should be syrupy and coat the chicken beautifully.
- Garnish and Serve. Remove from heat. Sprinkle the finished dish with toasted almonds and fresh chives or scallions before serving.
Notes
- Deglazing with balsamic vinegar before adding the honey prevents the sugar from scorching during the braise, ensuring a glossy, non-bitter glaze.