Oh, friends, let’s talk about chocolate cake. There’s arguably no dessert more universally loved, more comforting, or more celebratory than a slice of rich, moist chocolate cake. It’s a staple for birthdays, holidays, or just because you had a craving that only chocolate can fix. We’ve all dreamt of that perfect, tender crumb and deep, cocoa flavor, right?
But if you’re anything like me, you might have a few memories (that you’d rather forget!) of slicing into a beautiful cake, only to find it disappointingly dry and crumbly. It’s happened to the best of us, even with the most promising recipes. It feels like a baking fail, and honestly, it’s just sad when your chocolate cake doesn’t live up to its potential.
Well, I’m here today to tell you that those days are officially over! I’ve discovered the secret, the simple little trick that changed my chocolate cake game forever. This isn’t just a chocolate cake recipe; it’s the Ultimate Chocolate Cake. It delivers consistent, incredibly moist, and perfectly tender results every single time. Get ready to bake a cake so good, you’ll wonder how you ever made chocolate cake any other way.
This recipe focuses on maximizing flavor and moisture, ensuring that each bite is a decadent experience. Whether you’re a seasoned baker or just starting out, you can achieve chocolate cake perfection with these easy-to-follow steps and my favorite secret ingredient!
Why This Ultimate Chocolate Cake is a Keeper
Forget everything you thought you knew about finicky chocolate cake recipes. This one is designed for success, focusing on flavor, texture, and ease. Here’s why it will quickly become your go-to:
- Unbeatable Moisture: The key technique employed here ensures a super moist crumb that stays tender for days, not just hours. No more dry edges or crumbly centers!
- Intense Chocolate Flavor: We use a generous amount of unsweetened cocoa powder, and a special trick helps “bloom” that cocoa, deepening the chocolatey richness.
- Simple & Straightforward: Despite delivering incredible results, the process is remarkably easy. No fancy techniques or complicated steps needed.
- Perfect Texture: The combination of leavening agents and liquid creates a light yet substantial cake with a tender, open crumb.
- Versatile Pan Size: This recipe is designed for a standard 9×13 inch pan, making it perfect for potlucks, parties, or easy slicing.
Gathering Your Ingredients for Ultimate Chocolate Cake
The beauty of this Ultimate Chocolate Cake lies in its simplicity. You won’t find any obscure ingredients here, just pantry staples that come together to create something truly special. The magic is in the proportions and how they’re combined. Let’s look at what you’ll need and why each component plays a vital role in achieving that coveted moist texture and deep chocolate flavor.
Our dry ingredients lay the foundation for the cake’s structure and flavor. Granulated sugar provides sweetness and also helps retain moisture. All-purpose flour gives the cake its body, while unsweetened cocoa powder is where all that wonderful chocolate taste comes from. We use a dynamic duo of baking soda and baking powder; the soda reacts with the acidic cocoa, and the powder provides extra lift, ensuring a light, fluffy cake. A touch of salt balances the sweetness and enhances the chocolate notes.
For the wet ingredients, we bring in richness and binding. Large eggs provide structure and richness. Milk adds moisture and helps activate the leavening agents. Vegetable oil contributes significant moisture and tenderness, far more effectively than butter in this particular recipe, ensuring the cake stays soft. Pure vanilla extract is essential for rounding out the flavors, adding warmth and complexity that complements the chocolate beautifully.
And now, for the secret weapon – hot liquid! Using hot water or hot brewed coffee isn’t just about adding moisture. The heat helps to “bloom” the cocoa powder, releasing its full flavor potential and creating a richer, more intense chocolate taste. Coffee, if you choose to use it, amplifies the chocolate notes even further without necessarily making the cake taste like coffee. This hot liquid also interacts with the baking soda, creating a wonderfully tender crumb.
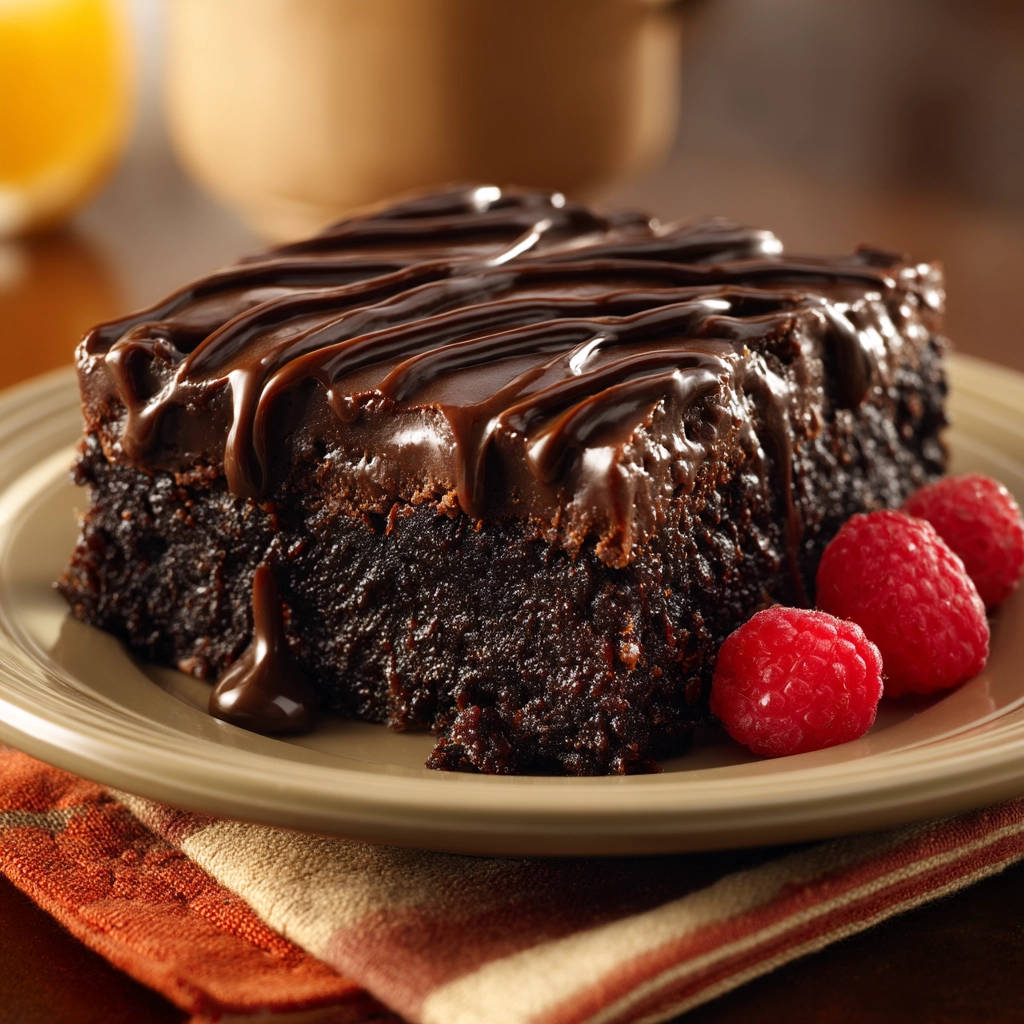
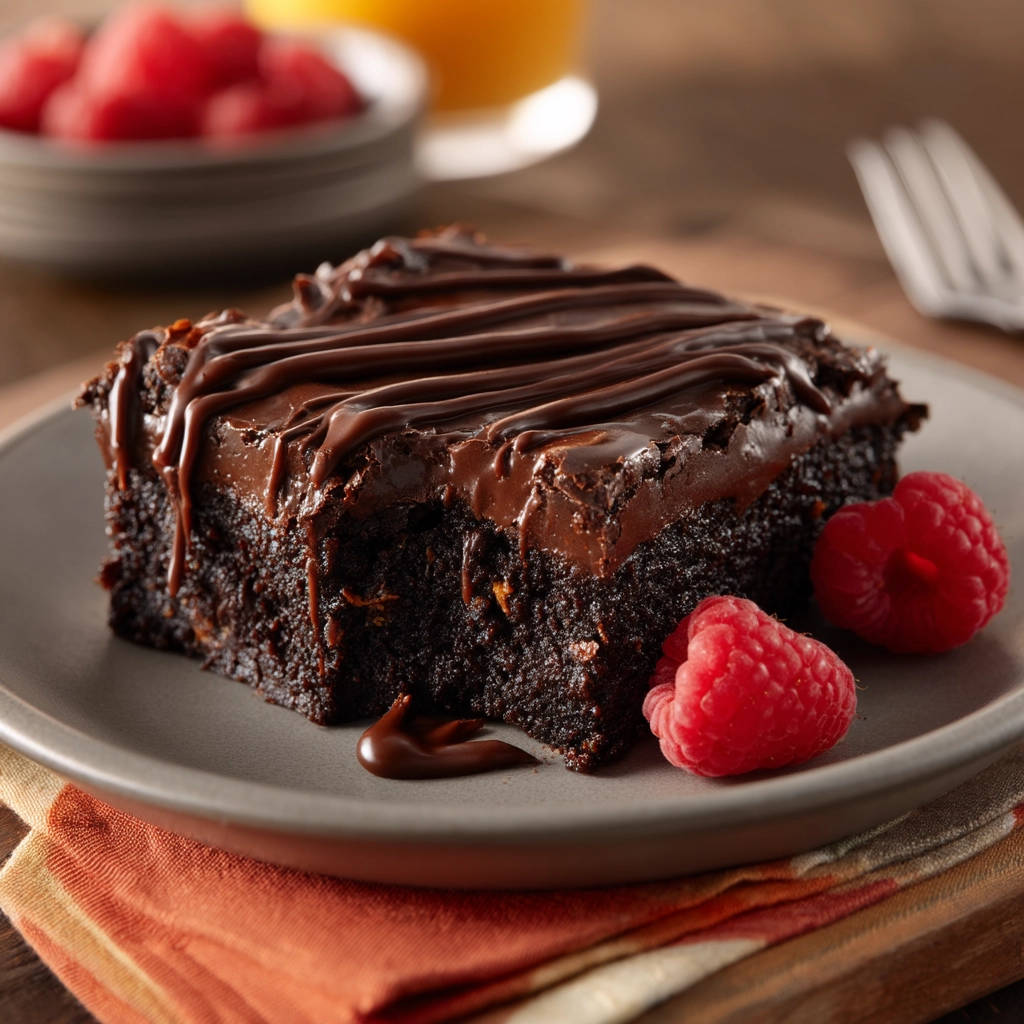
Finally, no chocolate cake is complete without a luscious topping! We’ll whip up a simple, yet incredibly decadent chocolate ganache-style frosting using semi-sweet chocolate chips and heavy cream or milk. This creates a smooth, glossy glaze that sets up beautifully.
Here is a list of the ingredients you’ll need:
- 2 cups granulated sugar
- 1 and 3/4 cups all purpose flour
- 3/4 cup unsweetened cocoa powder
- 1 and 1/2 teaspoons baking soda
- 1 and 1/2 teaspoons baking powder
- 1 teaspoon salt
- 2 large eggs
- 1 cup milk
- 1/2 cup vegetable oil
- 2 teaspoons vanilla extract
- 1 cup hot water or hot brewed coffee
For the simple chocolate frosting:
- 8 ounces semi sweet chocolate chips
- 1/2 cup heavy cream or milk
Crafting Your Ultimate Chocolate Cake: Step-by-Step
Alright, ready to unlock the secret to the most incredibly moist chocolate cake you’ve ever made? Follow these steps, and you’ll be enjoying a slice of pure chocolate bliss in no time. We’ll go through each stage, explaining the ‘why’ behind the actions to help you understand the process and achieve perfect results.
Before you even start mixing, preheat your oven to 350 degrees F (175 degrees C). Proper oven temperature is crucial for even baking and the correct rise. While the oven heats, prepare your pan. For this recipe, a 9×13 inch baking pan works wonderfully. Generously grease the bottom and sides of the pan with butter or cooking spray, then lightly flour it. This simple step creates a barrier that prevents the cake from sticking, ensuring you can remove it cleanly (if you plan to) or slice it easily right from the pan.
In a large mixing bowl, it’s time to combine your dry ingredients. Add the granulated sugar, all-purpose flour, unsweetened cocoa powder, baking soda, baking powder, and salt. Use a whisk to gently combine everything. Whisking isn’t just about mixing; it helps to aerate the flour and cocoa and ensures that the leavening agents and salt are evenly distributed throughout the mixture. This uniform distribution is key for a consistent texture and rise in your finished cake.
Now, add the liquid and binding agents to the dry mixture. Crack your two large eggs directly into the bowl. Pour in the milk, vegetable oil, and vanilla extract. These ingredients introduce moisture and richness, binding the dry ingredients together. Use an electric mixer on medium speed to beat the ingredients together for about two minutes. This step helps to combine the wet and dry ingredients smoothly and starts to develop the cake’s structure. Make sure to stop and scrape down the sides and bottom of the bowl with a spatula as needed to ensure everything is incorporated evenly.
This is the moment of truth, the simple trick that makes all the difference in creating a super moist chocolate cake! Carefully stir in the hot water or hot brewed coffee. The batter will become quite thin – don’t panic, this is exactly how it should be! The hot liquid activates the cocoa and baking soda powerfully, creating tiny air bubbles that result in that wonderfully tender crumb. Stir gently just until combined; do not overmix after adding the hot liquid. Overmixing can develop the gluten too much, leading to a tougher cake. A few small lumps are okay!
Pour the now-thin batter into the prepared 9×13 inch baking pan. Gently spread the batter into an even layer using a spatula if needed. Give the pan a gentle tap on the counter a couple of times to help release any large air bubbles and ensure the top is relatively flat.
Transfer the pan to your preheated oven. Bake for 30 to 35 minutes. The exact baking time can vary slightly depending on your oven, so start checking around the 30-minute mark. You’ll know the cake is done when a wooden skewer or toothpick inserted into the center comes out clean, with no wet batter attached. There might be a few moist crumbs, which is perfectly fine!
Once baked, take the cake out of the oven. Let it cool in the pan set on a wire rack for about 10 minutes. This initial cooling period allows the cake to set slightly, making it less likely to break. After 10 minutes, if you plan to remove the cake from the pan to frost it on a serving platter, you can attempt to invert it onto the wire rack to cool completely. However, this cake is often delicious and easier to manage when simply cooled completely in the pan before frosting. Choose the method that works best for you!
While the cake cools, it’s the perfect time to make the incredibly easy chocolate frosting. Place the semi-sweet chocolate chips in a medium, heatproof bowl. In a small saucepan or using a microwave-safe dish in the microwave, heat the heavy cream or milk until it’s just simmering – you’ll see small bubbles forming around the edges. Do not boil it vigorously. Pour the hot cream directly over the chocolate chips. Let this mixture stand undisturbed for about 5 minutes. This allows the heat from the cream to start melting the chocolate. After 5 minutes, gently whisk the mixture starting from the center and working your way outwards until it becomes completely smooth, glossy, and emulsified. If you have any stubborn unmelted chocolate pieces, you can gently warm the mixture further over very low heat on the stove or in short 10-15 second bursts in the microwave, stirring in between, until it’s perfectly smooth. Be careful not to overheat.
Once the cake has cooled completely (this is important so the frosting doesn’t melt right off!), pour or spread the warm, smooth chocolate frosting evenly over the top. The warmth of the frosting helps it spread beautifully, creating a lovely glaze. Let the frosting set slightly at room temperature before slicing and serving. This might take anywhere from 30 minutes to an hour, depending on your room temperature.
Tips for Perfect Ultimate Chocolate Cake Every Time
Making this Ultimate Chocolate Cake is straightforward, but a few extra tips can help ensure your success and take your cake from great to absolutely spectacular!
- Measure Ingredients Accurately: Especially the flour and cocoa powder. Spoon the flour into your measuring cup and level it off with a straight edge, don’t scoop directly from the bag as this compacts it. Accurate measurements are crucial for the right cake structure.
- Don’t Overmix the Batter: Once the dry and wet ingredients are combined, beat only for the recommended two minutes. After adding the hot liquid, just stir until just combined. Overmixing develops gluten, leading to a tougher cake. Remember, a slightly thin batter after adding the hot liquid is correct!
- Ingredient Temperature: While not strictly necessary for this recipe, using room temperature eggs and milk can sometimes help ingredients combine more smoothly, leading to a more uniform batter.
- Hot Liquid Choice: Using hot brewed coffee instead of hot water will deepen the chocolate flavor without making the cake taste like coffee. It’s a baker’s secret for richer chocolate goods. If you don’t like coffee, hot water works perfectly fine!
- Check for Doneness Correctly: The skewer test is your best friend. Insert it into the very center of the cake. If it comes out clean or with a few moist crumbs attached, it’s done. If there is wet batter, bake for a few more minutes and test again.
- Cooling is Key: Allow the cake to cool in the pan for the initial time to prevent it from falling apart. If you plan to frost outside the pan, make sure it’s fully cooled before attempting to invert it. For frosting in the pan, full cooling is essential so the frosting doesn’t melt.
- Frosting Consistency: If your frosting seems too thick, you can gently warm it slightly. If it’s too thin after whisking, let it sit for another 5-10 minutes; it will thicken as it cools.
- Storage: Store the cooled and frosted cake covered at room temperature for 2-3 days, or in the refrigerator for up to a week.
Recipe Variations to Try
Once you’ve mastered the basic Ultimate Chocolate Cake, feel free to get creative! This moist canvas is perfect for variations:
- Add Chocolate Chips: Fold a cup of semi-sweet or dark chocolate chips into the batter just before pouring it into the pan for extra pockets of melted chocolate.
- Different Frostings: While the simple chocolate ganache is divine, this cake also pairs wonderfully with a classic buttercream frosting, cream cheese frosting, or even a peanut butter frosting if you’re a fan of that combo. If you love dessert bars, you might also enjoy exploring other decadent chocolate treats like our Fudgy Espresso Brownies or Chocolate Peanut Butter Layer Cake.
- Extract Swap: Try adding a touch of peppermint extract (1/4 to 1/2 tsp) along with the vanilla for a chocolate-mint twist.
- Make Cupcakes: This batter can easily be made into cupcakes. Fill cupcake liners about two-thirds full and bake for 18-22 minutes, or until a toothpick comes out clean.
Your Ultimate Chocolate Cake Questions Answered (FAQ)
Got questions? Don’t worry, I’ve got answers! Here are some common queries about baking this moist chocolate cake.
Can I use Dutched-process cocoa powder?
This recipe is specifically written for unsweetened natural cocoa powder (like Hershey’s or Ghirardelli). Natural cocoa is acidic and reacts with the baking soda to provide lift. Dutched-process cocoa is neutral and requires baking powder for leavening. While you could potentially adapt it, using natural unsweetened cocoa powder will give you the intended results in terms of rise, texture, and flavor profile for this specific recipe.
My cake came out dry. What did I do wrong?
Several factors can cause a cake to be dry:
- Overmeasuring Flour: Too much flour is a common culprit. Make sure to spoon and level your flour.
- Overbaking: Even a few minutes too long in the oven can dry out a cake. Start checking for doneness at the minimum bake time. Ovens can vary, so trust the skewer test!
- Not Using Hot Liquid: The hot water or coffee is crucial for moisture and activating the cocoa.
- Old Leavening Agents: Baking soda and powder lose potency over time. Make sure yours are fresh.
Double-checking these steps should help ensure a moist outcome next time!
Can I make this cake ahead of time?
Absolutely! This Ultimate Chocolate Cake is fantastic for making ahead because its moisture level keeps it tender. You can bake the cake a day in advance, let it cool completely, and then wrap it tightly in plastic wrap or store it in an airtight container at room temperature. Frost it closer to serving time. The frosting can also be made ahead and stored in the refrigerator; gently rewarm and whisk until smooth before using.
Can I use milk instead of heavy cream for the frosting?
Yes, the recipe notes that you can use either heavy cream or milk for the frosting. Using heavy cream will result in a richer, slightly thicker, and more stable ganache. Using milk will create a lighter, more pourable glaze that might not set up quite as firmly. Both work, so choose based on your preference and what you have on hand!
Is the hot coffee taste noticeable if I use it?
In this recipe, using hot brewed coffee doesn’t typically make the cake taste like coffee. Instead, the coffee acts as a flavor enhancer, deepening and intensifying the natural chocolate flavor of the cocoa powder. Think of it like a little boost to make the chocolate taste even more chocolatey! If you are very sensitive to coffee flavor, hot water is a perfectly good substitute and will still contribute the essential moisture and blooming effect.
Can I make this in a different size pan?
While designed for a 9×13 inch pan, you could potentially use this batter for two 8 or 9-inch round cake pans. The baking time will vary; start checking around 25-30 minutes for round pans. You’ll need to adjust the frosting quantity or make a second batch if you’re layering two cakes. Alternatively, if you prefer individual portions, you could try this batter as the base for a chocolate trifle or even miniature cakes.
Enjoy Your Homemade Ultimate Chocolate Cake!
There you have it – the Ultimate Chocolate Cake recipe that promises never to leave you with a dry slice again. The secret is simple, the ingredients are common, and the results are truly spectacular. This cake is rich, deeply flavorful, and boasts a tender, moist crumb that will have everyone asking for seconds.
It’s perfect for any occasion, from a casual dessert after dinner to the centerpiece of a celebration. Bake it, frost it, and share the joy (or keep it all to yourself, I won’t tell!). I can’t wait for you to try this recipe and experience the difference that one simple trick makes.
Did you make this Ultimate Chocolate Cake? I’d love to hear how it turned out! Leave a comment below and let me know your thoughts. Happy baking!
Ultimate Chocolate Cake

Ingredients
- 2 cups granulated sugar
- 1 and 3/4 cups all purpose flour
- 3/4 cup unsweetened cocoa powder
- 1 and 1/2 teaspoons baking soda
- 1 and 1/2 teaspoons baking powder
- 1 teaspoon salt
- 2 large eggs
- 1 cup milk
- 1/2 cup vegetable oil
- 2 teaspoons vanilla extract
- 1 cup hot water or hot brewed coffee
- For the frosting:
- 8 ounces semi sweet chocolate chips
- 1/2 cup heavy cream or milk
Directions
- Preheat oven to 350 degrees F (175 degrees C). Grease and flour a 9×13 inch baking pan.
- In a large bowl, whisk together the sugar, flour, cocoa powder, baking soda, baking powder, and salt.
- Add the eggs, milk, oil, and vanilla extract to the dry ingredients. Beat with an electric mixer on medium speed for two minutes. Scrape down the sides of the bowl as needed.
- Here is the key to that moist texture: Stir in the hot water or hot brewed coffee. The batter will be thin, this is correct. Do not overmix after adding the hot liquid.
- Pour the thin batter into the prepared pan.
- Bake for 30 to 35 minutes, or until a wooden skewer inserted into the center comes out clean.
- Let the cake cool in the pan on a wire rack for about 10 minutes before attempting to remove it, or cool completely in the pan if frosting in the pan.
- While the cake cools, make the frosting. Place the chocolate chips in a medium bowl. Heat the heavy cream or milk in a small saucepan or microwave until just simmering. Pour the hot cream over the chocolate chips. Let stand for 5 minutes, then whisk until smooth and glossy. If needed, you can gently warm the mixture further over low heat or in short microwave bursts, stirring until smooth.
- Pour or spread the warm frosting over the cooled cake. Let the frosting set slightly before slicing and serving.