Alright, let’s talk about beef sandwiches. Specifically, those glorious, piled-high creations filled with slow-cooked, tender shredded beef. They’re the stuff of comfort food dreams, perfect for a casual dinner, game day, or just because. But confession time: have you ever bitten into one, full of anticipation, only to be met with meat that’s dry, tough, and just… disappointing? I’ve been there, and let me tell you, it’s a culinary heartbreak.
For years, I struggled to get that truly succulent shredded beef at home. It seemed like no matter what cut I used or how long I cooked it, it always ended up on the drier side. But through trial and error (and a lot of slightly-too-dry sandwiches!), I discovered a simple, game-changing technique that guarantees perfectly moist, fall-apart tender shredded beef every single time. This trick is all about how you handle the beef during the cooking process, and once you know it, you’ll never make a dry shredded beef sandwich again!
Why This Ultimate Shredded Beef Sandwich is a Keeper
This isn’t just another shredded beef recipe; it’s the one you’ll come back to again and again. Here’s why:
- Unbeatable Tenderness: Thanks to our secret cooking method, the beef becomes incredibly tender and easy to shred with just two forks.
- Packed with Flavor: We build layers of flavor starting with a deep sear, then simmer the beef in a rich broth with aromatics.
- Perfectly Juicy: Say goodbye to dry meat! The beef stays submerged in liquid during cooking and then gets returned to the flavorful juices, ensuring maximum moisture.
- Simple Oven Method: While it takes time, the process is largely hands-off, letting your oven do most of the work.
- Crowd-Pleasing: This recipe makes a generous amount of delicious shredded beef, ideal for feeding a family or a gathering.
Gathering Your Ingredients for Your Juicy Shredded Beef Sandwich
Crafting the perfect sandwich starts with choosing the right components. For this ultimate shredded beef sandwich, we rely on a few key ingredients that work together to create deep flavor and that signature tender texture. Don’t underestimate the importance of each one!
- Boneless Beef Chuck Roast (2-3 pounds): This is your star ingredient. Chuck roast is ideal for slow cooking because it has connective tissue that breaks down over time into gelatin, resulting in incredibly tender, moist, and flavorful shredded beef. Look for a roast with good marbling for the best results. The 2-3 pound size is perfect for yielding enough meat for about 4 generous sandwiches with potential leftovers.
- Olive Oil (2 tablespoons): Used for searing the beef and sautéing the vegetables. A good quality olive oil adds a subtle richness.
- Large Onion (1, sliced): Onions provide a foundational layer of savory sweetness that permeates the cooking liquid and the beef as it cooks slowly. Slicing them allows them to soften and release their flavor easily.
- Garlic (3 cloves, minced): The aromatic backbone of many savory dishes, garlic adds warmth and depth. Freshly minced garlic is always best for maximizing flavor.
- Beef Broth (4 cups): This is the crucial liquid for braising the beef. Using beef broth instead of just water injects more flavor into the meat as it becomes tender. Choose a good quality, low-sodium broth so you can control the seasoning later.
- Bay Leaf (1, optional): While optional, a bay leaf adds a subtle, earthy, and slightly floral note that enhances the overall savory profile of the cooking liquid.
- Salt and Black Pepper (to taste): Essential for seasoning the beef generously before searing and adjusting the flavor of the finished shredded meat and its juices. Don’t be shy with the initial seasoning!
- Long Sandwich Rolls or Baguettes (4): The vessel for our delicious beef! Choose sturdy rolls that can hold up to the juicy filling without getting soggy too quickly. French baguettes sliced lengthwise are a classic choice, or use your favorite sub rolls. If you enjoy baking, you could even try using a crusty artisan loaf for a different texture!
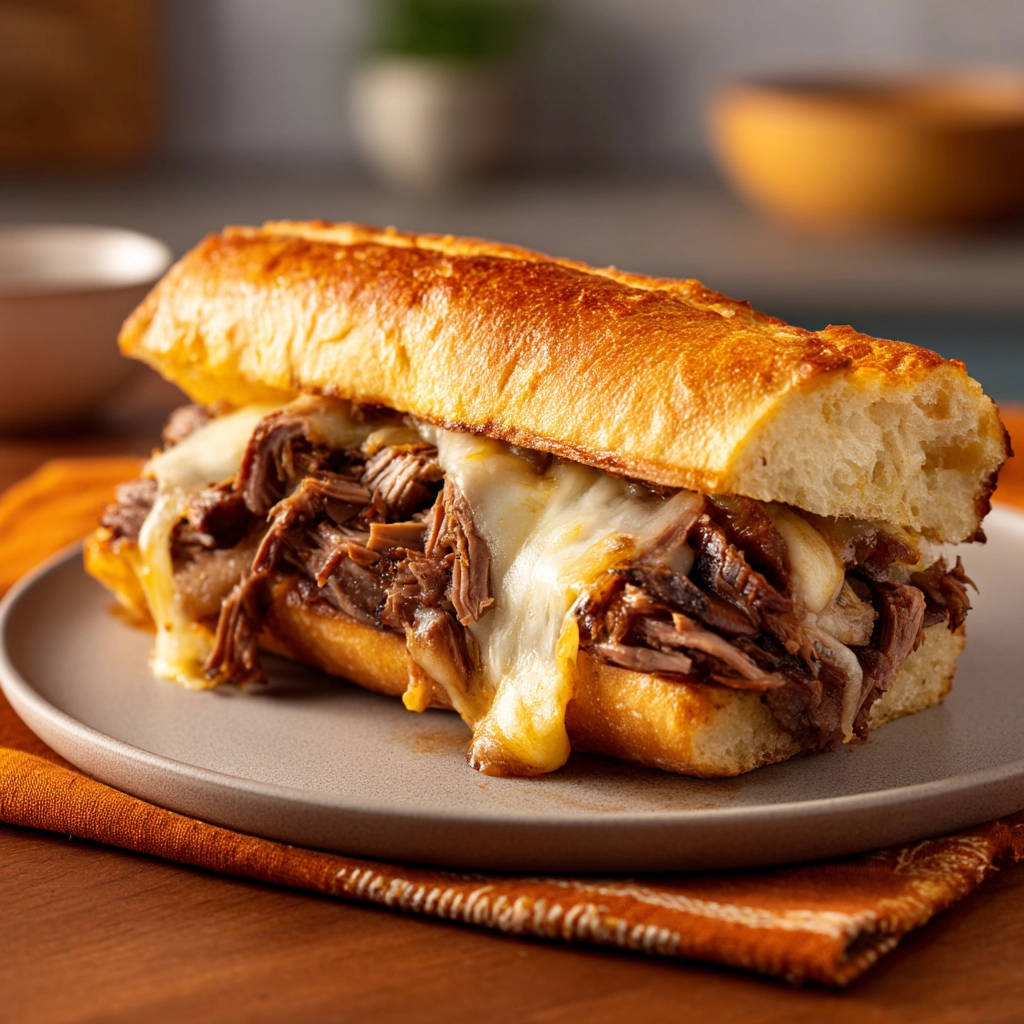
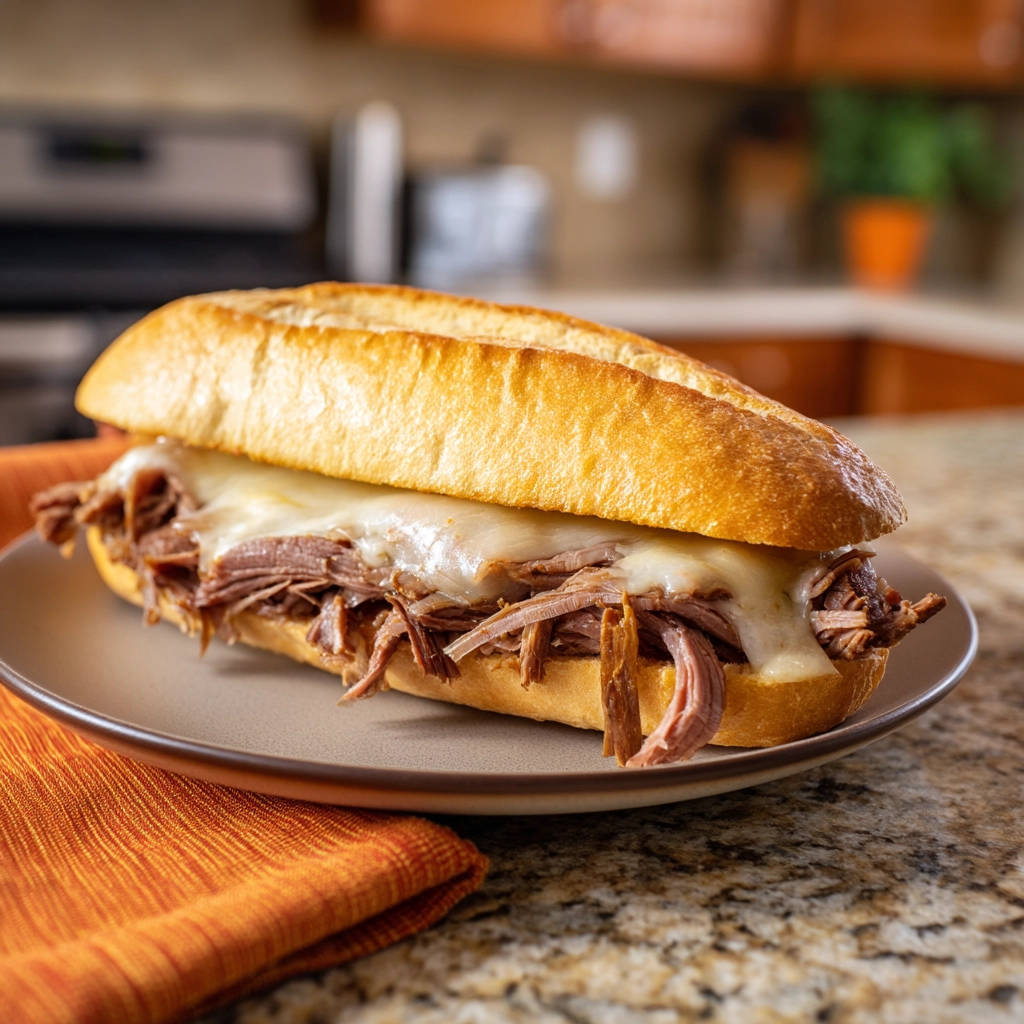
- Provolone or Mozzarella Cheese (8 slices): Melty cheese is the perfect companion to savory beef. Provolone offers a slightly tangy, smoky flavor, while mozzarella is milder and pulls beautifully. Feel free to use a mix or your favorite melty cheese!
Crafting Your Ultimate Shredded Beef Sandwich: Step-by-Step
Ready to transform that humble chuck roast into a sandwich sensation? Follow these steps closely, paying attention to the details, and you’ll be rewarded with juicy, tender shredded beef goodness!
- Get Started with Heat: First things first, preheat your oven to 325 degrees F (160 degrees C). This relatively low temperature is key to slow cooking, allowing the beef’s connective tissues to break down gradually without drying out the meat.
- Prepare the Beef: Take your beef roast and pat it completely dry using paper towels. Removing excess moisture is crucial for achieving a good sear, which is where the initial flavor really develops. Once dry, season the roast generously on all sides with salt and black pepper. Don’t be afraid to use a good amount – this seasoning needs to penetrate the thick cut of meat.
- Sear for Flavor: Heat the olive oil in a large Dutch oven or an oven-safe pot over medium-high heat on your stovetop. The pot needs to be large enough to comfortably hold the roast and the liquid later. Once the oil is shimmering, carefully add the seasoned beef. Sear it on all sides until it develops a deep, dark brown crust. This browning isn’t just for looks; it creates complex flavors through the Maillard reaction. Use tongs to carefully turn the roast. Remove the seared beef from the pot and set it aside on a plate.
- Build the Flavor Base: Add the sliced onion to the same pot (no need to wash it – those browned bits from the beef add extra flavor!). Cook the onion, stirring occasionally, until it softens and starts to get slightly browned around the edges, which usually takes about 5-7 minutes. This caramelization adds sweetness. Now, stir in the minced garlic and cook for just about 1 minute more. You’ll know it’s ready when the garlic is fragrant but be careful not to let it burn, as burnt garlic can taste bitter.
- Introduce the Braising Liquid: Pour the beef broth into the pot. Use a wooden spoon or spatula to scrape up any delicious browned bits stuck to the bottom of the pot – this is called deglazing and captures all that concentrated flavor. If you’re using a bay leaf, add it now. Bring this liquid mixture to a gentle simmer on the stovetop.
- The Tenderizing Trick: Carefully return the seared beef roast to the pot with the simmering liquid. Position it so the liquid comes about halfway or two-thirds of the way up the sides of the roast. This is the little trick that makes all the difference! Cooking the beef partially submerged in liquid ensures that as the meat fibers break down, they stay incredibly moist and absorb the flavors from the broth. It prevents the top of the roast from drying out while the bottom is simmering away.
- Slow Cook to Perfection: Cover the pot tightly with a lid. Make sure it’s a tight seal to keep the moisture locked in. Transfer the covered pot to your preheated oven (325°F / 160°C). Let it cook undisturbed for 3 to 4 hours. The exact time will depend on the size and shape of your roast, but you’ll know it’s done when it is absolutely fork-tender and easily pulls apart with minimal effort. You should be able to insert a fork and twist easily.
- Shred and Reserve: Carefully remove the pot from the oven. Take the tender beef out of the pot and place it on a cutting board or in a large bowl. Using two forks, gently shred the beef into delicious pieces. While the beef is resting slightly, skim off any excess fat that has risen to the surface of the cooking liquid in the pot. This liquid is packed with flavor!
- Moisten the Meat: Return the shredded beef to the pot with some of the flavorful cooking liquid. Stir it gently to coat all the shredded meat. This step is essential for keeping the beef incredibly moist and flavorful. You can always add more liquid later if needed when assembling the sandwiches, or save some for dipping. Taste the shredded beef and add a little more salt and pepper if you think it needs it.
- Prepare the Rolls: While the beef is staying warm and juicy, get your sandwich rolls ready. Preheat your broiler or set your oven to 375 degrees F (190 degrees C). Slice the long sandwich rolls or baguettes lengthwise but not all the way through, creating a hinge. Place the rolls open-faced on a baking sheet. Toast them lightly under the broiler or in the oven for just 1-2 minutes until they are slightly golden. Keep a close eye on them as they can burn quickly! Toasting helps prevent the rolls from getting soggy. For another bread option, consider warming up some slices of our soft sandwich bread recipe.
- Load ‘Em Up: Pile a generous amount of the warm, shredded beef onto the bottom half of each toasted roll. Don’t be shy! More beef equals a happier sandwich.
- Add the Cheese: Top the shredded beef generously with slices of provolone or mozzarella cheese. Use enough slices to cover the meat so you get a nice, melty layer.
- Melt the Cheese: Place the assembled sandwiches back on the baking sheet. Return the baking sheet to the broiler or oven (at 375°F / 190°C) and cook until the cheese is beautifully melted and bubbly. This takes just a minute or two under the broiler, maybe a bit longer in the oven. Watch them constantly to make sure the rolls don’t burn under the broiler!
- Serve and Enjoy: Place the top half of the roll onto the melted cheese. These sandwiches are best enjoyed immediately while everything is warm and the cheese is gooey. Remember that reserved cooking liquid? You can warm it up and serve it on the side in small bowls for dipping, just like they do at your favorite deli.
Tips for Perfect Shredded Beef Sandwiches Every Time
Want to elevate your shredded beef sandwich game even further? Here are a few extra tips to keep in mind:
- Choose the Right Cut: Chuck roast is truly the best for this recipe because of its fat and connective tissue content, which transforms into gelatin during slow cooking. Cuts like round roast or sirloin are leaner and will likely turn out dry with this method.
- Don’t Skip the Sear: Searing the beef is crucial for developing deep, savory flavors that will make your sandwich irresistible. Make sure the pot and oil are hot enough to get a good brown crust.
- Liquid Level is Key: As mentioned in the steps, ensuring the beef is partially submerged (half to two-thirds) in the broth is the secret to keeping it moist throughout the long cooking process.
- Cook Until Fork-Tender: Resist the urge to take the beef out too early. It’s done when a fork twists easily in the thickest part, indicating that the connective tissue has fully broken down. If it’s still tough, it needs more time.
- Resting the Beef: Allowing the beef to rest for a few minutes after removing it from the pot helps the juices redistribute throughout the meat before shredding, contributing to tenderness.
- Seasoning is Crucial: Season the beef generously before searing, and then taste and adjust the seasoning of the shredded beef and its juices before serving. Building flavor in layers makes a huge difference.
- Roll Selection Matters: Use a sturdy roll that won’t fall apart under the weight and moisture of the beef and cheese. Toasting is a must!
What to Serve With Your Ultimate Shredded Beef Sandwich
A glorious shredded beef sandwich deserves equally delicious companions. Here are a few ideas for perfect side dishes:
Classic sides like crispy potato chips (or even homemade potato chips!), french fries, or a simple coleslaw are always winners. For something a bit heartier, consider serving it alongside creamy scalloped potatoes, golden roasted potatoes, or even some perfectly roasted veggies like carrots and broccoli.
A green salad is always a refreshing contrast, and a cup of savory soup, perhaps a classic beef and barley soup or a hearty beef chili (if you’re feeling extra meaty!), would make for a truly substantial meal.
Your Ultimate Shredded Beef Sandwich Questions Answered (FAQ)
Here are some common questions people ask when making shredded beef for sandwiches:
Can I make shredded beef in a slow cooker instead of the oven?
Absolutely! The slow cooker is another excellent method for achieving tender shredded beef. After searing the meat and sautéing the onions/garlic on the stovetop, you can transfer everything to your slow cooker pot. Add the beef broth and bay leaf, ensuring the liquid still comes up about halfway to two-thirds of the beef. Cook on low for 6-8 hours or on high for 3-4 hours, or until the beef is fork-tender. Proceed with shredding and returning the meat to some of the liquid as directed in the main recipe.
What’s the best cut of beef for shredding?
Boneless beef chuck roast is widely considered the best cut for shredded beef due to its high amount of collagen and fat. This collagen breaks down during the long, moist cooking process, resulting in that incredibly tender and juicy texture. Other cuts that work well include brisket or shoulder roast, but chuck is usually the most reliable and readily available option.
How do I store leftover shredded beef?
Store any leftover shredded beef in an airtight container along with some of the cooking liquid. This liquid is key to keeping the beef moist. It will keep in the refrigerator for 3-4 days.
Can I freeze shredded beef?
Yes, shredded beef freezes beautifully! Allow the beef and its liquid to cool completely. Transfer it to freezer-safe containers or heavy-duty freezer bags, making sure to include enough liquid to keep it moist. Freeze for up to 3 months. Thaw overnight in the refrigerator before reheating.
How do I reheat shredded beef?
To reheat, place the shredded beef and its liquid in a pot on the stovetop over medium-low heat, stirring occasionally until heated through. You can also reheat it in the microwave in a microwave-safe dish, stirring partway through. Add a splash more broth or water if it seems dry.
What other seasonings can I add to the shredded beef?
While this recipe is fantastic as is, you can customize the flavors. Consider adding a pinch of dried thyme, rosemary, or smoked paprika to the cooking liquid. For a touch of sweetness, you could add a tablespoon of brown sugar. A dash of Worcestershire sauce can also add savory depth.
Enjoy Your Homemade Ultimate Shredded Beef Sandwich!
There you have it – the secret to an ultimate shredded beef sandwich that’s consistently tender, juicy, and packed with flavor. No more sad, dry sandwiches here! This recipe proves that with the right technique, you can achieve restaurant-quality results in your own kitchen.
Gather your ingredients, set aside the time for the slow cooking magic, and get ready to enjoy one of the most satisfying sandwiches you’ll ever make. Serve it up hot, cheese melted and bubbly, with plenty of those delicious juices ready for dipping. It’s pure comfort in a bun.
Try this recipe out and let me know what you think in the comments below! Did you use provolone or mozzarella? What’s your favorite side dish to pair with it? I can’t wait to hear about your juicy shredded beef sandwich success!
Ultimate Shredded Beef Sandwich

Ingredients
- 2-3 pound boneless beef chuck roast
- 2 tablespoons olive oil
- 1 large onion, sliced
- 3 cloves garlic, minced
- 4 cups beef broth
- 1 bay leaf (optional)
- Salt to taste
- Black pepper to taste
- 4 long sandwich rolls or baguettes
- 8 slices provolone or mozzarella cheese
Directions
- Preheat oven to 325 degrees F (160 degrees C).
- Pat the beef roast completely dry with paper towels. Season generously all over with salt and pepper.
- Heat olive oil in a large Dutch oven or oven-safe pot over medium-high heat. Sear the beef on all sides until deeply browned. Remove beef from pot and set aside.
- Add the sliced onion to the pot and cook until softened and slightly browned, about 5-7 minutes. Add the minced garlic and cook for 1 minute more until fragrant.
- Pour in the beef broth and scrape up any browned bits from the bottom of the pot. Add the bay leaf if using. Bring the liquid to a simmer.
- Return the seared beef roast to the pot. The liquid should come about halfway or two-thirds of the way up the sides of the roast. This is the key to tender, juicy beef; cooking it submerged in liquid ensures it stays moist as it breaks down.
- Cover the pot tightly and transfer to the preheated oven. Cook for 3 to 4 hours, or until the beef is fork-tender and easily pulls apart.
- Carefully remove the beef from the pot and place it on a cutting board or in a large bowl. Use two forks to shred the beef into pieces. Skim off any excess fat from the cooking liquid in the pot.
- Return the shredded beef to the pot with some of the cooking liquid. Stir to coat the beef and keep it moist. You can add more liquid later if needed. Season with salt and pepper to taste.
- Preheat your broiler or set oven to 375 degrees F (190 degrees C). Slice the sandwich rolls lengthwise and place them open-faced on a baking sheet. Toast lightly under the broiler or in the oven for 1-2 minutes until golden.
- Pile the shredded beef onto the bottom half of each roll. Top generously with cheese slices.
- Place the sandwiches back on the baking sheet and broil or bake until the cheese is melted and bubbly. Watch carefully to prevent burning.
- Place the top half of the roll on the sandwich. Serve immediately. You can also warm the reserved cooking liquid and serve it on the side for dipping if desired.