Craving sushi but intimidated by the thought of making it at home? You’re not alone! Many home cooks dream of creating beautiful sushi platters, but the fear of sticky rice and messy rolls often holds them back. But what if I told you that restaurant-quality sushi is totally achievable in your own kitchen? This ultimate sushi platter recipe guides you through every step, revealing the secrets to perfect sushi rice and stunning presentation. Get ready to impress your friends and family with your newfound sushi skills!
Why You’ll Love This Ultimate Sushi Platter
This isn’t just another sushi recipe; it’s a complete guide that empowers you to create amazing sushi at home. Here’s why you’ll absolutely love it:
- No More Sticky Rice Nightmares: We’ll show you the foolproof technique to achieve perfectly textured sushi rice that won’t cling to everything.
- Customizable to Your Taste: This recipe provides a foundation, but you can easily adapt it to your favorite fillings and toppings.
- Impressive Presentation: Learn how to arrange your sushi for a visually stunning platter that will wow your guests.
- Fun and Rewarding: Making sushi is a surprisingly therapeutic activity, and the satisfaction of creating delicious rolls from scratch is unmatched.
Gathering Your Ingredients for Ultimate Sushi
Creating the perfect sushi platter begins with selecting the right ingredients. The key is to balance fresh, high-quality ingredients with flavors that complement each other. Let’s break down what you’ll need to embark on your sushi-making adventure. The combination of the umami rich rice and fresh fish makes a symphony of flavors in the mouth.
For the Foundation: The Sushi Rice and Vinegar
The heart of any great sushi is, of course, the rice! We’re using sushi rice for its unique ability to become sticky when cooked, which is crucial for holding the rolls together. Regular long-grain rice just won’t cut it here. Look for “sushi rice” or “Japanese short-grain rice” at your local grocery store or Asian market. And don’t skimp on the rice vinegar; it’s what gives sushi rice its signature tangy flavor. Let’s gather:
- 2 cups sushi rice
- 2 cups water
- ½ cup rice vinegar
- 2 tablespoons sugar
- 1 teaspoon salt
The Stars of the Show: Fresh Fillings
Now for the fun part! The fillings are where you can really get creative and personalize your sushi platter. Freshness is paramount here, especially when using raw fish. If you’re unsure about sourcing sushi-grade fish, ask your local fishmonger for recommendations or consider using cooked alternatives. Consider this:
- Nori sheets (seaweed sheets)
- Tuna (sushi-grade)
- Salmon (sushi-grade)
- Avocado
- Shrimp (cooked)
The Finishing Touches: Texture and Flavor Boosters
Don’t underestimate the power of toppings! A sprinkle of sesame seeds and masago (smelt roe) adds a delightful crunch and burst of flavor that elevates your sushi platter to the next level. These small additions will add great enhancement to the recipe. We’ll be needing:
- Sesame seeds
- Masago
Crafting Your Ultimate Sushi Platter: Step-by-Step
Ready to roll? Don’t worry, even if you’ve never made sushi before, this step-by-step guide will walk you through the process. The most important thing is to be patient and have fun! We’ll start with the crucial step of preparing the sushi rice, then move on to assembling your rolls and creating a stunning platter.
- Rinsing the Rice: The Foundation for Success. Begin by placing the sushi rice in a fine-mesh sieve and rinsing it thoroughly under cold running water. This is a crucial step, as it removes excess starch that would otherwise make the rice overly sticky. Continue rinsing until the water runs clear; this might take a few minutes. Think of it like washing away impurities to reveal the true potential of the rice.
- Cooking the Rice: Achieving the Perfect Texture. Transfer the rinsed rice to a saucepan and add 2 cups of fresh water. Bring the mixture to a boil over medium-high heat. Once boiling, immediately reduce the heat to low, cover the saucepan tightly, and simmer for 15 minutes. It’s important not to lift the lid during this time, as you want to trap the steam and allow the rice to cook evenly.
- Resting the Rice: Patience is Key. After 15 minutes, remove the saucepan from the heat and let it stand, still covered, for another 10 minutes. This allows the rice to fully absorb the remaining moisture and develop its signature fluffy texture. Resist the urge to peek!
- Preparing the Sushi Vinegar: Tangy Goodness. While the rice is cooking, prepare the sushi vinegar. In a small saucepan, combine the rice vinegar, sugar, and salt. Heat the mixture over low heat, stirring constantly, until the sugar and salt are completely dissolved. Be careful not to boil the mixture; you simply want to warm it enough to dissolve the solids.
- The Key Technique: Combining Rice and Vinegar (The Non-Stick Secret!). This is where the magic happens! Gently transfer the cooked rice to a large bowl (wooden is best, but any large bowl will do). Slowly drizzle the sushi vinegar mixture over the rice, using a rice paddle or wooden spoon to carefully fold it in. The secret is to use a cutting motion with the paddle, rather than stirring vigorously. This prevents the rice from becoming mashed and releasing too much starch. While folding, use a fan (or have a helper use one) to gently fan the rice. This helps it cool down quickly and absorb the vinegar evenly, further preventing stickiness.
- Cooling the Rice: Ready for Rolling. Allow the seasoned rice to cool slightly before using it for sushi. It should be warm to the touch, but not hot. This will make it easier to handle and prevent it from sticking to the nori sheets.
- Assembling the Sushi Rolls: A Step-by-Step Guide. Place a nori sheet on a sushi rolling mat (a bamboo mat is ideal). Moisten your hands slightly to prevent the rice from sticking. Spread a thin, even layer of rice over the nori sheet, leaving a small (about ½ inch) strip bare at the top edge. This bare strip will be used to seal the roll.
- Adding the Fillings: Get Creative!. Arrange your desired fillings (tuna, salmon, avocado, shrimp, etc.) horizontally near the bottom edge of the rice. Don’t overfill the roll, as this will make it difficult to roll tightly.
- Rolling the Sushi: Technique Matters. Using the rolling mat, carefully lift the bottom edge of the mat and begin to roll the sushi forward, tucking the fillings inside. Apply gentle pressure to create a tight, compact roll. Once you reach the bare strip of nori, moisten it slightly with water to help seal the roll.
- Slicing and Garnishing: Presentation is Key. Using a sharp knife (preferably a sushi knife or a very sharp chef’s knife), wet the blade with water before each slice. This will prevent the rice from sticking to the knife and ensure clean, even cuts. Slice the roll into bite-sized pieces (usually 6-8 pieces per roll). Sprinkle the sushi rolls with sesame seeds and masago, if desired.
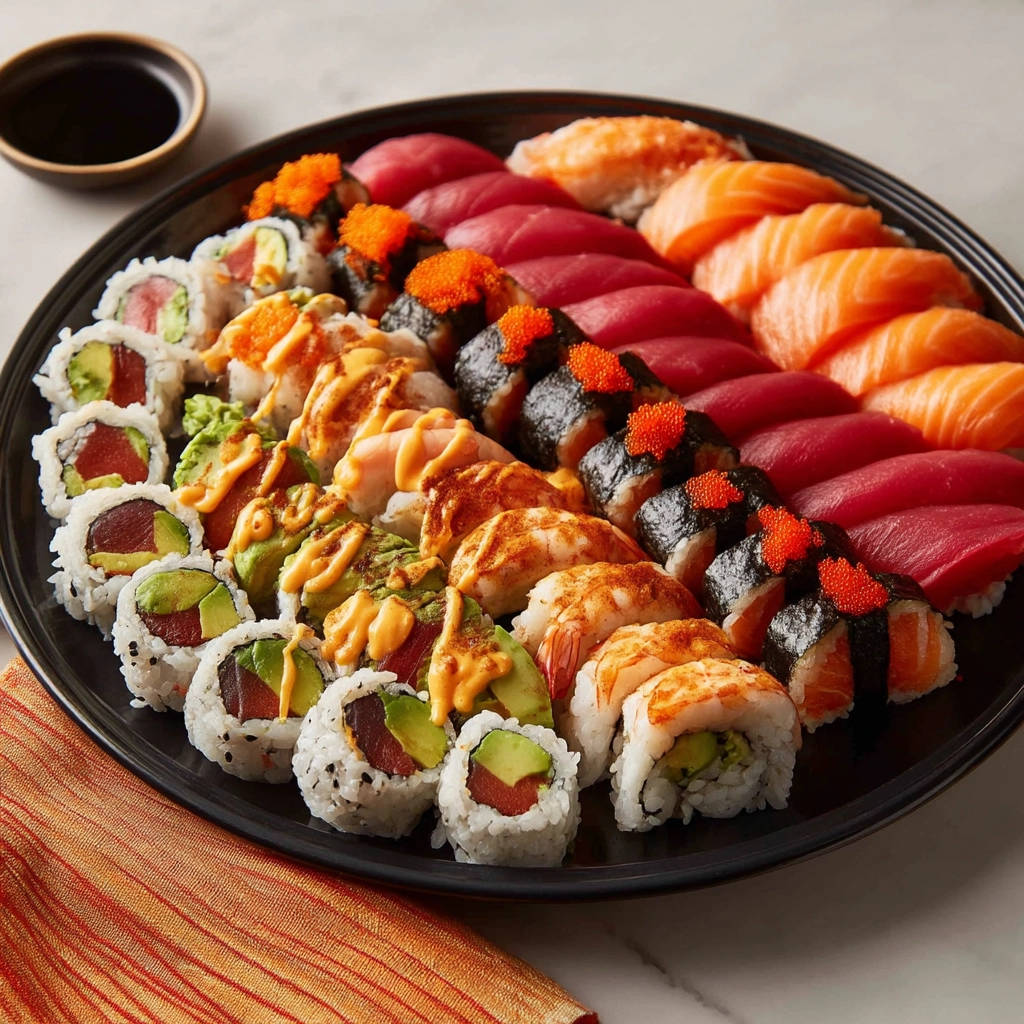
- Arranging the Platter: The Final Flourish. Arrange the sushi rolls, nigiri (slices of fish on rice – simply press slices of your chosen fish onto small oblongs of sushi rice), and any other desired toppings (such as pickled ginger or wasabi) attractively on a platter. Serve immediately for the best flavor and texture.
Tips for Perfect Ultimate Sushi Every Time
Mastering sushi takes practice, but these tips will help you achieve consistently delicious results. From rice selection to rolling techniques, these insights will elevate your sushi game!
- Choose High-Quality Ingredients: The fresher the ingredients, the better the flavor. Especially when dealing with raw fish, ensure you’re purchasing sushi-grade quality from a reputable source.
- Don’t Overcook the Rice: Overcooked rice will be mushy and difficult to work with. Follow the cooking times carefully and resist the urge to stir the rice while it’s simmering.
- Use a Sharp, Wet Knife: A dull knife will tear the sushi rolls, resulting in messy slices. Wetting the blade before each cut prevents the rice from sticking and ensures clean, even slices.
- Tight Rolls are Key: A tightly rolled sushi roll will hold its shape better and be easier to slice. Apply gentle but firm pressure when rolling to create a compact roll.
- Experiment with Fillings: Don’t be afraid to get creative with your fillings! Try different combinations of fish, vegetables, and sauces to create your own signature sushi rolls.
- If you’re looking for a good side to complement sushi, consider a refreshing rice pilaf, such as our golden vegetable rice pilaf. It offers a contrasting flavor profile that balances the richness of the sushi.
What to Serve With Ultimate Sushi
Complete your sushi night with these complementary dishes:
- Edamame: Steamed edamame sprinkled with sea salt is a classic and healthy appetizer.
- Miso Soup: A warm bowl of miso soup adds a comforting and savory element to the meal.
- Seaweed Salad: A refreshing seaweed salad provides a light and tangy contrast to the richness of the sushi.
- Ginger Salad: A light side to change the taste buds
Your Ultimate Sushi Questions Answered (FAQ)
Still have questions about making sushi? Here are some answers to common queries:
Can I use regular rice instead of sushi rice?
While technically possible, it’s not recommended. Sushi rice has a higher starch content, which gives it the sticky texture needed for sushi rolls. Regular rice will likely result in rolls that fall apart easily.
Where can I find sushi-grade fish?
The best place to find sushi-grade fish is at a reputable fishmonger or Asian market. Ask for recommendations and ensure the fish is clearly labeled as “sushi-grade” or “sashimi-grade.”
How long does sushi last?
Sushi is best consumed immediately after making it. However, if you have leftovers, store them in an airtight container in the refrigerator and consume them within 24 hours. Be especially cautious with sushi containing raw fish.
Can I make sushi ahead of time?
While you can prepare the sushi rice ahead of time, it’s best to assemble the rolls just before serving. This will prevent the nori sheets from becoming soggy and the rice from drying out.
What if my sushi rolls are falling apart?
This is usually caused by one of two things: either the rice is not sticky enough, or the rolls are not being rolled tightly enough. Ensure you’re using sushi rice and following the rinsing and cooking instructions carefully. When rolling, apply gentle but firm pressure to create a tight, compact roll. Also, consider visiting our webpage for Golden Rice Pilaf for another delightful rice recipe.
Enjoy Your Homemade Ultimate Sushi!
Congratulations! You’ve now mastered the art of making sushi at home. With a little practice, you’ll be creating stunning sushi platters that rival those of your favorite restaurants. So gather your ingredients, invite some friends, and get ready to roll! Don’t forget to share your creations on social media and let us know what you think in the comments below!
Ultimate Sushi Platter (Stops Rice Sticking!)

Ingredients
- 2 cups sushi rice
- 2 cups water
- 1/2 cup rice vinegar
- 2 tablespoons sugar
- 1 teaspoon salt
- Nori sheets
- Tuna
- Salmon
- Avocado
- Shrimp
- Sesame seeds
- Masago
Directions
- Rinse the sushi rice under cold water until the water runs clear. This removes excess starch.
- Combine the rinsed rice and 2 cups of water in a saucepan.
- Bring to a boil, then reduce heat to low, cover, and simmer for 15 minutes.
- Remove from heat and let stand, covered, for 10 minutes.
- While the rice is cooking, prepare the sushi vinegar. In a small saucepan, combine rice vinegar, sugar, and salt. Heat over low heat, stirring until the sugar and salt are dissolved. Do not boil.
- Transfer the cooked rice to a large bowl.
- **Key Technique to Stop Rice Sticking:** Gently drizzle the sushi vinegar mixture over the rice, using a rice paddle or wooden spoon to *carefully* fold it in. The secret is to cut through the rice with the paddle, *avoiding* mashing or stirring vigorously, which releases starch and causes stickiness. Fan the rice while mixing to help it cool down and absorb the vinegar evenly.
- Once the rice has cooled slightly, it’s ready to use for sushi.
- Lay a nori sheet on a sushi rolling mat. Spread a thin layer of rice evenly over the nori, leaving a small strip bare at the top edge.
- Add your desired fillings (tuna, salmon, avocado, shrimp, etc.) near the bottom edge of the rice.
- Using the rolling mat, tightly roll the sushi, using the bare strip of nori to seal the roll.
- Slice the roll into bite-sized pieces with a sharp, wet knife.
- Sprinkle with sesame seeds and masago, if desired.
- Arrange the sushi rolls, nigiri (slices of fish on rice), and any other desired toppings on a platter. Serve immediately.