Most home cooks struggle with ground beef that turns out gray, crumbly, and remarkably bland. You’ve likely been there: you toss the meat into a lukewarm pan, stir it constantly, and end up with something that tastes more like boiled protein than a vibrant Mexican-inspired feast. These Zesty Ground Beef Burrito Bowls are designed to end that cycle forever by focusing on high-heat techniques that build layers of flavor.
The secret to a restaurant-quality bowl isn’t a complicated ingredient list; it’s all about how you treat the beef and the spices. We’re aiming for a specific “zesty” profile that balances the deep, smoky heat of the beef with the bright acidity of fresh lime and the cooling richness of sour cream. It’s a high-protein, flavor-dense meal that feels indulgent while staying incredibly fresh.
To get that punchy flavor, you have to master the “bloom and sear” method. The biggest mistake people make is adding spices to the liquid at the end of the cooking process. Instead, you need to toast your spices in the hot beef fat early on. This unlocks oil-soluble flavor compounds that would otherwise stay trapped, ensuring every single bite has a deep, smoky resonance rather than just a salty finish.
The Science of Searing and Spice Blooming
When you place ground beef in a hot skillet, you’re looking for the Maillard reaction. This is a chemical reaction between amino acids and reducing sugars that gives browned food its distinctive, savory flavor. If you crowd the pan or stir the meat immediately, the moisture escapes and steams the beef instead of searing it. By leaving the meat in large, flat chunks for the first few minutes, you create a dark mahogany crust that provides a massive boost to the overall savory profile of the bowl.
Once you’ve achieved that crust, the next scientific hurdle is “blooming” your spices. Many of the aromatic compounds in chili powder, cumin, and smoked paprika are fat-soluble. If you simply dump them into a watery sauce, they stay “dusty” and raw. However, when you stir them into the rendered beef fat in the center of your pan, the heat awakens those essential oils. You’ll actually smell the difference as the aroma shifts from a dry powder to a rich, toasted fragrance in under a minute.
This process also helps to mellow out the harshness of dried garlic and onion powders. Instead of a sharp, biting aftertaste, blooming creates a rounded, savory base that permeates the entire dish. Therefore, the fat in the pan isn’t just a byproduct; it’s the primary vehicle for flavor delivery. This is why we don’t drain the pan until after the spices have had their moment to shine.
Essential Components for Zesty Ground Beef Burrito Bowls
Quality ingredients make a huge difference when the recipe is this simple. For the beef, I always recommend an 80/20 fat ratio. While lean beef might seem healthier, it lacks the moisture needed to survive a high-heat sear and doesn’t provide enough fat to properly bloom your spices. That 20% fat content renders out, acting as the “sauce” that carries the heat of the chili and the earthiness of the cumin.
The rice serves as your neutral canvas, so texture is everything. Long-grain white rice is the gold standard here because the grains stay separate and fluffy rather than clumping together. Additionally, when selecting your produce, look for Roma tomatoes. They have a lower water content and thicker walls than beefsteak tomatoes, which means they won’t turn your bowl into a soggy mess as they sit.
Selecting the Right Beef Fat Ratio
If you use 93/7 or 90/10 beef, you’ll likely find the meat becomes dry and rubbery before it ever gets a good sear. The 80/20 ratio provides enough lubrication to let the meat fry in its own juices. If you’re worried about the final dish being too greasy, you can always tilt the pan and spoon out the excess fat *after* you’ve bloomed your spices. This way, you keep the flavor but lose the heavy oiliness.
The Dry Spice Pantry Staples
Smoked paprika is the “secret weapon” in this spice blend. While regular paprika adds color, the smoked version provides a back-of-the-throat warmth that mimics a slow-cooked chili. Cumin provides the earthy, “taco-style” base, while a high-quality chili powder gives the dish its body. Make sure your garlic powder is fresh; if it’s clumped in the jar, it won’t distribute evenly and can leave bitter hot spots in the meat.
Step-by-Step: Mastering the Zesty Beef Base
Start by getting your skillet hot—I mean really hot. When you add the oil, it should shimmer and move like water across the surface. Drop the beef in and resist every urge to grab your spatula. You want to hear a loud, aggressive sizzle. If the pan is quiet, you’re boiling the meat, not searing it. Let it sit for a full three minutes until the bottom is deeply browned.
After you flip the meat and break it up, you’ll notice a pool of liquid and fat in the center. This is your flavor zone. Push the beef to the edges to create a “well” and drop your spices right into that hot fat. Within 30 seconds, the spices will begin to bubble and darken slightly. This is the transformation you’re looking for. Once they smell toasted, toss the beef back into the center to coat every crumble in that spice-infused oil.
Developing the Maillard Crust
Patience is the hardest part of this recipe. You’re looking for deep mahogany edges on the beef chunks. If you flip too early, the meat will stick to the pan and tear. When the sear is perfect, the meat will naturally release from the surface. This crust isn’t just for looks; it provides a crunchy texture contrast to the soft rice and beans that follow.
Toasting Aromatics and Softening Peppers
Once the spices are bloomed, toss in your diced yellow peppers. We add them now so they can pick up the residual heat and spice without turning into mush. You want them to soften just enough to lose their raw bite while maintaining a slight “snap.” This adds a necessary structural element to the bowl, preventing every bite from having the same soft texture.
Deglazing and Reducing the Pan Sauce
As the meat cooks, little brown bits called “fond” will stick to the bottom of the pan. This is concentrated flavor gold. When you pour in the beef broth, use your wooden spoon to scrape those bits up. The liquid will turn dark and rich, eventually reducing into a glossy sauce that clings to the beef and beans. You aren’t looking for a soup; you want a thick glaze that ensures the meat stays juicy.
Customizing Your Zesty Ground Beef Burrito Bowls
This recipe is a fantastic template for customization. If you’re looking for a low-carb option, swap the white rice for cauliflower rice sautéed with a little lime and cilantro. For those who need extra fiber, quinoa makes an excellent base that absorbs the beef juices beautifully. If you want to turn up the heat, finely mince a chipotle pepper in adobo sauce and add it during the spice-blooming phase for a smoky, fiery kick.
You can also change the protein entirely. Ground turkey or chicken works well, though you’ll definitely need to add an extra tablespoon of oil since those meats are much leaner. For a vegetarian-friendly twist, use a plant-based crumble and vegetable broth, following the exact same searing and blooming steps to ensure the meat substitute doesn’t taste bland.
Optimal Assembly and Texture Layering
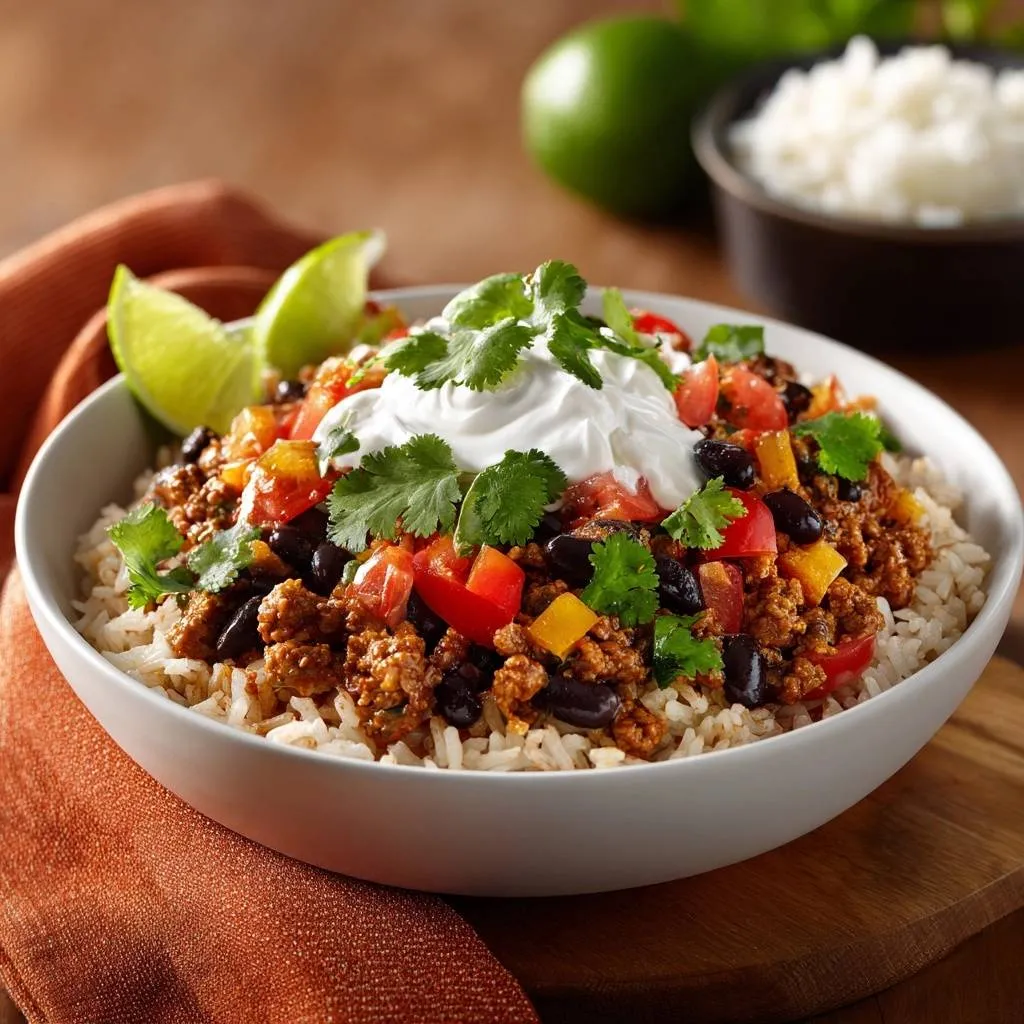
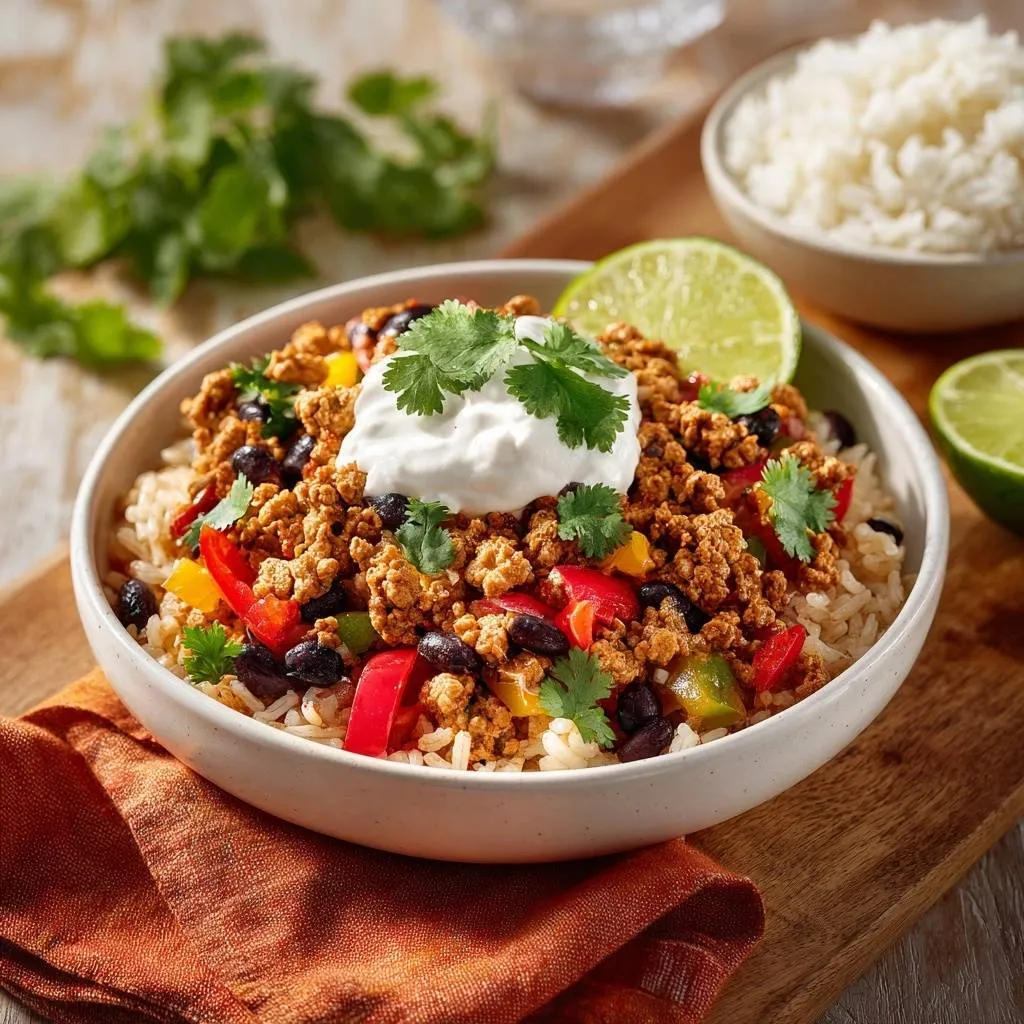
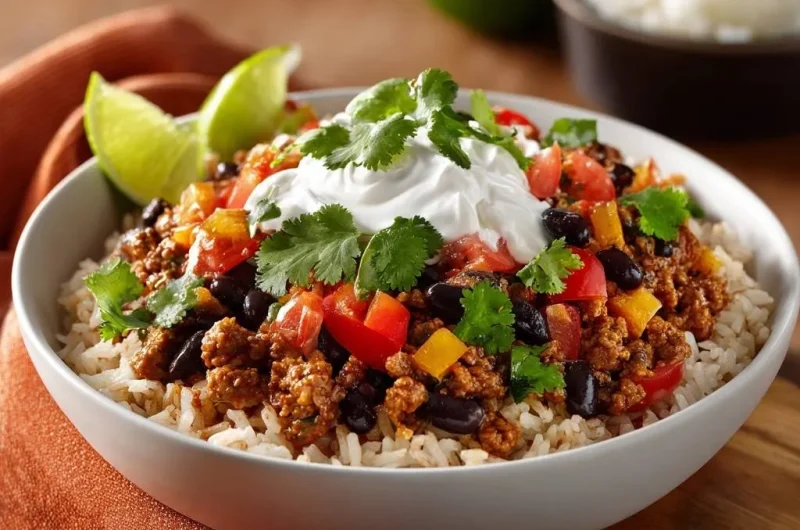
Bowl architecture matters more than you think. Start with a generous base of warm rice to act as a sponge for the beef juices. Place the hot beef and bean mixture on one side, then arrange your cold toppings—the tomatoes and cilantro—on the other. This temperature contrast between the steaming beef and the cold, crisp vegetables is what makes a burrito bowl feel fresh rather than heavy.
Place a large dollop of sour cream right in the center. As you eat, the sour cream will melt slightly into the warm beef, creating a creamy sauce that ties the whole bowl together. Finally, never skip the lime wedges. The hit of fresh acid right before you eat cuts through the richness of the beef fat and “wakes up” all the spices you worked so hard to bloom.
Troubleshooting Common Texture Issues
If your beef ends up too oily, it’s likely because the pan wasn’t hot enough to evaporate the moisture, or you used a very high-fat meat without draining. Simply tilt the pan and use a wad of paper towels held with tongs to soak up the excess. If the spices taste bitter, you may have toasted them for too long. Next time, add the liquid the moment you smell that strong, toasted aroma.
Mushy rice is another common pitfall. This usually happens from using too much water or over-stirring during the steaming process. To fix this for your next batch, try rinsing the rice in a fine-mesh strainer until the water runs clear. This removes excess surface starch, which is the primary culprit behind sticky, gummy rice grains.
Meal Prep and Storage Strategies
These bowls are a meal prepper’s dream because the beef actually tastes better the next day as the spices continue to meld. However, you should store the components separately if possible. Keep the rice and beef in one container, and the fresh toppings like tomatoes, lime, and sour cream in another. This prevents the cold ingredients from getting “cooked” when you reheat your lunch.
When reheating the beef and rice, add a tiny splash of water or broth to the container before microwaving. This creates a bit of steam that prevents the beef from becoming rubbery and keeps the rice grains tender. These bowls will stay fresh in an airtight container in the refrigerator for up to four days, making them a perfect grab-and-go option for a busy work week.
Refreshing Sides and Pairings
To round out the meal, consider a side that offers a sharp contrast to the savory beef. A simple cabbage slaw with a vinegar-based dressing provides a wonderful crunch and acidity. It acts as a palate cleanser between bites of the rich, zesty beef. If you want something more substantial, a side of grilled corn with a dusting of chili powder fits the theme perfectly.
For drinks, look for something crisp and effervescent. A chilled hibiscus tea, also known as Agua de Jamaica, offers a tart, floral profile that complements the smoky paprika. Alternatively, a simple lime-infused sparkling water provides the necessary bubbles to cut through the creaminess of the sour cream and the richness of the 80/20 beef fat.
Expert Tips for Maximum Flavor
1. Salt your diced tomatoes in a small bowl five minutes before serving. This draws out their juices and intensifies their natural sweetness, making them taste like a quick pico de gallo.
2. Always rinse your long-grain rice. Rinsing away the starch ensures that every grain stays distinct and fluffy, which is essential for that professional bowl texture.
3. Use a cast-iron skillet if you have one. Cast iron retains heat better than stainless steel, which helps you get that deep, dark sear on the beef without the pan temperature dropping.
4. Fluff your rice with a fork, never a spoon. A spoon smashes the grains together, while a fork separates them, keeping the texture light and airy.
5. Fresh lime juice is non-negotiable. The bottled stuff has a metallic aftertaste that can ruin the bright, zesty finish of the dish. Buy the actual fruit!
How long can I store these burrito bowls in the fridge?
You can store the cooked beef and rice in an airtight container for up to 4 days. However, I recommend keeping the fresh toppings like tomatoes, cilantro, and sour cream in separate containers. This prevents the fresh items from wilting or becoming soggy when you reheat the base components. For the best results, add the fresh lime squeeze only right before you eat.
Why is my ground beef gray instead of brown?
Gray meat is usually the result of “crowding the pan” or not using enough heat. When too much meat is added at once, the temperature of the skillet drops, and the meat begins to release moisture. That moisture turns into steam, which boils the meat instead of searing it. To fix this, make sure your pan is shimmering hot and cook the beef in batches if your skillet isn’t large enough to leave space between the chunks.
Can I use a different type of bean?
Absolutely. While black beans are traditional for their earthy flavor and firm texture, pinto beans are a fantastic substitute. They have a creamier consistency that works well with the zesty beef. If you use canned beans, just make sure to rinse and drain them thoroughly to remove the metallic-tasting canning liquid and excess sodium.
What can I use if I don’t have beef broth?
If you don’t have beef broth, you can use chicken broth or even plain water. The main purpose of the liquid is to deglaze the pan and create a light sauce. If you use water, you might want to add an extra pinch of salt or a dash of soy sauce to compensate for the lack of savory depth that broth provides. Avoid using just lime juice as the deglazing liquid, as it can become too bitter when reduced.
Is this recipe spicy?
This recipe has a “zesty” profile, which means it is flavorful and aromatic but has a relatively low heat level. The chili powder and smoked paprika provide warmth rather than a burning sensation. If you want to make it truly spicy, you can add a teaspoon of red pepper flakes or a diced jalapeño during the pepper-sautéing step. To keep it very mild, simply reduce the chili powder by half.
Can I freeze the beef mixture?
Yes, the zesty ground beef and bean mixture freezes exceptionally well. Allow it to cool completely before placing it in a freezer-safe bag or container. It will stay good for up to 3 months. I do not recommend freezing the cooked rice, as it often becomes grainy and dry upon thawing. Instead, make a fresh batch of rice when you are ready to eat the frozen beef.
Zesty Ground Beef Burrito Bowls
Course: Main CourseCuisine: Mexican-AmericanDifficulty: easy4
servings15
minutes20
minutes35
Minutes540
kcalMexican-American
Ingredients
1 pound ground beef (80/20 recommended for better searing)
2 cups cooked long-grain white rice
1 can (15 oz) black beans, rinsed and drained
1 cup diced Roma tomatoes
1 yellow bell pepper, finely diced
2 tablespoons chili powder
1 teaspoon ground cumin
1 teaspoon garlic powder
1/2 teaspoon onion powder
1/2 teaspoon smoked paprika
1/2 teaspoon salt (plus more to taste)
1/2 cup beef broth or water
1/2 cup sour cream
1/2 cup fresh cilantro, roughly chopped
2 limes, cut into wedges
1 tablespoon vegetable oil
Directions
- Heat the vegetable oil in a large skillet over medium-high heat until shimmering. Add the ground beef, breaking it into 3 or 4 large, flat chunks.
- The Flavor Fix: Do not stir the meat immediately. Let it sit undisturbed for 3-4 minutes to develop a deep, dark brown crust. This Maillard reaction is the foundation of real flavor.
- Flip the chunks and break the meat into smaller crumbles. Push the meat to the edges of the pan, leaving a small pool of fat in the center. (If using very lean beef, add an extra teaspoon of oil here).
- Add the chili powder, cumin, garlic powder, onion powder, and smoked paprika directly into that center fat. Stir the spices in the oil for 30-45 seconds until fragrant and bubbling. This “blooming” process removes the raw, dusty taste of dried spices and intensifies the aromatics.
- Stir the spices into the meat and add the diced yellow peppers. Sauté for 2 minutes until the peppers begin to soften.
- Pour in the beef broth (or water) and salt. Use a wooden spoon to scrape the bottom of the pan to release all the flavorful browned bits (fond).
- Add the black beans to the skillet. Simmer for 5 minutes, stirring occasionally, until the liquid reduces into a thick, glossy sauce that coats the beef and beans.
- Taste the mixture; add an extra pinch of salt or a squeeze of lime if needed to brighten the flavors.
- Assemble the bowls: Start with a base of warm white rice. Top with a generous portion of the zesty beef and bean mixture.
- Garnish with the diced tomatoes, a large dollop of sour cream in the center, and plenty of fresh cilantro. Serve immediately with lime wedges on the side to squeeze over the bowl.
Notes
- The ‘bloom and sear’ method is essential; toasting spices in the beef fat removes the raw, dusty taste of dried spices and intensifies the aromatics.