Oh, I know the feeling! You spend time making a beautiful cake layer, anticipating that perfect spiral filled with delicious cream, and then… crack! Trying to roll a cake and having it break is honestly one of the most frustrating moments in baking. It happened to me more times than I care to admit. But fear not, fellow home bakers! I finally cracked the code (pun intended!) and found the secret method that makes rolling a Strawberry Cream Roll an absolute breeze, resulting in a perfect, gorgeous dessert every single time.
This recipe isn’t just about avoiding cracks; it’s about creating a delightful, light, and creamy treat bursting with fresh strawberry flavor. It’s become my go-to for a flawless roll cake, perfect for special occasions, potlucks, or just a weekend indulgence. Get ready to bake a beautiful dessert that will impress everyone!
Why You’ll Absolutely Adore This Strawberry Cream Roll
Beyond the joy of achieving a crack-free roll (which, let’s be honest, is a huge win!), there are so many reasons this particular Strawberry Cream Roll recipe stands out. It’s a symphony of textures and flavors that just works beautifully together.
- The Crack-Free Method: The simple technique of rolling the cake while it’s still warm trains the cake to hold its shape as it cools, dramatically reducing the risk of splitting.
- Light and Airy Cake: The specific mixing method for the cake batter results in a sponge that is naturally flexible and light, the perfect canvas for our filling.
- Dreamy Cream Cheese Filling: A combination of softened cream cheese, powdered sugar, and whipped heavy cream creates a filling that is rich yet light, providing a wonderful contrast to the cake and fresh fruit. If you love creamy desserts, this filling is a winner – perhaps even inspiring you to try other recipes like our mini cheesecakes or a creamy baked cheesecake!
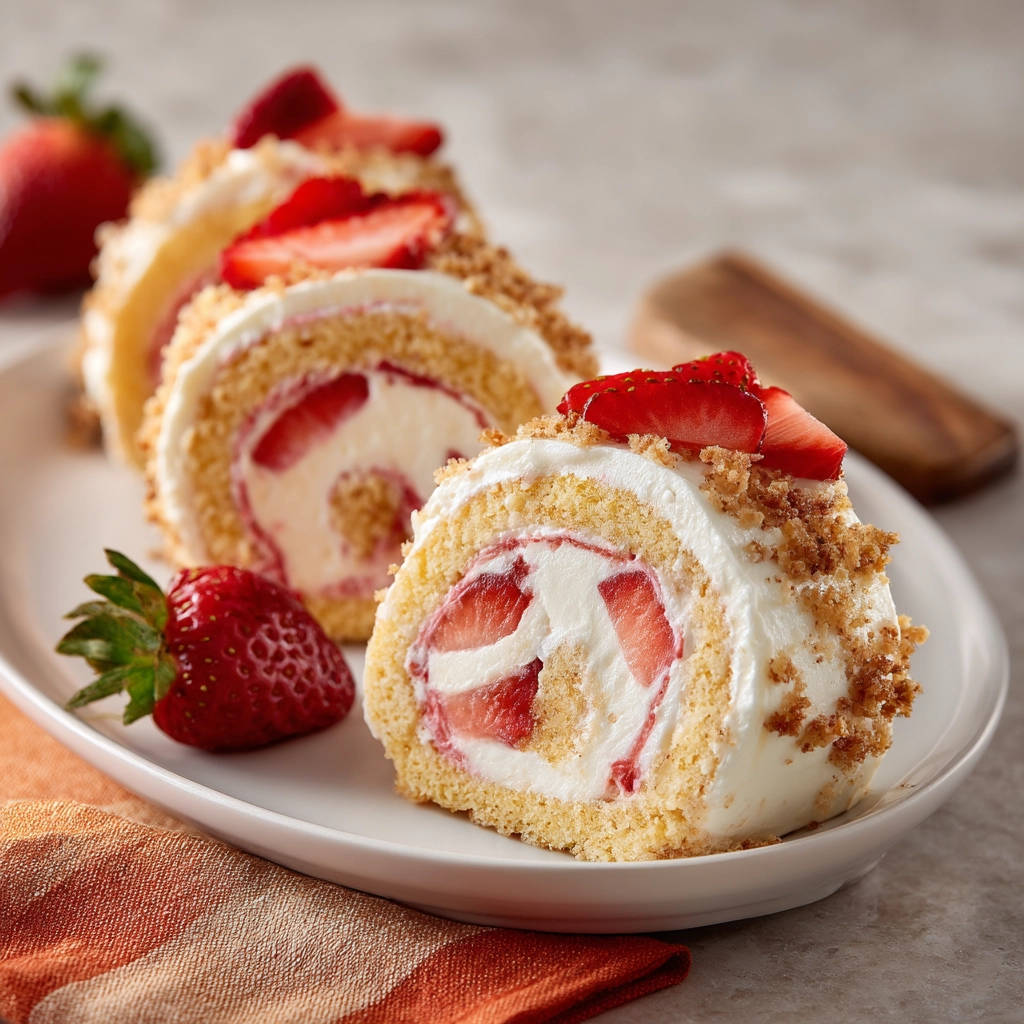
- Bursting with Fresh Fruit: Layers of sweet, sliced strawberries add a juicy, vibrant element that balances the richness of the cream.
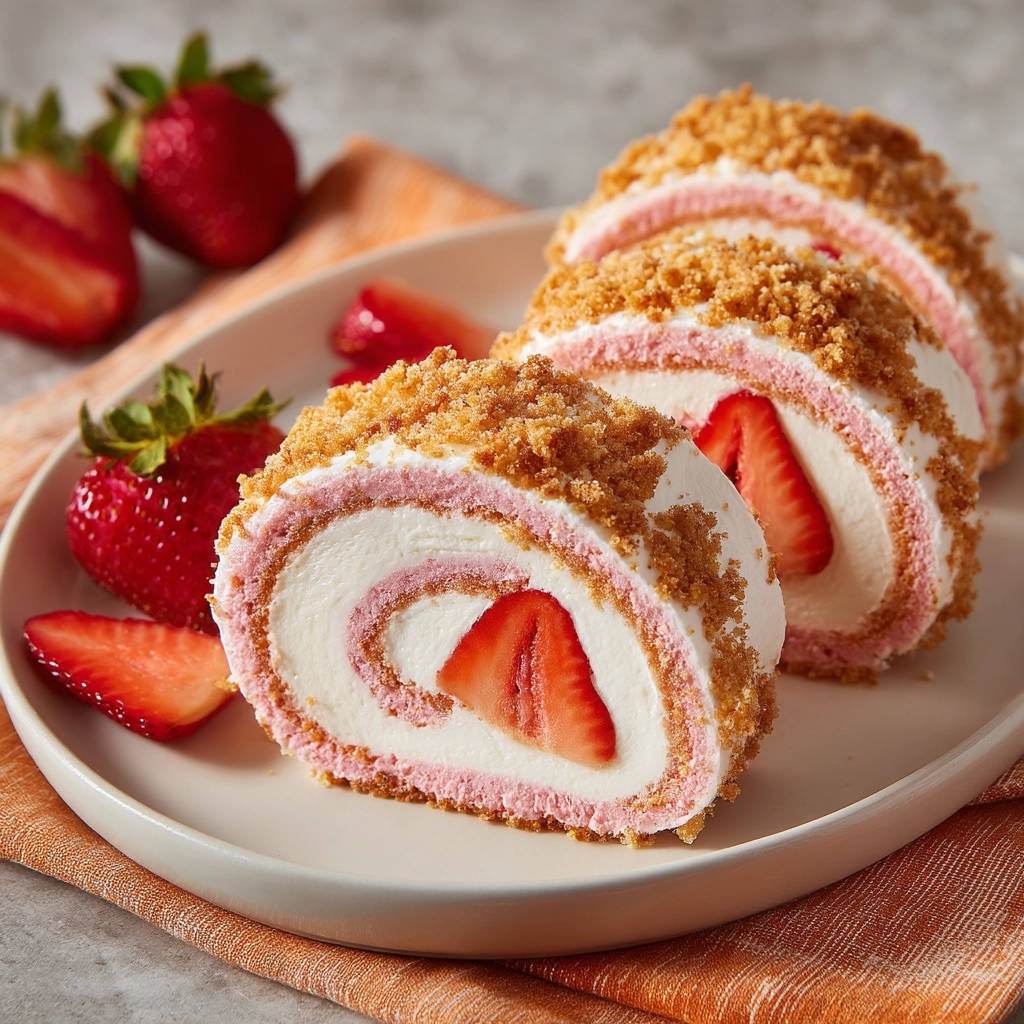
- Beautiful Presentation: A finished cake roll, dusted with powdered sugar and coated in crushed cookies, looks incredibly impressive with minimal effort.
Gathering Your Ingredients for the Perfect Strawberry Cream Roll
Creating this delightful dessert starts with having the right components ready. Each ingredient plays a crucial role in building the flavor and texture of the Strawberry Cream Roll, from the flexible cake base to the luscious filling and the final decorative touch.
- All-Purpose Flour: 3/4 cup. This provides the fundamental structure for our cake. Make sure to measure it accurately by spooning it into your measuring cup and leveling it off, as scooping can compact the flour and result in a denser cake.
- Baking Powder: 1 teaspoon. Our leavening agent! Baking powder helps the cake rise and achieve that lovely, light texture essential for rolling without cracking.
- Salt: 1/4 teaspoon. A pinch of salt enhances the sweetness and balances the overall flavor of the cake.
- Large Eggs: 3. Eggs are vital for both structure and richness. Beating them properly with the sugar is a key step to incorporating air, which also contributes to the cake’s flexibility. Ensure they are at room temperature for best results when beating.
- Granulated Sugar: 1 cup. Sweetens the cake and, when beaten with the eggs, helps create a stable foam structure.
- Vanilla Extract: 1 teaspoon (for the cake) + 1 teaspoon (for the filling). Good quality vanilla adds warmth and depth of flavor to both the cake and the creamy filling.
- Optional Pink Food Coloring: A drop or two. This is purely for aesthetics if you want a lovely pink hue to your cake layer, enhancing the strawberry theme. Gel food coloring works best for vibrant color without adding too much liquid.
- Cream Cheese: 8 ounces, softened. The star of our creamy filling! Ensure the cream cheese is fully softened to room temperature. This is critical for beating it smooth without lumps.
- Powdered Sugar: 1/2 cup (for the filling) + extra for dusting. Sweetens the cream cheese filling and also provides that beautiful, classic dusting for the finished roll. Using extra for dusting the towel helps prevent the cake from sticking.
- Heavy Cream: 1 cup. Whipped into stiff peaks, it lightens the cream cheese mixture, creating that airy, luscious filling. It’s essential it’s cold to whip properly.
- Finely Crushed Graham Crackers or Cookies: 1 cup. This provides a delightful textural contrast and a decorative finish for the outside of the roll. Vanilla wafers or shortbread cookies also work wonderfully here. For other delicious uses of crushed cookies, check out our recipe for Strawberry Trifle.
- Fresh Strawberries: Sliced. The vibrant, juicy heart of the filling! Choose ripe, sweet strawberries and slice them evenly so they distribute well inside the roll.
Crafting Your Strawberry Cream Roll: A Step-by-Step Guide to Success
Creating this beautiful dessert is a process with a few key moments that ensure perfection. The “secret” lies in the technique used right after the cake comes out of the oven. Follow these steps carefully, and you’ll be rewarded with a stunning, crack-free roll cake.
- Prepare Your Workspace: Preheat your oven to 375 degrees F (190 C). This ensures the oven is the correct temperature when the cake goes in. Prepare a 10×15 inch jelly roll pan. Greasing the pan, lining it with parchment paper, and then greasing the parchment paper might seem like overkill, but this triple layer of non-stick protection is crucial for getting the delicate cake out cleanly.
- Combine Dry Ingredients: In a small bowl, whisk together the measured all purpose flour, baking powder, and salt. Whisking ensures these dry ingredients are evenly distributed, particularly the leavening, for a consistent rise. Set this aside for a moment.
- Whip the Eggs and Sugar: In a large mixing bowl, using an electric mixer, beat the three large eggs on high speed. Beat them for about 5 minutes. This step is crucial; beating for this long incorporates significant air, making the eggs thick and pale yellow. This volume of air is what gives the cake its lightness and flexibility. Gradually add the granulated sugar while continuing to beat on high speed, ensuring it’s well combined. Finally, stir in the vanilla extract and the optional pink food coloring, if you’re using it, until evenly distributed.
- Fold in Dry Ingredients: Now, gently fold the whisked dry ingredients into the egg mixture. Use a spatula and a light hand. The goal is to just combine the flour mixture into the wet ingredients without deflating the airy egg mixture. Overmixing will develop the gluten in the flour too much, resulting in a tougher cake that is prone to cracking. Stop folding as soon as you see no dry streaks.
- Bake the Cake Layer: Carefully spread the cake batter evenly into your meticulously prepared jelly roll pan. A small offset spatula can help you get an even layer right to the edges. Bake for 10-12 minutes. Pay close attention – you’re looking for the cake to be lightly golden and for the surface to spring back gently when touched with a fingertip. Overbaking will dry out the cake, making it brittle and difficult to roll, so err on the side of slightly underbaked if unsure.
- Prepare for Rolling: While the cake is in its final minutes of baking, prepare your rolling surface. Lay out a clean cotton kitchen towel or a large piece of parchment paper (larger than your pan). Sprinkle it generously and evenly with powdered sugar. This sugar helps prevent the hot cake from sticking to the towel/parchment.
- The Immediate Transfer: As soon as the cake comes out of the oven (and it must be immediately!), carefully invert the hot cake onto the prepared towel or parchment paper. Lift the pan away. Now, carefully peel off the parchment paper that was baked onto the bottom of the cake. Do this gently and slowly.
- The Critical Warm Roll: Starting from one of the short ends of the cake, carefully begin to roll the warm cake up, along with the towel or parchment paper inside the roll. Roll it tightly but gently into a log shape. Place the rolled cake, still wrapped, seam side down on a wire cooling rack. This is the magic step! Letting the cake cool completely while rolled trains it to hold this shape and creates the “memory” needed to prevent cracks when you unroll it later.
- Prepare the Creamy Filling: While the cake cools completely (allow ample time!), prepare the delicious filling. In a medium bowl, beat the softened cream cheese until it is smooth and free of lumps. Beat in the powdered sugar and the second teaspoon of vanilla extract until well combined and fluffy. In a separate bowl (or carefully clean the first), gradually beat in the cold heavy cream on high speed. Continue beating until stiff peaks form – the cream should hold its shape firmly. Gently fold this whipped cream into the cream cheese mixture until just combined. Don’t overmix, or you might lose the airy texture.
- Unroll and Spread: Once the cake is completely cool to the touch, gently and slowly unroll it from the towel/parchment. It should retain its rolled shape beautifully! Spread the prepared cream cheese filling evenly over the entire surface of the cake layer, leaving a small border (about 1/2 inch) around the edges.
- Add the Fresh Strawberries: Arrange your sliced fresh strawberries evenly over the top of the cream cheese filling. Try to distribute them so you get lovely pieces in each slice.
- The Final Roll: Starting from the same short end you used for the initial warm roll, carefully begin to reroll the cake, this time with the filling inside. Use the towel/parchment underneath to help guide and tighten the roll as you go. Roll it up gently but firmly to create a nice, compact spiral.
- Chill Time: Place the rolled cake back onto the wire rack (or a plate or cutting board), seam side down. Cover it loosely with plastic wrap and chill it in the refrigerator for at least 1 hour. This chilling time is essential for the filling to set properly, making the roll stable and easier to slice.
- Finish and Decorate: Once chilled and firm, carefully remove the towel or parchment paper. Lightly coat the sides of the cake roll with the finely crushed graham crackers or cookies. This adds flavor, texture, and helps to hide any minor imperfections on the outside.
- Slice and Serve: Use a sharp knife to slice the roll into desired portions. A gentle sawing motion works best. Clean the knife between slices for the neatest presentation. Serve immediately and enjoy!
Tips for Perfect Strawberry Cream Roll Every Time
Even with the foolproof rolling method, a few extra tips can help ensure your Strawberry Cream Roll turns out absolutely perfect and delicious from start to finish.
- Room Temperature Ingredients are Key (Mostly!): Ensure your eggs and cream cheese are at room temperature before you begin. This helps the eggs whip up properly and allows the cream cheese to become smooth without lumps. However, keep your heavy cream cold until you are ready to whip it for the filling.
- Don’t Guess on Baking Time: Ovens vary! Watch the cake closely during baking. It should be springy to the touch and just starting to pull away from the edges of the pan. Overbaking is the enemy of a flexible cake!
- Roll While Hot, Cool Completely While Rolled: This step is worth repeating because it’s THAT important. The heat keeps the cake pliable. Cooling in the rolled shape “teaches” it to stay that way.
- Crush Cookies Finely: For coating the outside, crushing the cookies into a fine crumb helps them adhere better and gives a nicer finish. You can use a food processor or place them in a zip-top bag and roll over them with a rolling pin.
- Chill Thoroughly: Don’t skip the chilling step! A well-chilled roll means a set filling and clean slices.
- Slice with a Sharp Knife: For beautiful slices, use a sharp knife and wipe it clean with a warm, damp cloth between each cut. This prevents the filling from smearing.
Serving Suggestions for Your Strawberry Cream Roll
While this Strawberry Cream Roll is certainly impressive and delicious enough to stand on its own, pairing it with a few simple additions can elevate the experience.
A dollop of extra whipped cream (perhaps flavored with a touch more vanilla or a hint of almond extract) is always a welcome addition. For a lighter option, a side of extra fresh sliced strawberries never hurts. If you’re serving this as part of a larger dessert spread, consider offering other fruity or creamy treats like Strawberry Cream Scones or even something entirely different like Classic Powdered Sugar Cookies.
Your Strawberry Cream Roll Questions Answered (FAQ)
Got questions? I’ve got answers! Here are some common questions people ask when making cake rolls:
Why do I need to roll the cake while it’s hot?
Rolling the cake while it’s still warm from the oven is the essential step that prevents cracking. When the cake is hot, it is much more pliable and flexible. As it cools in the rolled shape, it sets into that form, creating a ‘memory’ that allows you to unroll and re-roll it later with minimal risk of breakage. If you wait until it’s cool to roll it the first time, it will likely crack and crumble.
Can I use frozen strawberries?
While fresh strawberries are highly recommended for the best flavor and texture, you could potentially use frozen strawberries. However, frozen berries release a lot of moisture when thawed. You would need to thaw them completely and drain them very, very well to prevent the filling from becoming watery and making the cake soggy. Patting them dry with paper towels after draining is also a good idea. Using fresh berries avoids this extra step and ensures the best results.
How long will this Strawberry Cream Roll last?
Properly stored in an airtight container in the refrigerator, your Strawberry Cream Roll will typically last for 3-4 days. For the best texture and flavor, it’s usually best enjoyed within the first 1-2 days after assembly.
My cake stuck to the towel/parchment! What went wrong?
This usually happens if the towel or parchment wasn’t sprinkled generously enough with powdered sugar before rolling, or if you didn’t grease the parchment paper in the pan well enough initially. Make sure you use plenty of sugar on your rolling surface! The double greasing in the pan also helps immensely.
Can I make the cream cheese filling ahead of time?
You can make the cream cheese and powdered sugar mixture ahead of time and store it covered in the refrigerator. However, it’s best to whip the heavy cream and fold it into the cream cheese mixture just before you are ready to assemble the roll. Whipped cream is most stable and airy when freshly prepared.
Enjoy Your Homemade Strawberry Cream Roll!
There’s something truly special about a homemade cake roll, especially one that turns out as beautifully and deliciously as this Strawberry Cream Roll. The combination of soft cake, creamy filling, and fresh fruit is simply irresistible. This recipe takes the stress out of rolling and leaves you with nothing but pure dessert joy.
Give this recipe a try, and let me know how it turns out! Did the crack-free method work wonders for you too? Share your experience in the comments below, or tag me in your photos!
Strawberry Cream Roll

Ingredients
- 3/4 cup all purpose flour
- 1 teaspoon baking powder
- 1/4 teaspoon salt
- 3 large eggs
- 1 cup granulated sugar
- 1 teaspoon vanilla extract
- Optional: a drop or two of pink food coloring
- 8 ounces cream cheese, softened
- 1/2 cup powdered sugar
- 1 teaspoon vanilla extract
- 1 cup heavy cream
- 1 cup finely crushed graham crackers or cookies
- Fresh strawberries, sliced
Directions
- Preheat oven to 375 degrees F (190 C). Grease a 10×15 inch jelly roll pan. Line the bottom with parchment paper, then grease the parchment paper.
- In a small bowl, whisk together the flour, baking powder, and salt.
- In a large bowl, beat the eggs on high speed for about 5 minutes, until thick and pale. Gradually add the granulated sugar, beating until well combined. Stir in the vanilla extract and food coloring, if using.
- Gently fold the dry ingredients into the egg mixture just until combined. Do not overmix.
- Spread the batter evenly into the prepared pan. Bake for 10-12 minutes, or until the cake springs back when lightly touched. Do not overbake.
- While the cake is baking, lay out a clean cotton kitchen towel or a large piece of parchment paper and sprinkle it generously with powdered sugar.
- Immediately invert the hot cake onto the prepared towel/parchment. Carefully peel off the parchment paper that was on the bottom of the cake.
- Starting from a short end, carefully roll the warm cake and the towel/parchment together into a log. Place the rolled cake on a wire rack and let it cool completely, seam side down. Letting the cake cool while rolled trains it to hold its shape and prevents cracking later.
- While the cake is cooling, prepare the filling. In a medium bowl, beat the softened cream cheese until smooth. Beat in the powdered sugar and vanilla extract. Gradually beat in the heavy cream on high speed until stiff peaks form.
- Once the cake is completely cool, gently unroll it. Spread the cream cheese filling evenly over the cake, leaving about a 1/2 inch border around the edges.
- Arrange sliced strawberries over the filling.
- Starting from the same short end you started with before, carefully reroll the cake, using the towel/parchment to help guide it, making sure to roll it tightly but gently.
- Chill the rolled cake for at least 1 hour to allow the filling to set.
- Once chilled, remove the towel/parchment. Lightly coat the sides of the cake roll with the crushed graham crackers or cookies.
- Slice with a sharp knife and serve.