There was a time when cooking bone-in chops felt like a gamble-often resulting in a dry, uninspiring piece of meat. But through years in the kitchen, I’ve discovered the simple, yet transformative secrets to achieving truly Restaurant-Style Bone-In Chops every single time.
This isn’t just a recipe; it’s your reliable guide to unlocking unparalleled juiciness, tenderness, and a deeply satisfying flavor profile. Prepare to impress yourself and your guests with chops that taste like they came straight from a gourmet kitchen.
Tired of Dry Chops? Unlock Juicy, Restaurant-Quality Results
The frustration of a tough, flavorless chop is all too common for home cooks. Many believe that achieving that perfect, succulent interior and beautiful crust is solely the domain of professional chefs.
However, with a few expert techniques, you can easily overcome these challenges. This recipe is designed to transform your approach, delivering consistently delicious results.
Beyond Basic: What Makes These Restaurant-Style Bone-In Chops a Game-Changer?
This recipe focuses on simple, yet highly effective techniques that prioritize both moisture retention and flavor development. We build layers of taste from the very first step.
From a foundational dry pat to an aromatic butter baste, every element works in harmony. You’ll achieve a rich, golden sear and a perfectly tender interior that will redefine your chop expectations.
The Science of Succulence: How We Lock in Moisture and Flavor
Our method hinges on three critical techniques: intense searing, flavor-infused basting, and strategic resting. Each plays a vital role in preventing dryness.
A quick, hot sear creates a delicious crust and seals in juices. Butter basting adds incredible depth, and a proper rest ensures those juices redistribute, guaranteeing tender chops.
Your Flavor Toolkit: Essential Ingredients for Perfect Chops
The Star of the Show: Choosing the Right Bone-In Chops
Opt for thick-cut bone-in chops, ideally around 1.5 inches thick. The bone helps conduct heat evenly and adds flavor during cooking.
Thicker chops provide a larger window for searing a beautiful crust without overcooking the interior, leading to juicy chops.
Aromatic Boosters: Fresh Herbs, Garlic, and Onion Powder
Smashed garlic cloves and fresh rosemary or thyme infuse the basting butter with incredible aroma. These herbs penetrate the meat as it finishes cooking.
Garlic powder and onion powder in the initial seasoning create a savory base. They ensure deep flavor that permeates every bite of your bone-in chops.
The Searing Essentials: Olive Oil, Butter, and Seasonings
Olive oil is excellent for high-heat searing, providing that crucial initial crust. Unsalted butter adds richness and is perfect for basting without adding excess salt.
A balanced blend of salt, black pepper, garlic powder, and onion powder is essential for seasoning. This combination creates a robust, savory profile that complements the natural flavors of the chops.
Finishing Touch: Fresh Parsley
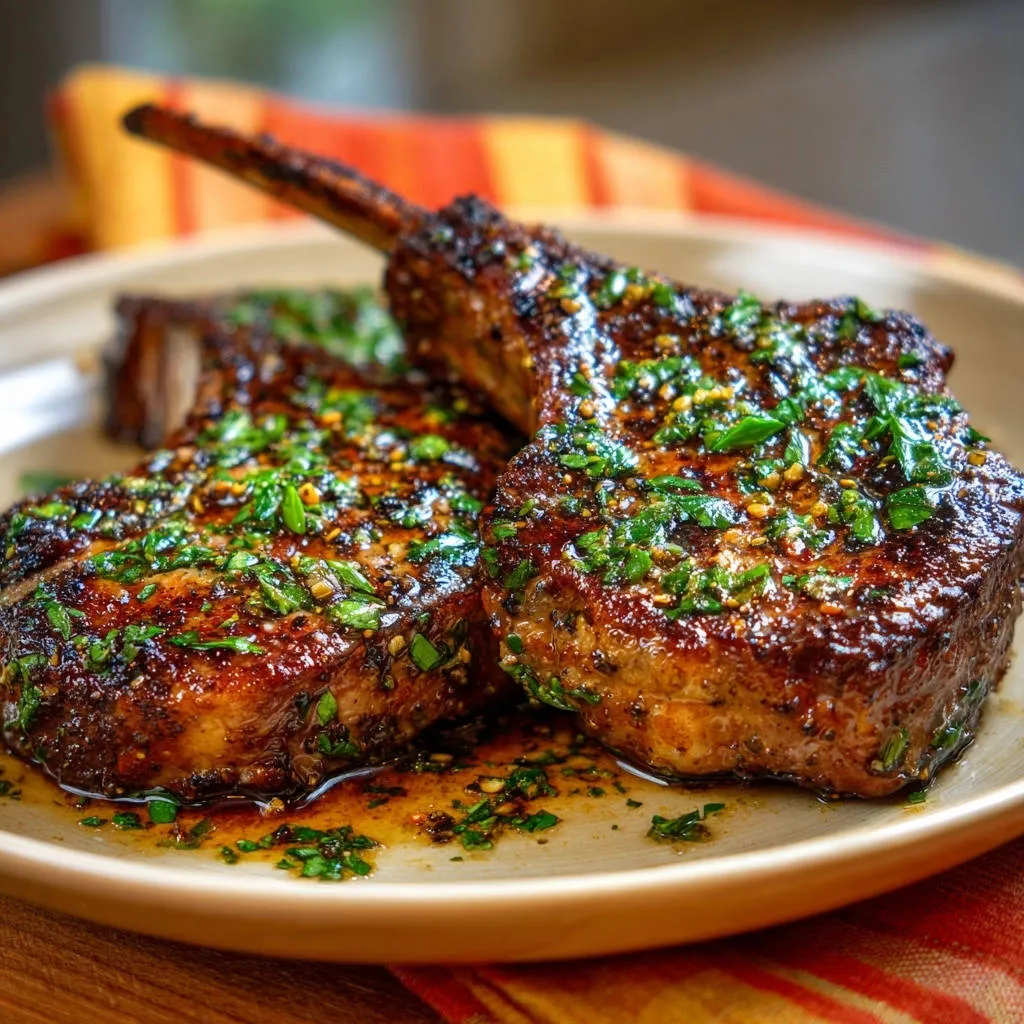
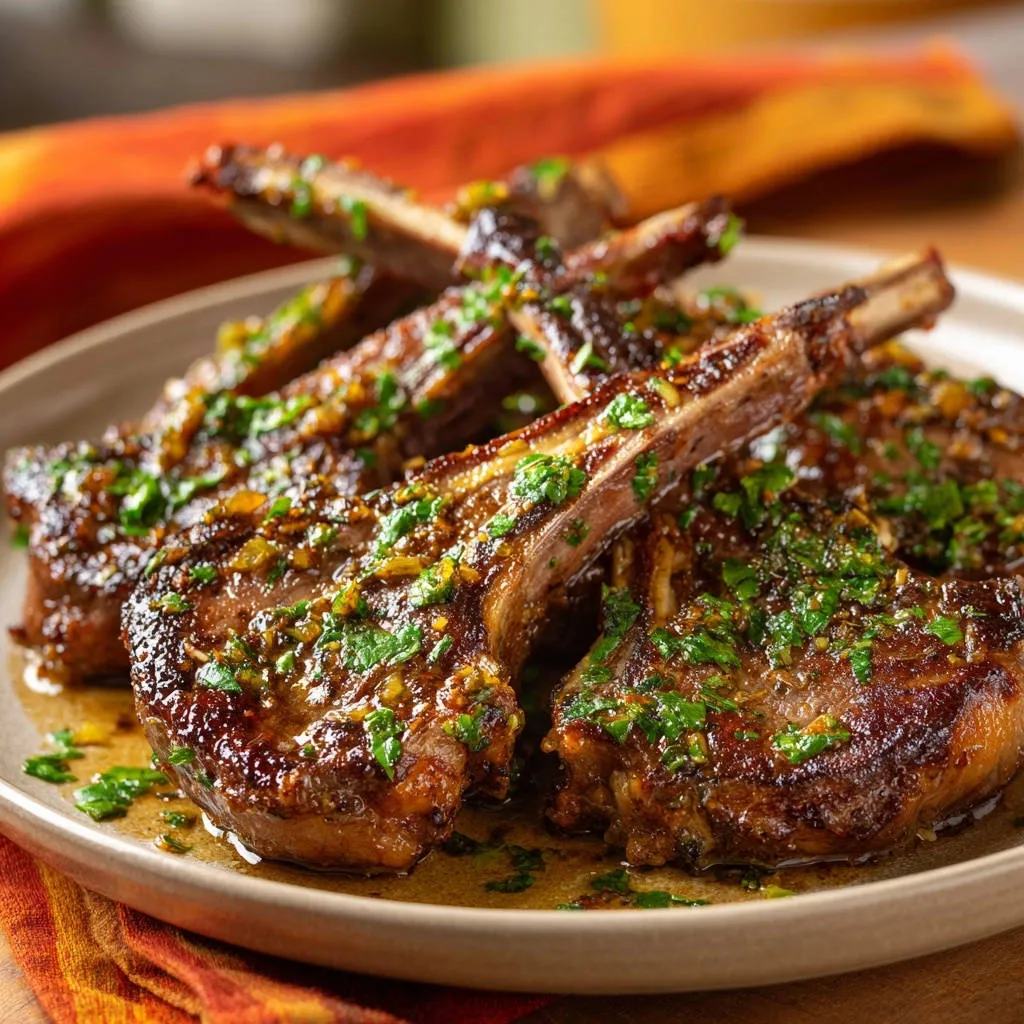
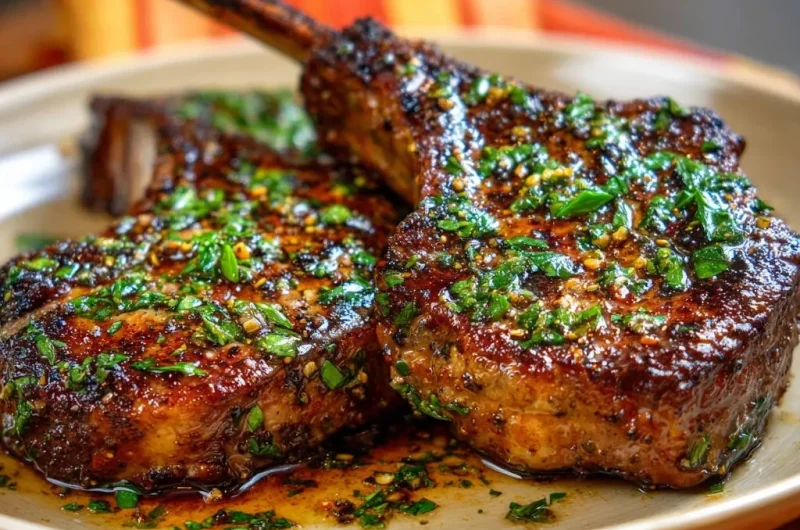
Fresh chopped parsley provides a bright, herbaceous finish. It adds a pop of color and a fresh counterpoint to the rich flavors of the chops and pan juices.
Kitchen Arsenal: Must-Have Equipment for Restaurant-Style Bone-In Chops
The Indispensable Cast Iron Skillet (or Heavy-Bottomed Pan)
A cast iron skillet is crucial for achieving a superior sear. Its excellent heat retention and even heat distribution create that sought-after golden-brown crust.
If you don’t have cast iron, a good quality heavy-bottomed stainless steel pan will also work well. The key is consistent heat.
Beyond the Basics: Thermometers, Tongs, and Resting Boards
An instant-read meat thermometer is your secret weapon for perfect doneness. It ensures your chops are cooked precisely to your preference, preventing overcooking.
Sturdy tongs allow for easy flipping and handling of the hot chops. A dedicated cutting board for resting is also important to contain juices.
Mastering the Method: A Step-by-Step Guide to Juicy Chops
Step 1: Prep for Perfection – The Crucial Dry Pat and Seasoning
Pat the chops incredibly dry on all sides with paper towels. This is crucial for a great sear!
Moisture on the surface prevents browning, leading to a greyish, steamed exterior instead of a crispy crust. Ensure every inch is dry.
Season both sides generously with salt, black pepper, garlic powder, and onion powder. Don’t be shy with the seasoning.
Let the seasoned chops sit at room temperature for at least 15-20 minutes. This helps them cook more evenly throughout.
Step 2: Achieve That Golden Sear – Building the Flavorful Crust
Heat the olive oil in a heavy-bottomed skillet (cast iron works wonders here) over medium-high heat until it’s shimmering and just starting to smoke.
A hot pan is essential for a proper sear. The oil should look wavy and slightly move when tilted.
Carefully place the chops in the hot skillet. Do not move them! Allow the heat to work its magic.
Sear for 3-4 minutes per side, until a deep, golden-brown crust forms. This crust means flavor and helps lock in juices, vital for Restaurant-Style Bone-In Chops.
Step 3: The Butter Baste – Infusing Flavor and Finishing Juiciness
Reduce the heat to medium-low. Add the unsalted butter, smashed garlic cloves, and rosemary or thyme sprig (if using) to the pan.
Lowering the heat prevents the butter and aromatics from burning while still cooking the chops through.
Once the butter is melted, tilt the pan slightly and use a spoon to continuously baste the chops with the melted, flavored butter for 2-3 minutes.
This basting technique continually coats the meat, infusing it with aromatic butter and ensuring a moist interior.
Flip the chops once or twice during basting. Continue to cook, basting, until the internal temperature reaches your desired doneness (130-135F for medium-rare).
Step 4: The Essential Rest – Why Patience Pays for Tender Chops
Transfer the cooked chops to a clean cutting board. Immediately remove them from the hot pan once they hit your target temperature.
Loosely tent them with aluminum foil and let them rest for at least 5-10 minutes. This step is non-negotiable for juicy chops.
Resting allows the internal juices, which have migrated to the center during cooking, to redistribute evenly throughout the meat. This guarantees tender chops.
Step 5: Garnish and Serve – Elevating the Presentation
Spoon the delicious pan juices, now infused with garlic and herbs, over the rested chops.
This flavorful sauce is a natural complement to the rich chops. Garnish generously with fresh chopped parsley.
Serve immediately and enjoy your perfectly cooked, flavorful Restaurant-Style Bone-In Chops!
Elevate Your Plate: Expert Tips for Unforgettable Bone-In Chops
Temperature Matters: Bringing Chops to Room Temp
Allowing your chops to sit at room temperature for 15-20 minutes before cooking ensures more even heat penetration.
This simple step prevents a raw center and an overcooked exterior, contributing to perfectly cooked, tender chops.
The Power of the Pat-Dry: Maximizing Your Sear
Moisture is the enemy of a good sear. Thoroughly patting the chops dry creates the ideal surface for that coveted golden-brown crust.
A dry surface allows for the Maillard reaction to occur efficiently, locking in flavor and juices.
Don’t Crowd the Pan: Ensuring Even Cooking
If cooking more than two chops, sear them in batches. Overcrowding lowers the pan temperature dramatically.
This causes the meat to steam instead of searing, which prevents a proper crust from forming.
Mastering the Baste: Technique for Maximum Flavor
Continuously spooning the melted butter and herb mixture over the chops not only infuses them with incredible flavor.
It also helps to cook them gently to perfection, keeping the exterior moist and flavorful.
Internal Temperature Guide: Achieving Your Perfect Doneness
Use a reliable meat thermometer for precise results. For medium-rare, aim for 130-135°F; medium, 135-140°F; medium-well, 140-145°F.
Remember, the internal temperature will rise slightly during resting, known as carryover cooking.
Resting: The Golden Rule for Juicy Meats
This non-negotiable step allows the muscle fibers to relax and reabsorb the juices, ensuring every bite is moist and tender.
Cutting too soon means all that delicious moisture will escape onto your cutting board, leaving you with dry chops.
Perfecting Your Plate: Troubleshooting Common Chop Challenges
Why are my chops dry or tough?
This usually indicates overcooking, the most common culprit for dry chops. Ensure you’re using a meat thermometer and pulling the chops off the heat a few degrees before your target doneness.
Also, insufficient resting time can lead to juices escaping, resulting in dry, tough meat. Always prioritize that essential rest!
My sear isn’t golden; it’s grey.
A grey sear often means the pan wasn’t hot enough or the chops weren’t patted dry enough. Both factors prevent proper browning.
Ensure your skillet is shimmering hot with the olive oil just starting to smoke, and that the chops are completely dry before placing them in the pan for a perfect sear.
The chops cooked unevenly.
Uneven cooking can result from starting with cold chops or overcrowding the pan. Cold meat hits the hot pan and takes longer to heat through evenly.
Always bring chops to room temperature before cooking, and sear them in batches if necessary to maintain consistent pan heat and achieve even cooking.
Beyond the Plate: Serving Suggestions and Perfect Pairings
Classic Sides That Complement Your Restaurant-Style Bone-In Chops
Pair your magnificent chops with creamy mashed potatoes or a rich potato gratin for a comforting meal. Roasted asparagus or sautéed green beans with garlic are excellent green vegetable choices.
For a lighter option, a crisp Caesar salad or a simple arugula salad with a lemon vinaigrette provides a refreshing contrast. Consider a wild mushroom risotto for an extra touch of elegance.
Wine & Beverage Recommendations
For wine, a medium-bodied red such as Pinot Noir or a light-bodied Cabernet Sauvignon beautifully complements the rich flavors of the chops. An oak-aged Chardonnay also pairs well.
If you prefer beer, a brown ale or a dry cider offers a wonderful balance. For non-alcoholic options, sparkling apple cider or a tart cranberry spritzer are excellent choices.
Plan Ahead: Storage, Reheating, and Make-Ahead Tips
Storing Leftover Chops Safely
Allow any leftover chops to cool completely before storing them. Place them in an airtight container and refrigerate for up to 3-4 days.
For longer storage, wrap individual chops tightly in plastic wrap, then foil, and freeze for up to 2-3 months. Thaw in the refrigerator overnight before reheating.
Best Ways to Reheat Without Drying Out
To reheat, gently warm the chops in a skillet over low heat with a splash of broth or water, covered, until just heated through. Alternatively, use a low oven (250°F) until warmed.
Avoid high heat or microwave reheating if possible, as these methods can quickly dry out the meat. The goal is to retain that lovely moisture and tenderness.
Can I Prep Ingredients in Advance?
Absolutely! You can pre-measure all your dry seasonings and mix them in advance. Fresh herbs can be washed, dried, and chopped or destemmed the day before.
Bringing the chops to room temperature and seasoning them can also be done up to 30 minutes before cooking. This streamlined prep makes for effortless execution.
Your Restaurant-Style Bone-In Chops Questions, Answered
What thickness of bone-in chops is best for this recipe?
This recipe is designed for thick-cut bone-in chops, ideally around 1.5 inches thick. This thickness allows for a beautiful sear while ensuring the interior cooks to a tender juiciness without drying out.
Thicker cuts are more forgiving and easier to cook to a precise doneness, yielding truly juicy chops.
Can I use boneless chops instead?
While you can use boneless chops, be aware that they cook faster and tend to dry out more easily due to the lack of bone and less insulation. Adjust cooking times accordingly.
It’s even more critical to monitor the internal temperature closely with a meat thermometer to prevent overcooking and maintain juiciness.
What’s the difference between fresh rosemary and thyme in this recipe?
Rosemary offers a more pungent, piney, and earthy flavor, with a slightly peppery finish. Thyme provides a milder, subtly minty, and herbaceous note.
Both complement pork beautifully and infuse the butter baste with fantastic aroma. Choose based on your personal preference or what fresh herbs you have on hand.
How do I know when the olive oil is hot enough for searing?
The olive oil is hot enough when it shimmers in the pan and just begins to show wisps of smoke. This indicates it’s at a high enough temperature to immediately begin searing the meat.
This ensures the Maillard reaction starts instantly, forming a delicious, golden-brown crust and contributing to a perfect sear.
Is it safe to eat medium-rare pork?
Yes, according to the USDA, pork is safe to consume at an internal temperature of 145°F (63°C), followed by a three-minute rest. This often results in a delicious medium-rare chop that is juicy and tender.
Using a reliable meat thermometer is key to achieving this safe and succulent doneness for your Restaurant-Style Bone-In Chops.
Ready to Impress? Share Your Bone-In Chops Masterpiece!
You now possess the knowledge and techniques to create truly exceptional Restaurant-Style Bone-In Chops in your own kitchen. Say goodbye to dry, bland chops and hello to perfectly seared, juicy, and flavorful masterpieces.
Don’t hesitate to put these expert tips into practice. Share your culinary triumph with friends and family, and savor the delight of every tender, succulent bite!
Restaurant-Style Bone-In Chops
Course: Main CourseCuisine: American CuisineDifficulty: easy2
servings20
minutes15
minutes45
minutesAmerican Cuisine
Ingredients
2 thick-cut bone-in chops (about 1.5 inches thick)
1 tablespoon olive oil
1 tablespoon unsalted butter
2 cloves garlic, smashed
1 sprig fresh rosemary or thyme (optional, for flavor)
1 teaspoon salt
1/2 teaspoon black pepper
1/2 teaspoon garlic powder
1/4 teaspoon onion powder
1/4 cup fresh parsley, chopped
Directions
- Prep for Perfect Results: Pat the chops incredibly dry on all sides with paper towels. This is crucial for a great sear! Season both sides generously with salt, black pepper, garlic powder, and onion powder. Let the seasoned chops sit at room temperature for at least 15-20 minutes. This helps them cook more evenly.
- Achieve That Golden Sear: Heat the olive oil in a heavy-bottomed skillet (cast iron works wonders here) over medium-high heat until it’s shimmering and just starting to smoke. Carefully place the chops in the hot skillet. Do not move them! Sear for 3-4 minutes per side, until a deep, golden-brown crust forms. This crust means flavor and helps lock in juices.
- Flavor Infusion and Juiciness Boost: Reduce the heat to medium-low. Add the unsalted butter, smashed garlic cloves, and rosemary or thyme sprig (if using) to the pan. Once the butter is melted, tilt the pan slightly and use a spoon to continuously baste the chops with the melted, flavored butter for 2-3 minutes. Flip the chops once or twice during basting. Continue to cook, basting, until the internal temperature reaches your desired doneness (130-135F for medium-rare).
- The Essential Rest: Transfer the cooked chops to a clean cutting board. Loosely tent them with aluminum foil and let them rest for at least 5-10 minutes. This step is non-negotiable for juicy chops, as it allows the internal juices to redistribute.
- Serve with Flair: Spoon the delicious pan juices over the rested chops. Garnish generously with fresh chopped parsley. Serve immediately and enjoy your perfectly cooked, flavorful chops!
Notes
- Key techniques include patting chops dry, achieving a golden sear, butter basting, and the essential resting period for optimal juiciness and flavor.