Craving those incredibly crispy-bottomed potstickers you get at your favorite restaurant? You know, the ones with that satisfying golden crunch contrast the tender, flavorful filling inside? If you’ve tried making them at home only to end up with soft, sad, or unevenly cooked dumplings, you are definitely not alone! For the longest time, I struggled to replicate that perfect texture myself.
But guess what? I finally cracked the code, and the secret to achieving those restaurant-quality results with Perfect Pan-Fried Potstickers is surprisingly simple. It’s all about one specific technique that ensures you get that coveted crispy bottom while the rest steams beautifully. Get ready, because your homemade potsticker game is about to change forever!
Why This Recipe is a Keeper
Beyond finally nailing that crispy bottom, this method for pan-frying potstickers is fantastic for several reasons:
- It’s incredibly straightforward, perfect for beginners and experienced cooks alike.
- You can use either frozen or fresh dumplings, making it super convenient.
- It delivers consistently delicious results every single time.
- Minimal ingredients are needed for maximum flavor payoff.
- You’ll save money compared to ordering takeout!
Say goodbye to guesswork and hello to potstickers that will disappear from the plate faster than you can make them.
Gathering Your Simple Ingredients for Potstickers
One of the beauties of making delicious pan-fried dumplings at home is that you don’t need a long list of obscure items. This recipe relies on just a few key players to achieve that incredible texture and taste. Think of these as your essential building blocks:
You’ll start with a bit of neutral cooking oil. The “neutral” part is key here because you want an oil that can handle medium-high heat without smoking excessively or imparting a strong flavor of its own. Vegetable oil, canola oil, or even grapeseed oil work wonderfully. This oil is what creates that initial sear and crispy foundation.
Next up are the stars themselves: the potstickers or dumplings. You can use frozen or fresh ones, whatever you have on hand! I’ve found this technique works equally well for both. The recipe is designed for about 12 dumplings, which fits nicely in a standard skillet. As for filling, chicken or vegetable options are widely available and highly recommended for their classic flavors that pair beautifully with the crispy wrapper.
The secret weapon in our crispy arsenal is the liquid – either water or chicken broth. Adding this to the hot pan creates steam, which is crucial for cooking the dumpling filling and wrapper through without burning the already-crisping bottom. Using chicken broth can add a subtle extra layer of flavor, but water works perfectly fine.
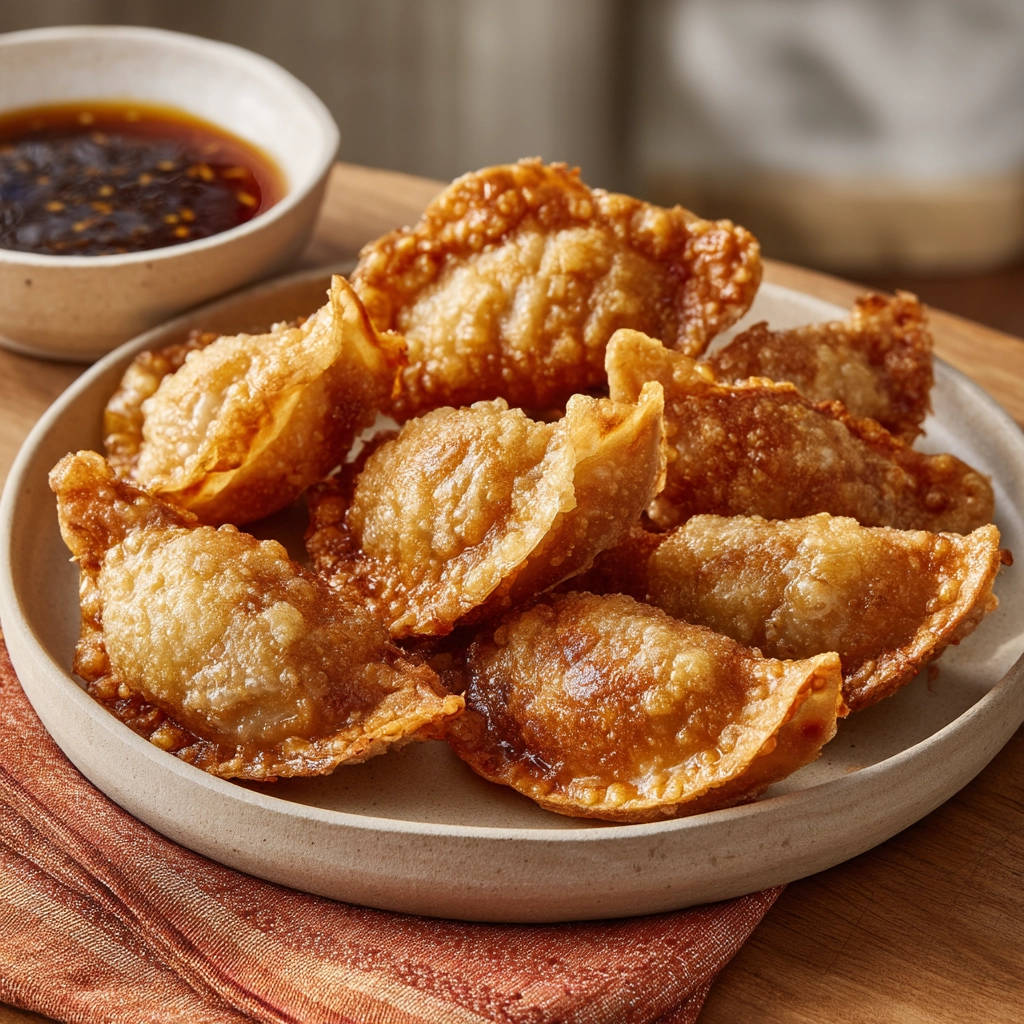
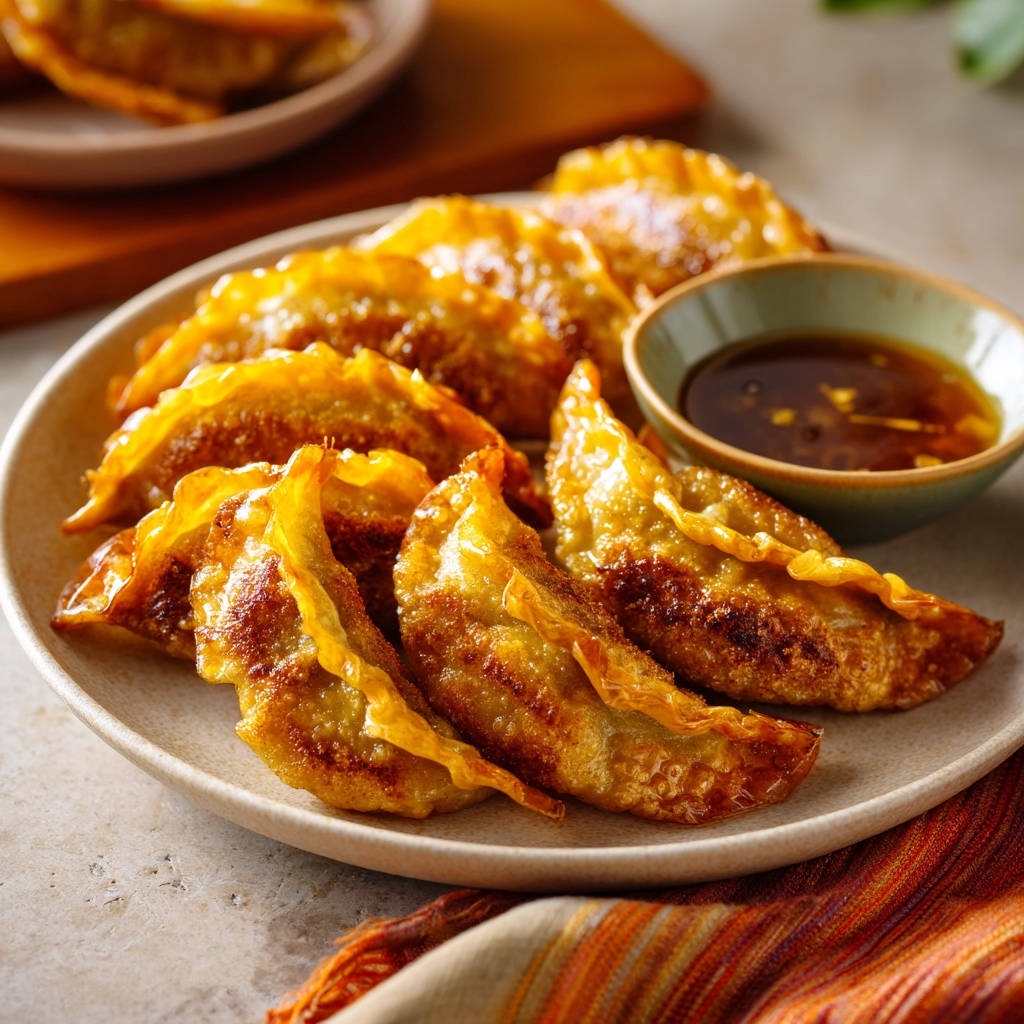
Finally, while optional based on preference, a simple dipping sauce elevates the experience. The classic combination involves pantry staples you likely already have:
- Neutral cooking oil (like vegetable or canola)
- Frozen or fresh potstickers/dumplings (chicken or vegetable filling recommended)
- Water or chicken broth
For the Dipping Sauce (Optional):
- Soy sauce
- Rice vinegar
- Sesame oil
- Pinch of red pepper flakes (optional, for a little heat)
Having everything measured and ready to go before you start is always a good practice in cooking!
Crafting Your Perfect Pan-Fried Potstickers: Step-by-Step Mastery
Okay, this is where the magic happens. Follow these steps carefully, and you’ll be rewarded with that glorious crispy texture. The key is the combination of initial frying, steaming, and then a final fry to really lock in the crispiness. Let’s walk through it:
Prepare Your Pan and Oil: Start by placing a non-stick skillet over medium-high heat. You want the pan to get properly hot before adding the oil. Once hot, add the tablespoon of neutral cooking oil. Swirl the pan around to ensure the oil coats the entire bottom surface evenly. This initial layer of hot oil is critical for building that first crispy layer.
Arrange the Potstickers: Carefully and deliberately place your frozen or fresh potstickers into the hot skillet in a single layer. It’s super important here that none of the potstickers are touching each other. Giving them space allows the hot oil to crisp up their bottoms uniformly. If they’re crowded, they’ll end up steaming instead of frying in this initial stage.
Execute the First Fry: Let the potstickers cook undisturbed for about 2 to 3 minutes. Don’t be tempted to poke or move them! This is the crucial first step where the bottoms make direct contact with the hot, oiled surface and start to turn golden brown and develop that initial crispiness. Peek underneath one after 2 minutes to check the color; they should be nicely golden.
Introduce the Steam (The Secret Step!): Now for the part that makes all the difference. Carefully pour the water or broth into the skillet. Be prepared – it will sizzle and create a lot of steam! Immediately after adding the liquid, quickly and tightly cover the skillet with a lid. This traps the steam inside, creating a mini-steamer environment.
Steam Until Tender: Reduce the heat down to medium-low. Let the potstickers steam, covered, for approximately 6 to 8 minutes. This steaming phase is vital for ensuring the wrappers become tender and pliable and, most importantly, that the filling inside cooks all the way through. The liquid works its magic here, gently cooking the interior without burning the crispy bottom you’ve already started to build.
Uncover and Increase Heat: Once the steaming time is up, carefully remove the lid. Watch out for the puff of hot steam that will escape! Increase the heat back up to medium-high. The goal now is to evaporate the remaining liquid in the pan.
Achieve Maximum Crispiness (The Second Fry): Continue cooking for another 1 to 3 minutes, or until all the liquid has completely evaporated and the bottoms of the potstickers are gloriously golden brown and achieve that extra, extra crispy texture you’re looking for. Listen for the sizzle sound as the water evaporates and the oil starts frying again. This second fry after the steam bath is the key to locking in that ultimate crispiness.
Serve and Enjoy: Once the potstickers are perfectly golden and crispy on the bottom, remove them from the pan immediately. Don’t let them sit in the pan, or they might lose some crispiness. If using, mix together the soy sauce, rice vinegar, sesame oil, and optional red pepper flakes in a small bowl. Serve your homemade Perfect Pan-Fried Potstickers hot with the dipping sauce. Prepare for them to disappear quickly!
Tips for Perfect Potstickers Every Single Time
Making crispy potstickers is quite forgiving once you understand the technique, but here are a few extra tips to ensure your success and make them even better:
- Use the Right Pan: A good quality non-stick skillet is your best friend for this recipe. It helps prevent sticking during both the initial fry and the final crisping phase.
- Don’t Overcrowd: Resist the urge to cram too many potstickers into the pan. Cook in batches if necessary. Overcrowding lowers the pan’s temperature and causes them to steam rather than fry initially, resulting in less crispy bottoms.
- Listen and Look: Pay attention to the sounds and sights. A good sizzle during the frying steps is what you want. The bottoms should be a beautiful golden brown, not pale or dark brown/black.
- Adjust Heat as Needed: Stovetops vary. If your pan seems too hot during the first fry and they’re browning too fast, slightly lower the heat. If the liquid isn’t evaporating quickly enough in the second fry, you can slightly increase the heat (but watch carefully!).
- Frozen vs. Fresh: Frozen potstickers are usually fine to cook directly from the freezer using this method. If using fresh, the steaming time might be slightly shorter (maybe 5-7 minutes), but still check for cooked filling and tender wrappers.
- Customize Your Sauce: The basic dipping sauce is fantastic, but feel free to play! Add finely grated fresh ginger, minced garlic, a splash of chili oil, or a pinch of sugar for different flavor profiles.
Following these simple tips will help you achieve consistently crispy and delicious results with your pan-fried dumplings.
What to Serve With Your Crispy Potstickers
Perfect Pan-Fried Potstickers make an excellent appetizer on their own, especially when served with that tangy dipping sauce. But if you’re looking to make them part of a larger meal, they pair wonderfully with a variety of dishes.
Classic companions include steamed rice or noodle dishes. For a complete Asian-inspired meal, you could serve them alongside a vibrant Restaurant-Style Fried Rice or a comforting bowl of Glass Noodle Soup.
If you prefer something lighter, a simple green salad or a refreshing side like our Elevated Avocado Salad can provide a nice contrast to the richness of the potstickers. They also work well as part of a larger spread of appetizers for entertaining.
Your Crispy Potsticker Questions Answered (FAQ)
Here are some common questions people ask when learning how to make crispy pan-fried dumplings:
Can I make crispy potstickers with different fillings?
Absolutely! While the recipe specifically mentions chicken or vegetable, this pan-frying technique with the steam-then-fry method works for almost any filling – beef, shrimp, or other combinations. The cooking time during the steaming phase might need slight adjustment depending on the density and type of filling, but the principle remains the same: steam to cook through, then fry to crisp.
What if my potstickers stick to the pan?
Sticking is usually caused by not using a good non-stick pan, not using enough oil, or trying to move the dumplings too early during the initial fry. Make sure your pan is adequately heated before adding the oil, ensure the oil coats the bottom well, and resist the urge to disturb them for the first 2-3 minutes until they have developed that golden crust.
Can I use this method for homemade dumplings?
Yes, this method is perfect for both store-bought frozen or fresh dumplings and those you make from scratch! If using homemade fresh dumplings, they might cook through a little faster during the steaming stage, so start checking for tenderness around the lower end of the recommended time (6 minutes).
My potstickers aren’t crispy after the second fry. What went wrong?
This usually happens if there’s still liquid in the pan when you finish cooking, or if you didn’t cook them long enough in the second frying stage. Ensure all the water or broth has completely evaporated before concluding the second fry. You might need that extra minute or two to get them perfectly golden and crunchy. Also, make sure your heat is back up to medium-high for that final crisping.
How should I store and reheat leftover pan-fried potstickers?
Store cooked potstickers in an airtight container in the refrigerator for 2-3 days. Reheating can be tricky if you want to keep the crispiness. The best way is to reheat them in a skillet over medium heat with a tiny bit of oil until heated through and the bottoms crisp up again. Microwaving will heat them but will result in a soft wrapper.
Enjoy Your Homemade Perfect Pan-Fried Potstickers!
There you have it – the foolproof way to achieve those restaurant-style crispy bottoms on your pan-fried potstickers right in your own kitchen. This technique is a game-changer and is so easy once you try it.
Give this recipe a go, and you’ll be making delicious, crispy dumplings that everyone will rave about. They’re perfect for a snack, an appetizer, or even a fun main course. Don’t forget to whip up that simple dipping sauce to complete the experience!
Did you try this method? How did your crispy potstickers turn out? I’d love to hear about your success in the comments below! Happy cooking!
Perfect Pan-Fried Potstickers

Ingredients
- 1 tablespoon neutral cooking oil (like vegetable or canola)
- 12 frozen or fresh potstickers/dumplings (chicken or vegetable filling recommended)
- 1/2 cup water or chicken broth
- For Dipping Sauce (optional, based on image):
- 1/4 cup soy sauce
- 1 tablespoon rice vinegar
- 1 teaspoon sesame oil
- Pinch of red pepper flakes (optional)
Directions
- Heat the neutral cooking oil in a non-stick skillet over medium-high heat. Swirl to coat the bottom evenly.
- Carefully place the potstickers in a single layer in the hot skillet. Make sure they are not touching each other.
- Cook undisturbed for 2 to 3 minutes, or until the bottoms are golden brown and crispy. This is the first step to achieving crispiness.
- Now for the crispy secret: Pour the water or broth into the skillet (be careful, it will steam!). Immediately cover the skillet tightly with a lid.
- Reduce the heat to medium-low and let the potstickers steam for 6 to 8 minutes, or until the wrappers are tender and the filling is cooked through. The liquid helps cook the inside without burning the outside.
- Remove the lid. Be cautious of steam. Increase the heat back to medium-high.
- Allow the remaining liquid to evaporate completely. Continue cooking for another 1 to 3 minutes, or until the bottoms are gloriously golden brown and extra crispy again. This second fry step after steaming locks in the crispiness you crave.
- Remove potstickers from the pan and serve immediately with dipping sauce ingredients mixed together in a small bowl, if using. Enjoy your perfectly crispy potstickers!