Welcome, fellow food lovers! Have you ever bitten into a supposedly crispy bacon wrapped jalapeño popper, only to find the bacon... well, less than crispy? Maybe even a little chewy or sadly limp? You are absolutely not alone! For years, I faced the same disappointment. I'd eagerly pull a batch of bacon wrapped jalapeño poppers from the oven, hopeful for that perfect crunch, only to be met with less-than-ideal results.
But guess what? Through trial, error, and a whole lot of popper testing (someone's got to do it!), I finally cracked the code. I discovered a simple, yet incredibly effective, trick that guarantees your bacon wrapping will be beautifully browned and undeniably crispy every single time. No more soggy sadness! This recipe is the ultimate party snack upgrade, and once you taste the difference, you'll never go back.
Why You'll Absolutely Adore These Bacon Wrapped Jalapeno Poppers
Beyond the guaranteed crispy bacon (which, let's be honest, is a huge selling point!), there are so many reasons this recipe deserves a spot in your entertaining repertoire or even just your weeknight snack lineup.
- The Perfect Balance: You get the creamy, cool interior from the cheese mixture, a pop of fresh, bright heat from the jalapeño, and that irresistible salty, crispy bite from the bacon. It's a symphony of textures and flavors!
- Crowd Pleaser Supreme: Put a platter of these out at any gathering, and watch them disappear. Seriously. They are universally loved. If you're planning a get-together, these are right up there with must-have appetizers like Cheesy Garlic Bombs or Baked Brie.
- Surprisingly Simple: While they look impressive, the process is straightforward and doesn't require any fancy techniques.
- That Crispy Bacon Trick: We already mentioned it, but it bears repeating! The method we use ensures the bacon renders properly and gets that glorious crispiness without leaving the jalapeño undercooked.
Gathering Your Ingredients for Crispy Jalapeno Poppers
Creating these delightful bites starts with selecting the right components. Each ingredient plays a vital role in achieving that perfect spicy, creamy, and crispy harmony.
First up, the stars of the show: fresh jalapeño peppers. You'll need about 12 to 15 of them. Look for peppers that are firm, smooth-skinned, and vibrant green. Size can vary, but try to pick ones that are roughly uniform so they cook evenly. Remember, the heat level can vary greatly from pepper to pepper and even within a single pepper! We'll address managing the spice later.
Next, the essential creamy filling: 8 ounces of softened cream cheese. Using softened cream cheese is crucial here. It makes mixing in the seasonings a breeze, resulting in a smooth, lump-free filling that melts beautifully inside the pepper as it bakes. Make sure you pull it out of the fridge about an hour beforehand or gently soften it.
To give that cream cheese some serious flavor depth, we add a few simple spices. You'll need 1/2 teaspoon of garlic powder and 1/2 teaspoon of onion powder. These pantry staples provide a savory base that complements both the heat of the jalapeño and the richness of the bacon. For an extra layer of warmth and a hint of smoky complexity, consider adding 1/4 teaspoon of smoked paprika. While optional, I highly recommend it - it really elevates the flavor profile.
And finally, the glorious wrapper: 12 to 15 slices of bacon. The type of bacon you choose matters for crispiness! A standard-cut bacon works best. Avoid thick-cut bacon, as it takes much longer to crisp and can sometimes result in an overcooked pepper before the bacon is done. We're looking for that perfect balance, and standard-cut delivers.
Here's a quick look at everything you'll need:
- 12-15 fresh jalapeño peppers
- 8 ounces cream cheese, softened
- 1/2 teaspoon garlic powder
- 1/2 teaspoon onion powder
- 1/4 teaspoon smoked paprika (optional)
- 12-15 slices bacon (standard cut recommended)
Crafting Your Crispy Poppers: Step-by-Step
Now for the fun part - bringing these delicious ingredients together! Follow these steps closely to ensure your bacon wrapped jalapeño poppers come out perfectly crispy and flavorful.
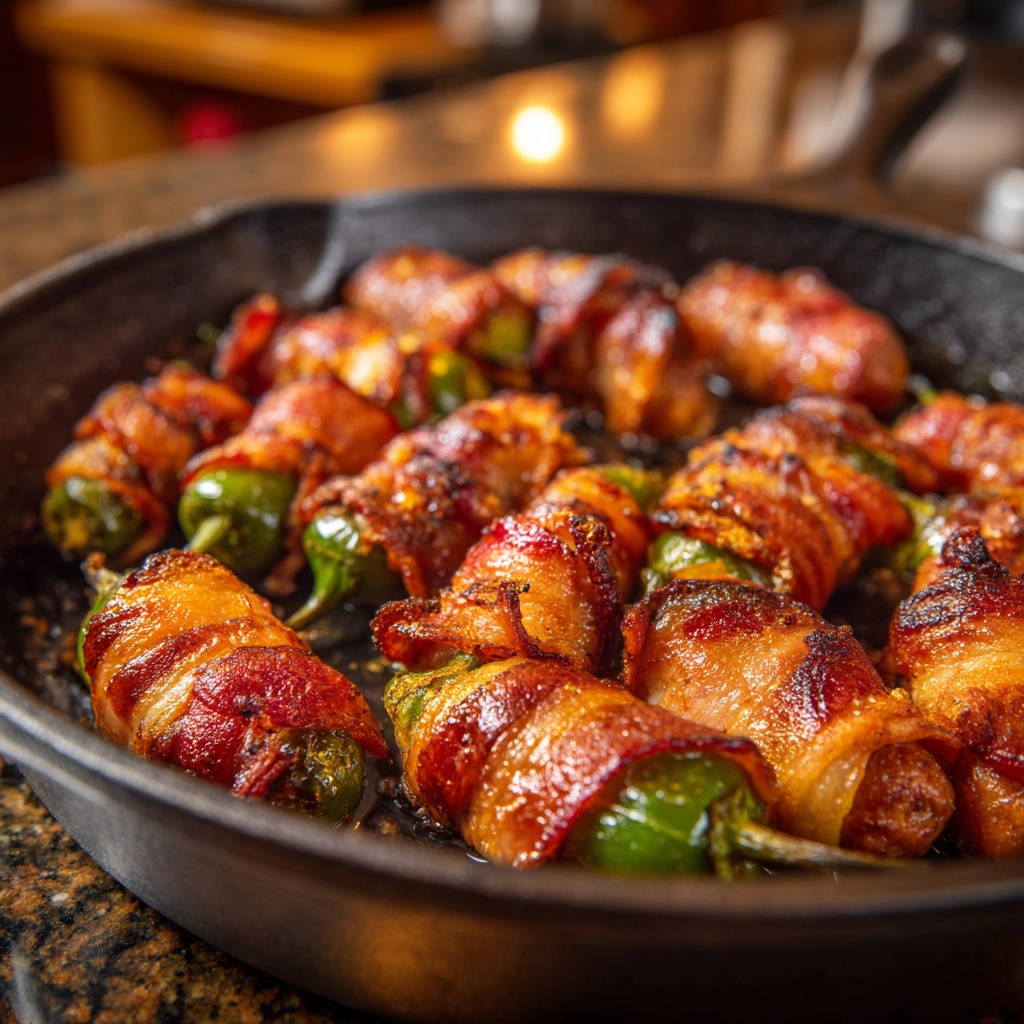
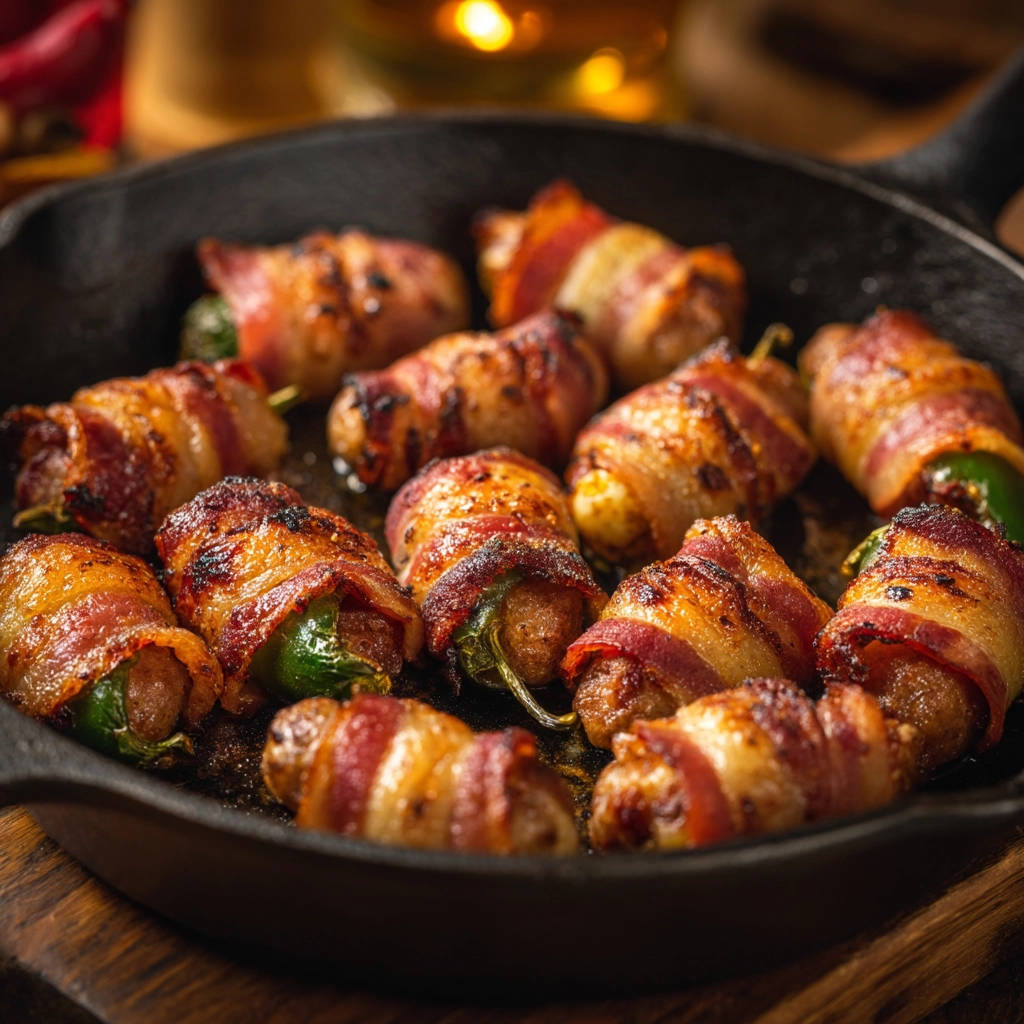
Preheat the Oven and Prep Your Pan: Start by getting your oven ready. You'll need it nice and hot at 400 degrees Fahrenheit (about 200 degrees Celsius). While the oven preheats, prepare your baking vessel. I love using a cast iron skillet because it helps conduct heat really well, promoting even crisping on the bottom. If you don't have one, a regular baking sheet lined with parchment paper works perfectly too. The parchment paper makes cleanup a breeze and prevents sticking.
Prepare the Jalapeños Safely: Handling jalapeños can lead to uncomfortable burning sensations, especially if you have sensitive skin. It's highly recommended to wear disposable gloves for this step! Carefully wash each pepper and pat them completely dry. Excess moisture can hinder the bacon crisping. Now, slice each pepper in half lengthwise right through the stem. Use a small spoon, like a grapefruit spoon or a teaspoon, to carefully scrape out the seeds and the white membranes. This is where most of the capsaicin (the compound that causes heat) resides, so removing it helps control the spice level. You can leave the stems attached if you like the way they look or for easy handling, or remove them - it's totally up to your preference.
Whip Up the Creamy Filling: In a small mixing bowl, combine the softened cream cheese with the garlic powder, onion powder, and the optional smoked paprika. Use a spoon or a rubber spatula to mix everything together until it's completely smooth and the spices are evenly distributed. The goal is a uniform, spreadable mixture.
Fill the Pepper Halves: Take a small spoon and carefully scoop the cream cheese mixture into each hollowed-out jalapeño half. Don't overstuff them, but make sure each half is generously filled right up to the edges. This creamy center is key to balancing the heat and providing a delicious contrast to the crispy exterior.
The Crispy Bacon Wrap Trick: Here's the magic step! Take a slice of bacon and cut it in half crosswise. You only need half a slice per jalapeño half. Starting at the stem end (or where the stem was), wrap one half slice of bacon tightly around the filled jalapeño half. Overlap the bacon slightly as you wrap, moving towards the tip of the pepper. It's crucial that the bacon is snug and completely covers the cream cheese filling. This tight wrap ensures the bacon stays in place, renders properly, and gets that guaranteed crispy texture all the way around the pepper.
Arrange for Baking: Place the wrapped jalapeño poppers in a single layer on your prepared cast iron skillet or parchment-lined baking sheet. Make sure they aren't touching each other. Giving them space allows the hot air to circulate freely, which is essential for crispy bacon.
Bake to Crispy Perfection: Slide the pan into your preheated 400-degree oven. Bake for 25 to 35 minutes. Keep an eye on them as they bake; the exact time will depend on the size of your peppers and the thickness of your bacon. You'll know they're ready when the jalapeños look tender (slightly wrinkled or softer) and, most importantly, the bacon is beautifully browned and gloriously crispy all around. Baking at this temperature for this duration allows the bacon fat to slowly render out, effectively 'frying' the bacon wrap and giving you that perfect crispy texture. If you want extra crispness and aren't afraid of a little extra vigilance, you can briefly move the pan under the broiler for the last 1-2 minutes. Watch them constantly during broiling, as they can go from perfectly crisp to burnt in seconds!
Cool Slightly and Serve: Once they are golden brown and crispy, carefully remove the pan from the oven. Resist the urge to bite into one immediately! The filling will be incredibly hot. Let them cool on the pan for just a few minutes before transferring them to a serving platter. This short cooling time also helps the bacon crisp up even further as they rest.
Tips for Perfect Bacon Wrapped Jalapeno Poppers Every Time
Achieving that ideal crispy bacon wrapped jalapeño popper is easy with a few simple tips.
- Bacon Choice Matters: As mentioned before, stick to standard-cut bacon. Thick-cut bacon is fantastic for many things, but it takes too long to crisp up completely on these poppers without overcooking the pepper and melting the cheese into oblivion.
- Prep Ahead: You can assemble these poppers several hours or even up to a day in advance. Store the assembled, unbaked poppers in a single layer in an airtight container in the refrigerator. When you're ready to bake, just pop them in the oven (you might need a few extra minutes of baking time since they are going in cold). This is a fantastic hack for party prep!
- Control the Heat: For milder poppers, be meticulous about removing all of the seeds and white membrane. If you like them spicier, you can leave a few seeds or a bit of membrane intact. Just be aware that heat is unpredictable!
- Don't Crowd the Pan: Give each popper its space on the baking sheet or skillet. Overcrowding leads to steaming instead of baking and crisping. Use two pans if necessary.
- Broiler Beware: If you use the broiler for extra crispness, stay right there and watch them. It happens fast!
- Serving Temperature: While they are best served warm, letting them cool for a few minutes is essential for the filling to set slightly and prevent burning your mouth.
What to Serve With Your Crispy Poppers
These crispy bacon wrapped jalapeño poppers are fantastic on their own, but they also pair beautifully with a variety of dips and accompaniments. A side of ranch dressing or blue cheese dressing is classic. A tangy barbecue sauce or a sweet chili sauce also makes a great dipping option. For a party spread, consider serving them alongside other popular bites like Cranberry Brie Bites or a refreshing Perfect Pico de Gallo.
Thinking about a full appetizer spread? These poppers would be right at home next to something creamy like a Smooth Melty Cheese Dip or some savory Creamy Veggie Pinwheels. The options are endless!
Your Jalapeno Popper Questions Answered (FAQ)
Here are some common questions folks ask about making perfect bacon wrapped jalapeño poppers:
How spicy are these poppers?
The spice level is primarily controlled by how much of the white membrane and seeds you remove from the jalapeño. Removing all of it will result in a mild pepper with just a hint of warmth and plenty of fresh pepper flavor. Leaving some or all of the membrane and seeds in will increase the heat significantly. Since individual peppers vary, you can test a tiny piece of the membrane before filling if you're unsure!
Can I use different kinds of cheese in the filling?
Absolutely! While cream cheese provides that essential creamy texture, you can mix in other cheeses for added flavor. Shredded cheddar, Monterey Jack, or a spicy pepper jack would all be delicious additions. Just make sure the total amount of cheese mixture is roughly the same so it fits well into the pepper halves.
Can I make these bacon wrapped jalapeño poppers ahead of time?
Yes, you can! As mentioned in the tips, assemble the poppers completely (filling and wrapping with bacon) and store them uncooked in a single layer in an airtight container in the refrigerator for up to 24 hours. Bake them when you are ready to serve. Note that they might take a few extra minutes of baking time when starting from cold.
What's the best way to store leftovers?
If by some miracle you have leftovers, allow them to cool completely, then store them in an airtight container in the refrigerator for 2-3 days. To reheat, bake them in a single layer on a baking sheet at 350°F (175°C) for 10-15 minutes, or until heated through and the bacon is crisp again. Avoid microwaving, as this will make the bacon chewy.
Is there a trick to keeping the bacon from sliding off?
The key trick, as detailed in step 5, is wrapping the bacon tightly and ensuring it overlaps itself slightly, especially at the stem end. Starting the wrap at the thicker stem end and wrapping towards the narrower tip often helps the bacon adhere better as it shrinks while cooking. Using standard-cut bacon also helps, as it's more pliable than thick-cut.
Enjoy Your Homemade Crispy Bacon Wrapped Jalapeno Poppers!
There you have it - the secret to perfectly crispy bacon wrapped jalapeño poppers! These little bites are truly addictive and guaranteed to be a hit. Whether you're making them for a party, a game day snack, or just because you have a craving, this recipe will deliver that satisfying combination of creamy, spicy, and, most importantly, crispy goodness.
Give this recipe a try and let me know how they turn out! What's your favorite dip to serve with them? Share your thoughts and tips in the comments below!
Bacon Wrapped Jalapeno Poppers

Ingredients
- 12-15 fresh jalapeño peppers
- 8 ounces cream cheese, softened
- 1/2 teaspoon garlic powder
- 1/2 teaspoon onion powder
- 1/4 teaspoon smoked paprika (optional)
- 12-15 slices bacon
Directions
- Preheat oven to 400 degrees Fahrenheit.
- Carefully wash and dry the jalapeño peppers. Wear gloves if you have sensitive skin. Cut each pepper in half lengthwise and use a small spoon to scrape out the seeds and membranes. Leave the stems attached or remove them, your preference.
- In a small bowl, mix the softened cream cheese with the garlic powder, onion powder, and smoked paprika if using.
- Spoon the cream cheese mixture into each jalapeño half.
- Cut the bacon slices in half crosswise. Wrap one half slice of bacon tightly around each filled jalapeño half. Start at the stem end and wrap towards the tip, ensuring the bacon is snug against the pepper and filling. This tight wrap is key to even crisping.
- Arrange the wrapped jalapeño poppers in a single layer in a cast iron skillet or on a baking sheet lined with parchment paper.
- Bake for 25-35 minutes, or until the jalapeños are tender and the bacon is beautifully browned and crispy. The baking process at this temperature allows the bacon fat to render slowly and crisp evenly around the pepper, ensuring that guaranteed crispy texture. For extra crispness, you can briefly broil for the last 1-2 minutes, watching constantly to prevent burning.
- Remove from oven and let cool slightly before serving.