
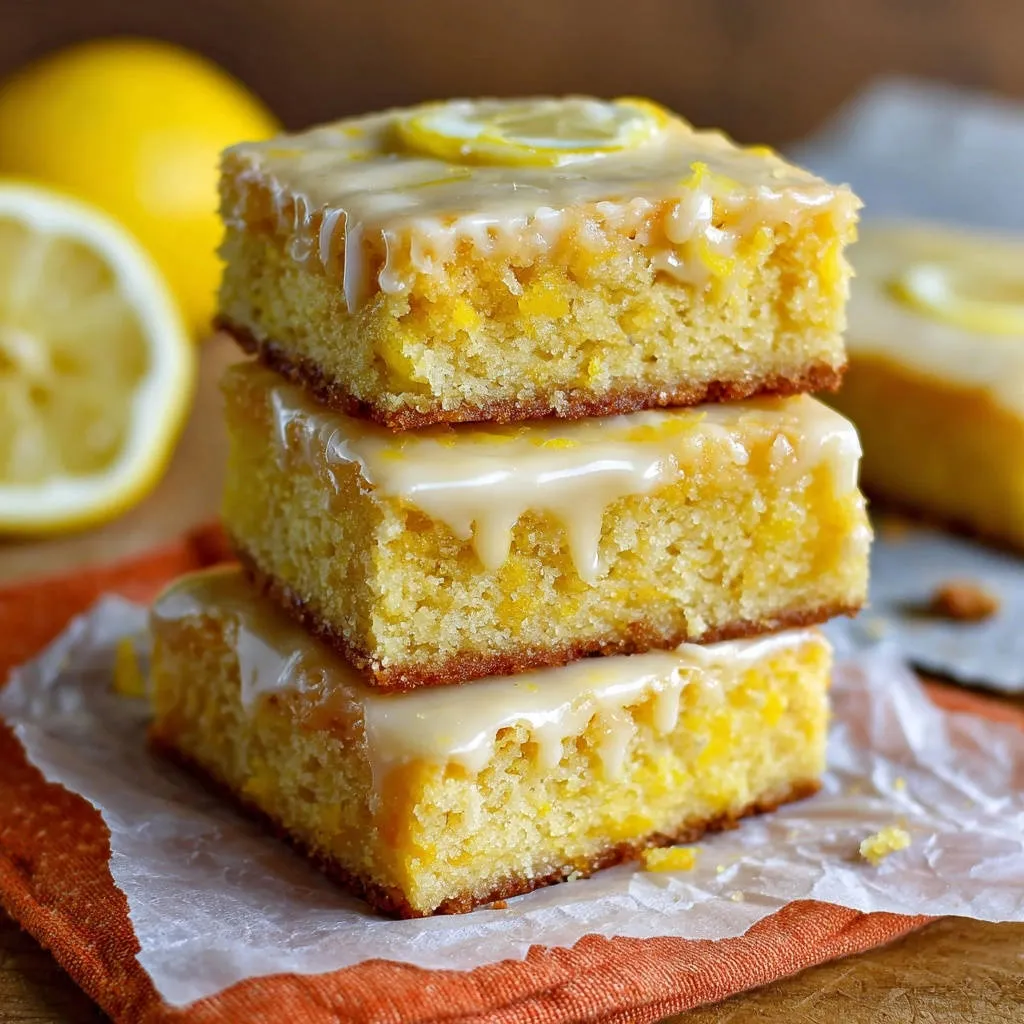
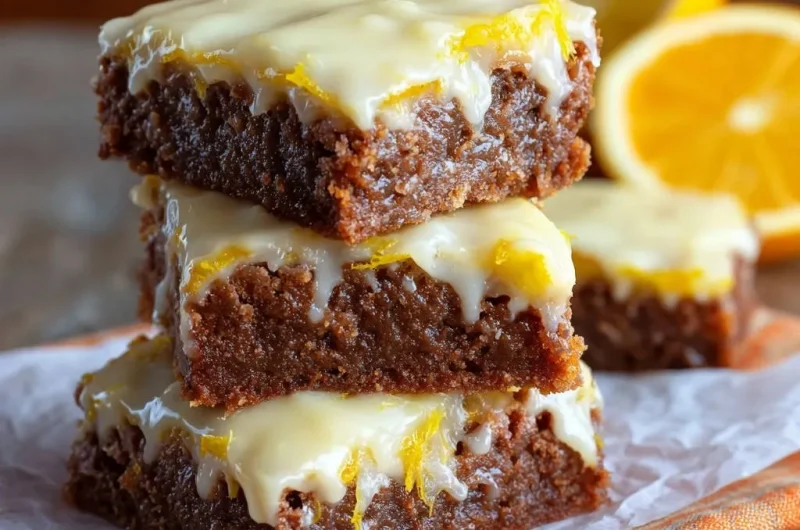
For years, I chased the dream of a chocolate bar that was truly fudgy, never dry or cakey, but always found something missing. Then, I discovered the magic of pairing that deep chocolate richness with a bright, zesty lemon glaze, and my kitchen changed forever. This recipe for Classic Chocolate Lemon Bars isn’t just easy; it consistently delivers a treat that’s perfectly gooey and bursting with a vibrant, unexpected flavor, making them absolutely irresistible every time.
Why These Classic Chocolate Lemon Bars Are Your New Go-To Dessert
The Secret to That Perfect Fudgy Texture (Never Dry or Cakey!)
Achieving a truly fudgy bar is a delicate balance, and this recipe nails it. We focus on precise ingredient ratios and a specific baking method to ensure your chocolate base remains moist and dense, not light and crumbly.
The result is a melt-in-your-mouth experience that chocolate lovers crave, setting these bars apart from standard brownie recipes.
Effortless Elegance: Simple Steps, Stunning Results
Don’t let the sophisticated flavor fool you; these bars are remarkably straightforward to make. With clear instructions and common kitchen tools, even a novice baker can achieve bakery-quality results.
They look impressive, taste incredible, and require minimal fuss, making them perfect for last-minute gatherings or a simple weekend treat.
A Bright & Bold Flavor Combination for Any Occasion
The marriage of rich, dark chocolate and a tangy lemon glaze creates an exhilarating taste experience. It’s a delightful contrast that keeps you coming back for more.
This unique flavor profile makes Classic Chocolate Lemon Bars versatile enough for potlucks, brunches, or an elevated everyday dessert.
Gather Your Essentials: The Building Blocks of Flavor
For the Irresistibly Fudgy Chocolate Base
Each ingredient plays a vital role in crafting the signature fudgy texture and intense chocolate flavor of these bars.
Unsalted Butter (Melted): Provides richness and essential moisture. Melting it helps achieve the dense, fudgy consistency by binding the other ingredients smoothly.
Granulated Sugar: Contributes sweetness and moisture, and also assists in creating that desirable chewy texture.
Large Eggs: Act as binders, adding structure and richness. They are crucial for the emulsification that leads to a truly fudgy bar rather than a cakey one.
Vanilla Extract: Enhances the chocolate flavor, adding warmth and depth to the base.
Unsweetened Cocoa Powder: Delivers deep chocolate flavor and color. Opt for a good quality cocoa powder for the best results, as it significantly impacts the final taste.
All-Purpose Flour: Used in a minimal amount, it provides just enough structure without making the bars tough or dry.
Salt: A small but mighty ingredient, salt balances the sweetness and intensifies the chocolate notes, making them pop.
Crafting the Vibrant Zesty Lemon Glaze
The glaze is the perfect bright counterpoint to the rich chocolate, and fresh ingredients are key here.
Powdered Sugar: Forms the smooth, quick-setting base of the glaze, dissolving easily for a silky finish.
Fresh Lemon Juice: Absolutely essential for that vibrant, tangy, and bright flavor. Bottled juice simply won’t offer the same refreshing zest.
Lemon Zest: The oils in fresh lemon zest provide intense aromatic punch and depth of flavor that juice alone cannot achieve.
Equip Your Kitchen: Essential Tools for Bar Perfection
Having the right tools ensures a smooth baking process and perfect results for your Classic Chocolate Lemon Bars.
8×8 Inch Baking Pan: The ideal size for thick, substantial bars. A metal pan generally conducts heat more evenly than glass for baking this type of bar.
Parchment Paper: Crucial for easy removal. Lining the pan with an overhang prevents sticking and makes lifting the whole batch out a breeze.
Large and Small Mixing Bowls: Essential for separating wet and dry ingredients and preparing the glaze efficiently.
Whisk: Perfect for combining ingredients thoroughly and incorporating air into the wet mixture for fudginess.
Wire Rack: Necessary for cooling the bars completely and evenly, preventing condensation and ensuring the glaze sets properly.
Your Step-by-Step Guide to Classic Chocolate Lemon Bars Perfection
- Prepare Your Pan:
Preheat the oven to 350°F (175°C) and line an 8×8 inch baking pan with parchment paper, ensuring an overhang on two sides.
This overhang is crucial for effortlessly lifting the finished bars from the pan once cooled, preventing any sticking or crumbling.
- Whisk Wet Ingredients for Fudginess:
In a large bowl, combine the melted butter and granulated sugar.
Whisk vigorously for approximately 1 minute until the mixture is well combined and slightly lighter in color. This essential step incorporates air and helps dissolve the sugar, contributing significantly to that signature fudgy texture and preventing a dense, cakey result.
- Incorporate Eggs and Vanilla:
Add the large eggs one at a time, whisking thoroughly after each addition until fully incorporated.
Stir in the vanilla extract, ensuring it’s evenly distributed for a balanced flavor that complements the chocolate beautifully.
- Combine Dry Ingredients:
In a separate, small bowl, whisk together the unsweetened cocoa powder, all-purpose flour, and salt.
This ensures all dry components are evenly distributed and eliminates lumps before mixing into the wet ingredients, promoting a uniform batter.
- Gentle Mixing is Key:
Gradually add the whisked dry ingredients to the wet mixture, mixing just until combined.
Exercise caution not to overmix; excessive mixing develops gluten, which is the primary culprit behind a tough, cakey texture instead of the desired rich, fudgy bar. Stop mixing as soon as no dry streaks remain.
- Bake to Perfection:
Pour the batter evenly into the prepared baking pan.
Bake for 25 to 30 minutes, or until the edges are set but the center still appears slightly underbaked and jiggly. A toothpick inserted near the center should emerge with moist crumbs, not liquid batter-this seemingly underbaked state is the secret to their incredible fudginess as they continue to set upon cooling.
- Cool Completely:
Remove the bars from the oven and allow them to cool completely in the pan on a wire rack before attempting to frost them.
Patience here is paramount for achieving clean, precise cuts and ensuring the lemon glaze sets properly without melting or running into the warm chocolate.
- Whip Up the Zesty Glaze:
While the bars cool, prepare the lemon glaze by whisking together the powdered sugar, fresh lemon juice, and 1 teaspoon of lemon zest in a medium bowl until smooth.
Add more lemon juice, a teaspoon at a time, if a thinner consistency is preferred; fresh lemon provides the brightest, most authentic flavor and aroma, far superior to bottled.
- Glaze and Garnish:
Once the bars are entirely cool, use the parchment paper overhang to lift them carefully from the pan.
Spread the lemon glaze evenly over the top, then sprinkle with additional lemon zest for an appealing garnish. Allow the glaze to set for about 15-20 minutes before cutting into squares and serving.
Unlock the Full Flavor: Expert Tips for Classic Chocolate Lemon Bars
Precision Matters for Fudginess: Accurate measurements, especially for flour and cocoa powder, are crucial. Too much dry ingredient can lead to a denser, more cake-like texture instead of the desired fudginess. Using a kitchen scale for dry ingredients offers the most precision.
Don’t Overbake! (The Golden Rule): Trust the visual cues described in the directions – a slightly jiggly center is correct. The bars will continue to firm up as they cool, ensuring that coveted melt-in-your-mouth texture. Overbaking is the quickest way to dry, cakey bars.
Fresh Lemon is Non-Negotiable: While convenient, bottled lemon juice simply cannot replicate the vibrant, aromatic punch and bright acidity that fresh lemon juice and zest bring to the glaze. It’s worth the squeeze and grate for truly exceptional flavor.
Cool Completely Before Glazing: Applying the lemon glaze to warm bars will cause it to melt and run off, rather than setting into a beautiful, smooth, and sliceable layer. Patience truly pays off here for both appearance and texture.
Parchment Paper is Your Best Friend: Don’t skip lining the pan with an overhang. It’s the easiest and most effective way to remove the entire batch of bars cleanly, making cutting and serving a breeze without any sticking.
Room Temperature Eggs: Using room temperature eggs helps them incorporate more smoothly and evenly into the batter. This creates a more uniform emulsion, contributing to a consistently tender and fudgy crumb in your finished bars.
Common Questions & Solutions: Troubleshooting Your Bars
Why Are My Chocolate Lemon Bars Cakey Instead of Fudgy?
The most common culprits for cakey bars are overmixing the batter or overbaking. Overmixing develops gluten, making the texture tough, while overbaking dries out the bars and makes them crumbly. Ensure you stop mixing as soon as dry ingredients are incorporated and pull them from the oven when the center is still slightly jiggly.
My Lemon Glaze is Too Thin or Too Thick. What Should I Do?
If your glaze is too thin, gradually whisk in more powdered sugar, a tablespoon at a time, until the desired consistency is reached. If it’s too thick, add more fresh lemon juice, a teaspoon at a time, until it’s spreadable but still opaque.
Why Did My Bars Crumble When I Tried to Cut Them?
This usually happens if the bars weren’t cooled completely before cutting. Warm bars are fragile and prone to crumbling or smudging the glaze. For the cleanest cuts, ensure they are thoroughly chilled, and use a sharp, warm knife (run under hot water and wipe dry) for each slice.
Enjoying and Storing Your Classic Chocolate Lemon Bars
Perfect Pairings and Serving Suggestions
These Classic Chocolate Lemon Bars are delightful on their own, but they also shine with a few complementary additions. Serve them with a hot cup of coffee, a refreshing glass of iced tea, or even a scoop of vanilla bean ice cream for an indulgent treat.
Fresh berries like raspberries or blueberries also provide a lovely color contrast and a burst of complementary fruitiness. For another incredible dessert, you might also enjoy my recipe for decadent chocolate brownies.
Storing for Optimal Freshness
To maintain their optimal freshness and texture, store Classic Chocolate Lemon Bars in an airtight container at room temperature for up to 3 days. For longer storage, you can refrigerate them for up to a week.
If refrigerated, allow them to come closer to room temperature for about 15-20 minutes before serving to fully appreciate their fudgy texture.
Can I Make These Classic Chocolate Lemon Bars Ahead of Time?
Absolutely! These bars are an excellent make-ahead dessert. You can bake the chocolate base up to 2-3 days in advance and store it, uncovered, at room temperature once fully cooled.
Prepare and apply the lemon glaze shortly before serving for the freshest appearance and best set. This strategy keeps the glaze vibrant and prevents it from softening too much over time. For more bright and zesty dessert ideas, don’t miss our ultimate lemon loaf cake recipe!
Your Questions Answered: Classic Chocolate Lemon Bars FAQs
Can I substitute melted chocolate for cocoa powder in the bars?
While melted chocolate provides richness, it has a different fat and sugar content than cocoa powder, which can significantly alter the texture of these bars. Cocoa powder is key to achieving that specific fudgy, dense, and slightly chewy consistency. For this recipe’s intended result, stick to unsweetened cocoa powder.
Is it possible to make these Classic Chocolate Lemon Bars gluten-free?
Yes, you can often substitute a 1:1 gluten-free all-purpose flour blend for the regular flour. Be aware that texture might vary slightly; some gluten-free blends can result in a slightly drier or more crumbly bar. Always follow the specific instructions on your chosen GF flour blend.
How long do these bars last, and where should I store them?
These bars will last about 2-3 days at room temperature in an airtight container. If you want to extend their freshness, they can be stored in the refrigerator for up to a week. The lemon glaze might become slightly tacky in humid environments, so consider refrigeration if that’s a concern.
Can I freeze Classic Chocolate Lemon Bars for later enjoyment?
Yes, these bars freeze beautifully! For best results, freeze them without the glaze. Once the chocolate base is completely cool, wrap the entire slab tightly in plastic wrap, then in foil. They can be frozen for up to 2-3 months. Thaw in the refrigerator overnight, then prepare and apply the fresh lemon glaze just before serving.
Ready to Impress? Share Your Classic Chocolate Lemon Bars Masterpiece!
Now that you have all the insider tips and tricks, you’re ready to create truly show-stopping Classic Chocolate Lemon Bars. Their unique blend of rich chocolate and bright lemon is guaranteed to earn rave reviews and requests for the recipe.
Don’t just bake them; savor the process and the incredible results. I’d love to hear how your bars turn out, so please share your experiences and any tips you discover along the way!
Classic Chocolate Lemon Bars
Course: DessertCuisine: American CuisineDifficulty: easy4
16 bars20
minutes30
minutesAmerican Cuisine
Ingredients
For the Bars:
1/2 cup (1 stick) unsalted butter, melted
1 cup granulated sugar
2 large eggs
1 teaspoon vanilla extract
1/2 cup unsweetened cocoa powder
1/2 cup all-purpose flour
1/4 teaspoon salt
For the Lemon Glaze:
1 1/2 cups powdered sugar
2 to 3 tablespoons fresh lemon juice
1 teaspoon lemon zest, plus more for garnish
Directions
- Preheat oven to 350 degrees F (175 degrees C). Line an 8×8 inch baking pan with parchment paper, leaving an overhang on two sides to easily lift the bars out later. Lightly grease the parchment paper.
- In a large bowl, combine the melted butter and granulated sugar. Whisk vigorously for about 1 minute until the mixture is well combined and slightly lighter in color. This helps create that signature fudgy texture.
- Add the eggs one at a time, whisking well after each addition until fully incorporated. Stir in the vanilla extract.
- In a separate small bowl, whisk together the cocoa powder, all-purpose flour, and salt.
- Gradually add the dry ingredients to the wet ingredients, mixing just until combined. Be careful not to overmix; overmixing develops gluten, which leads to a cakey, tough texture instead of fudgy.
- Pour the batter into the prepared baking pan and spread evenly.
- Bake for 25 to 30 minutes, or until the edges are set but the center still looks slightly underbaked and jiggly. A toothpick inserted near the center should come out with moist crumbs, not liquid batter. This is the secret to their fudgy texture; they will continue to set as they cool.
- Remove from the oven and let the bars cool completely in the pan on a wire rack before frosting. This is important for clean cuts and for the frosting to set properly.
- While the bars cool, prepare the lemon glaze. In a medium bowl, whisk together the powdered sugar, lemon juice, and 1 teaspoon of lemon zest until smooth. Add more lemon juice, a teaspoon at a time, if a thinner consistency is desired.
- Once the bars are completely cool, lift them from the pan using the parchment paper overhang. Spread the lemon glaze evenly over the top.
- Sprinkle with additional lemon zest for garnish. Let the glaze set for about 15-20 minutes before cutting into squares and serving.
Notes
- Ensure bars are completely cooled before glazing for the best texture and clean cuts. The slightly underbaked center is key to fudginess.