
Oh, the dream of biting into a perfectly crispy fried sushi roll, just like you get at your favorite Japanese restaurant! You know, the kind where you hear that satisfying crunch before you even taste the delicious filling inside? If you’ve ever tried to recreate that magic at home only to end up with a sad, soggy disappointment, you are definitely not alone. For years, I struggled to achieve that elusive golden crispness. But after much experimentation (and a few less-than-perfect rolls!), I finally cracked the code and discovered the simple secret to making truly Crispy Fried Sushi Rolls right in my own kitchen.
This recipe isn’t just about dipping sushi in oil; it’s about a specific technique that guarantees a crunchy exterior while keeping the inside perfectly intact and flavorful. Forget the frustration of mushy rice and fallen-apart rolls. Get ready to impress yourself and your loved ones with homemade fried sushi that’s crispy on the outside, tender on the inside, and utterly addictive. Let’s dive in!
Why You’ll Fall in Love with These Crispy Fried Sushi Rolls
Besides finally achieving that restaurant-quality crunch, there are so many reasons why this recipe will become your new favorite:
- No More Soggy Struggles: The specific method outlined here tackles the #1 problem of homemade fried sushi head-on, ensuring glorious crispiness every time.
- Surprisingly Simple: Once you understand the key steps, the process is straightforward and totally achievable for home cooks.
- Customizable Fillings: While the frying technique is crucial, the inside of the roll is entirely up to you! Use your favorite cooked fillings.
- Perfect Party Appetizer or Fun Dinner: These make for a fantastic starter or a unique main course for a fun night in.
- Satisfying Texture Contrast: The incredible crunch of the coating paired with the soft rice and flavorful filling is pure culinary bliss.
Gathering Your Ingredients for Crispy Fried Sushi Rolls
Making delicious fried sushi starts with gathering the right components and understanding why each one plays a role. Think of it in three main stages: building the roll, creating the perfect crispy coating, and finishing it off with flavor.
For the base of our rolls, you’ll need the standard sushi foundation:
- Cooked Sushi Rice: Properly seasoned and cooled sushi rice is essential. Its sticky texture helps the roll hold together, which is extra important before it takes a dip in hot oil. If you’re new to making sushi rice, mastering it is a key step for all sushi adventures, whether fried or traditional. You can learn more about making the perfect base rice by following a guide on preparing sushi rice properly.
- Nori Seaweed Sheets: These edible seaweed wrappers are the traditional vessel for sushi rolls. Choose good quality, fresh nori for the best flavor and flexibility when rolling.
Next, let’s talk about the delicious center. Remember, for frying, you MUST use cooked fillings.
- Your Favorite Cooked Sushi Roll Filling: This is where you get creative! Think spicy imitation crab mixed with a little mayonnaise (a classic for fried rolls), cooked shrimp (our recipe for perfectly grilled shrimp could be a great inspiration for a tasty filling!), cooked chicken, or even fully cooked and cooled vegetables mixed with a binder like cream cheese or mayo.
- Thinly Sliced Cucumber or Avocado (Optional): These add freshness, color, and a lovely textural contrast inside the roll. If you have leftover avocado or cucumber, you could even use them in an elevated avocado salad!
Now for the magic that makes them crispy:
- 1/2 cup All-Purpose Flour: This is the first layer of our breading station. It helps absorb any surface moisture and gives the egg something to cling to.
- 2 large Eggs, beaten: The egg acts as the binder, helping the Panko stick firmly to the roll.
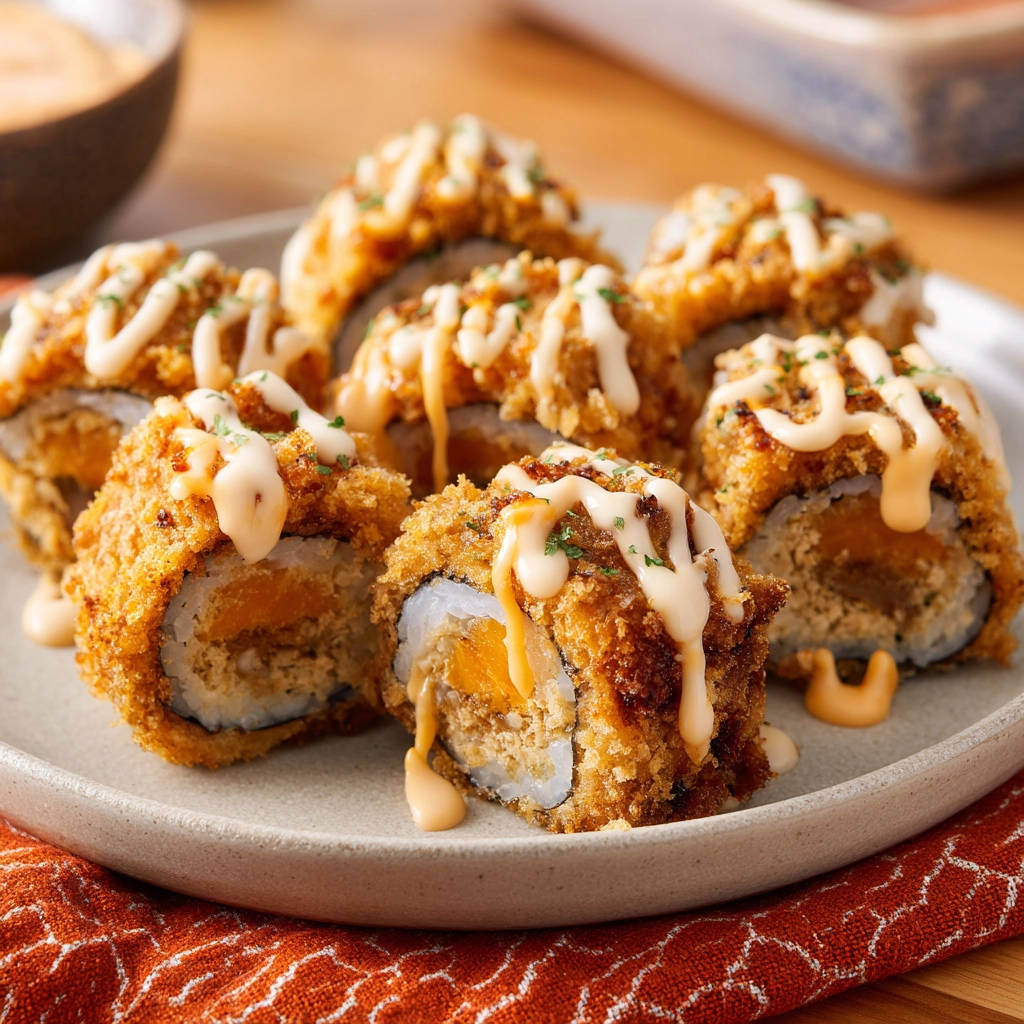
- 1 cup Panko Breadcrumbs: This is the real secret weapon for crunch! Panko is a Japanese-style breadcrumb that is larger, lighter, and flakier than standard breadcrumbs. It absorbs less oil and crisps up beautifully, giving you that unmistakable shatteringly crisp exterior.
And finally, the essentials for frying and serving:
- 2-3 cups Vegetable Oil, for frying: Use an oil with a high smoke point, like vegetable, canola, or peanut oil. You need enough to submerge the rolls halfway or completely, depending on your pot.
- Eel Sauce, for drizzling: This sweet and savory sauce is a classic pairing for fried rolls.
- Spicy Mayonnaise, for drizzling: A simple mix of mayonnaise and sriracha or your favorite hot sauce adds a creamy, spicy kick that perfectly complements the richness of the fried roll.
Crafting Your Crispy Fried Sushi Rolls: Step-by-Step
Alright, ingredients are ready! Let’s walk through the process of turning those humble sushi rolls into golden, crispy perfection. Don’t skip any steps, especially the chilling and the oil temperature – they are key!
- Prepare Your Sushi Rolls: Start by laying a sheet of nori on your bamboo sushi mat. If you don’t have a mat, a clean, flat surface will work, but the mat makes rolling much easier. Spread a thin, even layer of your prepared sushi rice over the nori. Be sure to leave about a half-inch border of nori exposed at the top edge – this will help you seal the roll later. Next, place your chosen cooked filling and any optional veggies horizontally across the bottom third of the rice. Think of it as building a little flavor log. If you’re looking for ideas on making base sushi rolls, check out our guide on how to make homemade sushi rolls.
- Roll Tightly: This is a crucial step for any sushi roll, and doubly so for fried ones. Using the bamboo mat (or your hands if not using a mat), lift the edge closest to you and roll it up and over the filling, pressing down gently but firmly as you go. Continue rolling away from you, using the mat to help shape and tighten the roll. Once you reach the far edge, use a little water on your finger to moisten the exposed nori border. This acts as glue to seal the roll securely. Repeat this process for all your desired rolls.
- Chill the Rolls: Resist the urge to fry them immediately! This step is vital. Wrap each rolled sushi tightly in plastic wrap. The plastic wrap helps maintain the shape and prevents them from drying out. Place the wrapped rolls in the refrigerator for at least 15-20 minutes. Chilling helps the rice and filling firm up significantly, making the rolls much easier to handle during the breading and frying process. Trying to bread and fry warm, soft rolls often leads to disaster!
- Set Up Your Breading Station: While the rolls are chilling, get your breading station ready. You’ll need three shallow dishes or plates. Pour the all-purpose flour into the first dish. In the second dish, pour your beaten eggs. In the third dish, spread out the Panko breadcrumbs. Make sure you have enough Panko to coat the rolls generously – you can always add more if needed. Having your station ready in a clear assembly line makes the coating process smooth and less messy.
- Coat the Rolls: Remove the chilled rolls from the plastic wrap. Take one roll at a time and first dredge it thoroughly in the flour, ensuring it’s completely coated. Gently shake off any excess flour – you want a thin, even layer. Next, carefully dip the floured roll into the beaten egg, turning to coat all sides. Let any excess egg drip back into the dish. Finally, roll the egg-dipped roll generously in the Panko breadcrumbs. Press the Panko gently onto the roll with your hands to ensure it adheres well and creates a thick, even coating. A good layer of Panko is key to maximum crispiness!
- Heat the Oil Properly (The Crispy Key!): This is arguably the most important step for achieving that perfect crunch. In a deep skillet or pot (like a Dutch oven), pour in your vegetable oil to a depth of 2-3 inches – enough to submerge the rolls halfway or more. Heat the oil over medium-high heat until it reaches the ideal frying temperature of 350-375 degrees Fahrenheit (175-190 Celsius). This temperature range is critical; too cool, and the rolls will soak up oil and become soggy; too hot, and the Panko will burn before the inside is properly heated through. If you don’t have a thermometer, you can test the oil by dropping a pinch of Panko breadcrumbs into it. It should immediately sizzle vigorously and turn golden brown within about 30 seconds. Getting the oil temperature right is essential for crispy results, just like it is when making extra crispy french fries!
- Fry the Rolls: Once the oil is hot and ready, carefully add 1 to 2 coated rolls to the oil using tongs. Do NOT overcrowd the pot. Overcrowding lowers the oil temperature, leading to soggy results. Give each roll space to fry evenly. Fry the rolls for 2-4 minutes, turning them occasionally with tongs, until they are a beautiful golden brown and look visibly crispy on all sides. The exact time will depend on your oil temperature and the size of your rolls.
- Drain: As the rolls turn golden brown and crispy, remove them from the hot oil using tongs. Transfer them to a plate generously lined with paper towels. The paper towels will help absorb any excess oil, ensuring the coating stays crispy and isn’t greasy.
- Slice and Serve: Allow the fried rolls to cool slightly for just a minute or two – they’ll be very hot inside! Using a very sharp knife that you dip in water between slices (this prevents the rice from sticking and tearing), slice each roll into 6-8 pieces. Arrange the sliced crispy fried sushi rolls on a serving plate.
- Drizzle: The final touch! Just before serving, generously drizzle the tops of the rolls with eel sauce and spicy mayonnaise. The combination of the sweet, savory, and spicy sauces adds a burst of flavor that elevates the crispy rolls.
Tips for Perfect Crispy Fried Sushi Rolls Every Time
Achieving that coveted crunch is easy once you know a few tricks. Here are some pro tips to ensure your fried sushi is always a success:
- Oil Temperature is King: We mentioned it in the steps, but it bears repeating. Use a thermometer if you have one! Maintaining the oil between 350-375°F is the most important factor for crispiness without greasiness.
- Don’t Rush the Chill: That 15-20 minutes (or even a little longer) in the fridge makes a huge difference in the rolls holding their shape during the frying process.
- Go Generous with Panko: Don’t be shy! A thick, even coating of Panko is what provides that maximum crunch. Gently press the breadcrumbs onto the roll to help them adhere.
- Avoid Overcrowding: Fry only a couple of rolls at a time. This keeps the oil temperature stable and allows the rolls to fry evenly on all sides.
- Use a Sharp, Wet Knife for Slicing: This is essential for clean cuts that don’t smash your beautiful crispy rolls. Wetting the blade between each slice prevents the rice and Panko from sticking.
- Cooked Fillings ONLY: Because the frying time is so short (just enough to crisp the outside), it’s crucial that all your fillings are already cooked and safe to eat. Raw fish should not be used in this recipe.
- Drain, Drain, Drain: Always drain the fried rolls on paper towels to wick away excess oil.
- Serve Immediately: Fried food is always best served fresh when it’s at its maximum crispiness!
What to Serve With Your Crispy Fried Sushi Rolls
These delicious rolls can be a meal on their own, but they also pair wonderfully with a few complementary sides. Consider serving them with a simple ginger salad, a refreshing cucumber salad, or some edamame. A side of pickled ginger and wasabi is, of course, a must for that authentic sushi experience. You could even whip up some perfect Mexican rice for a fusion twist!
Your Crispy Fried Sushi Rolls Questions Answered (FAQ)
Can I use raw fish in this recipe?
No, it is not recommended to use raw fish in these crispy fried sushi rolls. The frying time is very short, only enough to cook the exterior coating. This is not sufficient to cook raw fish to a safe internal temperature. Stick to cooked fillings like imitation crab, cooked shrimp, or cooked fish.
What’s the best oil for frying sushi rolls?
Use a neutral-flavored oil with a high smoke point. Vegetable oil, canola oil, peanut oil, or even grapeseed oil all work well. You need an oil that can get hot enough without breaking down and imparting off-flavors.
Can I bake these instead of frying?
While you could bake them, you won’t achieve the same level of all-around crispiness and golden color as you do with frying. Baking will result in a different texture. If you want crispy without deep frying, you could try an air fryer, though results may vary and it’s still not quite the same as submerged frying.
How do I store and reheat leftover fried sushi rolls?
Leftover fried sushi rolls are tricky because they can lose their crispiness. Store cooled leftovers in an airtight container in the refrigerator for up to 1-2 days. To reheat, the best method for regaining some crispiness is in an air fryer or oven at around 350°F (175°C) for a few minutes until heated through. Microwaving will make them soft and potentially soggy.
Can I make the rolls ahead of time?
You can prepare and roll the sushi up to step 3 (chilling them). Keep them tightly wrapped in the refrigerator for up to a few hours. However, it is best to coat them in the breading and fry them just before you plan to serve for optimal crispiness.
My Panko isn’t sticking! What am I doing wrong?
Make sure you’ve followed the breading steps in order: flour, then egg, then Panko. The flour helps the egg adhere, and the egg helps the Panko adhere. Also, ensure you’re pressing the Panko onto the roll gently to help it stick. Make sure the rolls were properly chilled, as warm, soft rolls are harder to coat evenly.
Enjoy Your Homemade Crispy Fried Sushi Rolls!
There you have it! The secret to restaurant-quality crispy fried sushi rolls is now yours. No more soggy disappointments, just glorious crunch and delicious flavor in every bite. Gather your ingredients, follow these steps, and get ready to enjoy a seriously satisfying culinary experience.
Give this recipe a try and let me know what you think! Did you conquer the crunch? What delicious fillings did you use? Leave a comment below and share your fried sushi adventures!
Crispy Fried Sushi Rolls

Ingredients
- Cooked sushi rice
- Nori seaweed sheets
- Your favorite cooked sushi roll filling (like spicy imitation crab or cooked shrimp, mixed with a little mayo)
- Thinly sliced cucumber or avocado (optional)
- 1/2 cup all-purpose flour
- 2 large eggs, beaten
- 1 cup Panko breadcrumbs
- 2-3 cups vegetable oil, for frying
- Eel sauce, for drizzling
- Spicy mayonnaise, for drizzling
Directions
- Prepare your sushi rolls: Lay a sheet of nori on a bamboo mat (or a clean surface). Spread a thin, even layer of sushi rice over the nori, leaving a small border at the top. Add your filling and sliced vegetables horizontally across the bottom third of the rice.
- Roll tightly: Using the mat, roll the sushi up firmly away from you. Wet the top edge of the nori to seal the roll. Repeat for desired number of rolls.
- Chill the rolls: For easier handling and frying, wrap the rolls tightly in plastic wrap and refrigerate for at least 15-20 minutes. This helps them firm up.
- Set up breading station: Place the flour in one shallow dish, the beaten eggs in a second, and the Panko breadcrumbs in a third.
- Coat the rolls: Remove rolls from plastic wrap. Dredge each roll first in the flour, shaking off excess. Then dip in the beaten egg, allowing excess to drip off. Finally, roll generously in the Panko breadcrumbs, pressing gently to ensure even coating.
- Heat the oil properly (The Crispy Key!): In a deep skillet or pot, heat the vegetable oil over medium-high heat until it reaches 350-375 degrees Fahrenheit (175-190 Celsius). This temperature is crucial for achieving a crispy exterior without making the inside mushy or burning the outside too quickly. If you don’t have a thermometer, you can test by dropping a pinch of Panko; it should sizzle and turn golden in about 30 seconds.
- Fry the rolls: Carefully add 1-2 rolls at a time to the hot oil, depending on the size of your pot (do not overcrowd). Fry for 2-4 minutes, turning occasionally with tongs, until the rolls are golden brown and crispy on all sides.
- Drain: Remove the fried rolls from the oil using tongs and place them on a plate lined with paper towels to drain excess oil.
- Slice and serve: Once slightly cooled, slice each roll into 6-8 pieces using a sharp, wet knife. Arrange on a plate.
- Drizzle: Generously drizzle with eel sauce and spicy mayonnaise just before serving.