Oh, brownies! Is there anything better than a warm, gooey, intensely chocolatey square of pure happiness? For years, I chased that perfect, fudgy texture, often ending up with treats that were, well, a little too dry and cake-like for my liking. It felt like a quest! But then I discovered a simple secret – a technique that transformed my homemade brownies from ‘just okay’ to ‘absolutely decadent’ every single time.
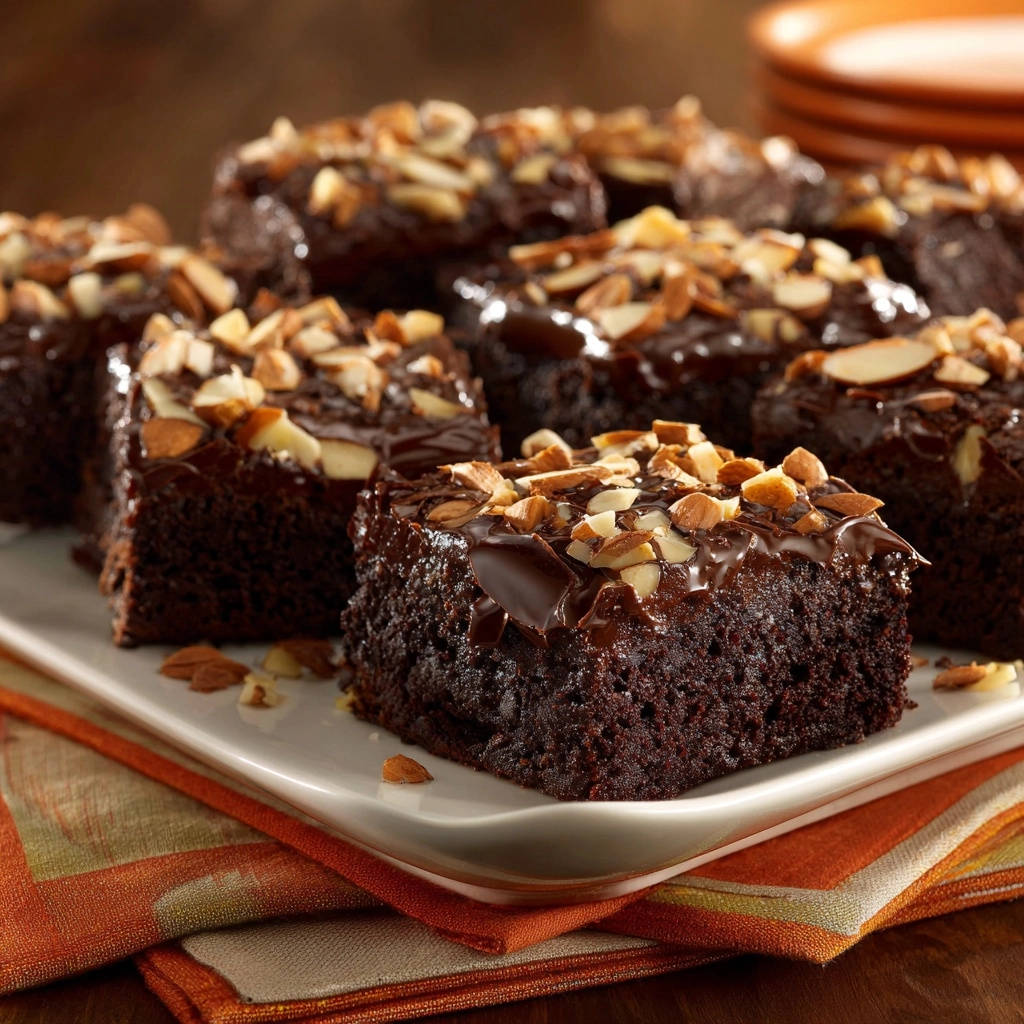
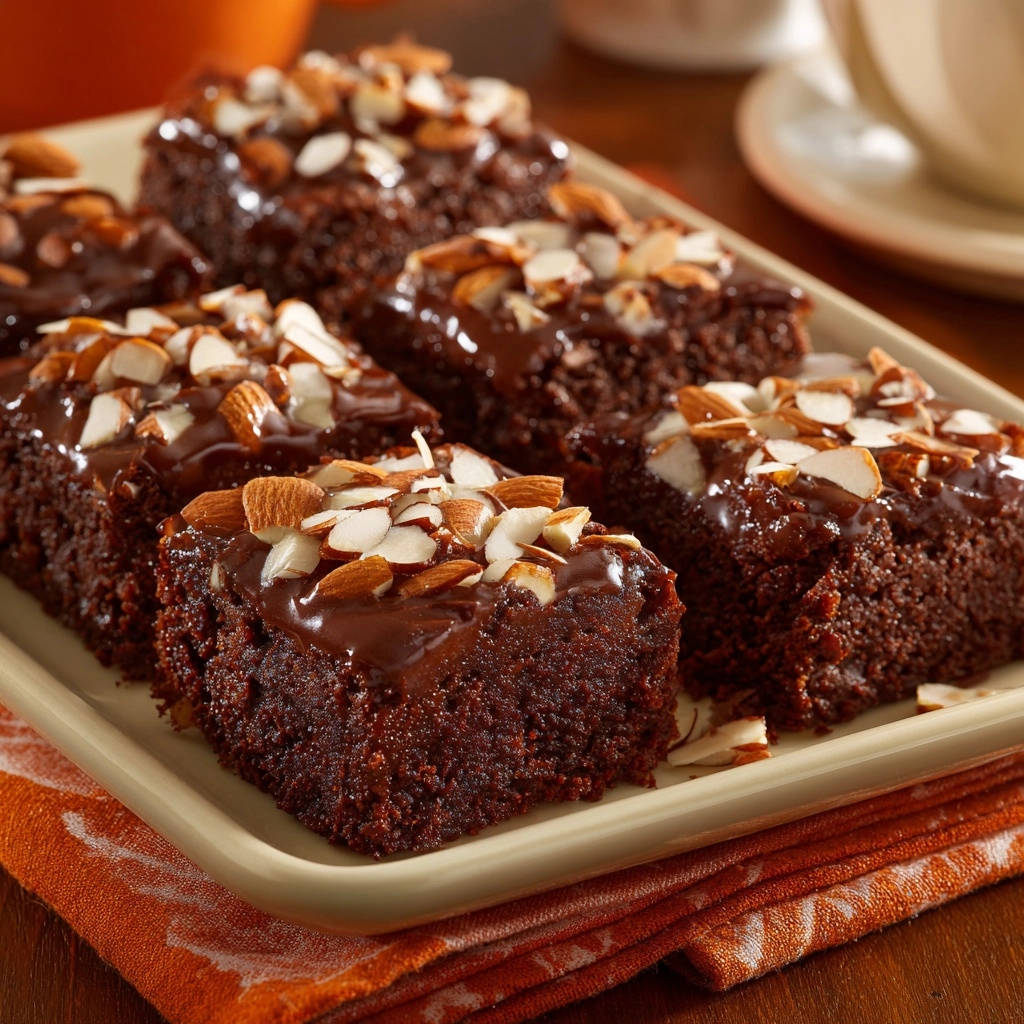
These Decadent Chocolate Brownies are the culmination of that quest. They aren’t cakey; they are dense, moist, and packed with rich chocolate flavor, complete with delightful pockets of melted chocolate chips and a delicate almond crunch on top. If you’ve ever been disappointed by a dry brownie, get ready for a game changer. This recipe delivers on the promise of truly fudgy perfection.
Why You’ll Love These Fudgy Chocolate Brownies
What makes this recipe stand out from the crowd? It’s all about achieving that coveted texture and deep flavor profile.
- Unapologetically Fudgy: The primary goal here is fudginess, and this recipe nails it. No dry crumbs in sight!
- Intense Chocolate Flavor: We use both cocoa powder and chocolate chips for layers of rich, deep chocolate taste.
- Simple Yet Effective Technique: The secret isn’t complicated, but it’s absolutely crucial for the perfect result.
- Beautifully Topped: A simple chocolate glaze and chopped almonds add extra decadence and a lovely textural contrast.
- Beginner-Friendly: Even if you’re new to baking, the steps are straightforward and easy to follow.
Gathering Your Ingredients for Decadent Brownies
Creating the ultimate fudgy brownie starts with understanding the role each ingredient plays. We’re building a rich foundation here, focusing on fats and sugars to promote moisture and density, rather than relying heavily on flour for structure.
Here’s a breakdown of what you’ll need and why:
- Unsalted Butter: We start by melting the butter. This step is essential for fudgy brownies. Unlike creaming butter and sugar (which incorporates air and leads to a cakey texture), melted butter creates a denser, chewier result. Using unsalted butter gives you control over the total salt content. You’ll need 1/2 cup for the brownie base and another 1 tablespoon for the rich chocolate topping.
- Granulated Sugar & Packed Light Brown Sugar: The combination of two sugars is key. Granulated sugar provides sweetness and helps with structure, while light brown sugar adds moisture due to its molasses content. It also brings a subtle caramel note that complements the chocolate beautifully. We use a full cup of granulated and a packed 1/2 cup of brown sugar in the batter for sweetness and texture.
- Large Eggs: Eggs bind the ingredients together and contribute to the richness and structure. Using two large eggs adds moisture and helps create that desirable dense crumb.
- Vanilla Extract: A teaspoon of good quality vanilla extract doesn’t just add its own flavor; it enhances and rounds out the chocolate notes, making them taste even richer.
- Unsweetened Cocoa Powder: This is where a lot of the chocolate flavor comes from. Use a good quality unsweetened cocoa powder for the best results. We use 1/2 cup in the batter.
- All Purpose Flour: We intentionally use a relatively small amount of flour (1/2 cup) compared to the other ingredients. This lower flour ratio helps ensure the brownies stay fudgy and don’t become dry or cake-like. It provides just enough structure to hold everything together.
- Baking Powder: Just a tiny amount (1/4 teaspoon) is used. We want a little bit of lift, but not so much that they become fluffy like cake. This small amount helps prevent them from being too dense or tough.
- Salt: A pinch of salt (1/4 teaspoon) is vital in chocolate baking. It balances the sweetness and intensifies the chocolate flavor, making it pop.
- Semi-Sweet Chocolate Chips or Chopped Chocolate: For those delightful gooey pockets of chocolate throughout the brownie! You’ll need 1 cup for the batter and another 1/2 cup for the luxurious glaze on top. Using high-quality chocolate chips or finely chopped semi-sweet chocolate will make a noticeable difference in taste and texture.
- Chopped Almonds: These are specifically for the topping, adding a wonderful crunch and nutty contrast to the rich, smooth chocolate glaze. A quarter cup is perfect for sprinkling.
Having all your ingredients measured and ready before you start (this is often called “mise en place” in professional kitchens!) will make the baking process much smoother and more enjoyable.
Crafting Your Fudgy Brownies: Step-by-Step
Now for the fun part – bringing these simple ingredients together to create magic! Remember, the key to truly fudgy brownies lies in careful mixing and watchful baking. Let’s walk through each step, focusing on the “why” behind the actions.
Prepare Your Baking Vessel: Start by preheating your oven to 350 degrees Fahrenheit (175 degrees Celsius). Proper oven temperature is crucial for baking success. Next, prepare your 8×8 inch baking pan. You can grease and flour it, but for the easiest cleanup and removal, I highly recommend lining it with parchment paper. Leave some overhang on the sides; this creates “handles” that you can use to lift the cooled brownies right out of the pan. This simple step makes slicing so much easier!
Melt the Base: Grab a medium saucepan and place it over low heat. Melt the 1/2 cup of unsalted butter gently. Low heat prevents the butter from burning or browning too quickly. Once melted, remove the saucepan from the heat immediately. Stir in the granulated sugar and packed light brown sugar. Stir until they are well combined with the melted butter. The mixture will look glossy and grainy from the sugar, and that’s exactly what you want. This step dissolves some of the sugar and lays the foundation for our dense, fudgy texture.
Cool Down Time: Patience is a virtue, especially here. Let the warm butter and sugar mixture cool slightly. About 5 minutes should do the trick. This cooling period is important because you don’t want to add the eggs while the mixture is too hot; doing so could scramble them!
Introduce the Wet Elements: Now it’s time for the eggs and vanilla. Whisk in the two large eggs, adding them one at a time. Whisk just until each egg is just combined with the mixture before adding the next. Over-whisking at this stage can incorporate too much air, which, as we’ve learned, leads to cakey brownies! Stir in the teaspoon of vanilla extract until fragrant and mixed through.
Combine the Dry Forces: In a separate, medium-sized bowl, take a whisk and combine your dry ingredients: the 1/2 cup unsweetened cocoa powder, 1/2 cup all purpose flour, 1/4 teaspoon baking powder, and 1/4 teaspoon salt. Give them a good whisk to ensure they are evenly distributed. This prevents pockets of unmixed leavening or salt in your finished brownies.
Gentle Marriage of Wet and Dry: This step is arguably THE most important secret to preventing dry, cakey brownies. Add the dry ingredients to the wet ingredients in the saucepan (or the bowl you transferred the wet mix to). Switch from a whisk to a spatula or wooden spoon. Stir GENTLY, using folding motions or slow stirs, just until no dry streaks of flour are visible. The moment the flour disappears into the wet mixture, STOP STIRRING. This minimal mixing prevents the development of gluten, which would make your brownies tough and cake-like. Resist the urge to keep mixing “just to be sure.” Trust me, stop when those streaks are gone.
Fold in the Chocolate Bliss: Now, gently fold in the 1 cup of semi-sweet chocolate chips or chopped chocolate. You want them distributed throughout the batter so you get those delightful melted pools of chocolate in every bite. A few gentle folds with your spatula or spoon will suffice.
Into the Pan: Pour the glorious, thick batter into your prepared 8×8 inch baking pan. Use your spatula to spread it evenly into the corners and level the top. Don’t worry if it seems very dense – that’s a good sign for fudginess!
Bake to Fudgy Perfection: Transfer the pan to your preheated oven. Bake for 25 to 30 minutes. The baking time is critical and depends on your oven. Start checking around the 25-minute mark. The brownies are done when a toothpick inserted into the center comes out with moist crumbs attached, not completely clean. If the toothpick comes out wet with batter, they need more time. If it comes out perfectly clean, you’ve gone too far! Slightly underbaking is the ULTIMATE secret to ensuring a moist, gooey, fudgy center. Pull them out when the edges look set and slightly pulled away from the pan, but the center still looks a tiny bit soft and moist. This residual heat will continue to cook them slightly as they cool.
Whip up the Glaze: While the brownies are still warm from the oven, prepare the simple chocolate glaze. In a small, microwave-safe bowl, combine the remaining 1/2 cup of semi-sweet chocolate chips (or chopped chocolate) and 1 tablespoon of unsalted butter. Microwave on high in 30-second intervals, stirring well after each interval, until the mixture is completely smooth and glossy. This usually takes about 1 to 2 minutes total, depending on your microwave power.
Top with Glossy Goodness: As soon as the glaze is smooth, pour it evenly over the warm brownies in the pan. Use a small spatula or the back of a spoon to gently spread the glaze across the entire surface.
Add the Almond Crunch: While the glaze is still warm and soft, sprinkle the 1/4 cup of chopped almonds evenly over the top. The nuts will settle into the glaze as it cools, creating a lovely visual and textural contrast.
The Hardest Step: Cooling: I know, I know. You want to dive in immediately! But allowing the brownies to cool completely in the pan is absolutely essential. As they cool, the structure sets, the flavors meld, and the texture becomes perfectly fudgy and dense. Trying to cut warm brownies will result in a crumbly mess. Patience here will be rewarded with clean-cut squares of pure deliciousness. Once completely cool (this can take a couple of hours), use the parchment paper overhang to lift the entire slab out of the pan onto a cutting board. Use a sharp knife to slice them into squares.
Following these steps, particularly the gentle mixing and slight underbaking, will ensure you achieve that perfect, desirable fudgy texture that we’re after!
Tips for Perfect Decadent Chocolate Brownies Every Time
Even with a great recipe, a few extra tips can elevate your baking game and guarantee success.
Don’t Overmix the Batter: I’ve said it before, but it bears repeating. Overmixing develops gluten, leading to tough, cakey brownies. Mix just until the dry ingredients disappear. A few small lumps of flour are far better than an overmixed, tough batter.
Err on the Side of Underbaking: When in doubt, pull them out slightly early. Brownies continue to cook from residual heat even after they are removed from the oven. That moist crumb on the toothpick is your best friend for ensuring fudginess. An extra minute or two in the oven can turn fudgy into cakey very quickly.
Use Quality Chocolate: The better the quality of your cocoa powder and chocolate chips (or chopped chocolate), the richer and more intense the chocolate flavor of your brownies will be. It really does make a difference!
Measure Flour Correctly: Spoon the flour into your measuring cup and level it off with a straight edge (like the back of a knife). Scooping directly from the bag can compact the flour, leading to too much flour and a dry result. This is a good practice for many baking recipes, like when making Soft Sandwich Bread or even something delicate like Fluffy Vanilla Cupcakes.
Patience with Cooling is Paramount: I know the aroma filling your kitchen is almost unbearable, but resist cutting into them until they are fully cooled. This allows the structure to set and makes them easy to cut into neat squares. Pop them in the fridge for an hour once they’ve cooled at room temperature for even cleaner cuts.
Personalize Your Topping: While the chocolate glaze and almonds are fantastic, feel free to experiment! You could skip the almonds, add sprinkles, or even swirl a bit of peanut butter into the warm glaze before it sets. Looking for other ways to incorporate peanut butter and chocolate? Check out our recipe for Chocolate Peanut Butter Layer Cake!
Storage: Store cooled brownies in an airtight container at room temperature for up to 3-4 days. For longer storage, you can freeze individual squares (once completely cooled) wrapped tightly in plastic wrap, then placed in a freezer-safe bag or container for up to 2-3 months.
What to Serve With Your Decadent Brownies
These brownies are absolute stars on their own, but a little accompaniment can make them an unforgettable dessert experience.
A classic pairing is, of course, a scoop of your favorite vanilla ice cream. The contrast of warm or room-temperature brownie with cold, melting ice cream is pure heaven. A drizzle of caramel sauce or a sprinkle of sea salt can take it even further.
For a simpler approach, a tall glass of cold milk is the perfect companion to cut through the richness. Or, serve them alongside fresh berries for a burst of freshness.
If you’re serving them as part of a dessert platter, they would pair wonderfully with other simple sweets like Soft Snickerdoodles or Classic Powdered Sugar Cookies.
Your Decadent Brownie Questions Answered (FAQ)
Baking can sometimes bring up questions, especially when aiming for a specific texture like fudgy. Here are some common queries about making these Decadent Chocolate Brownies.
Why are my brownies cakey instead of fudgy?
The most common culprits are overmixing the batter and overbaking. When you overmix, you develop the gluten in the flour, which creates a more structured, cake-like texture. Overbaking removes too much moisture, resulting in a dry brownie. Stick to mixing just until the dry streaks disappear and pull them from the oven when a toothpick has moist crumbs attached, not when it’s clean.
Can I use Dutch-process cocoa powder?
Yes, you can substitute Dutch-process cocoa for natural unsweetened cocoa in this recipe. Dutch-process cocoa has a smoother, less acidic flavor and darker color because it has been treated with an alkali. It won’t significantly impact the fudginess in this recipe’s structure, but it will slightly alter the flavor profile to be mellower. Both work, so it comes down to your preference for chocolate flavor intensity.
How do I cut neat brownie squares?
Patience is key! Ensure the brownies are completely cooled in the pan before attempting to cut them. For the cleanest cuts, lift the cooled slab out using the parchment paper overhang. Place it on a cutting board. Use a large, sharp knife. For extra clean edges, you can heat the knife under hot water, wipe it dry, make a cut, and repeat for each slice.
Can I add other mix-ins besides chocolate chips?
Absolutely! While this recipe focuses on pure chocolate decadence with a simple almond topping, feel free to fold in other ingredients with the chocolate chips in step 7. Nuts like walnuts or pecans are classic additions. White chocolate chips, peanut butter chips, or even chopped caramel candies could also be fun variations (just remember to stick to the rule of no pork products if considering additions like bacon bits).
How long do these brownies last?
When stored in an airtight container at room temperature, these fudgy brownies will stay wonderfully moist for 3-4 days. If you want to keep them longer, they freeze exceptionally well. Wrap individual squares tightly in plastic wrap and store in a freezer bag for up to 2-3 months. Thaw at room temperature or gently warm in the microwave.
Can I make these in a different-sized pan?
Yes, but you’ll need to adjust the baking time. A 9×13 inch pan will yield thinner brownies and will require a shorter baking time (likely 20-25 minutes), while a smaller pan (like 7×7 inches) will result in thicker brownies and a longer baking time. Always use the moist crumb toothpick test to determine doneness, regardless of the pan size.
Enjoy Your Homemade Decadent Chocolate Brownies!
There you have it – the secret to achieving those impossibly fudgy, rich, and utterly decadent chocolate brownies right in your own kitchen. This recipe is designed to be simple enough for anyone to tackle, yet uses specific techniques that guarantee a superior texture compared to more cake-like versions.
Baking should be a joy, and the reward of biting into one of these perfect squares is well worth the minimal effort. Whether you share them with friends, serve them warm with ice cream, or hide them all for yourself (I won’t tell!), these brownies are sure to become a favorite.
Give them a try and let me know what you think! Did you achieve peak fudginess? What’s your favorite way to enjoy them? Leave a comment below and share your brownie baking adventures!
Decadent Chocolate Brownies

Ingredients
- 1/2 cup unsalted butter
- 1 cup granulated sugar
- 1/2 cup packed light brown sugar
- 2 large eggs
- 1 teaspoon vanilla extract
- 1/2 cup unsweetened cocoa powder
- 1/2 cup all purpose flour
- 1/4 teaspoon baking powder
- 1/4 teaspoon salt
- 1 cup semi sweet chocolate chips or chopped chocolate
- For the topping:
- 1/2 cup semi sweet chocolate chips or chopped chocolate
- 1 tablespoon unsalted butter
- 1/4 cup chopped almonds
Directions
- Preheat oven to 350 degrees Fahrenheit. Grease and flour or line an 8×8 inch baking pan with parchment paper, leaving an overhang on the sides.
- In a medium saucepan over low heat, melt the 1/2 cup butter. Remove from heat and stir in the granulated sugar and brown sugar until combined.
- Let the mixture cool slightly for about 5 minutes.
- Whisk in the eggs one at a time until just combined. Stir in the vanilla extract.
- In a separate bowl, whisk together the cocoa powder, flour, baking powder, and salt.
- Add the dry ingredients to the wet ingredients. Stir gently with a spatula or wooden spoon just until no dry streaks remain. This is the key to preventing dry, cakey brownies. Do not overmix!
- Fold in the 1 cup of chocolate chips or chopped chocolate.
- Pour the batter into the prepared pan and spread evenly.
- Bake for 25 to 30 minutes, or until a toothpick inserted into the center comes out with moist crumbs attached, not completely clean. Slightly underbaking is crucial for fudginess. Watch carefully and pull them out when they are still slightly moist in the center.
- While the brownies are still warm, make the glaze. In a small microwave safe bowl, combine the 1/2 cup chocolate chips and 1 tablespoon butter. Microwave in 30 second intervals, stirring between each, until smooth.
- Pour the warm glaze over the warm brownies and spread with a spatula.
- Sprinkle the chopped almonds evenly over the glaze.
- Let the brownies cool completely in the pan before cutting into squares. This helps them set properly and makes them easier to cut.