Ever tried to cut into a beautiful layered cake, only for it to crumble or squish, leaving you with a less-than-perfect presentation? It’s a common frustration, but I’ve finally cracked the code to making these multi-layered beauties hold their shape, giving you picture-perfect slices every single time. This Decadent No-Bake Layered Cake is not just visually stunning; it’s a symphony of textures and flavors, built on one crucial, simple step that makes all the difference.
The No-Bake Magic: Why This Layered Cake Delights
This recipe transforms complex dessert dreams into an achievable reality. Forget the oven and tedious baking times; this elegant layered cake comes together with surprising ease, making it a true showstopper for any occasion.
Effortless Elegance, No Oven Required
The beauty of a no-bake dessert is unparalleled, especially during warmer months. You can create a truly stunning centerpiece without heating up your kitchen, making entertaining a breeze.
This approach also simplifies the process significantly, cutting down on active preparation time. For another fantastic no-bake creation, consider trying our Amazing No-Bake Peanut Butter Bars.
The Secret to Picture-Perfect Slices
The hallmark of a truly impressive layered cake is how well it holds its form when sliced. This recipe incorporates a critical chilling technique that ensures each layer sets perfectly, preventing any dreaded crumbling or squishing.
You’ll achieve clean, defined layers that impress everyone at the table, proving that no-bake can be just as stable and beautiful as baked.
A Symphony of Flavors & Textures in Every Bite
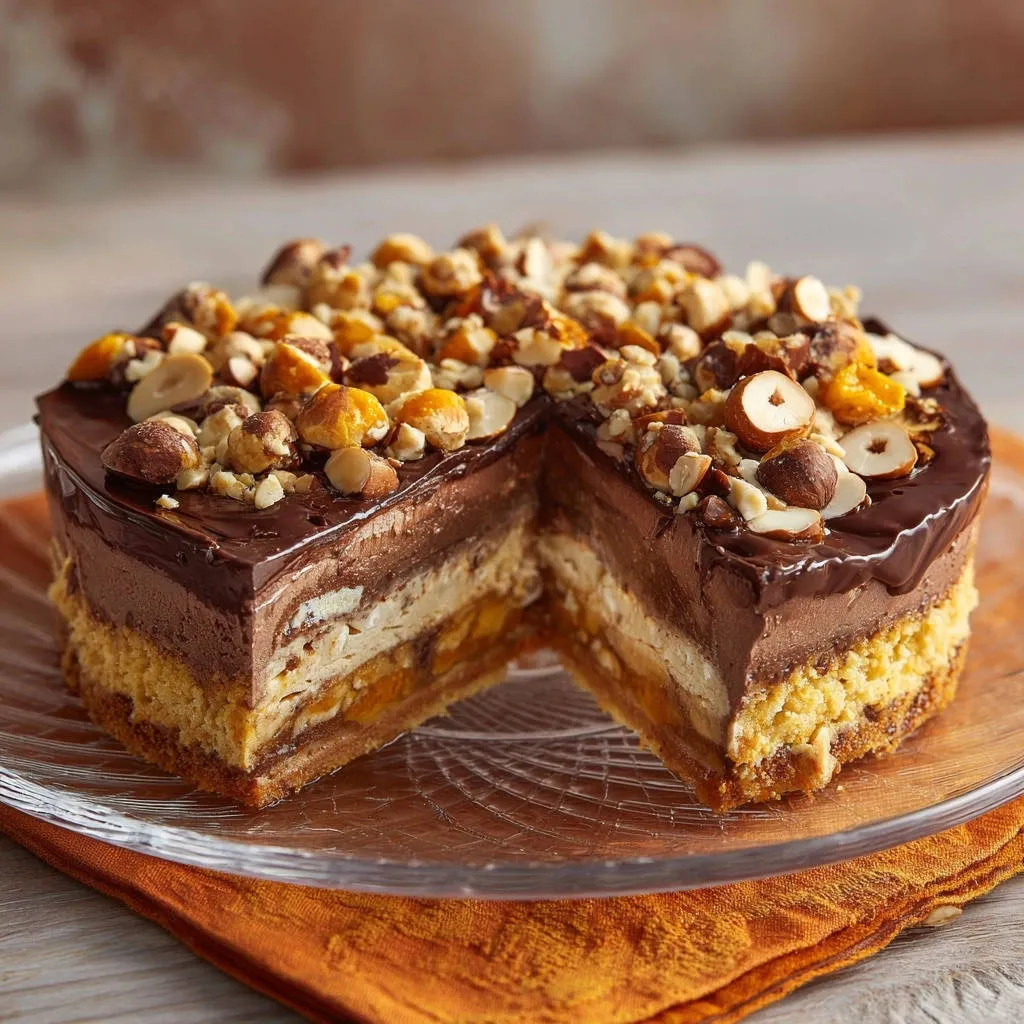
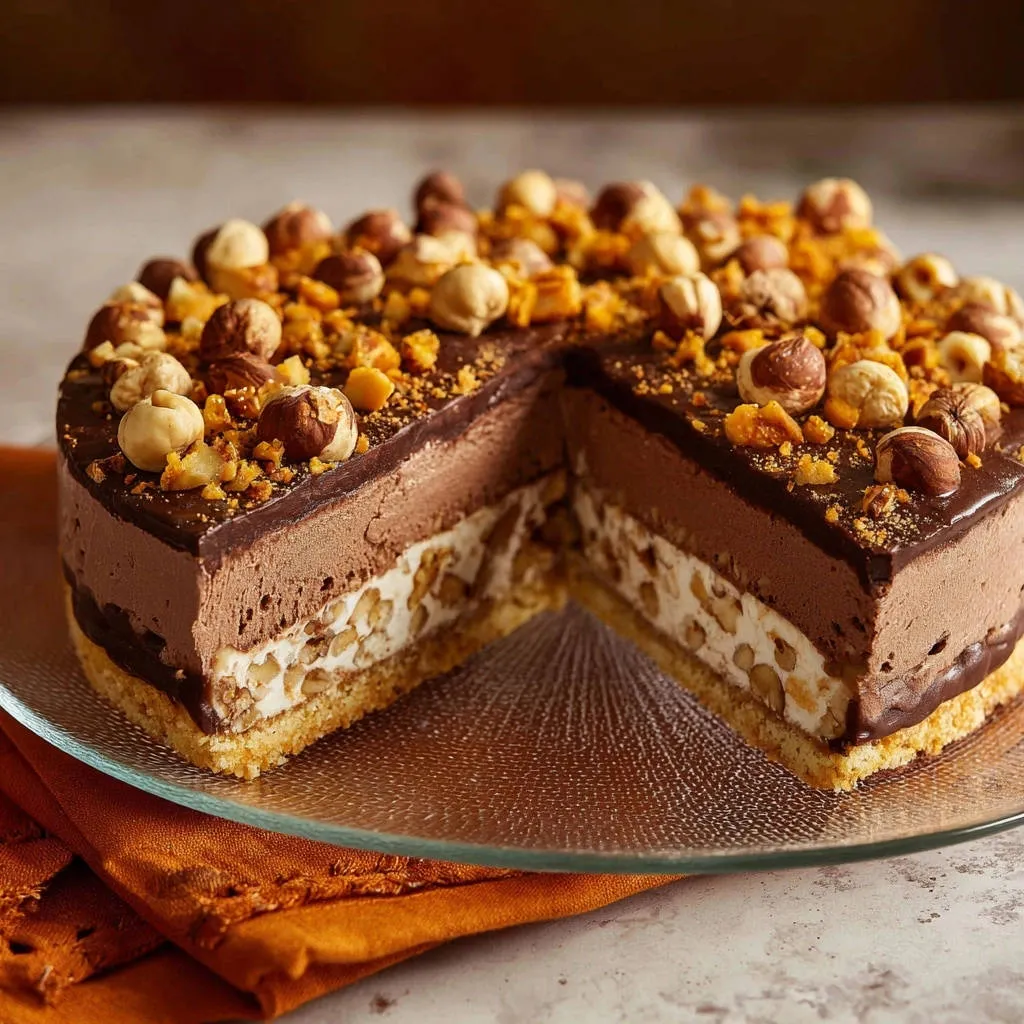
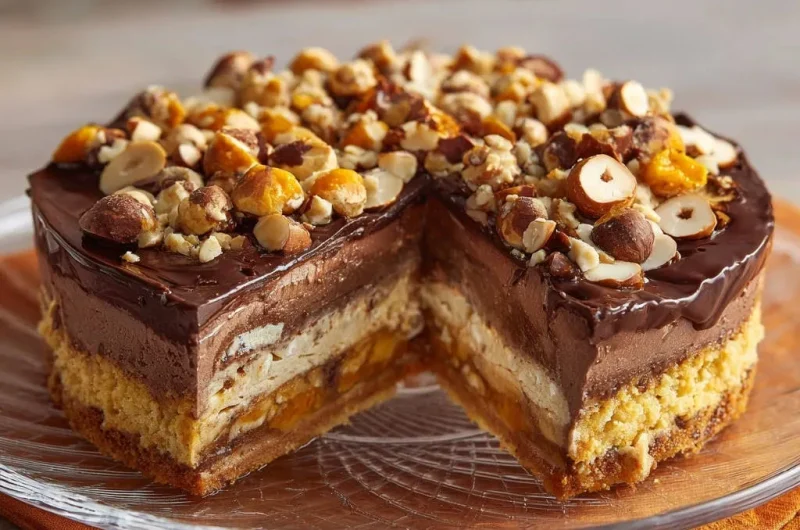
From the crisp, buttery shortbread crust to the tangy apricot, the light vanilla cream, and the rich chocolate mousse, every spoonful offers a delightful contrast. The glossy ganache topping and crunchy toasted nuts add the final luxurious touch.
This layered dessert delivers a complex taste experience with minimal effort, ensuring a truly decadent no-bake treat.
Essential Tools for Your Layered Cake Creation
Having the right tools simplifies the process and helps ensure a flawless finish for your layered cake. Gather these kitchen essentials before you begin.
- 8-inch Springform Pan:
Crucial for easy release of your beautifully layered cake without damaging its delicate structure. It allows you to unmold the cake effortlessly once set.
- Electric Mixer:
Makes whipping heavy cream and cream cheese light and fluffy, which is essential for creating airy, melt-in-your-mouth layers. A hand mixer or stand mixer will work perfectly.
- Rubber Spatula:
Ideal for gently folding in delicate mixtures like melted chocolate and dissolved gelatin to maintain the airy texture. It also helps in spreading layers evenly without deflating them.
- Small Microwave-Safe Bowls & Saucepans:
These are necessary for efficiently melting chocolate and dissolving gelatin, both key steps in preparing the cream, mousse, and ganache layers.
- Sharp Knife & Hot Water:
This simple trick is the ultimate secret for achieving clean, precise slices. Keep a mug of hot water and a towel handy to clean the knife between each cut.
The Building Blocks of Decadence: Key Ingredients Explained
Each ingredient in this decadent no-bake layered cake plays a vital role in its flavor, texture, and structural integrity. Understanding their purpose helps ensure a perfect result.
The Crispy Crust Foundation: Shortbread & Butter
Crushed shortbread cookies provide a sturdy, buttery, and slightly salty base that perfectly complements the sweet layers above. Their fine texture helps create a compact crust when combined with melted butter.
The melted unsalted butter acts as the binder, holding the cookie crumbs together firmly. For a different twist, you could experiment with graham crackers or chocolate wafer cookies, though the flavor profile will change.
If you’re a fan of classic buttery treats, our Classic Shortbread Fingers offer a delightful experience.
Apricot’s Tangy Counterpoint: Preserves
Apricot preserves introduce a bright, tangy fruit layer that cuts through the richness of the cream and chocolate. This vibrant addition adds both a burst of flavor and a beautiful contrasting color.
Choose a good quality preserve with real fruit pieces for the best texture and taste. The tartness balances the sweetness, making each bite more exciting.
The Creamy Dream Team: Heavy Cream & Cream Cheese
Very cold heavy cream is whipped to create the light, airy backbone of both the vanilla cream and chocolate mousse layers. Its high-fat content ensures a stable, voluminous whip.
Softened cream cheese in the vanilla layer adds a subtle tang and a crucial creamy body, preventing the layer from being overly sweet or too fragile. It contributes to the luxurious mouthfeel.
Rich Chocolate Indulgence: Mousse & Ganache Essentials
Good quality dark chocolate is paramount for the depth of flavor in both the chocolate mousse and the glossy ganache. Opt for a chocolate you enjoy eating on its own, as its flavor will shine through.
Cocoa powder in the mousse enhances the chocolate intensity and color without adding extra sweetness. This combination creates a truly rich, satisfying chocolate experience.
If you love rich chocolate desserts, be sure to check out our Decadent Chocolate Brownies for another tempting treat.
The Unsung Hero: Gelatin for Structure
Unflavored gelatin powder is the secret to this cake’s incredible stability. It sets and stabilizes the cream and mousse layers, allowing them to hold their elegant shape when sliced.
Properly blooming and dissolving the gelatin is crucial for a smooth texture and a perfectly set cake. It ensures your layers won’t collapse, even when serving.
The Crunchy Crown: Toasted Nuts & Dried Fruit
Toasted hazelnuts and sliced almonds provide a delightful crunch and nutty flavor, contrasting beautifully with the smooth, creamy layers. Toasting them beforehand deepens their flavor considerably.
Chopped dried apricots echo the tangy apricot layer, adding another textural element and a pop of color on top. These garnishes are not just for looks; they enhance the overall sensory experience.
Crafting Each Layer: Your Step-by-Step Decadent No-Bake Guide
Follow these precise steps to assemble your stunning Decadent No-Bake Layered Cake. Attention to detail, especially with chilling, ensures a perfect outcome.
- 1. Prepare the Crust:
In a medium bowl, combine the finely crushed shortbread cookies and melted unsalted butter. Ensure the butter is thoroughly incorporated into the crumbs, creating a uniform, moist mixture. Press this mixture firmly and evenly into the bottom of an 8-inch springform pan, using the back of a spoon or your knuckles to compact it well. Place the pan in the refrigerator to chill for at least 15 minutes; this helps the crust set and prevents it from crumbling when layers are added.
- 2. Add Apricot Layer:
Once the crust is chilled, carefully spread the apricot preserves evenly over its surface. Take care not to disturb the crust beneath. This layer adds a vibrant color and a delightful tangy counterpoint. Return the pan to the refrigerator to keep everything cool while you prepare the next layer, ensuring the preserves don’t warm up too much.
- 3. Make the Vanilla Cream Layer:
In a small microwave-safe bowl, sprinkle unflavored gelatin powder over 2 tablespoons of cold water. Let it sit for 5 minutes to bloom, becoming thick and jelly-like. Then, microwave for 10-15 seconds, or until the gelatin is completely dissolved and clear; stir well to ensure no granules remain. Let this dissolved gelatin cool slightly, but don’t let it set. In a large bowl, combine very cold heavy cream, softened cream cheese, powdered sugar, and vanilla extract. Beat with an electric mixer on medium-high speed until the mixture is light, fluffy, and holds soft peaks. Slowly pour the cooled dissolved gelatin mixture into the cream mixture while beating on low speed, just until it is incorporated. Avoid overmixing once the gelatin is added. Pour the vanilla cream mixture over the apricot layer in the springform pan and spread evenly. Place the pan in the freezer for 20 minutes to set partially, or in the refrigerator for at least 45 minutes; this partial set is vital before adding the next layer.
- 4. Make the Chocolate Mousse Layer:
Melt the finely chopped dark chocolate in a heatproof bowl set over a simmering pot of water (bain-marie method) or in the microwave in 30-second intervals, stirring until completely smooth. Allow the melted chocolate to cool slightly to room temperature; it should still be pourable but not hot. In a separate small microwave-safe bowl, sprinkle gelatin powder over 2 tablespoons cold water and let it bloom for 5 minutes. Microwave for 10-15 seconds until dissolved, then cool slightly. In a large bowl, combine very cold heavy cream, powdered sugar, and cocoa powder. Beat with an electric mixer on medium-high speed until soft peaks form. Gently fold in the cooled melted chocolate, being careful not to deflate the whipped cream. Finally, slowly pour the cooled dissolved gelatin mixture into the mousse while gently folding, just until it is incorporated without streaks. Carefully pour the chocolate mousse mixture over the vanilla cream layer in the springform pan and spread evenly, creating a smooth top surface.
- 5. THE CRUCIAL CHILL: Setting for Success:
This is the most critical step for achieving those picture-perfect slices and a stable cake. Cover the springform pan tightly with plastic wrap, ensuring no part of the cake is exposed. Refrigerate the cake for a minimum of 6 hours, or preferably overnight. This extended chilling time is absolutely essential for all layers to fully set and bond together, allowing the cake to hold its structure beautifully and cleanly when sliced. Do not rush this step; patience is key!
- 6. Prepare the Ganache Topping:
Once the cake is fully chilled and set, gently heat heavy cream in a small saucepan over medium heat until it just begins to simmer, with small bubbles forming around the edges. Do not boil. Remove from heat immediately and pour the hot cream over the finely chopped dark chocolate in a heatproof bowl. Let it sit undisturbed for 5 minutes; this allows the chocolate to melt evenly. Then, whisk slowly and steadily from the center outwards until the ganache is completely smooth, glossy, and emulsified. It should be rich and pourable.
- 7. Finish and Serve:
Pour the warm ganache over the fully chilled cake, ensuring it covers the top evenly. Use an offset spatula or the back of a spoon to gently spread it to the edges, allowing some of the luscious ganache to drip artfully down the sides. Immediately sprinkle with the chopped toasted hazelnuts, toasted sliced almonds, and chopped dried apricots for texture and visual appeal before the ganache sets. Return the cake to the refrigerator for another 30 minutes to allow the ganache to firm up slightly. To serve, carefully release the sides of the springform pan. Use a sharp, thin-bladed knife dipped in hot water and wiped clean between each cut to ensure clean, precise slices. Enjoy your perfectly layered and effortlessly elegant Decadent No-Bake Layered Cake!
Chef’s Secrets: Elevating Your Decadent No-Bake Layered Cake Game
Unlock the full potential of your layered cake with these expert tips and tricks, ensuring every creation is a triumph.
Mastering the Gelatin Bloom & Dissolve
Always sprinkle gelatin over cold water and let it sit for a full 5 minutes to “bloom” before heating. This allows the granules to fully hydrate.
When dissolving, use gentle heat (microwave in short bursts or a bain-marie) and stir until completely clear, ensuring no undissolved bits remain. Undissolved gelatin can create a grainy texture in your layers.
Achieving Light & Fluffy Cream Layers
For the best whipped cream, ensure your heavy cream is very cold, and for the vanilla layer, your cream cheese is softened to room temperature. This combination allows for maximum aeration and a smooth, lump-free mixture.
Avoid over-whipping the heavy cream, as it can become grainy and lose its smooth texture. Stop as soon as soft peaks form for the mousse, and light fluffiness for the vanilla layer.
The Art of Folding (Not Stirring!) Delicate Mixtures
When incorporating melted chocolate into whipped cream or dissolved gelatin into your base mixtures, use a gentle folding technique with a rubber spatula.
This method preserves the air you’ve incorporated, maintaining the light and airy texture of your mousse and cream layers. Stirring vigorously can deflate them, resulting in a denser cake.
The Perfect Slice Every Time: Knife Know-How
The hot knife trick is non-negotiable for clean slices. Dip your sharp knife in a tall glass of very hot water, wipe it completely dry with a clean towel, and then make your cut.
Repeat this process for every single slice. The hot blade glides through the chilled layers, preventing drag and smearing, ensuring a perfect edge on each piece of your elegant dessert.
Creative Topping & Flavor Variations
Feel free to customize the cake to your taste! Instead of apricot, try raspberry or strawberry preserves for a different fruit note. A white chocolate ganache could replace the dark for a sweeter, creamier top.
Experiment with garnishes like fresh berries (raspberries or strawberries are beautiful), chocolate shavings, or even a sprinkle of sea salt flakes over the ganache for a sophisticated touch.
Troubleshooting Your No-Bake Layered Cake: Common Hurdles Solved
Even expert bakers encounter challenges. Here are solutions to common issues that might arise when making your Decadent No-Bake Layered Cake.
My Cake Layers Aren’t Setting Firmly Enough
The most common culprit is insufficient chilling time. The 6-hour minimum, preferably overnight, is crucial for the gelatin to fully activate and set all layers. Resist the urge to cut corners here.
Ensure your gelatin was properly bloomed and completely dissolved. Undissolved gelatin won’t provide the necessary structure, leading to a softer, less stable cake.
The Ganache Looks Oily or Separated
This usually happens if the cream was overheated or if you whisked the ganache too vigorously or for too long. Overheating can cause the fats to separate.
To fix it, remove the bowl from heat and add a splash of cold cream (1-2 teaspoons). Whisk gently from the center outward until it comes back together. If it’s still oily, try whisking it over an ice bath for a moment to cool it down quickly.
My Slices Are Messy or Crumbling
This issue almost always points back to inadequate chilling or improper slicing technique. The cake must be thoroughly chilled-at least 6 hours, ideally overnight-for optimal firmness.
Always use a very sharp knife, heat it in hot water, and wipe it clean between every single cut. This prevents layers from sticking and dragging, ensuring perfectly clean edges.
The Cake Tastes Too Sweet (or Not Sweet Enough)
Taste is personal! For future attempts, you can adjust the amount of powdered sugar in both the vanilla cream and chocolate mousse layers to suit your preference.
Remember that the apricot preserves add sweetness and tang, so consider that balance. If you prefer less sweet, slightly reduce the sugar; for more, add a touch more powdered sugar.
Planning Ahead: Storing Your Decadent Layered Cake
One of the many advantages of this Decadent No-Bake Layered Cake is its excellent make-ahead potential and storage flexibility. Plan your dessert to perfection.
Optimal Storage for Maximum Freshness
Once fully set, store your Decadent No-Bake Layered Cake in an airtight container in the refrigerator. This prevents it from absorbing odors and keeps it fresh.
Properly stored, the cake will maintain its quality and texture for up to 3-4 days. It’s often even better the second day after the flavors have fully melded.
Can You Freeze This No-Bake Cake?
Yes, this no-bake cake freezes beautifully, making it perfect for preparing far in advance. Wrap the chilled cake (before garnishing with nuts and apricots) tightly in several layers of plastic wrap, then a layer of foil.
It can be frozen for up to 1 month. To thaw, transfer the wrapped cake to the refrigerator overnight. Add the ganache and garnishes just before serving for the freshest look and best texture.
Make-Ahead Tips for Stress-Free Entertaining
The extended chilling time makes this cake an ideal candidate for preparing a day or two in advance. You can make the entire cake, including the initial 6+ hour chill, the day before your event.
On the day of serving, simply prepare the ganache, garnish, and give it a final short chill. This frees up valuable time, allowing you to relax and enjoy your guests.
Serving Your Decadent No-Bake Layered Cake: Perfect Pairings
Elevate the experience of this impressive dessert with thoughtful accompaniments and presentation touches that truly make it shine.
Ideal Accompaniments to Enhance Flavor
Pair a slice of this rich cake with a warm cup of freshly brewed coffee or a bold espresso, which beautifully complements the chocolate notes. A light, slightly tart berry coulis drizzled on the plate adds a fresh, fruity counterpoint.
For a truly indulgent experience, serve with a small scoop of high-quality vanilla bean ice cream or a dollop of lightly sweetened whipped cream. These additions enhance the creamy textures and provide a delightful contrast.
Presentation Pointers for a Stunning Display
To showcase the beautiful layers, choose a clean, simple plate that allows the cake to be the star. A light dusting of cocoa powder or powdered sugar around the base of the slice can add a professional touch.
Consider placing a few extra toasted nuts or a fresh berry next to the slice on the plate. The contrast of textures and colors will make your Decadent No-Bake Layered Cake even more appealing.
Frequently Asked Questions About Decadent No-Bake Layered Cake
Here are answers to some common questions that arise when making this impressive no-bake layered cake, ensuring your success.
Can I use different types of cookies for the crust?
Yes, absolutely! While shortbread offers a classic, buttery flavor, you can certainly experiment. Graham crackers provide a more traditional cheesecake-like crust, while chocolate wafer cookies or even Oreos (with their cream filling removed) would create a delicious chocolate base. Each will subtly alter the final flavor profile, so choose one that complements the other layers.
Is it possible to make this Decadent No-Bake Layered Cake dairy-free?
Making this cake dairy-free is possible with some substitutions, though the texture might vary slightly. You would need full-fat canned coconut cream (chilled, then only use the thick cream from the top) for the heavy cream, and a good quality vegan cream cheese alternative. Ensure all chocolate used is also dairy-free. The overall richness and specific mouthfeel may differ from the dairy version but can still be quite delicious.
How long does the cake really need to chill before serving?
The cake really needs to chill for a minimum of 6 hours, but preferably overnight (8-12 hours) is ideal. This extended chilling time is crucial because it allows the gelatin in both the vanilla cream and chocolate mousse layers to fully set and firm up. Without sufficient chilling, the layers will be too soft and won’t hold their shape, leading to messy, collapsed slices rather than the clean, defined layers you desire.
Can I prepare the layers in advance over a few days?
Yes, this recipe is excellent for make-ahead preparation! You can prepare the crust and apricot layer, chill them, and then add the vanilla cream layer and chill that as well. The chocolate mousse layer can be made and added the following day, followed by the essential overnight chill. The ganache and garnishes should always be added on the day of serving for the freshest appearance and texture, but the core cake can be assembled 1-2 days prior.
What if I don’t have a springform pan?
While a springform pan is highly recommended for easy release and perfectly clean edges, you can use a regular 8-inch round cake pan as an alternative. Line the pan completely with parchment paper, leaving an overhang on two opposite sides to create “slings” for lifting the cake out. Be aware that removing the cake from a regular pan will be more challenging, and the edges may not be as pristine, but it is certainly doable.
Your Masterpiece Awaits: Share Your Decadent Creation!
You now have all the expert knowledge to create a truly impressive Decadent No-Bake Layered Cake that will amaze everyone. This recipe proves that effortless elegance and show-stopping results are well within your reach, even without turning on the oven.
Go forth with confidence, embrace the crucial chilling step, and prepare to delight. We’d love to see your stunning creations! Share your photos with us on social media or leave a comment below with your experience or any delicious variations you tried.
Decadent No-Bake Layered Cake
Course: DessertCuisine: American CuisineDifficulty: easy8
servings1
hour480
minutesAmerican Cuisine
Ingredients
For the Crust:
1 ½ cups crushed shortbread cookies (about 20 cookies)
½ cup unsalted butter, melted
For the Apricot Layer:
¾ cup apricot preserves
For the Vanilla Cream Layer:
1 cup heavy cream, very cold
4 ounces cream cheese, softened
¼ cup powdered sugar
1 teaspoon vanilla extract
1 teaspoon unflavored gelatin powder
2 tablespoons cold water
For the Chocolate Mousse Layer:
4 ounces dark chocolate, finely chopped
1 cup heavy cream, very cold
¼ cup powdered sugar
2 tablespoons cocoa powder
1 teaspoon unflavored gelatin powder
2 tablespoons cold water
For the Chocolate Ganache Topping:
½ cup dark chocolate, finely chopped
½ cup heavy cream
For the Garnish:
¼ cup toasted hazelnuts, roughly chopped
¼ cup toasted sliced almonds, roughly chopped
2 tablespoons chopped dried apricots
Directions
- Prepare the Crust: In a medium bowl, combine the crushed shortbread cookies and melted butter. Press the mixture firmly into the bottom of an 8-inch springform pan. Place in the refrigerator to chill for at least 15 minutes.
- Add Apricot Layer: Spread the apricot preserves evenly over the chilled crust. Return to the refrigerator.
- Make the Vanilla Cream Layer: In a small microwave-safe bowl, sprinkle gelatin powder over 2 tablespoons cold water. Let it sit for 5 minutes to bloom. Microwave for 10-15 seconds, or until completely dissolved. Let cool slightly.
- In a large bowl, combine cold heavy cream, softened cream cheese, powdered sugar, and vanilla extract. Beat with an electric mixer on medium-high speed until light and fluffy. Slowly pour the cooled dissolved gelatin mixture into the cream mixture while beating on low speed, just until incorporated.
- Pour the vanilla cream mixture over the apricot layer in the springform pan and spread evenly. Place the pan in the freezer for 20 minutes to set partially, or in the refrigerator for at least 45 minutes.
- Make the Chocolate Mousse Layer: Melt the chopped dark chocolate in a heatproof bowl over a simmering pot of water or in the microwave in 30-second intervals, stirring until smooth. Let cool slightly.
- In a separate small microwave-safe bowl, sprinkle gelatin powder over 2 tablespoons cold water. Let it sit for 5 minutes to bloom. Microwave for 10-15 seconds, or until completely dissolved. Let cool slightly.
- In a large bowl, combine cold heavy cream, powdered sugar, and cocoa powder. Beat with an electric mixer on medium-high speed until soft peaks form. Gently fold in the cooled melted chocolate. Slowly pour the cooled dissolved gelatin mixture into the mousse while gently folding, just until incorporated.
- Pour the chocolate mousse mixture over the vanilla cream layer in the springform pan and spread evenly.
- THE KEY FOR PERFECT SLICES: Cover the springform pan tightly with plastic wrap and refrigerate for a minimum of 6 hours, or preferably overnight. This extended chilling time is essential for all layers to fully set and for the cake to hold its structure beautifully when sliced.
- Prepare the Ganache Topping: Once the cake is fully chilled, gently heat heavy cream in a small saucepan until just simmering. Remove from heat and pour over the chopped dark chocolate in a heatproof bowl. Let sit for 5 minutes, then whisk until smooth and glossy.
- Finish and Serve: Pour the warm ganache over the chilled cake, spreading it evenly to the edges and allowing some to drip down the sides. Immediately sprinkle with chopped hazelnuts, almonds, and dried apricots. Return to the refrigerator for another 30 minutes to set the ganache.
- To serve, carefully release the sides of the springform pan. Use a sharp knife dipped in hot water and wiped clean between each cut to ensure clean, precise slices. Enjoy your perfectly layered cake!
Notes
- Extended chilling (preferably overnight) is essential for perfect slices and structure.