Oh, these homemade onion rolls. Let me tell you, they are an absolute dream! There’s something truly magical about a soft, warm, homemade roll, but when you add sweet, slow-cooked caramelized onions? Pure bliss! For the longest time, I struggled with caramelizing onions. They’d be perfect one minute, and the next? A crispy, burnt mess. It felt like such a frustrating dance. But after many trials and errors, I finally discovered the simple, non-negotiable trick that guarantees perfectly sweet, jammy caramelized onions every single time. Once I mastered that, these Homemade Onion Rolls became utterly irresistible.
Why You’ll Fall in Love with These Onion Rolls
These aren’t just any rolls. They are:
- Incredibly soft and fluffy thanks to the yeast dough base.
- Bursting with deep, sweet, savory flavor from the slow-cooked onions.
- Surprisingly simple to make once you know the caramelization secret.
- Perfect as a side dish, a base for mini sandwiches, or just enjoyed warm with a smear of butter.
- Guaranteed to impress anyone who tries them!
Gathering Your Ingredients for Homemade Onion Rolls
Making these delicious rolls requires a few pantry staples and, of course, the star ingredient: onions! Each component plays a crucial role in achieving the perfect texture and flavor profile for these savory delights. Don’t worry, there’s nothing fancy or hard to find on this list.
- All Purpose Flour: The foundation of our rolls. Using standard all-purpose flour gives us a reliable base for developing gluten during kneading, resulting in that desirable soft yet slightly chewy texture. You’ll need 3 and 1/2 cups, plus a little extra for dusting your kneading surface.
- Active Dry Yeast: This is what gives our rolls their lift and airy structure. Make sure your yeast is active – the warm water and sugar step is key to checking this! You’ll need 2 and 1/4 teaspoons.
- Warm Water (105-115°F): The perfect temperature water is essential for waking up and activating the yeast. If it’s too cool, the yeast won’t bloom; too hot, and you’ll kill it. 1 cup is just right for this recipe.
- Sugar: Just a couple of tablespoons! Sugar serves two purposes here: it provides food for the yeast, helping it activate vigorously, and it adds a subtle sweetness to the dough itself, balancing the savory onions.
- Salt (for the dough): A teaspoon of salt is added to the dough mixture after the yeast has bloomed. Salt is vital for controlling the yeast activity, strengthening the gluten structure, and enhancing the overall flavor of the bread.
- Unsalted Butter, Melted: Melted butter adds richness, tenderness, and a lovely aroma to the dough. Using unsalted butter gives you control over the salt content in the recipe. You’ll need 3 tablespoons.
- Large Egg, Beaten (for egg wash): An egg wash brushed on before baking gives the rolls a beautiful golden-brown crust and helps the poppy seeds adhere. One large egg is all you need.
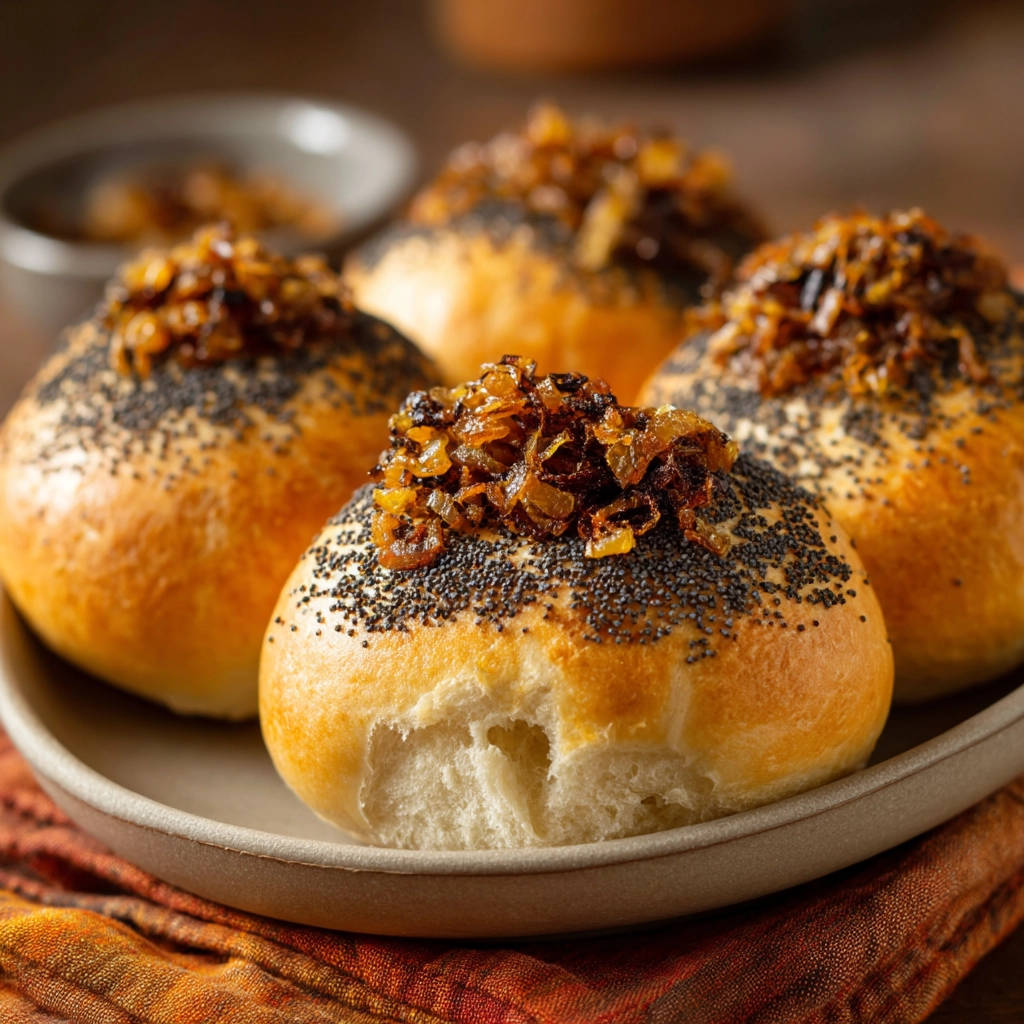
- Poppy Seeds: A classic topping for onion rolls! Poppy seeds add a delightful subtle crunch and nutty flavor to the exterior. 2 tablespoons provide a generous coating.
- Large Yellow Onions, Thinly Sliced: The undeniable stars! Yellow onions are perfect for caramelizing because they have a higher sugar content than white onions, leading to that wonderful sweetness. Slicing them thinly ensures they cook down evenly. You’ll need 3 large ones.
- Olive Oil: Used to cook the onions slowly. Olive oil adds a nice flavor base and helps facilitate the low-and-slow caramelization process without burning. 2 tablespoons are needed for the onions.
- Salt (for the onions): Just a pinch (1/4 teaspoon) added at the beginning helps draw out moisture from the onions, aiding in the caramelization process.
Crafting Your Homemade Onion Rolls: Step-by-Step
Ready to bake some magic? Follow these steps carefully, especially the key to those perfect caramelized onions, and you’ll be rewarded with incredibly delicious rolls.
-
Wake Up Your Yeast: Start by combining your warm water, active dry yeast, and sugar in a spacious bowl. Give them a gentle swirl to mix. The goal here is to ensure your yeast is happy and active. Let this mixture sit undisturbed for about 5 minutes. You’ll know it’s working when a lovely layer of foam or bubbles appears on the surface. If nothing happens, your water might have been too hot or too cold, or your yeast might be old. Time to start over with fresh yeast!
-
Build the Dough Base: Once your yeast is bubbly and alive, stir in the salt and the melted butter. Now, it’s time to bring in the flour. Add the all-purpose flour gradually, mixing as you go. You can use a sturdy spoon initially, or a stand mixer with a dough hook. Keep adding flour and mixing until a shaggy dough forms – it won’t look smooth or pretty yet, just like a collection of flour and liquid coming together.
-
Get Kneading: Turn that shaggy dough out onto a surface that you’ve lightly dusted with a little flour. Now, put in some work! Knead the dough by hand for 6 to 8 minutes. This physical act develops the gluten strands within the flour, which are essential for creating a bread that is both soft and has a satisfying chew. As you knead, the dough will transform from sticky and rough to smooth, elastic, and much easier to handle. If you’re using a stand mixer with a dough hook, let it knead for about 5-7 minutes on medium-low speed until the dough is smooth and pulls away from the sides of the bowl.
-
First Rise – Let it Double!: Lightly coat a clean large bowl with a little oil. Place your beautifully kneaded dough ball into the bowl, and give it a turn to make sure all sides are lightly oiled. This prevents it from sticking. Cover the bowl snugly with plastic wrap or a clean kitchen towel. Find a warm, cozy spot away from drafts – this is where the magic of fermentation happens! Let the dough rise for 1 to 1 and a half hours, or until it has visibly doubled in size. Patience is key here; a good first rise is crucial for light and airy rolls. A warm oven (turned off) with the light on, or even just your counter on a warm day, works well.
-
Begin Caramelizing (The Key Step): While your dough is on its first rise, it’s the perfect time to prepare the star topping. Get a large, heavy skillet – cast iron or a good quality non-stick pan is great – and heat the olive oil over very LOW heat. Add the thinly sliced yellow onions and the quarter teaspoon of salt. Stir everything together so the onions are coated in the oil. This low heat is the absolute secret weapon. It prevents the sugars in the onions from burning before they have a chance to break down and become sweet and golden. Rushing this step leads to burnt, bitter onions instead of sweet, jammy ones.
-
Cook Low and Slow: Now, settle in for a bit of a waiting game. Continue cooking the onions over that consistent LOW heat, stirring only occasionally (every 5-10 minutes is plenty). You are not sautéing here; you are slowly coaxing sweetness and color out of them. This process will take a minimum of 45 minutes, and often up to an hour or even longer, depending on your stove and pan. Watch as the onions soften, shrink, and gradually turn from pale white to translucent, then a light gold, deepening over time into a rich, golden brown. They should be incredibly soft and possess an intoxicating sweet aroma. If you notice the onions sticking to the bottom of the pan or starting to brown too quickly in spots, immediately reduce the heat even further. You can also add a tablespoon of water to the pan and scrape up any browned bits (deglazing) to keep things from burning and add flavor back into the onions. Remember: low heat, patience, and occasional stirring are your best friends!
-
Cool Those Onions: Once your onions have transformed into a pile of sweet, deeply colored, jammy goodness, remove the skillet from the heat. Spoon the caramelized onions into a small bowl. It’s important to let them cool completely before you think about adding them to the rolls. Warm onions can impact the dough’s second rise.
-
Shape Your Rolls: By now, your dough should be beautifully risen. Gently punch it down in the bowl to release the air. Turn the dough out onto a lightly floured surface. Divide the dough into 8 to 10 equal portions. You can eyeball this or use a kitchen scale for perfect uniformity. Take each portion and gently shape it into a smooth ball or roll shape. The easiest way is often to pull the edges of the dough underneath the ball and pinch them together on the bottom, creating surface tension on top.
-
Second Rise – Get Puffy!: Arrange the shaped rolls on a baking sheet that you’ve lined with parchment paper (parchment makes cleanup a breeze!). Leave a few inches of space between each roll, as they will expand again. Cover the baking sheet loosely with plastic wrap or a clean towel. Let the rolls rise again in a warm spot for another 30 to 45 minutes. They should look noticeably puffier and feel light when you gently touch them.
-
Preheat Your Oven: While the rolls are undergoing their second rise, about 15-20 minutes before they look ready, preheat your oven to 375°F (190°C). This ensures the oven is at the correct temperature for even baking.
-
Egg Wash and Seeds: Right before they go into the oven, take your beaten egg and lightly brush the tops of each puffy roll. This egg wash isn’t just for looks – it helps create that beautiful golden crust and acts as a glue for our topping. Sprinkle the poppy seeds generously over the tops of the rolls, allowing them to stick to the egg wash.
-
Bake ‘Em Up: Carefully place the baking sheet into the preheated oven. Bake for 18 to 22 minutes. Keep an eye on them towards the end of the baking time. You’ll know they’re done when they have a lovely golden-brown color on top and, if you tap the bottom of a roll, it sounds hollow.
-
The Grand Finale: Add the Onions!: Remove the golden, fragrant rolls from the oven. Let them cool slightly on the baking sheet for just a few minutes – enough so they are handleable but still warm. Then, just before serving, use a spoon to gently press a slight indentation into the top of each roll. Spoon a generous amount of your perfectly cooled, caramelized onions onto each roll. The warmth of the roll will slightly warm the onions, creating the most incredible combination.

Tips for Perfect Homemade Onion Rolls Every Time
Even with the secret to caramelization unlocked, a few extra tips can help ensure your homemade onion rolls turn out beautifully every time:
- Check Your Yeast: Don’t skip the proofing step (Step 1). If your yeast doesn’t get foamy, it’s dead, and your dough won’t rise. Buy new yeast and try again!
- Proper Kneading: Don’t under-knead. The elasticity you develop through kneading is crucial for the roll’s structure and texture. If kneading by hand, it’s a good workout! If using a mixer, trust the process.
- Warm Rising Spot: A consistent warm temperature helps the dough rise efficiently. Drafts can slow or stop the process. If your kitchen is cool, the turned-off oven trick is invaluable.
- Thinly Slice Onions: Uniform, thin slices are important for even caramelization. A mandoline can help here, but be careful!
- Patience with Onions: Seriously, this is the most important part. Low heat + time = magic. Resist the urge to crank up the heat. Those browned bits are flavor, but burnt bits are bitter! The deglazing trick in Step 6 is your friend if you see them sticking.
- Don’t Overcrowd the Pan (Onions): If you’re making a double batch of caramelized onions, you might need to do it in two batches to avoid overcrowding the pan, which will steam the onions instead of browning them.
- Don’t Overbake: Keep an eye on the rolls during the last few minutes of baking. Overbaked rolls can be dry. They should be golden, not dark brown.
What to Serve With Your Onion Rolls
These savory rolls are incredibly versatile! They make an excellent accompaniment to so many meals. They are, of course, perfect alongside rich, hearty dishes like a Classic Pot Roast or Cozy Shepherd’s Pie. Their sweetness is a wonderful contrast. They also pair beautifully with soups and stews. Imagine dipping a warm, onion-topped roll into a bowl of classic chicken noodle soup or hearty beef chili – pure comfort!
They can also elevate simple meals. Use them instead of regular rolls for mini sliders or sandwiches. Or, frankly, enjoy them completely on their own, perhaps with just a little extra butter!
Your Homemade Onion Rolls Questions Answered (FAQ)
Can I use a different type of onion for caramelization?
Yellow onions are the traditional choice for caramelizing because of their balance of sulfur compounds (which break down and lose their bite) and higher sugar content. Sweet onions (like Vidalia or Walla Walla) will caramelize even faster and be sweeter, while white or red onions will have a stronger, more pungent flavor even after cooking, and may not get quite as sweet. For the best classic result, stick with yellow.
How far in advance can I make the caramelized onions?
The caramelized onions can be made 2-3 days in advance and stored in an airtight container in the refrigerator. Reheat them gently before topping the warm rolls.
Can I make the dough ahead of time?
Yes! You can prepare the dough up through the first rise. After the first rise, punch it down gently, cover the bowl tightly with plastic wrap, and refrigerate for up to 24 hours. On baking day, let the dough sit at room temperature for about 30-60 minutes to take the chill off before shaping and proceeding with the second rise.
How should I store leftover onion rolls?
Store cooled onion rolls in an airtight container at room temperature for 2-3 days. The caramelized onions can be stored separately in the fridge if you haven’t added them all, or store the topped rolls together. Reheat gently in the microwave for a few seconds or wrap in foil and warm in a low oven (around 300°F/150°C) for about 10 minutes.
Can I freeze Homemade Onion Rolls?
Yes, you can! For best results, freeze the rolls without the caramelized onion topping. Let the baked rolls cool completely, then place them in a single layer on a baking sheet in the freezer until solid. Transfer the frozen rolls to a freezer-safe bag or container. They can be frozen for up to 2-3 months. Thaw at room temperature, then warm in the oven. Freeze the caramelized onions separately if you have leftovers, then thaw and add when the rolls are reheated.
Why did my caramelized onions burn?
The most common reason is too high heat! Caramelization is a slow process. If the pan is too hot, the sugars will burn before the onions properly soften and sweeten. Ensure your heat is truly on LOW and be patient. Using a heavy-bottomed skillet also helps distribute heat more evenly.
Enjoy Your Homemade Onion Rolls!
There’s nothing quite like the aroma of freshly baked bread filling your kitchen, especially when it’s combined with the sweet, savory scent of caramelized onions. These Homemade Onion Rolls are a labor of love, but the payoff is immense. That first bite – soft roll meeting jammy, flavorful onion – is pure comfort food heaven. They are the perfect sidekick to your favorite meals, or a delightful snack on their own. Give this recipe a try, master that low-and-slow onion trick, and prepare to bake some incredibly delicious rolls.
I can’t wait for you to try these! Let me know how yours turn out in the comments below. Did you master the caramelized onions? What did you serve them with? Happy baking!
Homemade Onion Rolls

Ingredients
- 3 and 1/2 cups all purpose flour
- 2 and 1/4 teaspoons active dry yeast
- 1 cup warm water (105-115F)
- 2 tablespoons sugar
- 1 teaspoon salt
- 3 tablespoons unsalted butter melted
- 1 large egg beaten (for egg wash)
- 2 tablespoons poppy seeds
- 3 large yellow onions thinly sliced
- 2 tablespoons olive oil
- 1/4 teaspoon salt
Directions
- In a large bowl, combine warm water, yeast, and sugar. Let stand for 5 minutes until foamy.
- Stir in the salt and melted butter. Gradually add the flour, mixing until a shaggy dough forms.
- Turn the dough out onto a lightly floured surface and knead for 6-8 minutes until smooth and elastic.
- Place the dough in a lightly oiled bowl, turn to coat, cover, and let rise in a warm place for 1 to 1 and 2 hours, or until doubled in size.
- While the dough rises, make the caramelized onions. Heat olive oil in a large, heavy skillet over LOW heat. Add the sliced onions and 1/4 teaspoon salt. This low heat is key to preventing burning and developing deep flavor slowly.
- Cook the onions, stirring occasionally, for 45 minutes to 1 hour, or until they are deeply golden brown and very soft. If the onions start to stick or brown too quickly, reduce the heat further or add a tablespoon of water to deglaze the pan, scraping up any browned bits from the bottom. Patience is essential here for perfect caramelization.
- Once caramelized, remove the onions from the heat and set aside.
- Punch down the risen dough and divide it into 8-10 equal portions. Shape each portion into a smooth roll.
- Place the rolls on a baking sheet lined with parchment paper. Cover and let rise again for 30-45 minutes, or until puffy.
- Preheat your oven to 375F.
- Brush the tops of the rolls lightly with the beaten egg wash and sprinkle generously with poppy seeds.
- Bake for 18-22 minutes, or until golden brown and cooked through.
- Let the rolls cool slightly on the baking sheet. Just before serving, top each roll with a spoonful of the caramelized onions.