The secret to a perfect plate of charred summer squash and zucchini lies in the sound of the sizzle. When those thick green and yellow rounds hit a screaming hot cast-iron surface, they should hiss with authority. That sound is the moisture evaporating instantly, allowing the natural sugars to caramelize into deep, smoky grill marks rather than turning into a puddle of grey mush.
Most home cooks struggle with squash because it is essentially a sponge filled with water. If you’ve ever ended up with a watery mess that lacks any bite, you aren’t alone. This method focuses on high-heat geometry and moisture management to ensure every piece stays firm, vibrant, and packed with a concentrated earthy sweetness.
The real trick to professional-grade texture is the “Bone-Dry” rule. I’ve found that even a tiny bit of surface moisture acts as a thermal barrier, steaming the vegetable from the outside in. By aggressively patting the squash dry and delaying the salt until the very last second, you create a structural crust that locks the juices inside while the exterior develops a beautiful, charred snap.
The Science of Searing Summer Squash
Zucchini and yellow squash are roughly 95% water, which makes them a nightmare for traditional sautéing. When you apply heat, the pectin in the cell walls begins to break down, releasing that internal liquid. If the pan isn’t hot enough, that liquid pools and boils the vegetable, leading to that dreaded “weeping” effect on your plate.
To achieve a true char, we rely on the Maillard reaction. This chemical reaction between amino acids and reducing sugars requires temperatures well above the boiling point of water. Therefore, we must eliminate surface moisture so the squash can climb past 212°F immediately upon contact with the pan. This creates a savory, browned exterior before the delicate interior has a chance to collapse into a soft puree.
Essential Components for Charred Summer Squash and Zucchini
Success starts with how you prep your produce. I recommend cutting your zucchini and squash into 1-inch thick rounds or chunks. This “Golden Ratio” is thick enough to withstand intense heat without overcooking in the center, yet thin enough to develop a deep char in just a few minutes. If you slice them too thin, they’ll turn to limp ribbons before you ever see a grill mark.
The choice of oil is equally vital for this high-heat application. You need an oil with a high smoke point, like avocado or grapeseed oil. Extra virgin olive oil has a lower smoke point and will burn, creating a bitter, acrid flavor that ruins the delicate sweetness of the summer vegetables. Save the fancy olive oil for a finishing drizzle if you like, but stick to the heavy hitters for the actual cooking.
Selecting the Best Zucchini and Yellow Squash
When you’re at the farmer’s market or grocery store, bigger is definitely not better. Those giant, arm-length zucchinis are full of large, watery seeds and have a spongy texture that almost always turns to mush. Look for small to medium-sized squash that feel heavy for their size and have a tight, glossy skin.
Smaller vegetables have a denser cellular structure and fewer seeds. This means they hold their shape much better under the pressure of a hot grill pan. If the skin looks dull or feels slightly soft to the touch, it has already started losing moisture and won’t give you that satisfying “snap” when you bite into it.
The Role of Aromatics and Dry Spices
We use garlic powder and smoked paprika here for a very specific reason. Fresh minced garlic is wonderful, but it burns at the high temperatures required for a proper char. Burnt garlic tastes like charcoal in all the wrong ways. Garlic powder, however, adheres to the oiled surface of the squash and toasts evenly without becoming bitter.
The smoked paprika adds a layer of “faked” wood-fire flavor, which is especially helpful if you’re using an indoor grill pan. It complements the natural sweetness of the red onion wedges perfectly. These dry spices create a flavorful “rub” that toasts into the crust of the vegetable during those first four minutes of undisturbed cooking.
The Anti-Soggy Secret: Preparation and Moisture Control
If you take only one thing away from this guide, let it be this: moisture is the enemy of the char. After you slice your vegetables, you must pat them firmly with paper towels. I’m talking about a real, aggressive drying session. If the surface is damp, the heat of the pan goes into evaporating that water instead of browning the vegetable.
This preparation step is what separates a soggy side dish from a restaurant-quality vegetable centerpiece. By removing that surface film, you allow the oil and spices to make direct contact with the vegetable’s skin. This ensures that the very first second of cooking starts the browning process rather than a steaming process.
Why We Delay the Salt
Salt is a powerful dehydrator through the process of osmosis. The moment salt touches a sliced zucchini, it begins drawing water out of the cells and onto the surface. If you salt your vegetables in the mixing bowl, you’ll find a pool of water at the bottom within minutes. This is a recipe for disaster.
By waiting to salt until the vegetables are cooked and in the serving bowl, you keep that moisture locked inside the cell walls. This preserves the “crunch” and prevents the squash from becoming limp. You still get all the flavor of the salt, but it sits on the surface where it hits your taste buds first without ruining the structural integrity of the dish.
Step-by-Step: Achieving the Perfect High-Heat Char
Before you even think about adding the vegetables, your pan needs to be shimmering hot. If you’re using cast iron, let it preheat for at least five minutes. You want to see a tiny wisp of smoke starting to rise from the oil. This high initial heat is what “shocks” the vegetable and creates that instant sear.
The most common mistake is “pan-fiddling.” Once you lay those squash rounds down, leave them alone! Every time you move them or stir them, you drop the temperature of the pan and interrupt the crust formation. Let them sit undisturbed for a full four minutes. You’re looking for dark, distinct lines that look almost like they were painted on.
Phase 1: The Initial Contact and Crust Formation
During these first four minutes, the sugars in the squash and the red onions are undergoing caramelization. The red onion wedges should have the root end intact so they don’t fall apart into individual rings. This allows the flat sides of the wedge to get a deep, dark sear that tastes incredibly sweet and mellow.
You’ll notice the aroma changing from raw and grassy to sweet and smoky. This is your cue that the Maillard reaction is working. Don’t be afraid of a little dark color; that char is where the “grilled” flavor lives. If the pan starts smoking excessively, turn the heat down just a hair, but keep it hot enough to maintain that sizzle.
Phase 2: Flipping for Tender-Crisp Results
After the flip, the second side usually needs less time—about three minutes. The goal is “tender-crisp,” which means the vegetable is cooked through but still offers a slight resistance when you bite it. Remember the principle of carryover cooking; the squash will continue to soften for a minute or two after you take it off the heat.
For a similar approach to preventing mushy results, try this grilled summer squash with balsamic glaze.
If you cook it until it feels soft in the pan, it will be mushy by the time it hits the table. Use a pair of tongs to gently press on a piece of zucchini. It should feel slightly springy, not squishy. Once you hit that point, get them out of the pan and into your serving bowl immediately.
Equipment: Why Cast Iron and High Heat Matter
A heavy-bottomed cast-iron grill pan is the gold standard for this recipe. Cast iron has incredible heat retention, meaning when you drop a pound of cold vegetables onto it, the temperature doesn’t plummet. Stainless steel works too, but you have to be more careful about sticking. Non-stick pans are generally poor for charring because they can’t safely handle the extreme heat required.
If you’re cooking outdoors, the same rules apply. Ensure your grates are clean and well-oiled. The direct flame of a charcoal or gas grill adds an even deeper smoky dimension, but the “no-salt” and “bone-dry” rules remain the most important factors for success regardless of the heat source.
Flavor Variations and Seasonal Swaps
While the balsamic and parsley combo is a classic, this technique is a canvas for other flavors. For a Mediterranean twist, swap the parsley for fresh mint and add a sprinkle of dried oregano and lemon zest at the end. The coolness of the mint against the charred squash is incredibly refreshing on a hot day.
If you like heat, toss the finished vegetables with a pinch of Aleppo pepper or red chili flakes. You can also go for a “Garden Herb” version by using a mix of fresh dill and chives. The key is to always add fresh herbs at the very end so their delicate oils don’t burn or turn bitter in the hot pan.
What to Serve with Charred Summer Squash and Zucchini
This dish is a versatile powerhouse that pairs beautifully with almost any protein. The acidity of the balsamic glaze makes it a perfect partner for richer meats like seared lamb chops or a juicy ribeye steak. The glaze cuts through the fat and refreshes your palate between bites.
For a lighter summer meal, serve these charred vegetables alongside grilled lemon-herb chicken or a flaky piece of white fish. If you’re keeping it vegetarian, they are fantastic tossed into a hearty lentil salad or served over a bed of creamy polenta. The smoky char provides a “meaty” depth that makes the meal feel substantial.
For a lighter summer meal, serve these charred vegetables alongside grilled lemon-herb chicken or a crunchy rainbow veggie slaw.
Troubleshooting Common Squash Texture Issues
If your squash looks grey and limp instead of charred, the culprit is almost always pan crowding. When you put too many vegetables in the pan at once, the temperature drops and the moisture released from the squash has nowhere to go, so it steams. Work in batches to give each piece its own space.
Complementary Dishes
Explore these dishes that go well with charred vegetables.
- For a hearty addition, consider the sheet pan sausage and potato wedges, offering savory notes and satisfying textures.
- Try the skillet roasted cod with white beans and tomato for a flavorful seafood option that complements the freshness of summer vegetables.
If your onions are burning before the squash is done, check your wedge size. Onions have more sugar and burn faster, so keep them in thick wedges with the root attached. This protects the inner layers while the outer layer chars. If the dish is watery on the plate, you likely salted too early or didn’t pat the vegetables dry enough before cooking.
Expert Tips for Professional Vegetable Presentation
To get that restaurant-quality “glossy” look, don’t skip the balsamic glaze. It provides a beautiful dark contrast to the bright green and yellow of the squash. When plating, try “shingling” the rounds—overlapping them slightly in a circular pattern—rather than just piling them in a heap. This keeps them from steaming each other while they sit.
Finally, the fresh parsley isn’t just a garnish; it provides a necessary pop of color and a hit of freshness that balances the smoky char. Chop it roughly so you get big, vibrant flakes of green. When you toss everything together at the last second with the salt and pepper, the heat of the squash will just barely wilt the parsley, releasing its aroma right as it hits the table.
Frequently Asked Questions
Can I use a regular non-stick frying pan?
You can, but it isn’t ideal. Non-stick coatings are generally not designed for the sustained high heat needed to create a deep char. You might get some browning, but you won’t get those iconic, dark grill marks. Additionally, overheating non-stick pans can damage the coating. If it’s your only option, cook in very small batches to keep the heat as high as possible.
How do I store and reheat leftovers?
Store leftovers in an airtight container in the fridge for up to three days. Be aware that the texture will soften significantly as it sits. I don’t recommend reheating them in the microwave, as they will become very mushy. Instead, chop them up and fold them into a morning frittata, or eat them cold in a grain bowl with a little extra balsamic drizzle.
Is it necessary to peel the zucchini or squash?
No, you should definitely leave the skin on! The skin acts as a structural “skeleton” for the vegetable. It’s what holds the round together while the inside softens. Plus, the skin is where most of the fiber and vibrant color live. Peeling them will almost guarantee a mushy result that falls apart in the pan.
What is the best substitute for balsamic glaze?
If you don’t have balsamic glaze, you can use a reduction of pomegranate molasses for a similar sweet-tart profile. Alternatively, a simple squeeze of fresh lemon juice and a tiny pinch of sugar can mimic the acidity and balance. Avoid using regular balsamic vinegar straight from the bottle, as it is too thin and won’t cling to the vegetables like a glaze does.
Can I cut the vegetables into smaller cubes?
Cutting them into small cubes increases the surface area, which sounds good for browning but actually makes them overcook much faster. Small cubes tend to turn into a “hash” texture. The 1-inch thick rounds provide enough thermal mass to get a great char on the outside while staying firm in the middle. Stick to the larger chunks for the best texture control.
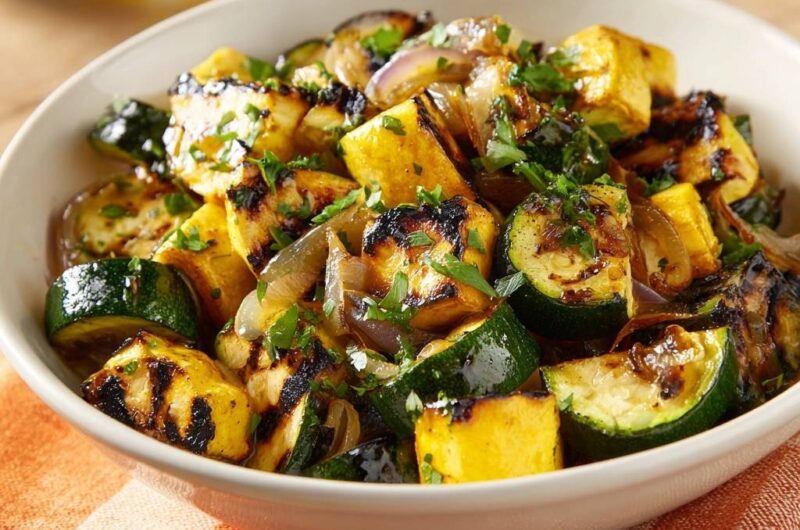
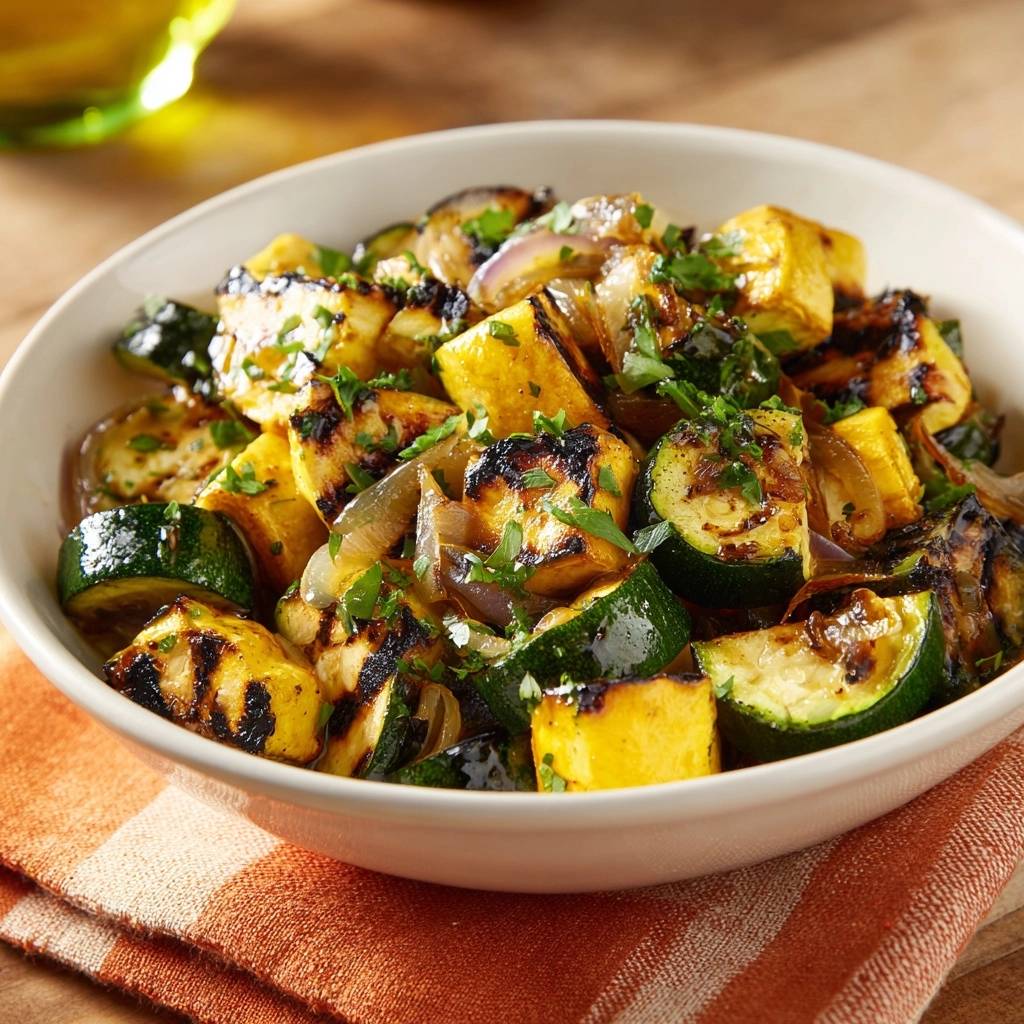
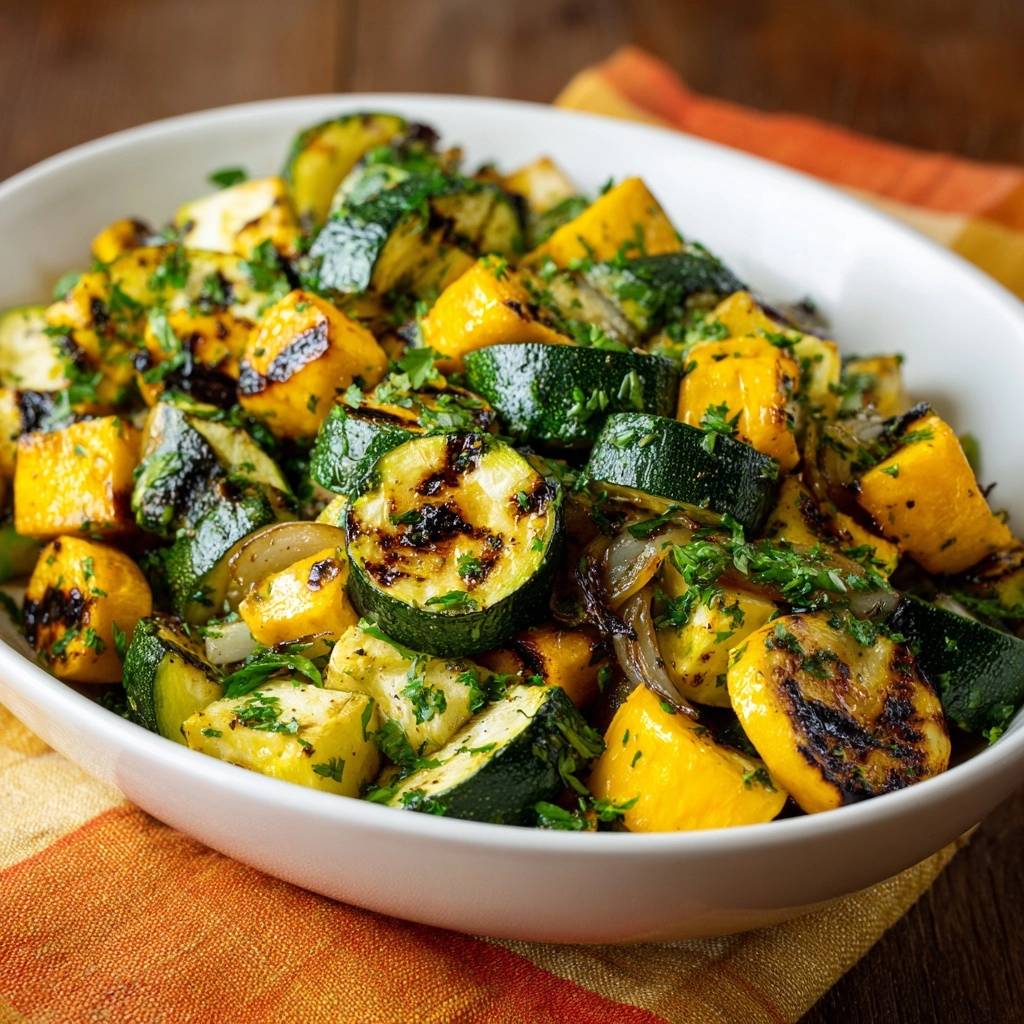
Charred Summer Squash and Zucchini
Course: Side DishCuisine: AmericanDifficulty: easy4
servings10
minutes12
minutes110
kcal22
MinutesA vibrant and firm vegetable dish featuring zucchini, yellow squash, and red onion. By using a specific high-heat searing method and delayed salting, these vegetables achieve a smoky crust while remaining tender-crisp.
Ingredients
2 medium zucchinis, cut into 1-inch thick rounds
2 medium yellow summer squash, cut into 1-inch thick chunks
1 large red onion, sliced into thick wedges (root end intact to hold together)
2 tablespoons high-smoke point oil (like avocado or grapeseed oil)
1 tablespoon balsamic glaze (for the final drizzle)
1 teaspoon garlic powder
1/2 teaspoon smoked paprika
1/4 cup fresh parsley, roughly chopped
Kosher salt and cracked black pepper to taste
Directions
- The most important step to prevent sogginess is to ensure your vegetables are bone-dry. After cutting, pat the zucchini and squash pieces firmly with paper towels to remove all surface moisture.
- In a large bowl, toss the squash, zucchini, and red onion wedges with the oil, garlic powder, and smoked paprika. Do NOT add salt yet. Salting now draws out moisture and causes the vegetables to stew rather than sear.
- Preheat a cast-iron grill pan or an outdoor grill to medium-high heat. The surface must be shimmering hot before adding the vegetables.
- Work in batches to avoid crowding. Place the vegetables on the grill grates in a single layer. Let them sit undisturbed for 4 minutes. This creates the distinct, dark charred grill marks seen in the image and builds a structural “crust” that keeps the inside firm.
- Flip the pieces carefully and cook for another 3 minutes. The vegetables should be tender-crisp, not soft.
- Remove the vegetables to a serving bowl. Immediately toss with the fresh parsley and a drizzle of balsamic glaze to match the glossy finish in the image.
- Season with salt and pepper only at the very last second before serving. This ensures the vegetables stay crisp and flavorful rather than turning into a watery mess on the plate.
Notes
- The key to preventing sogginess is to pat the vegetables dry before cooking and only add salt immediately before serving. Use a high-smoke point oil like avocado or grapeseed oil for the best results.