
Most citrus bars suffer from a fatal flaw that ruins the entire experience: the dreaded soggy bottom. You know the one—where the crust turns into a wet, mushy paste that sticks to the parchment paper instead of providing a satisfying crunch. It’s a common frustration that makes many bakers give up on creamy fruit bars altogether.
However, these Creamy Orange Zest Bars use a specific “Anti-Soggy” method to ensure every bite is structurally sound. We’re aiming for a specific sensory contrast here. You want a buttery, snappy graham cracker base that supports a silky, custard-like orange filling without falling apart in your hands.
The secret to this professional-grade texture is a double-bake technique combined with a moisture-barrier seal. By treating the crust as a foundation rather than an afterthought, you’ll create a dessert that looks as sharp as it tastes. This guide dives deep into the mechanics of citrus baking to ensure your bars are perfect every single time.
For an equally smooth texture, consider this silky graham cracker cheesecake.
The Science of the Moisture-Barrier Crust
To understand why this recipe works, we have to look at the physics of the “Protein Seal.” When you pour a liquid filling onto a porous graham cracker crust, osmosis naturally pulls the moisture downward. This is why traditional recipes often result in a base that feels more like wet sand than a baked cookie.
Therefore, we use a reserved egg white to create a hydrophobic layer. When you brush a thin layer of egg white onto a hot, par-baked crust, the heat coagulates the protein instantly. This creates a microscopic, waterproof shield that prevents the orange filling from penetrating the crackers.
In addition to the egg white, the par-baking process itself is vital. It allows the butter and sugar to caramelize and harden before the liquid elements are introduced. This structural integrity is what allows these Creamy Orange Zest Bars to maintain their snap even after sitting in the fridge for a few days.
Essential Components for the Orange Filling
The filling relies on a specific balance of fat, acid, and sugar to achieve that signature “creamy” mouthfeel. Sweetened condensed milk is the heavy lifter here. Unlike heavy cream, it has a high sugar density and reduced water content, which helps the bars set firmly without becoming icy or runny.
Furthermore, the quality of your citrus makes or breaks the flavor profile. Freshly squeezed orange juice contains volatile oils and enzymes that bottled juice simply lacks. More importantly, the fresh zest provides the aromatic punch. The oils in the skin are where the true “orange” essence lives, so don’t skip the grating process.
For a similar citrus brightness, explore these creamy lemon layer bars that also set perfectly.
The egg ratio is also carefully calibrated. By using two yolks plus one whole egg, we increase the fat content. This results in a richer, more stable custard that feels luxurious on the tongue. Finally, choosing a high-quality honey graham cracker provides a warm, toasted backdrop that complements the bright citrus notes perfectly.
Selecting the Right Citrus Varieties
While standard Navel oranges work beautifully, you can experiment with different varieties to tweak the acidity. Cara Cara oranges offer a lower acid profile and a stunning pinkish hue, while Blood oranges provide a sharp, raspberry-like undertone. Just keep in mind that higher acidity can cause the custard to set faster, so keep a close eye on the oven.
Step-by-Step: Engineering the Perfect Citrus Bar
Creating these bars is a process of transformation. You’ll start with loose crumbs and liquid ingredients, but through careful temperature control, they’ll become a cohesive, elegant dessert. Pay close attention to the visual cues at each stage to ensure success.
Phase 1: Compacting the Graham Cracker Base
When you mix your crumbs and melted butter, the texture should resemble wet sand. However, the real trick is in the compression. Use the flat bottom of a measuring cup or a heavy glass to press the mixture into the pan with firm pressure.
You want a dense, even layer that reaches all the way to the corners. If you just use your fingers, you’ll likely have “soft spots” where the filling can leak through. A tightly packed base is your first line of defense against a crumbling bar.
Phase 2: The Par-Bake and Egg White Seal
Bake the crust for exactly 10 minutes until it smells nutty and looks slightly darker. As soon as it comes out, brush that egg white on while the crust is still sizzling. You’ll see the egg white turn opaque almost immediately as it cooks onto the surface.
Be careful not to use too much egg white. You aren’t looking to make a layer of scrambled eggs on your crust. You just need a thin, glistening coat to fill in the microscopic gaps between the crumbs. This creates that essential moisture barrier.
Phase 3: Emulsifying the Creamy Orange Filling
When whisking your filling, start with the condensed milk and eggs, then slowly stream in the orange juice. You want to achieve a smooth, uniform emulsion. However, don’t whisk too vigorously or you’ll incorporate too much air.
Excess air creates bubbles on the surface and can cause the bars to crack as they cool. Whisk just until the yellow of the yolks has completely disappeared into the white of the milk. The mixture should look thick, glossy, and pale orange.
Phase 4: The Final Bake and Jiggle Test
The final bake is all about timing. You’re looking for the edges to be slightly puffed and golden, but the center should still have a “slight jiggle” when you gently shake the pan. This isn’t a liquid splash, but a firm wobble like set gelatin.
Remember that carry-over cooking is a real factor here. The bars will continue to firm up as they sit on the counter. If you wait until the center is completely stiff in the oven, the bars will likely turn out rubbery or dry once they’ve fully cooled.
Critical Equipment for Consistent Results
The pan you choose matters more than you might think. A light-colored metal 8×8 inch pan is the gold standard for this recipe. Metal conducts heat quickly and evenly, ensuring the crust bakes through before the custard overcooks.
Glass or ceramic pans hold heat much longer, which can lead to overbaked edges and a raw center. Additionally, always use a parchment paper “sling.” Leave an overhang on two sides so you can lift the entire block of bars out at once. This prevents you from having to dig the first square out with a spatula, which usually destroys the crust.
Troubleshooting Common Orange Bar Failures
If your filling is too runny after chilling, it’s usually a sign of underbaking or using eggs that were too small. Always use “Large” eggs to ensure the protein count is high enough to set the custard. Conversely, if the crust is too hard to bite through, you may have over-compacted it or baked the par-bake for too long.
Surface cracking is another common issue. This usually happens if the oven temperature spikes or if the bars are placed too close to the top heating element. Always bake on the center rack and use an oven thermometer if you suspect your appliance runs hot. A gentle, even heat is the key to a smooth, crack-free surface.
Storage and the Essential Chilling Window
I know it’s tempting to slice into these while they’re warm, but you must wait. The chilling window of at least 3 hours is a chemical necessity. The fats in the sweetened condensed milk need time to re-solidify and stabilize the structure of the bar.
For storage, keep the bars in an airtight container in the refrigerator. They’ll stay fresh for up to 4 days. To prevent the crust from absorbing “fridge smells,” I recommend placing a piece of parchment paper over the top of the bars before sealing the lid. This keeps the flavor pure and the texture crisp.
Flavor Variations and Citrus Swaps
Once you master the base recipe, you can get creative. For a “Creamsicle” vibe, add a teaspoon of vanilla bean paste to the filling. The little black flecks look beautiful against the orange. If you want something with more bite, swap the graham crackers for ginger snaps.
The spicy ginger pairs incredibly well with the sweet orange custard. You can also try a “Citrus Medley” by using a mix of lemon, lime, and orange juices. Just ensure the total liquid volume remains the same so the custard sets properly.
What to Try Next
To complement your citrusy bars, consider these recipes.
- For a hearty start to your morning, explore the ricotta stuffed brioche French toast, offering a similar richness and delightful texture.
- If you enjoy that satisfying crispness from your orange bars, you’ll appreciate the golden crispy hash brown waffles, designed for perfect crunch.
Expert Tips for Clean Professional Slicing
To get those perfectly sharp edges you see in bakeries, use the “Hot Knife” technique. Run your sharpest knife under hot water for 30 seconds, then wipe it completely dry. Make one long, smooth cut through the chilled bars.
Crucially, you must wipe the blade clean and re-heat it between every single slice. This prevents the creamy filling from dragging into the crust layer. It takes an extra minute, but the professional results are well worth the effort.
Frequently Asked Questions
Can I use bottled orange juice?
Technically yes, but I don’t recommend it. Bottled juice is pasteurized, which kills the bright, volatile flavor notes found in fresh fruit. Furthermore, you’ll miss out on the fresh zest, which provides the essential oils that make these bars aromatic. If you must use bottled, ensure it is 100% juice with no added sugar, and add an extra teaspoon of orange extract to compensate for the flat flavor.
Why did my crust crumble when slicing?
A crumbling crust usually stems from two things: not enough butter or not enough pressure. Ensure you are using the full amount of melted butter to bind the crumbs. Additionally, the 1-hour room temperature cooling period is vital. If you move the bars directly from the hot oven to the cold fridge, the sudden temperature shift can cause the crust to contract and pull apart.
Is there a substitute for sweetened condensed milk?
In this specific recipe, there isn’t a simple 1:1 swap. Sweetened condensed milk provides a unique combination of sugar and reduced milk solids that creates the “creamy” texture. Evaporated milk is too thin and lacks the sugar density required to set the custard. If you need a dairy-free option, you can find sweetened condensed coconut milk, which works quite well as a substitute.
How do I prevent the topping from sinking?
The topping should be sprinkled on gently right before the bars go into the oven for the final bake. If your crumbs are sinking, your filling might be too thin. Make sure you’ve whisked the eggs and condensed milk thoroughly to create a stable base. Also, ensure your topping crumbs are mixed well with the melted butter so they stay light and airy on the surface.
Can these bars be frozen for later?
Yes, these bars freeze surprisingly well! To maintain the “Anti-Soggy” promise, flash-freeze the sliced bars on a baking sheet for one hour until firm. Then, wrap each bar individually in plastic wrap and store them in a freezer bag. When you’re ready to eat, thaw them in the refrigerator overnight. Avoid thawing at room temperature, as this can cause condensation that softens the crust.
Orange Zest Bars
Course: DessertCuisine: AmericanDifficulty: medium12
bars15
minutes35
minutes240
kcal50
MinutesA citrus dessert bar featuring a creamy orange custard filling over a crisp graham cracker base. This recipe uses a moisture-barrier method with egg whites to ensure the crust remains crunchy and stable.
Ingredients
2 cups graham cracker crumbs (divided: 1.5 cups for base, 0.5 cup for topping)
1/2 cup unsalted butter, melted (divided)
1/4 cup granulated sugar
14 ounces sweetened condensed milk
1/2 cup fresh orange juice
1 tablespoon orange zest
3 large eggs (1 white reserved for sealing; 2 yolks + 1 whole egg for filling)
1/2 teaspoon vanilla extract
1/4 teaspoon salt
Directions
- Preheat your oven to 350°F (175°C) and line an 8×8 inch baking pan with parchment paper, leaving an overhang on the sides.
- Prepare the Base: In a bowl, combine 1.5 cups graham cracker crumbs, 1/3 cup melted butter, and the sugar. Press the mixture firmly into the bottom of the prepared pan using the bottom of a flat measuring cup to ensure a dense, stable crust.
- Par-Bake and Seal: Bake the crust for 10 minutes. Remove from the oven and immediately brush the hot crust with a thin layer of the reserved egg white. This creates a waterproof protein barrier that prevents the liquid filling from soaking into the crust.
- Prepare the Topping Crumble: In a small bowl, mix the remaining 0.5 cup graham cracker crumbs with the remaining melted butter and a pinch of orange zest. Set aside.
- Make the Filling: In a medium bowl, whisk together the sweetened condensed milk, orange juice, 1 tablespoon orange zest, 2 egg yolks, 1 whole egg, vanilla, and salt until completely smooth.
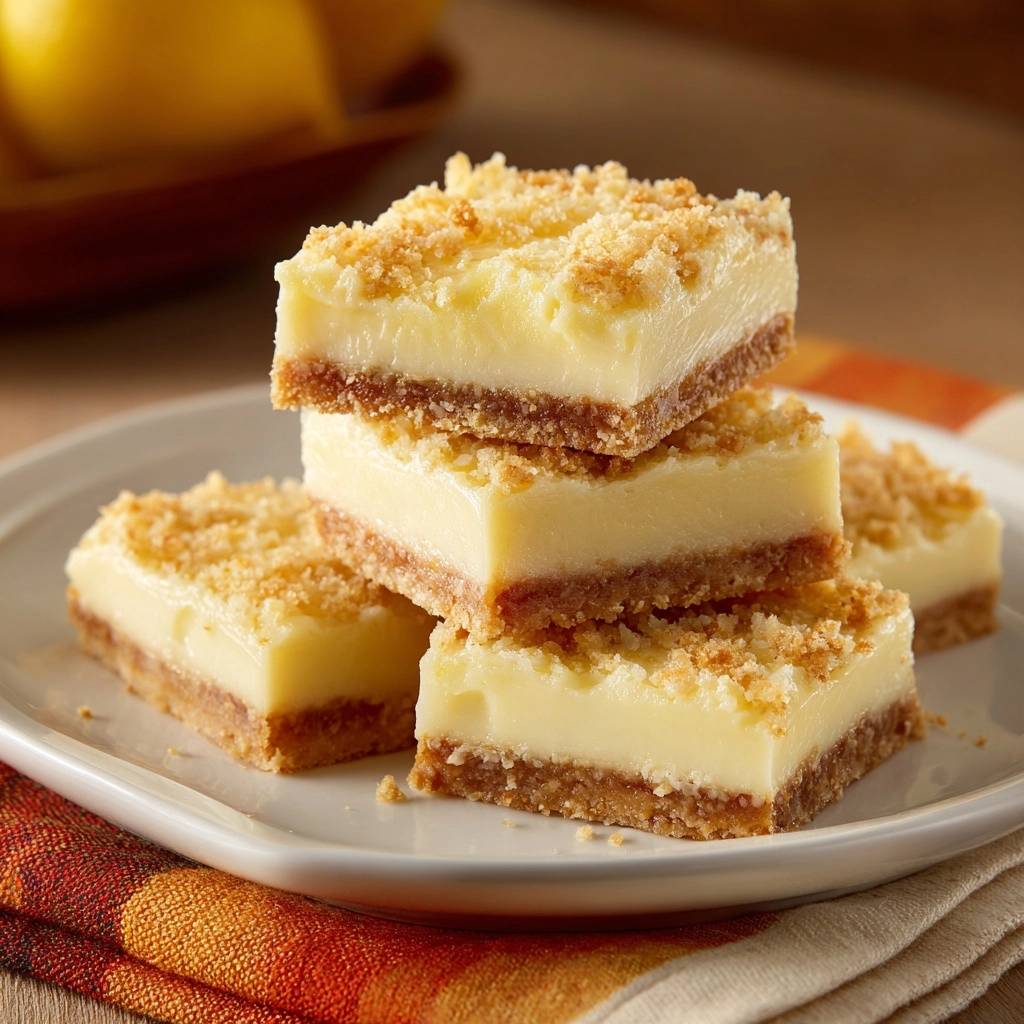
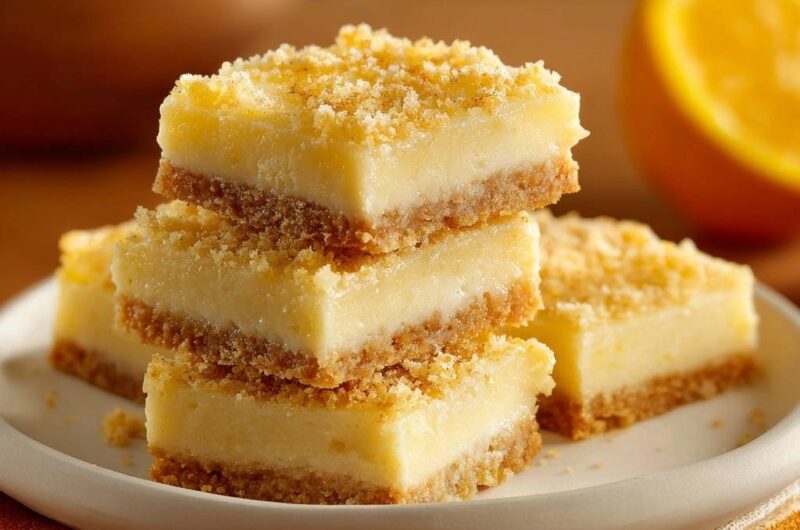
- Assemble: Pour the orange mixture over the sealed crust. Evenly sprinkle the reserved buttered crumbs over the top of the liquid filling to achieve the textured finish shown in the image.
- Final Bake: Bake for 22 to 25 minutes until the edges are slightly golden and the center is set but still has a slight jiggle.
- Set and Chill: Allow the bars to cool completely in the pan at room temperature for 1 hour, then refrigerate for at least 3 hours. This cooling period is essential for the custard to set and the crust to remain crisp.
- Slice: Lift the bars out using the parchment paper overhang and slice into squares with a sharp, warm knife. Top with additional fresh zest if desired.
Notes
- Brushing the hot crust with egg white creates a waterproof protein barrier that prevents the liquid filling from soaking in. Ensure the bars chill for at least 3 hours to allow the custard to set properly.