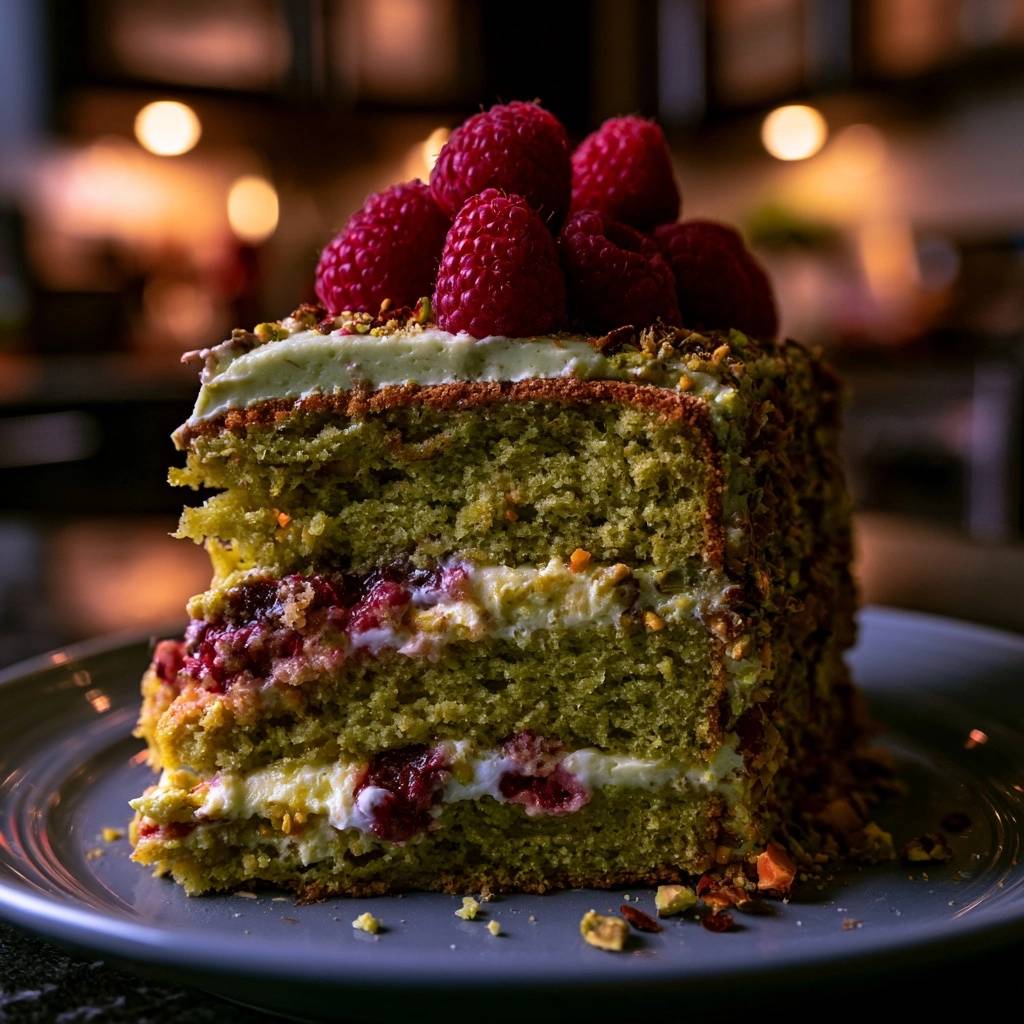
Nothing ruins a beautiful layer cake faster than fruit juice leaking into the sponge and turning it into a mushy mess. You spend hours in the kitchen only to have the middle layers dissolve into a purple, soggy puddle. This Raspberry Pistachio Layer Cake solves that structural nightmare with a specific moisture barrier technique.
The secret lies in the contrast between the earthy, dense pistachio sponge and the bright, tart pop of fresh raspberries. Instead of a generic sweet cake, you get a sophisticated balance of nutty oils and vibrant fruit acidity. The texture remains light and airy because we control exactly where the moisture goes.
I’ve found that the key to success is the fat-heavy frosting seal. By creating a hydrophobic layer between the fruit and the crumb, you ensure the cake stays firm for days. This isn’t just about flavor; it’s about the physics of a perfect slice that doesn’t collapse the moment your fork hits the plate.
The Science of the Moisture Barrier Technique
When you place fresh raspberries or preserves directly onto a naked sponge, the cake acts like a thirsty sponge. The sugar in the fruit draws moisture out of the berries through osmosis, and that liquid migrates straight into the air pockets of your cake. This process, known as saturation, leads to a structural failure where the middle of the cake becomes heavy and wet.
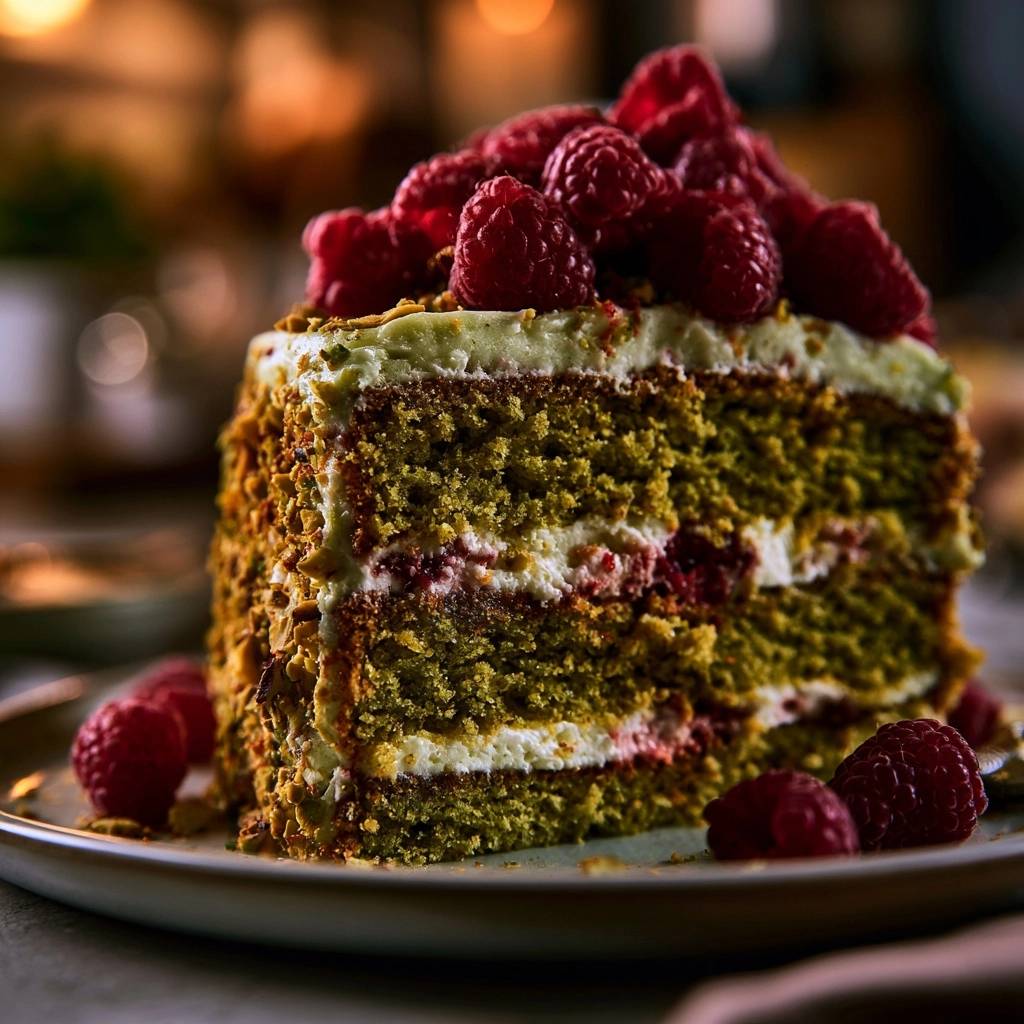
To prevent this, we use a moisture barrier. The cream cheese and butter in the frosting are packed with fats that naturally repel water. By spreading a thin, even layer of this frosting over the entire surface of the cake layer before adding the fruit, you create a waterproof seal. The juice from the raspberries simply cannot penetrate the fat layer to reach the flour particles.
Furthermore, the addition of pistachio paste to the frosting increases the viscosity. This thicker consistency provides a sturdy foundation that supports the weight of the upper layers. Without this barrier, the weight of the top two layers would squeeze the fruit juice even deeper into the bottom sponge, accelerating the soggy texture we want to avoid.
Essential Components for the Pistachio Sponge
For the base of this cake, you want to use raw, unsalted pistachios. Salted nuts will completely throw off the sodium balance and mask the delicate, floral notes of the pistachio. Grinding them yourself ensures the oils are fresh, which contributes to a moist, tender crumb that boxed flours simply can’t replicate.
Temperature control is your best friend when mixing this batter. You must use room temperature eggs and milk to ensure a proper emulsion. If you add cold milk to creamed butter, the fat will seize and the batter will look curdled. A smooth emulsion traps air, which expands in the oven to give you that sought-after lift.
Don’t skip the almond extract in the ingredient list. While it might seem counterintuitive, a small amount of almond extract actually amplifies the natural nuttiness of the pistachios. It acts as a flavor bridge, making the green nuts taste more like themselves while providing a lovely aromatic quality that pairs perfectly with the raspberries.
Selecting and Grinding Your Pistachios
When you head to the store, look for the greenest raw pistachios you can find, as these provide the best natural color. You want to pulse them in a food processor until they reach a fine, sandy consistency. Be extremely careful not to walk away during this process.
If you process the nuts for even thirty seconds too long, the friction and heat will release the oils, turning your dry meal into pistachio butter. You need a dry, flour-like texture so it incorporates evenly with the all-purpose flour. If the nuts become oily, they will weigh down the batter and result in a greasy, flat cake.
Fresh vs. Frozen Raspberries: The Structural Impact
Fresh raspberries are mandatory for this specific layering technique. Frozen berries are harvested at peak ripeness and then frozen, which breaks down their cell walls. As soon as they begin to thaw inside your cake, they release a massive amount of liquid that no barrier can fully contain.
Fresh berries maintain their structural integrity, holding their shape even under the weight of the cake layers. They provide a burst of texture and a controlled release of juice. If you absolutely must use frozen, you would need to cook them down into a thick reduction first, but for this specific “high pile” aesthetic, fresh is the only way to go.
Step-by-Step: Aerating the Pistachio Batter
Start by creaming your softened butter and sugar for at least three to five minutes. You’re looking for the mixture to turn a very pale yellow, almost white, and look noticeably fluffy. This step is where you build the air bubbles that make the cake light.
When you add the eggs, do it one at a time, beating well after each addition. You’ll see the mixture transform from a grainy paste into a smooth, voluminous cream. If the mixture looks like it’s breaking, add a tablespoon of your flour mixture to help it come back together.
Finally, alternate adding your dry ingredients and milk, starting and ending with the dry. Mix on the lowest speed just until the last streaks of flour disappear. Overmixing at this stage develops gluten, which will turn your elegant pistachio sponge into something tough and bread-like.
Precision Baking and Cooling Protocols
Using three 8-inch pans is a strategic choice for stability. A taller, narrower cake is less likely to sag in the middle than a wider 9-inch version. To get perfectly flat tops, you can wrap the outside of your pans with damp cake strips, which prevents the edges from setting before the center has a chance to rise.
Once the cakes are out of the oven, let them rest in the pans for ten minutes before flipping them onto a wire rack. This allows the structure to firm up slightly so they don’t break. You must let these layers cool completely to room temperature, or even chill them in the fridge for an hour.
Frosting a warm cake is a recipe for disaster. The heat will melt the butter in your moisture barrier, causing it to slide right off the sponge. A cold cake also crumbs less, giving you a much cleaner finish when you start applying that beautiful green pistachio frosting.
Constructing the Anti-Soggy Raspberry Filling
This is where the magic happens. Place your first layer on the stand and spread a thin coat of frosting across the top. Now, pipe a “dam” or a ring of frosting about half an inch tall around the very edge of the cake. This acts as a physical wall to keep the preserves from leaking out the sides.
Spread your raspberry preserves inside that dam, then gently press the fresh raspberries into the jam. You want to anchor them so they don’t roll around when you place the next layer on top. This double-layer of fruit provides both the concentrated flavor of the preserves and the fresh pop of the berries.
Repeat this for the second layer, ensuring your frosting dam is level all the way around. When you place the final cake layer on top, press down very gently to set the structure. This “nesting” of the fruit inside the frosting walls is what gives the cake its impressive height and clean, professional-looking profile.
Whipped Pistachio Cream Cheese Frosting
To get the right consistency, make sure your cream cheese is softened but not oily. Beat it with the butter until there are no lumps before adding the powdered sugar. The pistachio paste adds a rich, savory depth that cuts through the sweetness of the sugar.
If your frosting feels too soft to hold the weight of the layers, chill it for 15 minutes before you start assembling. You want it to be stiff enough to hold a peak but smooth enough to spread without tearing the cake. This specific ratio of fat to sugar is what makes the moisture barrier so effective.
Professional Finishing: The Roasted Pistachio Crust
The crushed roasted pistachios on the exterior aren’t just for looks; they provide a fantastic crunch that contrasts with the soft cream. Use your palm to gently press the nuts into the sides of the cake while the frosting is still fresh and tacky. Work from the bottom up to get full coverage.
For the top, don’t just scatter the raspberries. Pile them high in the center to create a crown effect. This adds a sense of abundance and luxury to the presentation. The roasted nuts on the side also help hide any imperfections in your frosting technique, making it look like it came from a high-end bakery.
Troubleshooting Common Layer Cake Failures
If your cake layers are sliding, it usually means the frosting was too soft or the room is too warm. Pop the cake into the fridge for 30 minutes to firm up the “dam” and it should stabilize. Chilling is the most common fix for almost any structural issue with layer cakes.
If the pistachio flavor feels muted, check the quality of your pistachio paste. Some brands use fillers or too much sugar. You can boost the flavor by lightly toasting the raw pistachios before grinding them, though this will result in a browner cake rather than a vibrant green one.
A dense sponge usually points to expired baking powder or overmixing the flour. Always check the date on your leavening agents. If the frosting is too runny, add more powdered sugar one tablespoon at a time until it reaches a spreadable, stiff consistency that holds its shape.
Make-Ahead Strategies and Storage Logistics
This cake actually tastes better on day two. The moisture barrier allows the pistachio oils to seep into the crumb without making it soggy, while the raspberry flavor intensifies. You can store it in the refrigerator for up to three days in an airtight container or under a cake dome.
Because of the fresh raspberries, I do not recommend freezing the fully assembled cake. The berries will turn to mush when they thaw, and the moisture barrier will likely fail as the ice crystals melt. However, you can bake the pistachio sponge layers in advance, wrap them tightly in plastic, and freeze them for up to a month.
When you’re ready to serve, take the cake out of the fridge about 20 minutes before slicing. This allows the butter in the frosting to soften just enough to be creamy, but keeps the fruit filling cold and stable. Always use a sharp knife to ensure you don’t crush the delicate layers.
Expert Tips for Clean Slicing
To get those perfect, Instagram-worthy slices, use a tall chef’s knife dipped in hot water. Wipe the blade completely dry before making each cut. The heat from the metal will glide through the chilled cream cheese frosting and the pistachio crust without dragging the filling through the sponge.
Make one clean downward motion rather than sawing back and forth. After each slice, wipe the blade clean again. This prevents the red raspberry preserves from smearing onto the green pistachio layers, keeping the internal colors bright and distinct for every guest.
Frequently Asked Questions
Can I use pistachio flour instead of grinding my own?
Yes, you can use store-bought pistachio flour, but ensure it is fresh. Nut flours go rancid quickly because of their high oil content. If the flour smells slightly bitter or like paint, it has gone bad. Homemade ground pistachios usually offer a better texture and more vibrant color.
How do I make this without food coloring while keeping it green?
To get a natural green hue, use the highest quality “AAA” grade pistachios, which are often brighter. You can also replace a tablespoon of the milk with matcha powder. The matcha provides a deep green color and an earthy flavor that complements the pistachio without needing artificial dyes.
What is the best substitute for pistachio paste?
If you can’t find pistachio paste, you can make a quick version by blending 1/2 cup of roasted pistachios with a teaspoon of neutral oil and a pinch of sugar until completely smooth. Alternatively, you can use very finely ground pistachios, though the frosting will have a slightly grainier texture.
Why did my raspberry dam collapse?
The dam usually collapses if the frosting is too warm or if the dam was piped too thin. Ensure your frosting is chilled and stiff. The ring of frosting should be at least half an inch wide to provide enough surface area to support the weight of the cake layer above it.
Can I use this technique with other fruits like strawberries?
Absolutely. This moisture barrier technique works perfectly with sliced strawberries, blackberries, or even lemon curd. The key is always the fat-heavy frosting layer that prevents the fruit’s liquid from migrating into the cake sponge. Just ensure the fruit is cut into uniform pieces so the cake remains level.
Raspberry Pistachio Layer Cake
Course: DessertCuisine: AmericanDifficulty: easy12
servings35
minutes35
minutes70
Minutes510
kcalAmerican
Ingredients
2 cups all-purpose flour
1 cup finely ground raw pistachios (unsalted)
1.5 cups granulated sugar
1 tablespoon baking powder
1/2 teaspoon salt
1 cup unsalted butter, softened
3 large eggs, room temperature
1 cup whole milk
1 teaspoon vanilla extract
1/2 teaspoon almond extract
2-3 drops green food coloring (optional, for visual vibrancy)
Filling & Frosting:
8 ounces cream cheese, softened
1/2 cup unsalted butter, softened
3 cups powdered sugar
1/4 cup pistachio paste (or finely ground pistachios)
1.5 cups fresh raspberries
1/2 cup raspberry preserves
1 cup crushed roasted pistachios (for coating the exterior)
Directions
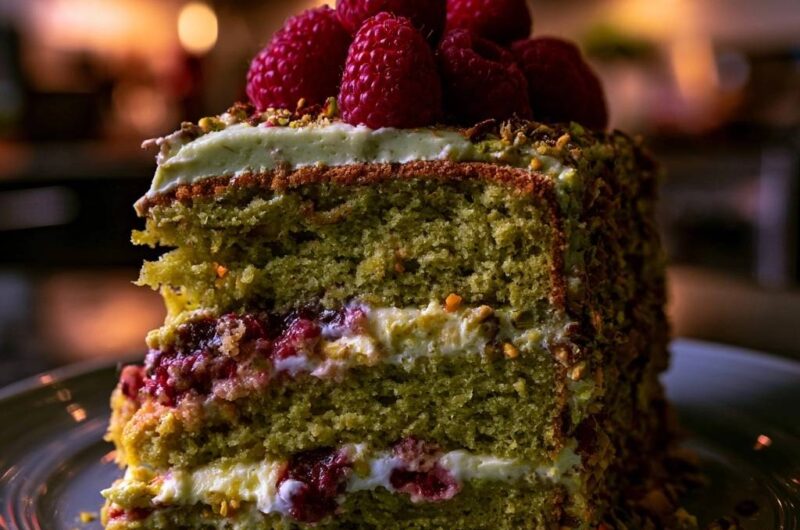
- Preheat your oven to 350°F (175°C). Grease and flour three 8-inch round cake pans (to achieve the three-layer height shown in the image).
- In a medium bowl, whisk together flour, ground pistachios, baking powder, and salt.
- In a large bowl, cream the butter and granulated sugar until pale and fluffy. Add eggs one at a time, followed by vanilla and almond extracts. Add food coloring if using.
- Gradually add the dry ingredients to the wet ingredients, alternating with the milk. Mix until just combined.
- Divide the batter evenly between the three pans. Bake for 25-30 minutes or until a toothpick comes out clean. Let cool completely in the pans before frosting.
- Prepare the Pistachio Cream Barrier: Beat the cream cheese and butter until smooth. Add powdered sugar and pistachio paste, whipping until stiff and spreadable.
- To solve the soggy cake problem, create a moisture barrier: Place the first cake layer on a plate. Spread a thin, even layer of the pistachio frosting over the entire surface. This fat-heavy layer seals the sponge.
- Use a piping bag to create a 1/2-inch tall “dam” of frosting around the edge of the cake.
- Spread 1/4 cup of raspberry preserves inside the dam. Gently press fresh raspberries into the preserves.
- Repeat the process with the second cake layer. Top with the third cake layer.
- Frost the top and sides of the cake with the remaining pistachio frosting.
- Visual Finish: Press the crushed roasted pistachios firmly into the sides of the cake until fully coated. Pile fresh raspberries high in the center of the top layer as shown in the image. Chill for at least 1 hour before slicing to allow the barrier to set.
Notes
- To ensure the best results, chill the cake for at least one hour before slicing to allow the moisture barrier to set. Use room temperature eggs and butter for a smoother batter consistency.