Picture this: you spend time creating a beautiful, no-bake dessert masterpiece. It’s chilled, it’s gorgeous, you slice into it… and then the filling sadly slides off the plate like a melting snowman. If you’ve ever faced the disappointment of a runny no-bake pie filling, especially a creamy one like peanut butter and chocolate, you are absolutely not alone! It used to happen to me more often than I’d like to admit. But after much trial and error, and let’s be honest, some slightly messy pie mishaps, I finally discovered the absolute key trick to getting a perfectly set, sliceable filling every single time. And this Peanut Butter Chocolate Pie? It’s the perfect showcase for just how wonderfully that little trick works!
This recipe combines the dreamy, nostalgic flavors of peanut butter and chocolate in a smooth, rich filling, all nestled in a crisp cookie crust. It’s surprisingly easy to make, requires no oven time (perfect for warm weather or busy days!), and with my tested method, guarantees a slice that holds its shape beautifully. Get ready to impress everyone with a no-bake Peanut Butter Chocolate Pie that’s as delightful to serve as it is to eat!
Why This Peanut Butter Chocolate Pie is a Keeper
Beyond the sheer deliciousness of peanut butter and chocolate together, this pie offers several irresistible advantages:
- Foolproof Setting: The primary reason this recipe stands out is its reliability. You won’t have to cross your fingers hoping the filling sets – the technique guarantees a firm, yet still creamy, result.
- No-Bake Ease: Avoid heating up your kitchen. This dessert is made entirely in the refrigerator, making it ideal for any season.
- Classic Flavor Combination: Peanut butter and chocolate are a match made in heaven. This pie delivers that beloved pairing in a decadent, dessert form.
- Simple Ingredients: You likely have many of the components in your pantry already, and the rest are easily found at any grocery store.
- Showstopping Presentation: With simple drizzles and toppings, this pie looks just as incredible as it tastes, perfect for parties, holidays, or just a special treat.
It’s a dessert that satisfies that deep craving for something sweet, salty, and incredibly creamy, all without the stress of a potentially runny mess.
Gathering Your Ingredients for This Dreamy Pie
Creating this perfectly set Peanut Butter Chocolate Pie starts with selecting the right components. Each ingredient plays a vital role, from building the sturdy foundation to creating that rich, smooth, and sliceable filling. Let’s look at what you’ll need and why these specific elements work so well together.
For the chocolate cookie crust, we start with simple chocolate cookie crumbs. Using about 20 standard chocolate sandwich cookies (creme filling removed, or just crushed whole if you prefer), you’ll get the perfect amount of crumbs for a standard 9-inch pie plate. These cookies provide a deep chocolate flavor that complements the peanut butter filling beautifully. Melting unsalted butter is crucial here; it acts as the binder that holds those crumbs together, creating a firm base that won’t crumble apart when you slice.

The star of our filling is the creamy peanut butter. Opt for a standard, smooth variety for the best texture. Natural peanut butters that separate can sometimes affect the set of no-bake fillings due to their oil content, so a processed, no-stir creamy peanut butter is your best bet for guaranteed success. Paired with softened cream cheese, which provides essential structure and a lovely tangy richness, these two form the decadent backbone of the pie.
To sweeten and add body, we use powdered sugar. Unlike granulated sugar, powdered sugar dissolves easily into creamy mixtures, resulting in a silky-smooth texture. Adding vanilla extract is optional but highly recommended; it enhances the overall flavor profile, adding a warm note that complements both the chocolate and peanut butter.
Now, for the ingredient that helps achieve that beautiful lightness and helps the filling set: whipped topping (like Cool Whip), thawed, or homemade whipped cream. This ingredient needs to be carefully folded in, as you’ll see in the instructions, to maintain its airy texture while incorporating fully into the dense peanut butter mixture.
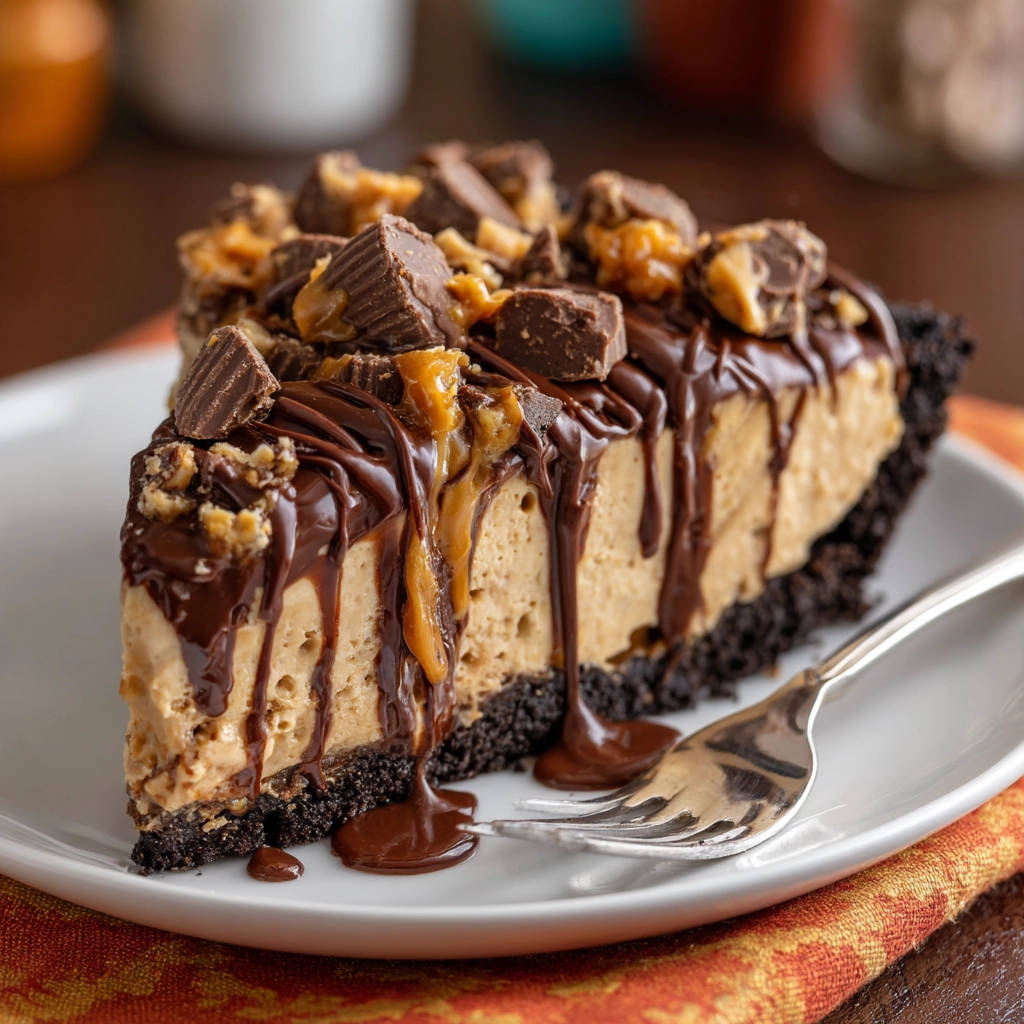
Finally, for those irresistible finishing touches, you’ll need chocolate syrup or ganache and caramel sauce for drizzling. These add extra layers of flavor and visual appeal. Chopped peanut butter cups scattered on top provide a delightful textural contrast and another punch of peanut butter chocolate goodness.
Here’s the full list to have ready:
- 1 and 1/2 cups chocolate cookie crumbs (from about 20 cookies)
- 1/4 cup unsalted butter, melted
- 8 ounces cream cheese, softened
- 1 cup creamy peanut butter
- 1 and 1/2 cups powdered sugar
- 1 teaspoon vanilla extract (optional)
- 8 ounces frozen whipped topping, thawed, or 3 cups homemade whipped cream
- 1/2 cup chocolate syrup or ganache, for drizzling
- 1/4 cup caramel sauce, for drizzling
- 1 cup chopped peanut butter cups, for topping
Crafting Your Peanut Butter Chocolate Pie: Step-by-Step Perfection
Let’s walk through the process of bringing this incredible no-bake Peanut Butter Chocolate Pie to life. Each step is straightforward, but paying attention to the details, especially the chilling time and how you handle the whipped topping, is key to that perfectly set filling.
- The very first step is creating the base: In a medium bowl, combine your chocolate cookie crumbs and the melted unsalted butter. Stir them together until the crumbs are evenly moistened by the butter. This mixture should resemble wet sand. Once combined, transfer this mixture into a 9-inch pie plate. Use the bottom of a glass or a flat measuring cup to firmly press the crumbs into the bottom and up the sides of the plate. Compact it really well – this is what gives you a sturdy crust that won’t fall apart when you slice. Place this crust in the refrigerator to chill for at least 30 minutes while you work on the filling. This chilling time helps the butter firm up, setting the crust in place.
- Next, we start building the creamy heart of the pie. In a large bowl, use an electric mixer (handheld or stand mixer works great) to beat together the softened cream cheese and the creamy peanut butter. It’s crucial that your cream cheese is truly softened to room temperature at this stage; cold cream cheese will result in a lumpy filling. Beat them until the mixture is completely smooth and the two ingredients are well combined, with no streaks of plain cream cheese or peanut butter. This might take a few minutes. Then, add the powdered sugar and the vanilla extract (if you’re using it). Continue beating until the mixture is smooth, creamy, and light. Scrape down the sides of the bowl as needed to ensure everything is incorporated.
- Now, for the technique that prevents the dreaded runny filling: gently folding in the whipped topping. Take your thawed whipped topping or homemade whipped cream and add it to the peanut butter mixture. Using a rubber spatula, begin to gently fold the whipped topping into the peanut butter mixture. The key here is a light hand. You want to incorporate the whipped topping fully, ensuring there are no streaks of plain white topping left, but you do not want to beat or vigorously mix it. Overmixing at this stage will deflate the airiness of the whipped topping, which is essential for the filling’s texture and its ability to set properly. Fold until just combined.
- Once the filling is perfectly mixed (and not overmixed!), carefully pour it into your chilled cookie crust. Use your spatula to smooth the top of the filling, creating an even surface.
- This is where the magic truly happens, the step that transforms a potentially soft filling into one that slices beautifully: the extended chilling time. Cover the pie loosely. You can use plastic wrap, but make sure it’s not pressing directly onto the filling, or an inverted plate or pie carrier. Place the covered pie back into the refrigerator for a minimum of 4 to 6 hours. However, for the very best, most reliable set, I highly recommend leaving it in the refrigerator overnight. This long chill gives the ingredients, particularly the cream cheese and whipped topping, ample time to firm up and bind together, ensuring your pie holds its shape when you slice it.
- Just before you’re ready to serve your magnificent Peanut Butter Chocolate Pie, prepare your drizzles and toppings. If your chocolate syrup or caramel sauce is a bit thick, you can warm them gently in a microwave or a small saucepan for easier drizzling. Generously drizzle both the chocolate syrup and caramel sauce over the top of the chilled pie. The pattern is up to you – go wild! Finally, scatter the chopped peanut butter cups all over the drizzles.
- And there you have it! Your perfectly set Peanut Butter Chocolate Pie is ready to be enjoyed. Slice it using a sharp knife (running the knife under warm water and wiping it clean between slices can help with clean cuts) and serve up a slice of pure peanut butter and chocolate bliss.
Tips for Perfect Peanut Butter Chocolate Pie Every Time
Achieving pie perfection is easy with a few simple tips. Following these pointers will ensure your Peanut Butter Chocolate Pie turns out beautifully set and delicious every single time.
- Ensure Cream Cheese is Softened: This is critical for a smooth filling. Leave the cream cheese out on the counter for at least an hour, or gently warm it in the microwave for a few seconds (be careful not to melt it!) if you’re short on time. Lumps from cold cream cheese will remain in your final filling.
- Don’t Overmix After Adding Whipped Topping: This is the secret ingredient to prevent runny filling. The whipped topping provides aeration and helps the pie set. Overmixing will deflate it, resulting in a softer, less stable filling. Gentle folding with a spatula is key.
- Chill the Crust Properly: Giving the crust at least 30 minutes in the fridge helps the butter solidify, making the crust firm and less likely to crumble when you add the filling or slice the pie.
- The Overnight Chill is Non-Negotiable: While 4-6 hours is the minimum, chilling the pie overnight is truly the magic step for a perfectly firm, sliceable filling. Plan ahead!
- Quality Ingredients Matter: Use a creamy peanut butter you love the taste of and a good quality chocolate cookie for the crust. The flavor really shines through.
- Get Creative with Toppings: While peanut butter cups are classic, feel free to experiment! Mini chocolate chips, chopped peanuts, a sprinkle of flaky sea salt, or even extra dollops of whipped cream would be fantastic additions.
- Homemade Whipped Cream vs. Frozen Whipped Topping: You can definitely use homemade whipped cream (about 3 cups total, stabilized if possible for extra firmness, although the folding technique helps here too). Just make sure it’s whipped to stiff peaks before folding it in. Frozen whipped topping is convenient and generally provides a very reliable set.
By paying attention to these small details, you’ll master the art of the no-bake pie and have a consistently wonderful Peanut Butter Chocolate Pie.
Your Peanut Butter Chocolate Pie Questions Answered (FAQ)
Got questions about making this glorious no-bake pie? Here are some common ones people ask:
Why is my peanut butter chocolate pie filling still runny?
The most common culprits are not allowing the cream cheese to soften sufficiently (leading to lumps and poor emulsification with the peanut butter), or more often, overmixing the whipped topping into the peanut butter mixture. Remember, gentle folding is key to keeping the filling light and set-able. And, of course, not chilling the pie for long enough is the biggest reason for a runny pie. Make sure you give it that crucial 4-6 hours, or preferably overnight, in the refrigerator.
Can I use crunchy peanut butter?
You absolutely can! Using crunchy peanut butter will add a lovely textural element to the filling. It might affect the overall smoothness slightly, but the flavor will still be fantastic. Just be aware it might not be as uniformly “creamy” as the original version.
Can I use different cookies for the crust?
Yes, feel free to get creative with the crust! Chocolate graham crackers, Oreos (creme removed), or even classic powdered sugar cookies could work, adjusting the amount of melted butter slightly if needed until the mixture holds together like wet sand. Using a different cookie will change the flavor profile of the crust, but the process remains the same.
How long does this pie keep in the refrigerator?
This Peanut Butter Chocolate Pie will keep well covered in the refrigerator for 3 to 4 days. The crust may soften slightly over time, but the filling should remain beautifully set.
Can I freeze Peanut Butter Chocolate Pie?
Yes! No-bake pies like this freeze quite well. To freeze, cover the pie tightly with plastic wrap, then wrap again in aluminum foil or place it in a freezer-safe container. It can be frozen for up to 1-2 months. Thaw it overnight in the refrigerator before slicing and serving.
What’s the best way to slice a no-bake pie cleanly?
For clean slices, use a sharp knife. Dip the knife in hot water and wipe it dry before making each cut. This helps the knife glide through the creamy filling and firm crust without dragging or sticking.
Enjoy Your Homemade Peanut Butter Chocolate Pie!
There you have it – the secret to a perfectly set, utterly irresistible Peanut Butter Chocolate Pie. No more wobbly slices or dessert disappointments! This recipe is a true crowd-pleaser, perfect for satisfying that sweet tooth with minimal effort. The combination of rich chocolate crust, smooth peanut butter filling, and decadent drizzles and toppings is simply divine.
Give this recipe a try and see for yourself how wonderfully easy and rewarding it is to make a no-bake pie that holds its shape beautifully. I can almost guarantee it will become a go-to dessert in your rotation. Don’t forget to leave a comment below and let me know how yours turned out, or share your favorite toppings!
Peanut Butter Chocolate Pie

Ingredients
- 1 and 1/2 cups chocolate cookie crumbs (from about 20 cookies)
- 1/4 cup unsalted butter, melted
- 8 ounces cream cheese, softened
- 1 cup creamy peanut butter
- 1 and 1/2 cups powdered sugar
- 1 teaspoon vanilla extract (optional)
- 8 ounces frozen whipped topping, thawed, or 3 cups homemade whipped cream
- 1/2 cup chocolate syrup or ganache, for drizzling
- 1/4 cup caramel sauce, for drizzling
- 1 cup chopped peanut butter cups, for topping
Directions
- In a medium bowl, combine the chocolate cookie crumbs and melted butter. Press the mixture firmly into the bottom and up the sides of a 9 inch pie plate. Chill the crust in the refrigerator for at least 30 minutes while you prepare the filling.
- In a large bowl, beat the softened cream cheese and peanut butter together with an electric mixer until smooth and well combined. Add the powdered sugar and vanilla extract (if using) and beat until smooth and creamy.
- This is the crucial step for a filling that sets perfectly: Gently fold the thawed whipped topping (or whipped cream) into the peanut butter mixture using a spatula. Use a light hand to keep the filling airy, but make sure it’s completely incorporated with no streaks of plain whipped topping visible. Do not overmix at this stage.
- Pour the filling into the chilled cookie crust. Smooth the top with the spatula.
- Now for the magic that prevents a runny pie: Cover the pie loosely and refrigerate it for a minimum of 4 to 6 hours, but preferably overnight. This extended chilling time is essential for the filling to firm up and hold its shape when sliced.
- Just before serving, warm the chocolate syrup and caramel sauce slightly if needed for easier drizzling. Drizzle generously over the top of the pie. Scatter the chopped peanut butter cups over the drizzles.
- Slice and serve your perfectly set pie.