Hey there, fellow snack enthusiasts and chocolate lovers! Have you ever tried making those wonderfully convenient energy bites or decadent chocolate truffles at home, only to end up with a sticky, unmanageable mess that refuses to hold its shape? You are definitely not alone! I’ve been there, wrestling with crumbly mixtures or gooey pastes that are impossible to roll neatly, let alone dip in chocolate. It felt like a kitchen challenge I couldn’t conquer for the longest time.
But guess what? After countless experiments, tweaking ratios, and trying different binding methods, I stumbled upon the absolute, game-changing secret. It’s a simple, almost deceptively easy step, but it makes all the difference between frustration and perfectly firm, rollable, dippable Pistachio Chocolate Energy Bites that hold their shape beautifully every single time. Seriously, once you know this trick, you’ll wonder how you ever made energy bites without it!
These delightful little treats combine the earthy, slightly sweet crunch of pistachios with the rich indulgence of chocolate, all bound together by the natural goodness of dates. They’re quick, easy, no-bake, and make for a fantastic grab-and-go snack, a healthy-ish dessert option, or even a lovely homemade gift. Ready to make energy bites that actually work? Let’s get started!
Why These Energy Bites Are Perfect
Beyond just solving the ‘sticky mess’ problem, these particular pistachio chocolate energy bites have so much going for them. They’re not just easy; they’re genuinely enjoyable to make and eat! Here are a few reasons why they’ve become a staple in my kitchen:
Hold Their Shape Like a Dream: Thanks to that crucial technique I mentioned (more on that in the steps!), these bites are firm enough to roll smoothly and maintain their form, even after being dipped in melted chocolate.
Simple, Wholesome Ingredients: You only need a handful of pantry staples – nuts, dates, chocolate, and a pinch of salt. No complex sugars or artificial binders here.
Naturally Sweetened: Dates provide all the sweetness you need, giving these bites a lovely caramel-like undertone without any added refined sugar.
Quick & Easy No-Bake: No oven required! Everything comes together in your food processor, and then it’s just a matter of chilling, rolling, and dipping.
Delicious Flavor Combination: The pairing of nutty pistachios and rich chocolate is simply divine. It feels indulgent, but you know you’re getting good stuff inside.
Versatile: Great for a pre or post-workout snack, a mid-afternoon energy boost, or a delightful little treat with your coffee or tea.

Gathering Your Ingredients for Perfect Pistachio Chocolate Energy Bites
Creating these delightful little powerhouses requires just a few key players. Each ingredient plays a vital role, contributing to both the texture and the incredible flavor combination that makes these Pistachio Chocolate Energy Bites so irresistible. Think of them as tiny flavor bombs ready to fuel your day!
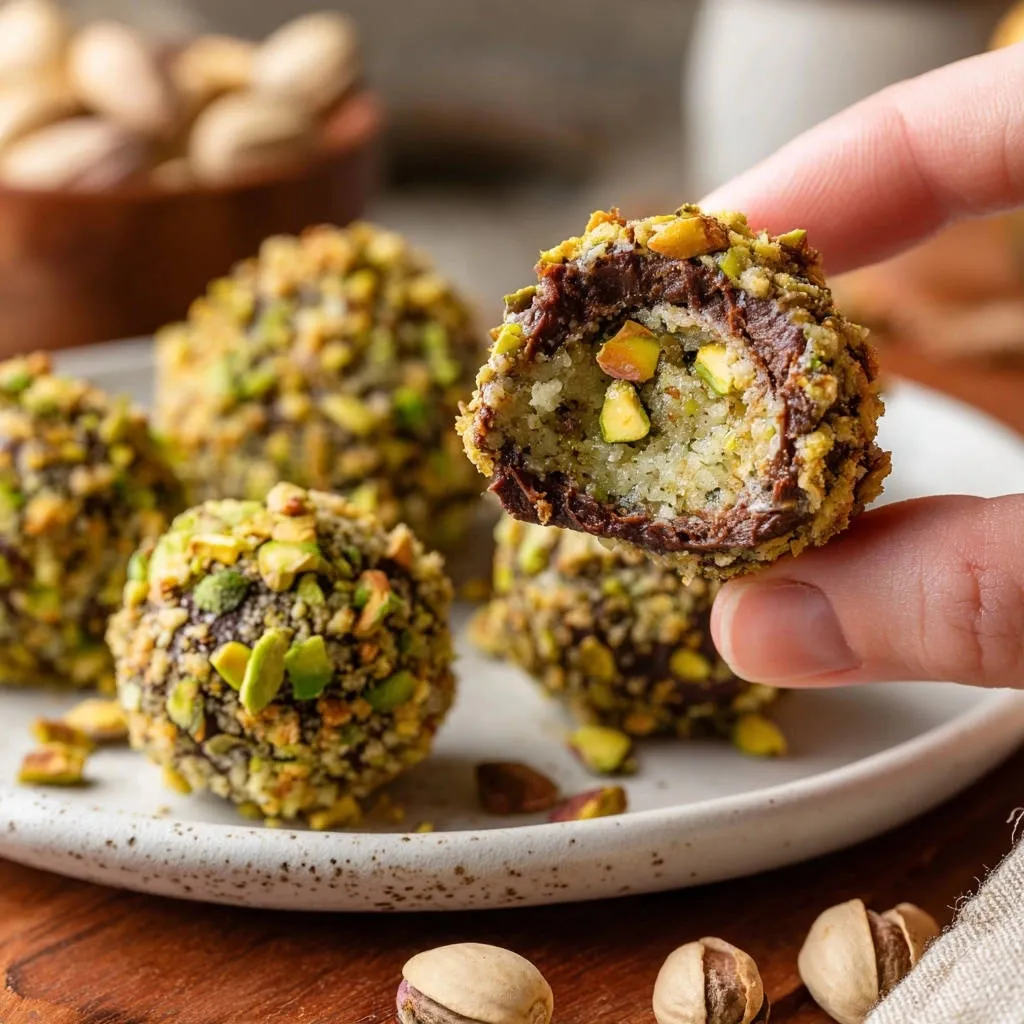
Shelled Unsalted Pistachios: We’re using a full cup for the base of our bites, which gets processed down to a fine meal. This forms the nutty, slightly savory foundation. Make sure they are unsalted so you can control the seasoning later. You’ll also need an additional half cup of chopped pistachios specifically for coating the finished bites, adding a beautiful green visual and a lovely crunch.
Pitted Dates: About one cup of pitted dates is what binds everything together. The magic here comes from using soft dates. Medjool dates are absolutely ideal because of their natural moisture and caramel-like stickiness. If your dates seem a little dry, you can soak them in warm water for about 10 minutes and then drain them really well before using. This ensures the mixture processes smoothly and holds together properly.
Salt: Just a quarter teaspoon of salt enhances all the other flavors. It balances the sweetness of the dates and brings out the best in the pistachios and chocolate. Don’t skip this tiny but mighty ingredient!
Semi-Sweet Chocolate Chips or Chopped Chocolate: Four ounces of your favorite semi-sweet chocolate will provide that classic, slightly bitter contrast to the sweet dates and nuts. You can use chips, which are convenient, or finely chopped chocolate from a bar, which sometimes melts a bit more smoothly.
Coconut Oil (Optional): Adding just one teaspoon of coconut oil to the chocolate before melting is entirely optional, but it helps create a smoother, more fluid melted chocolate. This makes dipping the energy bites much easier and results in a thinner, more even chocolate coating.
That’s it! Just a handful of simple items are standing between you and a batch of perfectly formed pistachio chocolate energy bites.
Making the Magic Happen: Step-by-Step Perfect Pistachio Chocolate Energy Bites
Okay, here’s where the real fun begins! Follow these steps carefully, paying special attention to those critical chilling periods. This isn’t just a list; we’ll talk through what’s happening at each stage to ensure your success.
Get the Base Ready: Measure out the one cup of shelled pistachios and add them to the bowl of your food processor along with the quarter teaspoon of salt. Secure the lid and process the nuts. Your goal here is to break them down into a texture that looks like a fine meal or coarse flour. Don’t over-process to the point of creating nut butter just yet; we want a crumbly texture that will later bind with the dates.
Bind with Dates: Now, toss the pitted dates into the food processor with the ground pistachio meal. Pulse and process again. Be patient! At first, the mixture will look quite crumbly, but as the dates break down and release their natural sugars and moisture, they will start to bind everything together. Keep processing until the mixture clumps together and forms a ball, or at least a very thick, cohesive paste that sticks to itself readily when you pinch off a piece. This is the texture you’re aiming for before the crucial next step. As noted in the ingredients, if it seems too dry and won’t bind, add one more date. If it’s too wet, a tablespoon of almond flour or more ground pistachio meal can help firm it up.
The First Crucial Chill: Scoop the entire mixture out of the food processor and transfer it into a medium-sized bowl. Cover the bowl tightly. Now, pop it into the refrigerator for at least 30 minutes. This is THE secret step! Chilling the mixture significantly firms it up, making it much, much easier to handle, scoop, and roll into smooth, non-sticky balls. Skipping this step is why many energy bites become a gooey struggle.
Shape Those Bites: Once the mixture is nicely chilled and firm, line a baking sheet with parchment paper. Remove the bowl from the fridge. Scoop out small portions of the mixture – a standard tablespoon is a great size for consistent energy bites. Take each scoop and roll it tightly between your palms to form a smooth, compact ball. The mixture should feel firm and hold its shape well. Place the rolled balls onto the prepared baking sheet.
The Second Chill for Dipping Success: After you’ve rolled all the bites, return the baking sheet with the rolled balls to the refrigerator for another 30 minutes. This second chilling period is essential! It ensures the balls are cold and firm all the way through, which prevents them from softening and falling apart when you dip them into the warm melted chocolate.
Melt the Chocolate: While your perfectly rolled balls are chilling, it’s time to prepare the chocolate coating. Place the semi-sweet chocolate chips or chopped chocolate into a microwave-safe bowl. If you’re using the optional coconut oil for a smoother finish, add it now. Microwave the chocolate in short intervals, typically 30 seconds at a time. After each interval, remove the bowl and stir the chocolate really well. Stirring helps the chocolate melt evenly and prevents it from burning. Continue microwaving and stirring until the chocolate is completely melted and beautifully smooth. Be very careful not to overheat it, as burnt chocolate is unusable.
Dip and Coat: Take the chilled, firm energy balls out of the refrigerator. Have your bowl of melted chocolate and your chopped pistachios for coating ready. Working with one ball at a time, drop it into the melted chocolate. Use a fork or a dipping tool to gently turn the ball, ensuring it’s fully coated, letting any excess chocolate drip back into the bowl. Immediately after dipping, carefully lift the chocolate-covered ball and roll it in the reserved chopped pistachios, gently pressing the nuts onto the surface to get a good coating. Place the coated bite back onto the parchment-lined baking sheet.
Set the Chocolate: Once all your pistachio chocolate energy bites are dipped and coated, return the baking sheet to the refrigerator for a final chill. This last refrigeration period, about 20 minutes or until the chocolate is completely firm to the touch, allows the chocolate coating to set and harden properly.
Store and Enjoy: Transfer the finished energy bites to an airtight container. Store them in the refrigerator to maintain their perfect shape and freshness. They make such a satisfying grab-and-go snack!
See? It’s not complicated, but those chilling steps are truly the difference makers for perfectly formed, dippable pistachio chocolate energy bites!
Pro Tips for Perfect Energy Bites Every Time
Want to make sure your Pistachio Chocolate Energy Bites are absolute perfection? Here are a few extra tips I’ve picked up along the way:
Date Quality Matters: Seriously, use soft, plump dates like Medjool. If your dates are hard, they won’t process properly and the mixture will be dry and crumbly. As mentioned, soaking them first can help, but starting with soft dates is easiest.
Don’t Skip the Chill: I know I’ve said it, but it bears repeating! The refrigerator time is non-negotiable if you want bites that hold their shape and are easy to work with. Plan for it.
Process Thoroughly but Watchfully: In step 2, ensure the dates are fully incorporated and the mixture is sticky and cohesive. However, don’t let the food processor run so long that the nuts turn into a runny butter before the dates bind things.
Rolling Technique: Roll the balls firmly and quickly between your palms. The warmth of your hands can soften the mixture, so working efficiently helps maintain their shape. If the mixture gets too soft while you’re rolling, pop the bowl back in the fridge for a few minutes.
Chocolate Melting: Microwave melting chocolate requires patience. Use those short 30-second bursts and stir diligently. Overheating will seize the chocolate, making it thick and unusable for dipping.
Recipe Variations to Try
Once you’ve mastered the basic technique for these pistachio chocolate energy bites, feel free to get creative! The core formula of dates + nuts is incredibly adaptable.
Different Nuts or Seeds: Swap out the pistachios in the base for almonds, walnuts, cashews, or even sunflower seeds for a nut-free option (though you’d miss the pistachio coating!).
Add Cocoa Powder: For a double chocolate punch, add 1-2 tablespoons of unsweetened cocoa powder to the food processor with the pistachios in step 1.
Other Coatings: Instead of chopped pistachios, roll the dipped bites in shredded coconut, finely chopped different nuts, cocoa powder, or even just leave them plain with a chocolate shell.
Extracts: A splash of vanilla or almond extract can add another layer of flavor to the mixture.
If you enjoy experimenting with no-bake treats, you might also like trying recipes like No-Bake Cookie Butter Dessert or exploring the world of Homemade Peanut Butter Cups!
Your Pistachio Chocolate Energy Bite Questions Answered (FAQ)
Got questions about whipping up these delightful treats? Let’s tackle some common ones.
Why are my energy bites still sticky and hard to roll?
Ah, this is the classic problem these bites solve! The most likely culprit is skipping or shortening those crucial chilling steps. The refrigeration time is what allows the natural fats from the nuts and the sugars from the dates to firm up. Without adequate chilling (at least 30 minutes for the main mix, and another 30 for the rolled balls), the mixture will remain too soft and sticky to handle neatly. Make sure you give them the full chilling time!
Can I use any type of date?
While technically any pitted date can be used, results vary greatly depending on their softness. Soft, moist dates like Medjool work best as they process easily and provide the necessary stickiness to bind the mixture without needing extra liquid. Drier dates will result in a crumbly mix. If you only have dry dates, soak them in hot water for 10-15 minutes, then drain them thoroughly and pat them dry before using.
How long do these Pistachio Chocolate Energy Bites last?
When stored in an airtight container in the refrigerator, these energy bites should last for about 1-2 weeks. The dates and nuts are quite stable. The chocolate coating also helps preserve them. For longer storage, you can freeze them.
Can I freeze these energy bites?
Yes, absolutely! Energy bites freeze beautifully. Once the chocolate coating is fully set after the final chill, place the bites in a single layer on a parchment-lined baking sheet and freeze for about 1-2 hours until solid. Then, transfer them to a freezer-safe airtight container or bag. They should last for up to 3 months in the freezer. Thaw them in the refrigerator for a few hours or enjoy them straight from frozen for a firmer bite.
Do I have to dip them in chocolate?
No, the chocolate dipping and pistachio coating are optional, though they do make them extra special and help them hold their shape a little better at room temperature. If you prefer a simpler bite, you can skip step 6, 7, and 8. The chilled date-nut balls on their own are still delicious and make for a great basic energy bite.
Can I add other things to the mixture?
Yes, you can! Small additions can work well. Try adding a tablespoon of chia seeds, flax seeds, or even mini chocolate chips to the food processor mixture in step 2. Just be mindful that adding too many dry ingredients might require an extra date or a tiny splash of water (a teaspoon at a time) to help it bind.
Enjoy Your Homemade Perfect Pistachio Chocolate Energy Bites!
There you have it! The secret to perfectly shaped energy bites, wrapped in a delightful pistachio and chocolate shell. These Pistachio Chocolate Energy Bites are proof that simple ingredients and a little bit of technique (okay, a little bit of chilling!) can create something truly wonderful. They are perfect for meal prepping snacks for the week, satisfying a sweet craving the healthy-ish way, or sharing with friends and family.
I hope you give this recipe a try and fall in love with how easy and foolproof it is once you follow the steps. Let me know in the comments below how yours turn out! Did you try any fun variations? I always love hearing about your kitchen adventures!
Pistachio Chocolate Energy Bites

Ingredients
- 1 cup shelled unsalted pistachios plus 1/2 cup chopped for coating
- 1 cup pitted dates (soft dates work best)
- 1/4 teaspoon salt
- 4 ounces semi sweet chocolate chips or chopped chocolate
- 1 teaspoon coconut oil (optional)
Directions
- Add the 1 cup shelled pistachios and salt to a food processor. Process until they become a fine meal.
- Add the pitted dates to the food processor with the pistachio meal. Process until the mixture comes together and forms a ball or a thick paste that sticks together when you pinch it. If it seems too dry, add one more date. If too wet, add a tablespoon of almond flour or more pistachio meal.
- Transfer the mixture to a bowl. Cover and refrigerate for at least 30 minutes. This is the crucial step for making the mixture easy to handle.
- Once chilled, scoop out small portions of the mixture (about 1 tablespoon each) and roll them tightly between your palms to form smooth balls. Place the rolled balls on a baking sheet lined with parchment paper.
- Return the baking sheet with the rolled balls to the refrigerator for another 30 minutes. Chilling them now ensures they stay firm when you dip them in chocolate.
- While the balls chill, melt the chocolate. Place the chocolate chips or chopped chocolate in a microwave safe bowl. Add the optional coconut oil if using. Microwave in 30 second intervals, stirring well after each, until completely melted and smooth. Be careful not to overheat.
- Remove the chilled balls from the refrigerator. Dip each ball into the melted chocolate, letting any excess drip off. Immediately roll the chocolate covered ball in the chopped pistachios, pressing gently to coat.
- Place the coated balls back on the parchment lined baking sheet. Refrigerate for at least 20 minutes to allow the chocolate coating to set completely.
- Store the finished energy bites in an airtight container in the refrigerator. They should hold their perfect shape!