Biting into a store-bought fish stick only to find it bland and dry was always a disappointment for me. I used to struggle with achieving that ideal flaky, moist interior and a truly crispy exterior without deep-frying. But I’ve finally cracked the code to making Crispy Baked Fish Sticks that are perfectly moist and delightfully crunchy every single time, thanks to a few simple, game-changing tricks.
This recipe transforms humble white fish into an irresistible meal or snack, proving that homemade can easily surpass anything from the freezer aisle. Get ready to discover your new favorite way to enjoy these family-friendly favorites!
The Game-Changing Secret to Irresistibly Crispy Baked Fish Sticks
Why This Recipe Stands Out From the Rest
This recipe isn’t just another way to cook fish; it’s a meticulously crafted method that guarantees success. It’s incredibly easy to follow, tastes absolutely fantastic, and quickly becomes a family favorite.
We’ve focused on techniques that deliver maximum flavor and texture with minimal fuss, making homemade fish sticks a joyful experience.
Say Goodbye to Dry, Bland Fish Sticks Forever
The days of dry, rubbery fish sticks are over. Our approach emphasizes precise cooking and specific preparation steps that lock in moisture while ensuring a perfectly flaky texture. You’ll be amazed at the tender, succulent fish within each golden-brown stick.
Healthier Crunch: Baked, Not Fried Perfection
Enjoy all the satisfying crunch of traditionally fried fish sticks without the excessive oil. This recipe utilizes the oven and a clever “spray top” technique to create an unbeatable crispy exterior. It’s a healthier alternative that doesn’t compromise on taste or texture, making it a guilt-free indulgence.
Crafting Culinary Magic: The Ingredients You’ll Need
Quality ingredients are the foundation of any great dish, and these baked fish sticks are no exception. Each component plays a vital role in achieving their perfect texture and flavor.
Choosing Your Star: The Best White Fish Fillets
For these baked fish sticks, select firm, flaky white fish fillets such as cod, tilapia, or pollock. These varieties hold up well during breading and baking, providing a tender, mild-flavored base.
Look for fresh, bright-looking fillets with no strong odor. If using frozen fish, ensure it’s completely thawed and thoroughly patted dry.
The Breading Trio: Flour, Eggs, and Panko Power
Our breading station relies on three essential components. All-purpose flour provides the initial dry layer, helping the egg adhere to the fish.
Beaten eggs act as the crucial binder, ensuring the breadcrumbs stick firmly. Finally, Panko breadcrumbs are our secret weapon for ultimate crispiness.
Panko, a Japanese breadcrumb, is coarser and absorbs less oil than regular breadcrumbs, resulting in an incredibly light and airy crunch. For a unique twist, you can explore adding some homemade crispy golden crumbs to your Panko mixture.
Seasoning Smarts: Elevating Flavor with Salt & Pepper
Don’t underestimate the power of simple seasoning. We incorporate salt and black pepper directly into both the flour and Panko layers.
This ensures every bite of your crispy baked fish sticks is seasoned throughout, enhancing the natural flavor of the fish.
Oil Essentials: For Crispiness and Non-Stick Ease
Olive oil is used twice in this recipe. A light brush or spray on the parchment-lined baking sheet prevents sticking and promotes a golden, crispy bottom.
A final mist of cooking spray or olive oil on top of the breaded fish sticks is paramount for achieving that coveted golden-brown, evenly crispy finish without deep frying.
Your Kitchen Arsenal: Essential Tools for Crispy Baked Fish Sticks
Having the right tools makes all the difference in achieving culinary perfection. Here’s what you’ll need to make these easy baked fish sticks.
Baking Sheets & Parchment Paper
A sturdy baking sheet provides even heat distribution, while parchment paper ensures a non-stick surface. This combination is crucial for achieving a uniformly crispy base on your fish sticks without any sticking.
Shallow Bowls for the Breading Station
Three shallow bowls are essential for an organized and efficient breading process. Setting up your flour, egg, and Panko in an assembly line streamlines the coating of each fish strip, keeping your kitchen cleaner.
The Handy Fish Spatula
A thin, flexible fish spatula is invaluable for carefully transferring the delicate breaded fish to and from the baking sheet. It helps prevent the crispy coating from breaking off and makes serving a breeze.
Instant-Read Thermometer (for perfect doneness)
While visual cues are helpful, an instant-read thermometer ensures your fish is cooked perfectly to 145°F (63°C). This tool is your best friend for preventing overcooked, dry, or rubbery fish, guaranteeing optimal flakiness every time.
From Fillet to Feast: Your Guide to Perfect Crispy Baked Fish Sticks
Let’s get cooking! Follow these detailed steps to create the best homemade crispy baked fish sticks you’ve ever tasted.
-
Preheat & Prep the Baking Sheet:
Preheat your oven to 425°F (220°C). Line a large baking sheet with parchment paper and lightly brush or spray with olive oil.
This crucial step creates a non-stick surface and is key for a crispy bottom crust. A hot oven ensures a quick cook, contributing to the fish’s moist interior.
-
Pat the Fish Dry:
Thoroughly pat the fish strips very dry with paper towels.
Removing excess moisture is essential for the breading to adhere properly and contributes significantly to a crispier, non-soggy result. Don’t skip this step!
-
Set Up Your Breading Station:
Arrange three shallow bowls for your breading station.
In the first bowl, combine flour with 1/2 teaspoon salt and 1/4 teaspoon pepper. In the second, whisk the eggs. In the third, mix Panko breadcrumbs with the remaining 1/2 teaspoon salt and 1/4 teaspoon pepper.
-
Bread the Fish Strips:
Dredge each fish strip first in the seasoned flour, shaking off any excess. Next, dip it into the beaten eggs, allowing any excess to drip off.
Finally, thoroughly coat the strip in the seasoned Panko breadcrumbs, pressing gently to ensure a firm and even coating. This meticulous coating is what gives our crispy baked fish sticks their signature crunch.
-
Arrange on Baking Sheet:
Place the breaded fish strips in a single layer on the prepared baking sheet.
Ensure they do not touch each other; adequate spacing allows for even airflow and crisping. Overcrowding can lead to steaming, which prevents crispiness.
-
The “Crispy Top” Spray:
Lightly spray the tops of the breaded fish sticks with cooking spray or a fine mist of olive oil.
This critical step promotes uniform golden browning and an exceptionally crispy texture without the need for deep frying, also aiding in quick and even cooking. It mimics the effect of frying in a healthier way.
-
Bake to Golden Perfection:
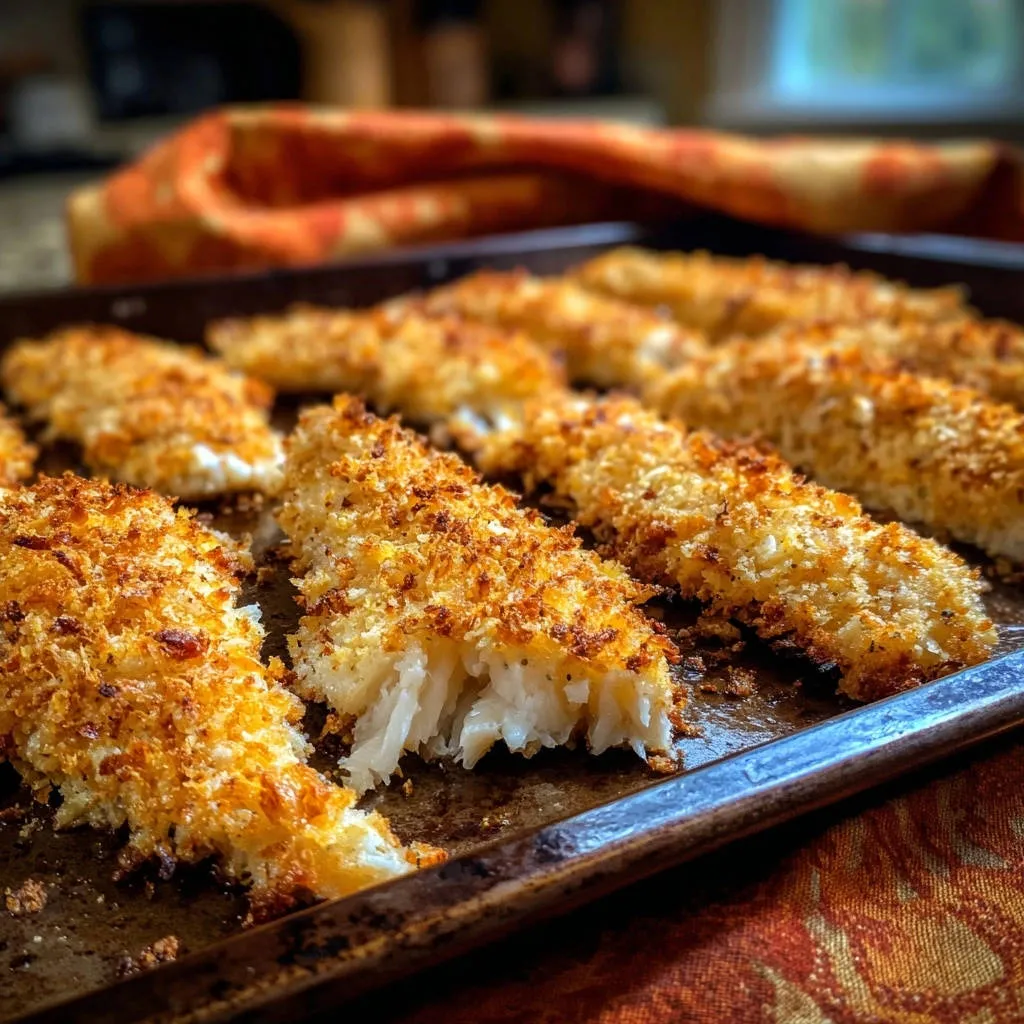
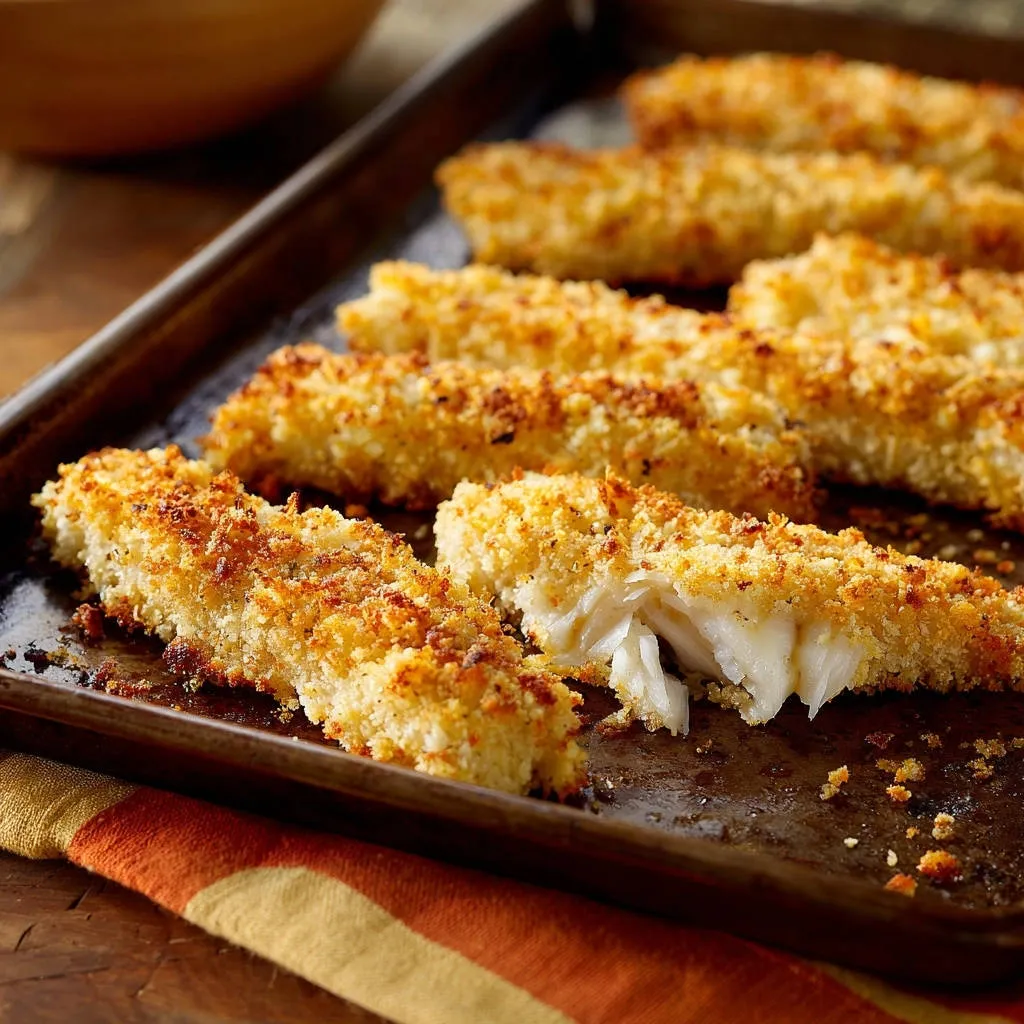
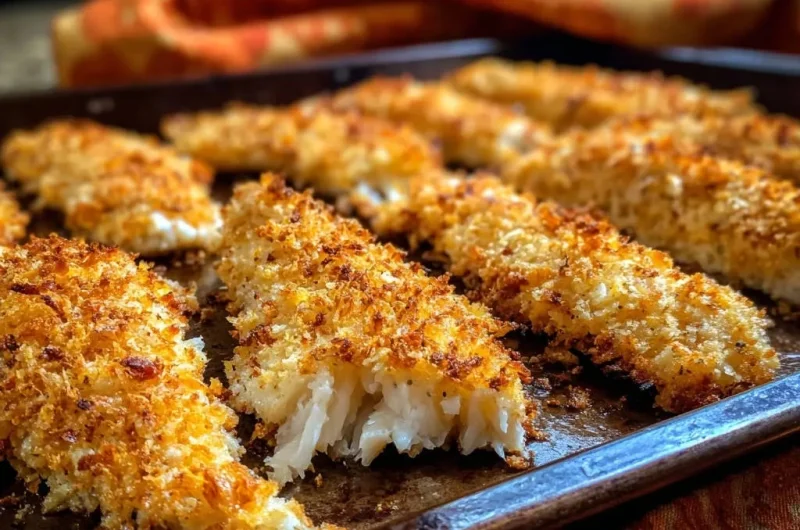
Bake for 12 to 15 minutes, or until the fish is golden brown and reaches an internal temperature of 145°F (63°C).
To prevent dry or rubbery fish, gently flake the thickest part with a fork; it should flake easily and look opaque throughout. Do not overcook! Using your instant-read thermometer is key here.
-
Serve Immediately:
Remove from the oven and serve your perfectly crispy baked fish sticks immediately with your favorite dipping sauce.
The crispiness is at its peak right out of the oven, offering an unbeatable texture.
Unlock the Crispy Code: Expert Tips for Baked Fish Sticks Success
Achieving consistently perfect crispy baked fish sticks comes down to a few key techniques. Master these tips for optimal results every time.
The Golden Rule: Pat Your Fish Dry!
This step cannot be overstressed. Excess moisture on the fish’s surface prevents the breading from adhering properly, leading to a soggy coating.
By thoroughly patting the fish dry with paper towels, you create the ideal surface for the flour to stick, setting the stage for a truly crispy baked fish stick.
Mastering the Breading Station for Even Coating
Set up your shallow bowls in an assembly line: flour, then egg, then Panko. This systematic approach ensures each fish strip is evenly coated without cross-contamination between bowls, creating a uniform, delicious crust.
When coating in Panko, gently press the breadcrumbs onto the fish. This helps them adhere firmly, creating a robust and super crispy layer.
The “Spray Top” Trick: Unlocking Unbeatable Crispiness
Lightly spraying the top of your breaded fish sticks with olive oil or cooking spray is a game-changer. It helps the Panko breadcrumbs toast and crisp up beautifully, mimicking the golden-brown effect of deep frying.
This even distribution of oil promotes uniform browning across all your crispy baked fish sticks, contributing significantly to their irresistible crunch.
Precision Baking: Avoid Overcooking for Flaky Perfection
Overcooking is the enemy of tender fish. Stick to the recommended baking time and use an instant-read thermometer to check for an internal temperature of 145°F (63°C).
The fish should flake easily with a fork and be opaque throughout, ensuring your homemade fish sticks are never dry or rubbery, but rather perfectly flaky.
Single Layer, Happy Fish: Spacing for Optimal Crisp
Arranging your breaded fish sticks in a single layer with adequate space between them is crucial. If the fish strips are too close, they will steam rather than bake, resulting in a softer, less crispy coating.
Proper spacing allows hot air to circulate freely around each piece, ensuring every side gets beautifully crisp and golden.
Beyond the Plate: Creative Ways to Serve Your Crispy Baked Fish Sticks
While delicious on their own, these crispy baked fish sticks truly shine when paired with the right accompaniments.
Classic Dipping Sauces
Serve your fish sticks with beloved classics like tangy tartar sauce, creamy remoulade, or a simple ketchup. For those who enjoy a little heat, a homemade sriracha mayo or a sweet chili sauce adds an exciting kick.
Consider whipping up a batch of perfect creamy garlic dip for a sophisticated and flavorful pairing.
Family-Friendly Side Dishes
Round out your meal with complementary side dishes. Think perfectly crispy oven-baked fries, roasted vegetables like crispy roasted cauliflower, or a fresh, vibrant green salad.
Sweet potato fries or even a comforting scoop of macaroni and cheese also make excellent partners for these homemade treats.
Turning Leftovers into New Meals (Fish Tacos, anyone?)
Don’t let any leftover crispy baked fish sticks go to waste! Flake them apart and use them as a delicious filling for fish tacos with a fresh slaw and lime crema. They also make an excellent addition to a quick salad or a wrap for a satisfying lunch.
Planning Ahead: Storing and Reheating Your Baked Fish Sticks
Proper storage and reheating ensure your delicious fish sticks remain as delightful as when they were first made. Keep these tips in mind for meal prep or enjoying leftovers.
Cooling and Refrigeration Guidelines
Allow cooked crispy baked fish sticks to cool completely before storing them. Place them in an airtight container lined with paper towels to absorb any excess moisture, which helps maintain crispness.
Refrigerate promptly and consume within 2-3 days for the best quality and safety.
Freezing for Future Feasts
You can freeze breaded, uncooked fish sticks for future convenience. Place them in a single layer on a baking sheet and freeze until solid, then transfer to a freezer-safe bag or container.
Cook from frozen, adding a few extra minutes to the baking time, and always ensure they reach an internal temperature of 145°F (63°C).
The Best Way to Reheat for Maximum Crispness
To revive the ultimate crispiness of your baked fish sticks, avoid the microwave. Reheat them in a preheated oven at 375°F (190°C) for about 8-12 minutes, or until heated through and crisp.
An air fryer is also an excellent option, reheating them at 350°F (175°C) for 5-7 minutes, ensuring they become perfectly crunchy once more.
Cracked the Code: Troubleshooting Common Crispy Baked Fish Stick Challenges
Even with a great recipe, sometimes things don’t go exactly as planned. Here are solutions to common issues when making your crispy baked fish sticks.
My Fish Sticks Aren’t Crispy Enough!
Ensure your oven is fully preheated to 425°F (220°C) and that you’ve patted the fish very dry. Lightly spray the tops of the breaded fish sticks with cooking spray or olive oil before baking.
Make sure they are arranged in a single layer with space between them on the baking sheet to allow for proper air circulation. You might need to bake for a minute or two longer until they reach that perfect golden brown.
Help! My Fish is Dry and Rubbery!
This is almost always a sign of overcooking. Use an instant-read thermometer to ensure the fish reaches precisely 145°F (63°C) and then remove it immediately from the oven.
Thicker fillets might require slightly longer cooking, but thinner fillets will cook very quickly. Don’t be afraid to take one out and check for flakiness.
The Breading Isn’t Sticking Well
The key to sticking breading is dry fish and a good egg wash. Pat your fish strips extremely dry before dredging in flour. Ensure each strip is fully coated in the egg, letting excess drip off, then firmly press the Panko onto the fish.
Do not overcrowd the breading station bowls; work in small batches if needed.
Uneven Browning Issues
Uneven browning often stems from inconsistent heat distribution or overcrowding. Ensure your oven is accurately calibrated and preheated.
Arrange the fish sticks in a single layer with ample space, and consider rotating the baking sheet halfway through the cooking time for perfectly golden, uniform results.
Your Crispy Baked Fish Sticks Questions, Answered!
Can I use frozen fish fillets for this recipe?
Absolutely! If using frozen fish fillets, ensure they are completely thawed in the refrigerator overnight. It is critically important to thoroughly pat them dry with paper towels to remove all excess moisture before breading.
How can I make this recipe gluten-free?
Making these crispy baked fish sticks gluten-free is simple. Substitute the all-purpose flour with a gluten-free all-purpose flour blend and use gluten-free Panko breadcrumbs. The rest of the recipe remains the same, delivering the same delicious crunch.
What’s the best way to tell if the fish is cooked through?
The best way to check for doneness is to use an instant-read thermometer. The internal temperature of the thickest part of the fish should reach 145°F (63°C). Visually, the fish should flake easily with a fork and appear opaque throughout.
Can I deep fry these instead of baking?
While you certainly can deep fry these fish sticks, this recipe is specifically designed to achieve exceptional crispiness through baking. Baking provides a healthier, less messy alternative with a superior texture for our baked fish sticks, matching the crispiness of fried options.
What are some healthy dipping sauce options?
For lighter dipping, consider Greek yogurt mixed with dill and lemon, a homemade fresh salsa, or even just a squeeze of fresh lime juice. A simple blend of mashed avocado with a touch of garlic and cilantro also makes a vibrant and healthy accompaniment.
Ready to Impress? Share Your Crispy Baked Fish Sticks Masterpiece!
You’ve now mastered the art of making perfectly crispy, never-dry baked fish sticks, a truly game-changing recipe that will delight your family and friends. We encourage you to try this simple trick and experience the difference yourself!
This homemade crispy baked fish stick recipe is perfect for weeknight dinners, party appetizers, or a fun family cooking project. We’d love to see your culinary creations! Share your beautiful plates of Crispy Baked Fish Sticks on social media and tag us, or leave a comment below with your favorite dipping sauce. Happy cooking!
Crispy Baked Fish Sticks
Course: Main CourseCuisine: American CuisineDifficulty: easy4
servings20
minutes15
minutes35
minutesAmerican Cuisine
Ingredients
1.5 pounds white fish fillets (like cod, tilapia, or pollock), cut into 1-inch wide strips
1/2 cup all-purpose flour
1 teaspoon salt, divided
1/2 teaspoon black pepper, divided
2 large eggs, beaten
1.5 cups Panko breadcrumbs
2 tablespoons olive oil, plus more for baking sheet
Cooking spray or additional olive oil for spraying
Directions
- Preheat your oven to 425F. Line a large baking sheet with parchment paper and lightly brush or spray with olive oil. This is key for a non-stick surface and a crispy bottom crust.
- Pat the fish strips very dry with paper towels. This step helps the breading stick better and contributes to a crispier result without making the fish soggy.
- Prepare your breading station: In one shallow bowl, combine the flour with 1/2 teaspoon salt and 1/4 teaspoon pepper. In a second shallow bowl, whisk the eggs. In a third shallow bowl, combine the Panko breadcrumbs with the remaining 1/2 teaspoon salt and 1/4 teaspoon pepper.
- Dredge each fish strip first in the seasoned flour, shaking off any excess. Then dip it into the beaten eggs, letting any excess drip off. Finally, thoroughly coat it in the seasoned Panko breadcrumbs, pressing gently to ensure the breading adheres well.
- Arrange the breaded fish strips in a single layer on the prepared baking sheet, ensuring they don’t touch each other.
- Lightly spray the tops of the breaded fish sticks with cooking spray or a fine mist of olive oil. This critical step promotes even browning and a super crispy texture without requiring deep frying, helping the fish cook quickly and evenly.
- Bake for 12 to 15 minutes, or until the fish is golden brown and the internal temperature reaches 145F. To ensure your fish is never dry or rubbery, check for doneness by gently flaking the thickest part of a fish stick with a fork. It should flake easily and look opaque throughout. Do not overcook!
- Remove from the oven and serve immediately with your favorite dipping sauce.
Notes
- Do not overcook the fish to ensure it stays moist and flaky. Serve immediately with your favorite dipping sauce.