There’s nothing quite like the disappointment of cutting into a beautiful chocolate cream pie only to find the filling has decided to stage a great escape. I’ve certainly experienced that heartbreak, but after many attempts, I finally cracked the code for a truly Decadent Chocolate Cream Pie that holds its glorious shape every single time.
This recipe delivers velvety smooth chocolate perfection, guaranteeing slice after perfect slice. Get ready to impress with a dessert that looks as incredible as it tastes.
Beyond the Basic: Why THIS Decadent Chocolate Cream Pie Wins Every Time
While many chocolate cream pie recipes promise deliciousness, this one stands apart due to its unwavering reliability and unparalleled textural experience. It’s the recipe you’ll turn to again and again.
The “No-Slide” Secret: Achieving a Flawless Fill
The most common frustration with chocolate cream pies is a runny or loose filling. My secret lies in precisely activating the cornstarch by boiling it for a full minute, ensuring it reaches its maximum thickening potential.
Paired with extended chilling, this technique guarantees a firm, sliceable filling that maintains its elegant shape from the first cut to the last bite, solving the common problem of a collapsing pie.
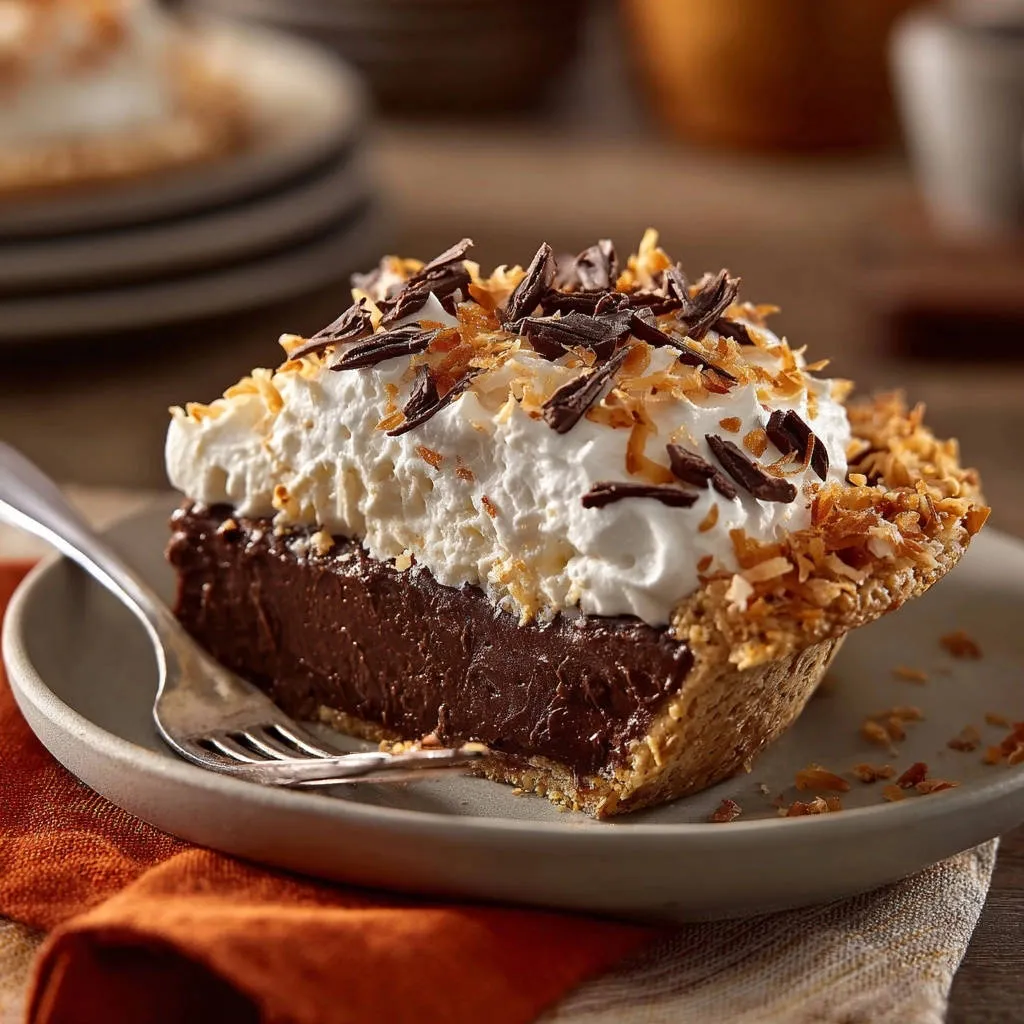
A Harmony of Textures: Creamy, Crunchy, and Pure Delight
This Decadent Chocolate Cream Pie is a symphony of textures. Imagine a sturdy, slightly crisp graham cracker crust providing the perfect base.
Layered above is a silken, rich chocolate filling that melts in your mouth. Finally, a mountain of light, airy whipped cream, adorned with crunchy toasted coconut and delicate chocolate shavings, completes this truly satisfying dessert.
The Culinary Canvas: Key Ingredients for Your Decadent Chocolate Cream Pie
Choosing quality ingredients and understanding their roles is fundamental to achieving a show-stopping Decadent Chocolate Cream Pie.
For the Flaky Foundation: Your Perfect Graham Cracker Crust
The crust provides essential texture and flavor contrast to the creamy filling.
Graham Cracker Crumbs: Finely ground crumbs ensure a cohesive and evenly textured crust. You can buy them pre-crushed or easily make your own from whole crackers.
Granulated Sugar: A touch of sugar sweetens the crust and aids in caramelization during baking, contributing to its crispness.
Unsalted Butter, Melted: Butter is the binding agent, holding the crumbs together firmly. Using unsalted butter allows you to control the overall saltiness of the pie.
The Heart of the Pie: Crafting the Rich Chocolate Filling
The filling is the star, delivering that profound chocolate experience.
Granulated Sugar & Salt: These balance the bitterness of the cocoa and enhance the overall sweetness and depth of flavor.
Cornstarch: This is our key thickening agent. Its proper activation is paramount for a perfectly set filling that slices cleanly.
Unsweetened Cocoa Powder: Opt for high-quality unsweetened cocoa for the best, most intense chocolate flavor. Natural or Dutch-processed cocoa works well, though Dutch-processed provides a darker color and milder flavor.
Whole Milk: The fat content in whole milk contributes to the filling’s creamy, luxurious texture and rich mouthfeel.
Unsalted Butter & Vanilla Extract: Added at the end, butter enriches the filling, adding silkiness, while vanilla amplifies the chocolate notes beautifully.
Cloud-Like Perfection: Whipped Cream Topping Essentials
A light, airy whipped cream topping provides a delightful contrast to the dense chocolate.
Heavy Cream: Essential for whipping, heavy cream (or heavy whipping cream) must have a high fat content (at least 36%) to achieve stiff peaks. Ensure it’s very cold for optimal results.
Powdered Sugar: Also known as confectioners’ sugar, it dissolves easily into the cream without creating a gritty texture, providing perfect sweetness.
Vanilla Extract: Just like in the filling, vanilla enhances the overall flavor profile of the topping.
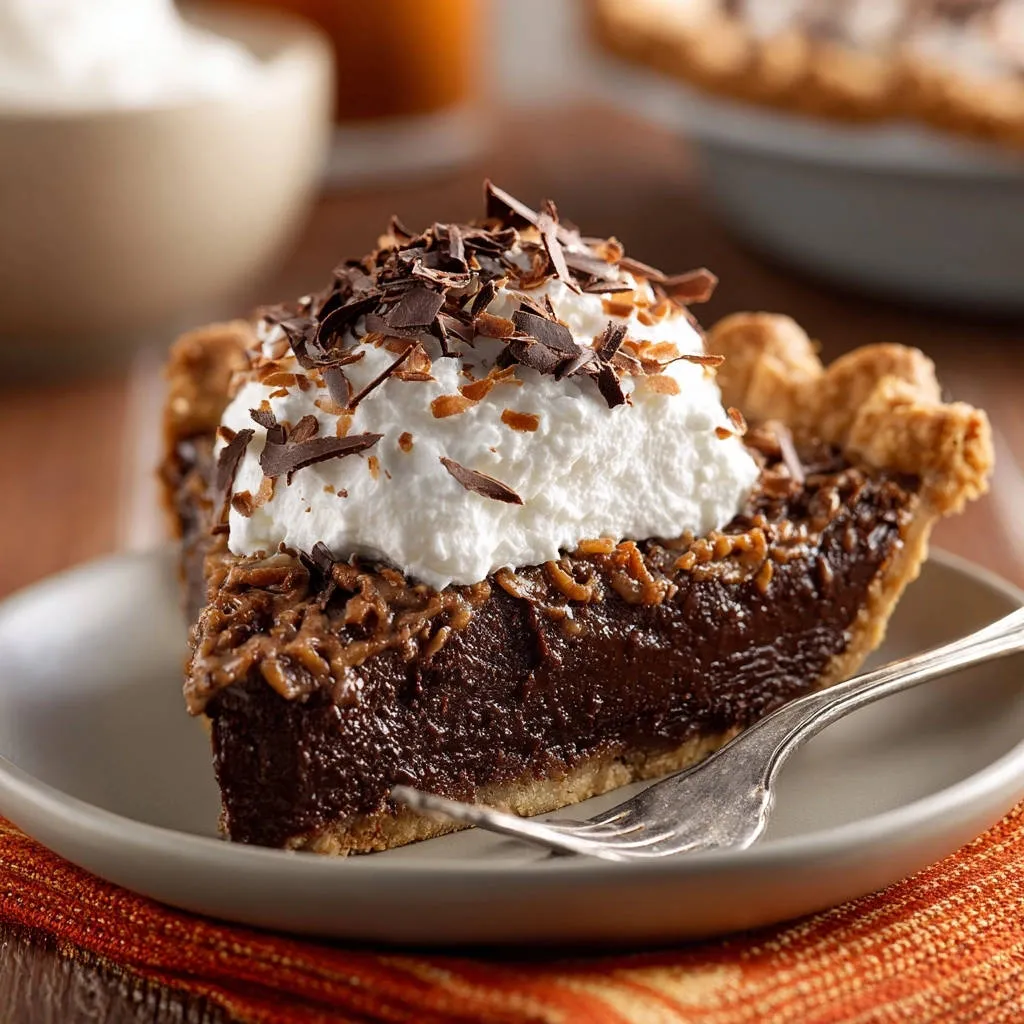
Garnishes for a Grand Finale: Coconut and Chocolate
These elements elevate your pie’s presentation and add wonderful textural and flavor dimensions.
Toasted Shredded Coconut: Toasted coconut adds a lovely nutty flavor and a satisfying chew. It provides a tropical hint that complements the rich chocolate.
Bittersweet Chocolate, Shaved: Shaving bittersweet chocolate adds an elegant touch and a subtle bitterness that perfectly balances the sweetness of the pie, making each bite more complex and exciting.
Equipping Your Kitchen for Decadent Chocolate Cream Pie Success
Having the right tools makes the process of creating a delicious homemade chocolate pie smoother and more enjoyable.
Must-Have Bakeware and Utensils
These are the essentials you’ll need for this dessert:
9-inch Pie Plate: The standard size for this recipe, ensuring proper crust and filling proportions.
Large Saucepan: Necessary for cooking the filling, its size prevents boiling over as the mixture thickens.
Whisk: Crucial for whisking dry ingredients, gradually incorporating milk, and stirring the filling constantly to prevent lumps and scorching.
Spatula: Ideal for smoothing the filling into the crust and for scraping down the sides of bowls.
Mixing Bowls: You’ll need at least two: one for the crust mixture and another, preferably chilled, for whipping the cream.
Optional Gadgets for Effortless Excellence
While not strictly necessary, these tools can certainly enhance your baking experience:
Electric Mixer (Handheld or Stand): This makes whipping the heavy cream a breeze, ensuring consistent stiff peaks without tiring your arm.
Rubber Scraper: Excellent for scraping every last bit of filling from the saucepan, minimizing waste.
Vegetable Peeler or Microplane: Perfect for easily creating beautiful chocolate shavings for garnish, much more precise than a knife.
Your Journey to Decadent Chocolate Cream Pie Mastery: A Step-by-Step Guide
Creating this rich chocolate pie is a straightforward process when you follow these detailed steps.
- Prepare the Crust:
In a medium bowl, combine the graham cracker crumbs, 1/4 cup granulated sugar, and melted butter. Mix until well combined and crumbly.
Press the mixture firmly into the bottom and up the sides of a 9-inch pie plate. This firm pressing is key to a sturdy crust that won’t fall apart when sliced, providing a solid foundation for your creamy chocolate pie.
Place in the refrigerator to chill while you prepare the filling. Chilling helps the butter solidify, preventing crumbling when pouring in the warm filling and ensuring your crust holds its form.
- Make the Chocolate Filling Base:
In a large saucepan, whisk together the 3/4 cup granulated sugar, cornstarch, cocoa powder, and salt. Whisking dry ingredients first ensures no lumps and even distribution of thickeners and flavors.
Gradually whisk in the whole milk until the mixture is smooth. Adding milk slowly and whisking continuously prevents lumps from forming when cooking, creating a perfectly smooth base for your rich chocolate filling.
- Cook the Filling to Perfection:
Place the saucepan over medium heat. Cook, stirring constantly with a whisk, until the mixture thickens considerably and comes to a full boil. Constant stirring is essential to prevent scorching on the bottom and ensure even thickening throughout the filling.
Once boiling, continue to boil and stir for 1 minute. This crucial step ensures the cornstarch is fully activated, guaranteeing a perfectly thick and set filling that holds its shape and won’t be runny.
- Finish the Filling Flavor:
Remove the saucepan from the heat. Stir in the 2 tablespoons of butter and 1 teaspoon of vanilla extract until the butter is completely melted and incorporated.
Adding these off the heat preserves the delicate vanilla flavor and allows the butter to melt smoothly into the hot mixture, adding richness and a silky texture to your perfectly set chocolate pie.
- Assemble the Pie:
Pour the hot chocolate filling into the chilled pie crust. Smooth the top with a spatula for an even layer, creating a clean canvas for the topping.
- Chill the Pie Thoroughly:
This is a crucial step for a perfectly set filling that won’t disappoint. Cover the pie loosely with plastic wrap to prevent a skin from forming and refrigerate for at least 4 hours, or preferably overnight, until the filling is completely firm and chilled through.
Patience here is rewarded with structural integrity, optimal texture, and a truly sliceable Decadent Chocolate Cream Pie.
- Prepare the Topping:
In a cold bowl with cold beaters (chilling them beforehand helps immensely!), whip the heavy cream, powdered sugar, and 1/2 teaspoon vanilla extract on high speed until stiff peaks form.
Stiff peaks mean the whipped cream will hold its shape beautifully when spread on the pie, creating that iconic lofty topping.
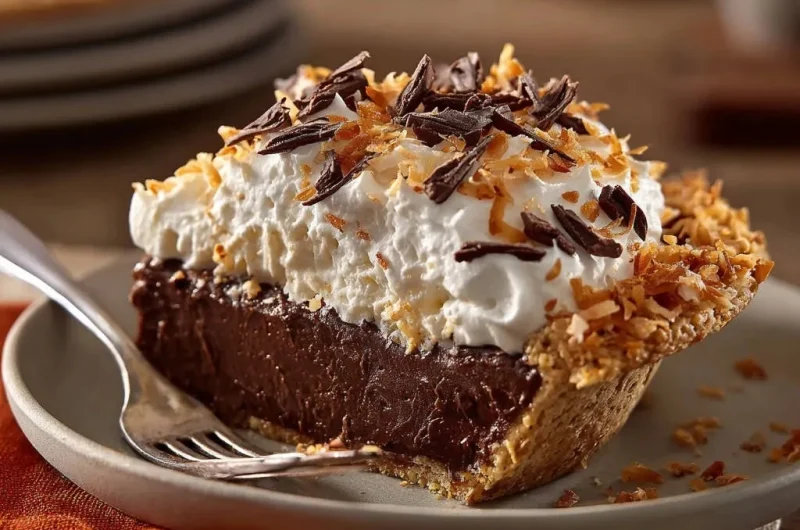
- Serve Your Masterpiece:
Spread the whipped cream evenly over the chilled pie. Sprinkle generously with toasted shredded coconut and chocolate shavings just before serving.
These garnishes add visual appeal, a delightful textural contrast, and a final burst of flavor to your stunning dessert.
Building the Base: Crafting Your Crust
The Art of the Filling: From Whisk to Wonderful
The Patient Perfection: Chilling for Success
The Grand Finale: Whipped Cream and Garnishes
Chef’s Insights: Elevating Your Decadent Chocolate Cream Pie
Go beyond the basics with these expert tips to ensure every slice is extraordinary.
Achieving the Perfect Filling Consistency
The key to a non-runny filling is vigilance during cooking. Ensure the mixture reaches a full, rolling boil that you cannot stir down.
Boiling for the full minute is non-negotiable for cornstarch activation. If it looks like thick gravy, you’re on the right track.
Crust Innovations and Preventative Measures
For a different flavor profile, consider using crushed Oreo cookies (removing the cream first) or shortbread cookies for your crust. Just be sure to adjust butter content slightly if needed for proper binding.
To prevent your graham cracker crust from crumbling, press it down very, very firmly into the pie plate using the bottom of a flat glass or a measuring cup. This compaction is essential for stability.
Mastering Whipped Cream: Tips for Stiff Peaks
Always start with very cold heavy cream, bowl, and beaters. Placing your bowl and beaters in the freezer for 15 minutes before whipping can make a huge difference.
Start whipping on medium-low speed to incorporate air, then gradually increase to high. Watch carefully and stop as soon as stiff peaks form to prevent over-whipping, which can lead to a grainy texture or even butter.
Flavor Boosters for a Richer Chocolate Experience
To deepen the chocolate flavor even further, add a pinch (1/4 teaspoon) of espresso powder to your dry filling ingredients. It won’t make the pie taste like coffee, but it will intensify the chocolate notes.
A tiny sprinkle of flaky sea salt over the finished pie can also balance the sweetness beautifully, adding a gourmet touch to your favorite chocolate desserts.
Decadent Chocolate Cream Pie Troubleshooting: Solving Common Challenges
Even seasoned bakers encounter hiccups. Here are solutions to common chocolate cream pie issues.
My Filling Isn’t Thickening!
The most common reason is not boiling the filling long enough or not at a high enough heat. Cornstarch needs heat and time to activate fully.
Solution: Return the saucepan to medium-high heat. Continue to whisk vigorously and constantly until the mixture comes to a full, rolling boil that bubbles even as you stir. Let it boil for a solid minute, stirring continuously. It will thicken!
Why Did My Crust Crumble?
Crumbly crusts often result from insufficient melted butter or not pressing the mixture firmly enough into the pie plate.
Solution: Ensure your butter is fully incorporated into the crumbs and that you press the mixture down very, very firmly, especially up the sides. A flat-bottomed measuring cup works wonders for compaction. Chilling is also vital for the butter to set and bind the crumbs.
Whipped Cream Won’t Hold its Shape
This is usually a temperature issue or a problem with over/under-whipping.
Solution: Always use very cold heavy cream, and ideally, chill your mixing bowl and beaters beforehand. If it’s too warm, the fat globules won’t emulsify properly. If it separates, you may have over-whipped it; at that point, it’s closer to butter. If it’s still liquidy, keep whipping, ensuring all components are cold.
Enjoying Your Decadent Chocolate Cream Pie: Serving, Storage, and Prep
Maximizing the enjoyment and longevity of your Decadent Chocolate Cream Pie is simple with these practical tips.
Picture-Perfect Slices: Serving Suggestions
For the cleanest, most beautiful slices, ensure your pie is thoroughly chilled, preferably overnight. Dip your knife in hot water and wipe it clean between each cut.
Serve chilled for the best texture and flavor. A light dusting of cocoa powder or a few fresh berries can further enhance its presentation.
Keeping it Fresh: Storage Solutions
Store your Decadent Chocolate Cream Pie, loosely covered with plastic wrap or in an airtight container, in the refrigerator.
It will remain fresh and delicious for 3-4 days. Covering it loosely helps prevent condensation from forming on the whipped cream, preserving its fluffy texture.
Planning Ahead: Make-Ahead Tips for Easy Entertaining
The graham cracker crust can be prepared and chilled up to 2 days in advance. You can also make the chocolate filling a day ahead, refrigerate it, and then gently rewarm it on the stovetop over low heat, whisking constantly, before pouring it into the chilled crust.
However, for the freshest and loftiest topping, it’s best to whip the cream and assemble the final pie just a few hours before serving. This ensures the whipped cream is at its peak lightness.
Your Decadent Chocolate Cream Pie Questions Answered
Here are answers to some common questions about making this delightful pie.
Can I use a different type of crust?
Absolutely! While graham cracker is classic, you can substitute it with crushed chocolate wafer cookies (like Oreos, with the cream removed) for an even richer chocolate experience, or even crushed shortbread cookies for a buttery flavor. Ensure the butter ratio is consistent to maintain structure, similar to how you would prepare the base for a perfect cheesecake.
Is there a dairy-free alternative for the filling or topping?
Yes, you can. For the filling, full-fat canned coconut milk (chilled overnight, then scoop out the thick cream layer) can replace whole milk, though it will impart a subtle coconut flavor. For the topping, use a store-bought dairy-free whipped topping or chill a can of full-fat coconut cream and whip the thick cream that rises to the top.
How long does chocolate cream pie last in the refrigerator?
Your Decadent Chocolate Cream Pie will last for 3 to 4 days when stored properly in an airtight container or loosely covered with plastic wrap in the refrigerator.
Can I freeze chocolate cream pie?
You can freeze the pie, but it’s best to do so without the whipped cream topping. Wrap the chilled pie tightly in several layers of plastic wrap, then foil. It can be frozen for up to 1 month. Thaw it in the refrigerator overnight before adding fresh whipped cream and garnishes.
What if I don’t have cornstarch?
While cornstarch is ideal for its clear, smooth finish, you can use all-purpose flour as an alternative, but you’ll need more of it (about double the amount of cornstarch) and the filling might have a slightly duller, cloudier appearance and taste. Arrowroot powder is another option, used in similar quantities to cornstarch, often yielding a slightly thinner but still well-set filling.
Your Decadent Chocolate Cream Pie Masterpiece Awaits!
You now possess the secrets to creating a truly unforgettable Decadent Chocolate Cream Pie. This recipe empowers you to bypass common pitfalls, delivering a dessert that is not only delicious but also flawlessly structured every single time.
Go ahead, gather your ingredients, trust the process, and prepare to delight everyone with your magnificent creation. I can’t wait for you to experience the joy of cutting into that perfectly set, incredibly rich slice!
Decadent Chocolate Cream Pie
Course: DessertCuisine: American CuisineDifficulty: easy8
servings30
minutes15
minutes300
minutesAmerican Cuisine
Ingredients
For the Crust:
1 1/2 cups graham cracker crumbs
1/4 cup granulated sugar
1/2 cup unsalted butter, melted
For the Chocolate Filling:
3/4 cup granulated sugar
1/4 cup cornstarch
1/2 cup unsweetened cocoa powder
1/2 teaspoon salt
3 cups whole milk
2 tablespoons unsalted butter
1 teaspoon vanilla extract
For the Topping:
1 1/2 cups heavy cream
1/4 cup powdered sugar
1/2 teaspoon vanilla extract
1/2 cup toasted shredded coconut
1 ounce bittersweet chocolate, shaved
Directions
- Prepare the crust: In a medium bowl, combine the graham cracker crumbs, 1/4 cup granulated sugar, and melted butter. Mix until well combined and crumbly. Press the mixture firmly into the bottom and up the sides of a 9-inch pie plate. Place in the refrigerator to chill while you prepare the filling.
- Make the chocolate filling: In a large saucepan, whisk together the 3/4 cup granulated sugar, cornstarch, cocoa powder, and salt. Gradually whisk in the whole milk until smooth.
- Cook the filling: Place the saucepan over medium heat. Cook, stirring constantly with a whisk, until the mixture thickens considerably and comes to a full boil. Once boiling, continue to boil and stir for 1 minute to ensure the cornstarch is fully activated and the filling is thick enough to set properly.
- Finish the filling: Remove the saucepan from the heat. Stir in the 2 tablespoons of butter and 1 teaspoon of vanilla extract until the butter is completely melted and incorporated.
- Assemble the pie: Pour the hot chocolate filling into the chilled pie crust. Smooth the top with a spatula.
- Chill the pie: This is a crucial step for a perfectly set filling. Cover the pie loosely with plastic wrap and refrigerate for at least 4 hours, or preferably overnight, until the filling is completely firm and chilled through.
- Prepare the topping: In a cold bowl with cold beaters, whip the heavy cream, powdered sugar, and 1/2 teaspoon vanilla extract on high speed until stiff peaks form.
- Serve: Spread the whipped cream over the chilled pie. Sprinkle with toasted shredded coconut and chocolate shavings before serving.
Notes
- Ensure adequate chilling time for a perfectly set filling; preferably overnight.