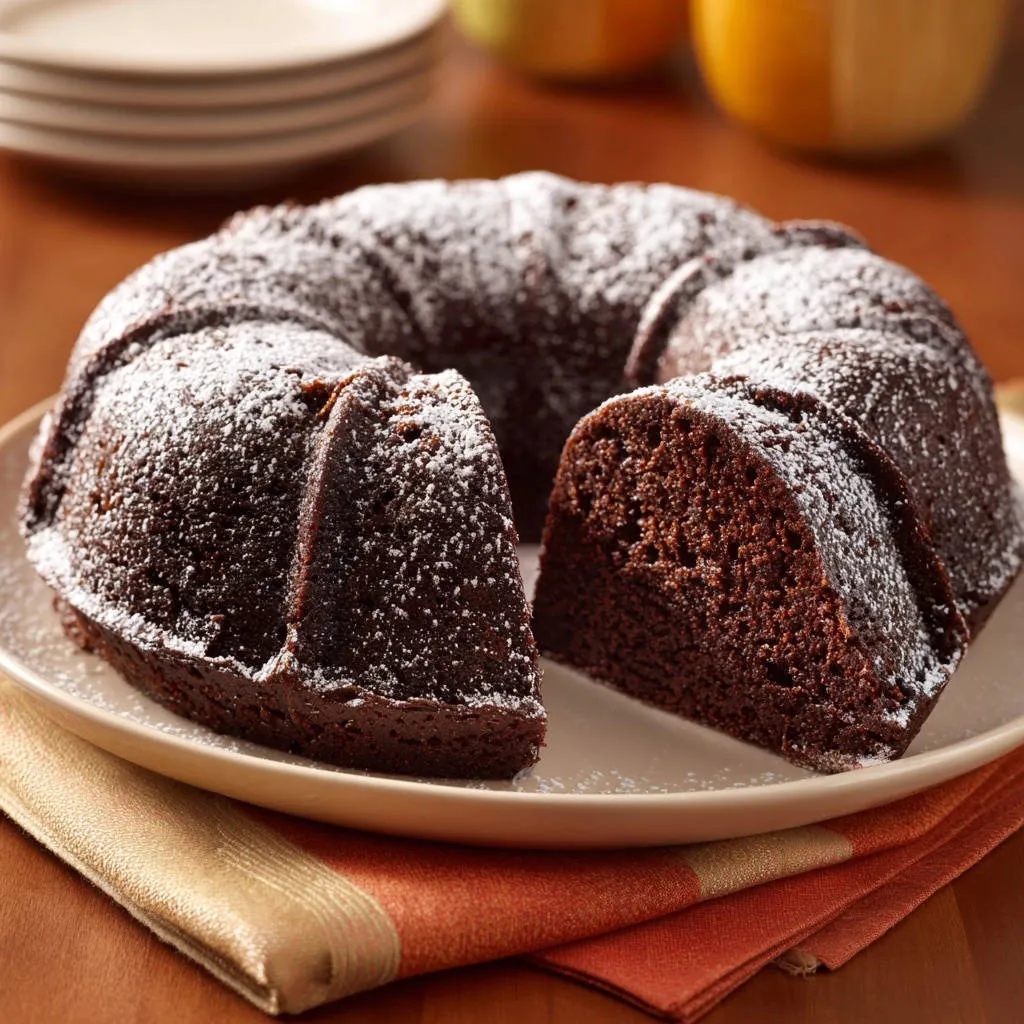
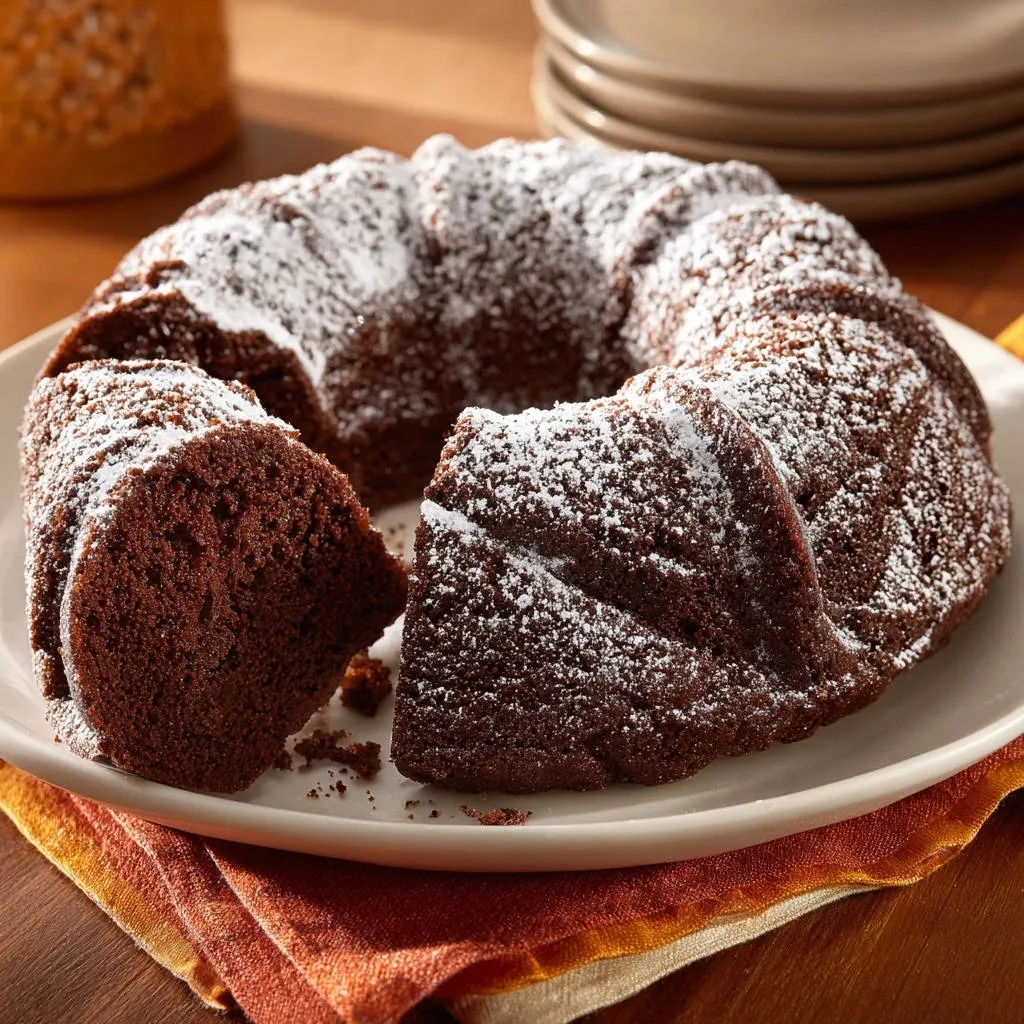
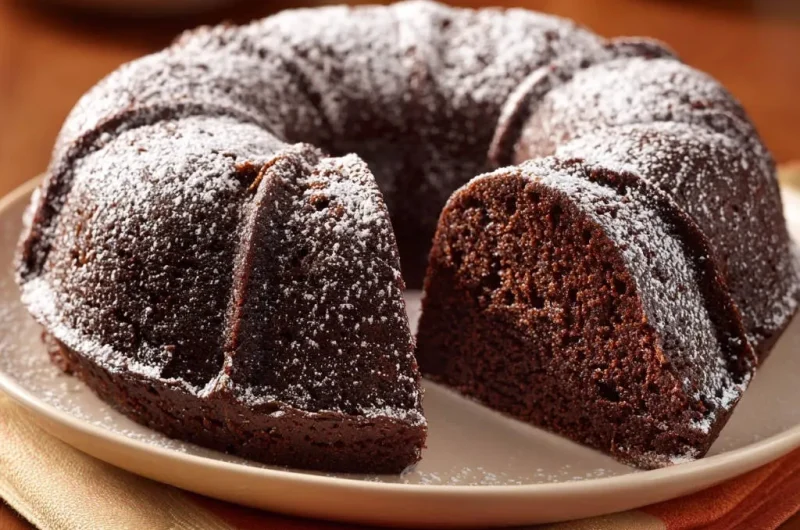
There’s nothing quite like the promise of a homemade chocolate cake, but the dread of it sticking to the pan can stop anyone in their tracks. I’ve certainly had my share of bundt cake battles, leaving me with delicious but broken desserts. This Easy Chocolate Bundt Cake recipe changes everything, introducing a simple, foolproof trick that guarantees a stunning, flawless release, every single time.
Get ready for a moist, intensely chocolatey cake that not only tastes incredible but also slides out of the pan beautifully, ready to impress. It’s a game-changer for home bakers, ensuring your beautiful bundt design always shines through.
Beyond the Basics: Why This Easy Chocolate Bundt Cake Shines
This isn’t just another chocolate cake; it’s engineered for success and supreme satisfaction. Its unique selling point lies in the ingenious pan preparation method-a simple combination of butter or spray and cocoa powder, which creates a non-stick barrier perfectly matching the cake’s color.
Beyond the guaranteed flawless release, the cake itself is a marvel of moistness and rich chocolate flavor. It’s incredibly forgiving and straightforward, making it ideal for both novice and experienced bakers seeking a reliable, show-stopping dessert. This recipe truly simplifies the process without compromising on taste or texture.
Crafting Cravings: Essential Ingredients for Your Bundt Cake
Understanding what each ingredient brings to your Easy Chocolate Bundt Cake is key to baking success. Quality matters, as does proper preparation, ensuring every component plays its part in creating a delicious, moist crumb.
Dry Delights: Flour, Cocoa, & Leavening Agents
All-Purpose Flour: Provides the fundamental structure. Spoon and level your flour to avoid a dense cake from too much compaction.
Unsweetened Cocoa Powder: The star of the show, delivering deep chocolate flavor. Opt for a good quality cocoa for the best taste, as it truly makes a difference.
Baking Soda & Salt: These are your leavening agent and flavor enhancer. Baking soda reacts with the buttermilk and boiling water to create lift and tenderness, while salt balances the sweetness and brings out the chocolate notes.
The Liquid Gold: Oil, Buttermilk & Vanilla Essence
Vegetable Oil: Unlike butter, oil remains liquid at room temperature, contributing to an exceptionally moist and tender cake crumb that stays soft for days. It ensures a consistently rich texture.
Buttermilk: Its acidity activates the baking soda, creating air pockets for a light texture. If you don’t have buttermilk, combine regular milk with lemon juice or vinegar and let it sit briefly to curdle.
Large Eggs: Bind the ingredients, add moisture, and contribute to the cake’s structure. Ensure they are at room temperature for better emulsion with the other liquids.
Vanilla Extract: A crucial flavor enhancer that complements and deepens the chocolate notes. Use pure vanilla extract for the best aromatic results.
Sweetness and Structure: Sugar and Eggs
Granulated Sugar: Provides sweetness and helps keep the cake moist by attracting and holding onto moisture. It also contributes to the cake’s tender crumb.
Large Eggs: In addition to binding and adding moisture, eggs provide structure and richness. Room temperature eggs blend more smoothly into the batter.
The Secret Stir-In: The Magic of Boiling Water
Boiling Water: This might seem unusual, but it’s the secret to an incredibly moist and intensely chocolatey cake. It blooms the cocoa powder, enhancing its flavor, and creates a thin batter that bakes into a wonderfully tender crumb.
Pan Prep Powerhouses: Butter/Spray & Cocoa Dusting
Softened Butter or Non-Stick Baking Spray with Flour: Essential for preventing sticking. The softened butter ensures a thorough coating in all crevices, while the spray offers convenience.
Additional Cocoa Powder for Dusting the Pan: This is the game-changer! Dusting the buttered pan with cocoa instead of flour prevents white residue and creates a seamless, non-stick surface that blends perfectly with your chocolate cake.
Equipping Your Kitchen: Essential Tools for Bundt Cake Perfection
Having the right tools makes all the difference when baking an Easy Chocolate Bundt Cake. Here’s what you’ll need to ensure a smooth process and a perfect result:
Bundt Pan: A standard 10-12 cup bundt pan is essential. Darker pans tend to bake cakes faster and create a darker crust, so adjust baking time slightly if using one.
Whisk: Used for combining dry ingredients and wet ingredients separately. Ensures proper aeration and even distribution of ingredients.
Large and Medium Mixing Bowls: Necessary for separating dry and wet ingredients before combining them. Choose bowls large enough to prevent spills.
Measuring Cups and Spoons: Accurate measurements are crucial in baking. Always level off dry ingredients for precision.
Wire Rack: Critical for cooling the cake both in the pan and after inversion. Allows air circulation for even cooling and prevents sogginess.
Rubber Spatula: Ideal for gently mixing the wet and dry ingredients and scraping down the sides of the bowl. Helps prevent overmixing.
Wooden Skewer or Toothpick: Used to test the cake for doneness. A clean skewer indicates the cake is fully baked through.
Your Path to Easy Chocolate Bundt Cake Perfection: A Detailed Guide
Follow these steps closely for a moist, decadent Easy Chocolate Bundt Cake that releases perfectly every time. Precision in prep and cooling are your best friends here!
- Prepare Your Oven:
Preheat your oven to 350 degrees Fahrenheit. Ensuring your oven is at the correct temperature from the start is crucial for even baking and proper rise. Use an oven thermometer to verify accuracy if you suspect your oven runs hot or cold.
- The Perfect Pan Prep (The Game Changer!):
This is the most critical step for a guaranteed clean release. Generously coat the inside of your bundt pan with softened butter, ensuring every crevice and curve is thoroughly covered. Alternatively, use a high-quality non-stick baking spray with flour.
Once buttered (or sprayed), sprinkle about 2 tablespoons of unsweetened cocoa powder into the pan. Rotate the pan, tapping and tilting, to coat the entire buttered surface evenly with the cocoa powder. Discard any excess cocoa powder. This creates a non-stick barrier that matches the cake color, hiding any imperfections and preventing white flour residue.
- Combine Dry Ingredients:
In a large bowl, whisk together the flour, 3/4 cup cocoa powder, baking soda, salt, and granulated sugar. Whisking ensures these ingredients are thoroughly combined and aerated, leading to a consistent crumb and preventing pockets of leavening.
- Mix Wet Ingredients:
In a separate medium bowl, whisk together the vegetable oil, buttermilk, eggs, and vanilla extract until well combined. Ensure eggs are fully incorporated for proper emulsification, which helps create a smooth batter.
- Combine Wet and Dry:
Pour the wet ingredients into the dry ingredients and mix with a spatula until just combined. Do not overmix; overmixing can develop gluten, leading to a tough, dry cake. A few small lumps are perfectly acceptable.
- Incorporate Boiling Water:
Carefully stir in the boiling water until the batter is smooth. The batter will be thin; this is intentional and contributes to the cake’s exceptional moist texture and rich chocolate flavor when baked.
- Fill the Pan:
Pour the batter evenly into your meticulously prepared bundt pan. Ensure it’s distributed without overfilling the pan, leaving about an inch from the top to allow for rise.
- Bake to Perfection:
Bake for 45-55 minutes, or until a wooden skewer inserted into the center of the cake comes out clean. Start checking at 45 minutes to prevent overbaking, which is a common cause of dry cakes.
- Crucial Cooling (In-Pan):
Remove the cake from the oven and let it cool in the pan on a wire rack for exactly 15 minutes. This specific cooling time in the pan allows the cake to firm up sufficiently before inversion, which is key for a clean release and maintaining its beautiful shape. It’s a critical waiting period; don’t rush it!
- The Confident Inversion:
After 15 minutes, place a wire rack over the top of the bundt pan. Carefully but confidently invert the cake onto the wire rack. Lift the pan straight up. Your cake should slide out cleanly. If it sticks slightly, gently tap the bottom of the pan a few times before lifting.
- Final Cool & Dust:
Allow the cake to cool completely on the wire rack before dusting generously with powdered sugar for serving. Cooling completely prevents the powdered sugar from melting and helps the cake fully set, ensuring perfect slices.
Chef’s Secrets: Elevate Your Easy Chocolate Bundt Cake Game
Mastering an Easy Chocolate Bundt Cake involves a few simple, expert tips that can take your baking from good to truly exceptional. These insights ensure optimal texture, flavor, and presentation.
Room Temperature Ingredients: Ensure your eggs and buttermilk are at room temperature. This helps them emulsify better with other ingredients, creating a smoother batter and a more even cake texture. Cold ingredients can cause the batter to seize.
Don’t Overmix the Batter: Once you’ve added the wet ingredients to the dry, mix just until combined. Overmixing develops gluten, leading to a tough, dense cake. A few lumps are perfectly fine and will disappear during baking.
The Magic of Sifting Cocoa: Sifting the cocoa powder and flour together with other dry ingredients prevents lumps and ensures an even distribution, contributing to a smooth, consistent crumb. It also helps aerate the dry ingredients.
Accurate Measuring: Especially for flour and cocoa powder, spooning into the measuring cup and then leveling off (instead of scooping directly) prevents compaction. Compacted ingredients can lead to a dry cake with an altered texture.
Trust the 15-Minute Rule: The instruction to cool the cake in the pan for exactly 15 minutes is crucial. It’s enough time for the cake to firm up and pull away from the pan’s edges, but not so long that it adheres to the pan. This precise timing is your key to a perfect release.
Baking Bumps? Troubleshooting Your Easy Chocolate Bundt Cake
Even with the best intentions, baking can sometimes present challenges. Here are solutions to common issues you might encounter with your Easy Chocolate Bundt Cake:
My Cake Stuck to the Pan!
This is usually due to inadequate pan preparation or not following the exact 15-minute cooling rule. Ensure every crevice of your bundt pan is thoroughly coated with butter/spray and cocoa, and always allow the full 15 minutes of in-pan cooling before inverting. The cocoa dusting is truly your best friend here.
My Cake is Dry or Crumbly!
A dry cake is often a sign of overbaking. Check your cake at the earlier end of the baking time range (45 minutes) with a wooden skewer. Also, ensure you’re not overmixing the batter, as this can develop too much gluten and result in a tough, dry texture. The boiling water helps, but overbaking counteracts it.
My Cake Sunk in the Middle!
Sinking can occur if the oven door is opened too early, causing a sudden temperature drop before the cake’s structure is set. It can also be a sign of underbaking, where the cake structure hasn’t fully set. Ensure your oven is accurately preheated and avoid opening the oven door before the last 10-15 minutes of baking. Trust the doneness test.
The Batter is Too Thin!
Don’t worry, the batter for this Easy Chocolate Bundt Cake is indeed thin, specifically because of the boiling water. This is intentional and contributes to the cake’s incredible moistness and tender crumb once baked. It’s a key feature of this particular recipe; trust the process!
Your Easy Chocolate Bundt Cake Questions, Answered!
Can I make this recipe gluten-free?
While this recipe is optimized for all-purpose flour, you can experiment with a 1:1 gluten-free baking flour blend. Be aware that the texture might be slightly different. Look for blends that specifically recommend use in cakes for best results, as some can be quite dry.
What if I don’t have buttermilk?
No problem! The recipe includes a fantastic substitute: combine 1 cup of regular milk (dairy or non-dairy) with 1 tablespoon of lemon juice or white vinegar. Let it sit for 5 minutes until it slightly curdles, then use as directed. This creates the necessary acidity for the baking soda to react, mimicking buttermilk’s effect.
Can I use butter instead of vegetable oil?
While butter would add a rich flavor, vegetable oil contributes to the cake’s exceptional moistness and light texture. Replacing it directly with melted butter might slightly alter the crumb structure, making it less tender. For the best result with this specific recipe, stick to vegetable oil.
How do I store leftover Bundt cake?
Store your Easy Chocolate Bundt Cake at room temperature in an airtight container for up to 3-4 days. This keeps it fresh and prevents it from drying out, maintaining its tender crumb and rich flavor.
Can I freeze this Easy Chocolate Bundt Cake?
Absolutely! This cake freezes beautifully. Once completely cooled, wrap it tightly in plastic wrap, then in aluminum foil. It can be frozen for up to 2-3 months. Thaw overnight in the refrigerator, then bring to room temperature before serving or dusting with powdered sugar. For another great freezing-friendly dessert, try our Decadent Chocolate Brownies.
Beyond the Bake: Serving & Storing Your Easy Chocolate Bundt Cake
Once your Easy Chocolate Bundt Cake is baked to perfection and released flawlessly, the fun truly begins with serving and ensuring its freshness for days to come.
Creative Toppings & Pairings
While a simple dusting of powdered sugar is elegant, feel free to get creative! A glossy chocolate ganache takes this cake to the next level, or a vibrant berry compote adds a touch of freshness. For ultimate decadence, serve slices with a scoop of vanilla bean ice cream or a dollop of freshly whipped cream. You might also find inspiration in our Amazing Chocolate Pecan Bundt Cake for topping ideas.
Storing Your Masterpiece for Freshness
To keep your Easy Chocolate Bundt Cake tasting its best, store it at room temperature. An airtight container or cake dome works perfectly, preventing the cake from drying out. Avoid refrigeration, as it can cause the cake to become dense and crumbly.
Make-Ahead Magic: Freezing & Thawing
This bundt cake is an excellent candidate for make-ahead baking. Once completely cooled, wrap the entire cake tightly in plastic wrap, then again in aluminum foil. This double layer protects against freezer burn. It can be frozen for up to 2-3 months without compromising flavor or texture. When ready to enjoy, simply thaw it overnight in the refrigerator, then bring it to room temperature before dusting and serving. This makes entertaining effortless!
Ready to Impress? Share Your Easy Chocolate Bundt Cake Masterpiece!
There’s a profound joy in baking something that looks as incredible as it tastes, especially when it’s an Easy Chocolate Bundt Cake that unmolds flawlessly every time. This recipe is designed to build your confidence and deliver an unforgettable dessert. Go ahead, bake it, and bask in the compliments!
I can’t wait to hear how this foolproof method transforms your baking experience. Share your beautiful bundt cake creations with us, and let’s celebrate the magic of perfect chocolate cakes together!
Easy Chocolate Bundt Cake
Course: DessertCuisine: American CuisineDifficulty: easy12
servings20
minutes45
minutesAmerican Cuisine
Ingredients
2 cups all-purpose flour
3/4 cup unsweetened cocoa powder
2 teaspoons baking soda
1 teaspoon salt
2 cups granulated sugar
1 cup vegetable oil
1 cup buttermilk (or 1 cup milk with 1 tablespoon lemon juice or white vinegar, let sit 5 minutes)
2 large eggs
1 teaspoon vanilla extract
1 cup boiling water
Powdered sugar for dusting
Softened butter or non-stick baking spray with flour
Additional cocoa powder for dusting the pan
Directions
- Preheat your oven to 350 degrees Fahrenheit.
- This is the crucial step for a perfect release: Generously coat the inside of your bundt pan with softened butter, ensuring every crevice and curve is thoroughly covered. Alternatively, use a high-quality non-stick baking spray with flour. Once buttered (or sprayed), sprinkle about 2 tablespoons of unsweetened cocoa powder into the pan. Rotate the pan, tapping and tilting, to coat the entire buttered surface evenly with the cocoa powder. Discard any excess cocoa powder. This creates a non-stick barrier that matches the cake color.
- In a large bowl, whisk together the flour, 3/4 cup cocoa powder, baking soda, salt, and granulated sugar.
- In a separate medium bowl, whisk together the vegetable oil, buttermilk, eggs, and vanilla extract until well combined.
- Pour the wet ingredients into the dry ingredients and mix with a spatula until just combined. Do not overmix.
- Carefully stir in the boiling water until the batter is smooth. The batter will be thin.
- Pour the batter evenly into your prepared bundt pan.
- Bake for 45-55 minutes, or until a wooden skewer inserted into the center of the cake comes out clean.
- Remove the cake from the oven and let it cool in the pan on a wire rack for exactly 15 minutes. This cooling time in the pan allows the cake to firm up sufficiently before inversion, which is key for a clean release.
- After 15 minutes, place a wire rack over the top of the bundt pan. Carefully but confidently invert the cake onto the wire rack. Lift the pan straight up. Your cake should slide out cleanly. If it sticks slightly, gently tap the bottom of the pan a few times before lifting.
- Allow the cake to cool completely on the wire rack before dusting generously with powdered sugar for serving.
Notes
- The unique pan preparation method is key to a perfect cake release.