If you have ever ended up with rubbery, gray scallops instead of that gorgeous golden crust, you know the frustration. My secret to consistently amazing Butter-Basted Pan-Seared Scallops lies in two critical elements: ruthlessly removing moisture before cooking and finishing the dish with a gentle garlic-butter baste.
This foolproof technique guarantees a stunning sear without ever overcooking the delicate center, transforming a challenging seafood dish into a simple weeknight luxury.
Why This Method Guarantees Restaurant-Quality Scallops
The Secret to Success: Cracking the Moisture Code
Scallops naturally hold a significant amount of water. If that moisture hits the hot pan, the pan temperature plummets instantly, and the water turns to steam.
Instead of searing, you are essentially steaming your scallops, which prevents the Maillard reaction needed for a crust and results in a sad, chewy texture. Getting the scallops bone dry beforehand solves this problem entirely.
Achieving the Deep, Golden Crust Without Overcooking
Our strategy uses a screaming hot pan initially to establish the deep, golden crust quickly.
After the flip, we immediately reduce the heat and introduce the basting butter and aromatics. This allows the internal temperature to rise gently to doneness while the crust finishes, preventing the centers from turning dry.
Flavor Layering: The Garlic-Butter Basting Finish
The basting step is the magic that defines great pan-seared scallops.
Scooping the fragrant, hot garlic butter over the seafood serves two purposes: it infuses the scallop exterior with rich flavor and finishes the cooking process gently, relying on the warm butter rather than intense direct heat.
The Essential Components for Your Butter-Basted Dish
Choosing the Right Scallops (The Importance of Size and Type)
Always choose large sea scallops, as their size allows enough time for a crust to form before the center overcooks. Bay scallops are too small for this high-heat searing method.
Before beginning, gently peel off the small, tough side muscle (adductor muscle) often attached to the side, as it contracts and becomes rubbery when heated.
High-Heat Oils and Dairy Decisions
You must start with an oil that has a high smoke point, like grapeseed or avocado oil, to withstand the high initial heat required for the sear.
Unsalted butter is specified for the basting stage so you can control the final seasoning precisely; standard salted butter could make the sauce too salty as it reduces.
Fresh Aromatics and Seasoning
Freshly minced garlic is non-negotiable for creating that aromatic basting sauce that coats the scallops.
Freshly cracked black pepper adds a necessary bite. Most critically, apply salt only moments before the scallops enter the pan to avoid drawing out precious surface moisture.
For more moist poultry ideas, check out this juicy lemon herb chicken.
Essential Gear for the Perfect Sear
The Non-Negotiable Skillet: Cast Iron vs. Stainless Steel
A heavy-bottomed pan is absolutely crucial because it retains heat consistently, preventing the pan temperature from dropping drastically when the cold seafood hits the surface.
Cast iron or high-quality stainless steel are ideal, as non-stick pans cannot handle the screaming hot temperatures required for a proper, deep sear.
The Role of Paper Towels and the Basting Spoon
A generous supply of paper towels is needed for the essential moisture removal step; without them, the recipe fails.
A large, sturdy metal spoon is necessary for the basting, allowing you to quickly and efficiently scoop the butter sauce over the scallops in the tilted pan.
Mastering the Butter-Basted Pan-Seared Scallops Technique
Phase 1: The Crucial Moisture Removal and Seasoning
Step 1: The Golden Sear Prep: Place the scallops on paper towels and pat them down vigorously. Let them rest on the counter for 15 minutes, swapping the towels if needed, until they are bone dry.
This drying process is the most crucial step for achieving caramelization, preventing a steaming effect when they hit the hot oil.
Season generously with salt and pepper right before they go into the pan.
Phase 2: High-Heat Initiation and Undisturbed Searing
Step 2: Heat the Pan: Add the high-heat oil and two tablespoons of butter. Heat the pan over medium-high until shimmering and just beginning to smoke lightly. The pan must be screaming hot.
Step 3: Sear Without Moving: Gently place the scallops in the pan, ensuring ample space between them (work in batches if necessary). Immediately lower the heat to medium-high.
Do not move or touch them for the full 2 to 3 minutes required for crust formation. Disturbing them prematurely will break the crucial sear and cause them to stick.
Phase 3: The Flip and Garlic Infusion
Step 4: The Flip and Baste Setup: Once the bottom crust is deep golden brown, flip the scallops. Reduce the heat immediately to medium-low.
Immediately add the remaining 2 tablespoons of butter and the minced garlic to the pan. The reduced heat prevents the garlic and butter from burning.
Phase 4: Continuous Basting to Finish the Cook
Step 5: Finish the Cook: Tilt the pan slightly and use a large spoon to continuously scoop the melted garlic butter over the scallops for about 60 to 90 seconds. This finishes the cook gently and infuses flavor.
Scallops are perfectly done when they are opaque throughout and feel firm to the touch but still tender inside. The total cook time is typically 4-5 minutes.
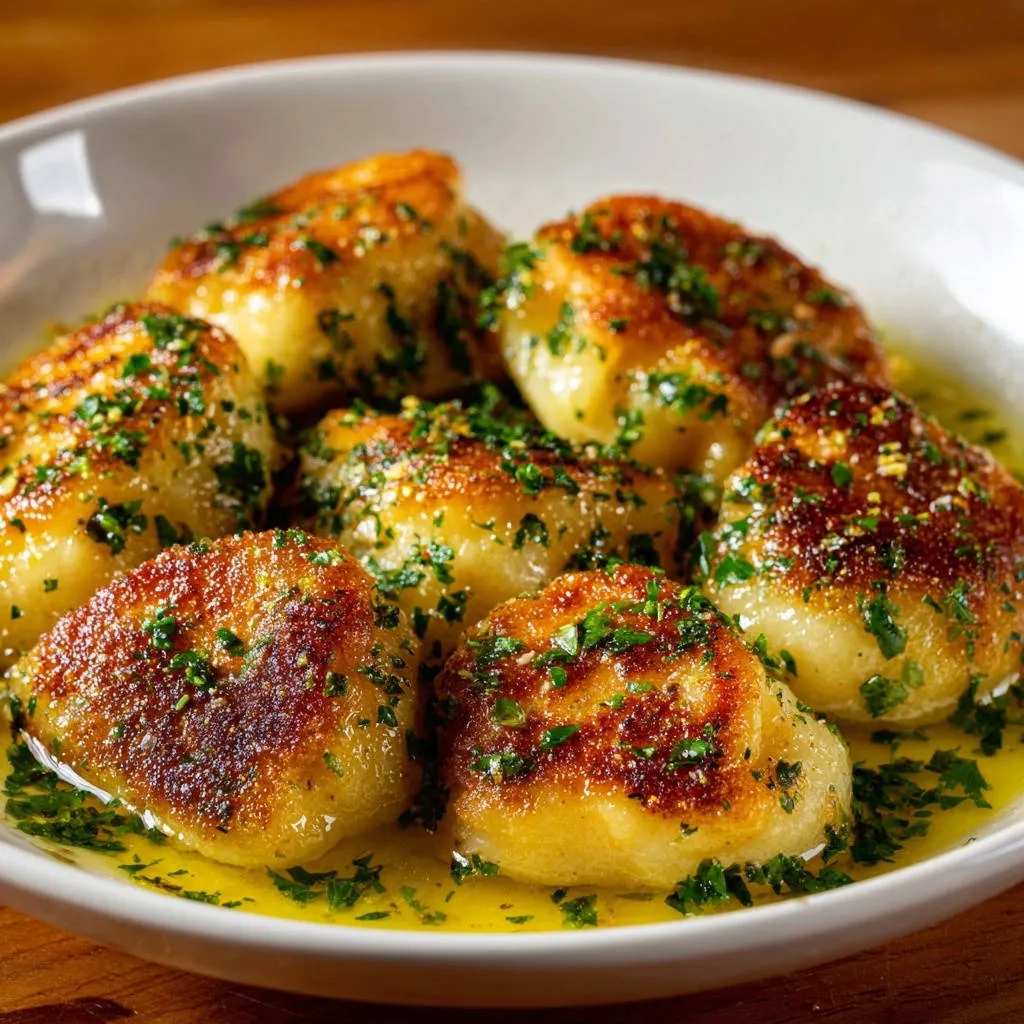
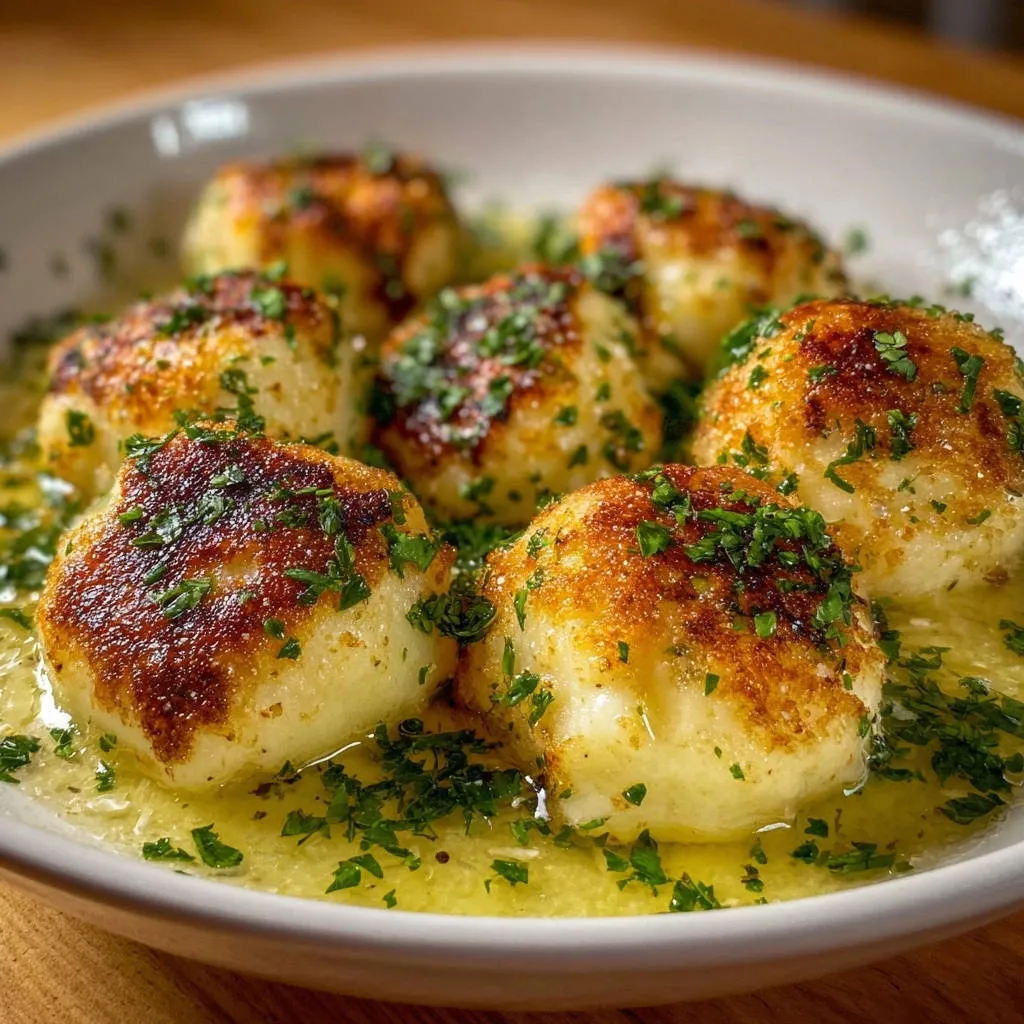
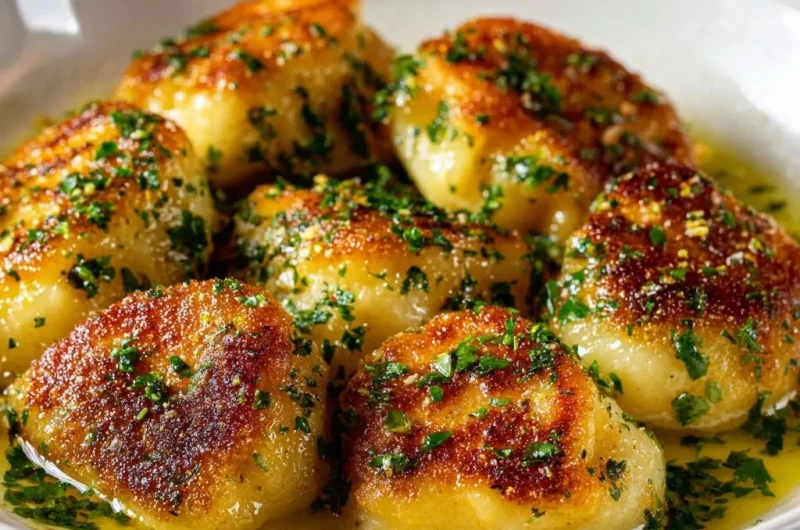
Step 6: Serve: Remove the scallops immediately and arrange them on a plate. Pour the warm garlic butter sauce over the top and finish with a sprinkle of fresh parsley for color and freshness.
Chef’s Secrets: Avoiding Rubber and Maximizing Flavor
Preventing a Gray Sear: Understanding Pan Capacity
Do Not Overcrowd the Pan: Overcrowding drops the pan temperature instantly and releases too much steam, leading to gray, tough scallops instead of a golden crust.
Work in multiple small batches if necessary, and ensure the pan returns to high heat between batches.
Achieving the Perfect Internal Doneness
Use the Finger Test: A perfectly cooked scallop should be slightly firm to the touch but still yield slightly when pressed, similar to the fleshy part of your palm when your thumb and middle finger are touching.
Overcooked scallops feel tough and rubbery, while raw ones feel soft and squishy. Practice this simple test for consistent results, rather than relying solely on timing.
Seasoning Timing: Why Salt Goes On Last
Season Right Before Searing: If you salt scallops even five minutes before cooking, the salt will begin to draw moisture back out onto the surface.
This completely undoes the critical drying prep step. Apply your salt and pepper only moments before placing them in the screaming hot pan.
Troubleshooting: Fixing Common Scallop Searing Problems
“My Scallops Stuck to the Pan!”
This usually means the pan wasn’t hot enough when the scallops went in, or you tried to move them too early. Ensure the oil is shimmering and just beginning to smoke before adding them.
Once a proper crust forms (after 2-3 minutes), they should naturally release from the pan. If they stick, give them another 30 seconds before trying to flip with a thin metal spatula.
“My Basting Butter is Burning or Browned Too Quickly”
The heat was likely too high during the basting phase. You must reduce the heat to medium-low right after flipping the scallops.
The butter should foam and melt, allowing the garlic to infuse slowly, not aggressively brown or smoke. If it starts to smoke heavily, remove the pan from the heat entirely while you finish basting with the residual heat.
“The Scallops Are Overcooked and Rubbery”
Scallops cook extremely fast due to their composition. Total cooking time for large sea scallops should not exceed 4-5 minutes, including the basting phase.
If you are unsure, remove them earlier; they will retain residual heat and continue cooking slightly. Ensure the drying step was performed rigorously, as excess moisture extends the cooking time needed to form the crust, leading to internal toughness.
Pairing Perfection: What to Serve with Your Golden Scallops
Quick Sides and Garnish Ideas
These expertly seared scallops pair beautifully with simple, absorbent sides that can soak up the rich garlic butter sauce.
Consider serving them over a creamy parmesan risotto, lightly pan-fried gnocchi, or a mound of simple parsley mashed potatoes to catch all the flavor.
Vegetable Companions That Complement Richness
For vegetables, choose something bright and quick that offers textural contrast and acidity.
Excellent choices include asparagus lightly tossed in lemon zest, blanched green beans, or a simple green salad with a tart vinaigrette to cut through the richness of the butter.
Your Top Questions About Cooking Scallops Answered
How Can I Store and Reheat Leftover Scallops?
Scallops are always best eaten immediately after cooking. If you have leftovers, store them in an airtight container in the fridge for up to 2 days.
To reheat, the best method is a very quick warm-up: place them in a hot pan with a small pat of butter for 30 seconds per side. Overheating will instantly risk them becoming overly tough and chewy.
How Do I Know If I Need to Remove the Side Muscle?
The side muscle is a small, rectangular piece of tough tissue located on the side of the scallop. If it’s still attached, it will contract intensely when cooked and become notably chewy.
Always gently peel it off and discard it before the drying step; it should come off easily with your fingers.
Can I Use Frozen Scallops for this Method?
Yes, but they require proper thawing and even more rigorous drying than fresh scallops, as freezing can cause cell walls to break, releasing more moisture.
Thaw them overnight in the refrigerator, drain them thoroughly, and then ensure they are completely dry-it helps to let them air dry on a rack in the fridge for an hour before patting them dry with paper towels.
Ready to Impress? Share Your Butter-Basted Pan-Seared Scallops Masterpiece!
With this proven method focused on moisture control and meticulous heat management, you are now equipped to conquer the high-heat searing world and enjoy perfectly cooked, golden Butter-Basted Pan-Seared Scallops that rival any fine-dining restaurant.
Don’t be afraid to try this simple, yet powerful, technique! If you made this recipe, let us know what side dishes you paired it with and tag us on social media-we love seeing your culinary creations!
Pan-Seared Scallops
Course: Main CourseCuisine: InternationalDifficulty: easy2
servings20
minutes7
minutes450
kcal27
minutesSay goodbye to sad, rubbery scallops. This method guarantees a deep, caramelized sear using a crucial prep step (drying) and a quick butter-basting finish infused with garlic. Master the high-heat technique for professional results at home.
Ingredients
1 pound large sea scallops (side muscle removed)
1 tablespoon high-heat oil (like grapeseed or avocado)
4 tablespoons unsalted butter, divided
2 cloves garlic, finely minced
1/4 cup fresh parsley, finely chopped
Salt
Freshly cracked black pepper
Directions
- The Golden Sear Prep: This is the most crucial step. Scallops hold a lot of moisture, which turns your hot pan into a steamer. Place the scallops on a layer of paper towels and pat them down vigorously until they are completely dry to the touch. Let them rest on the counter for 15 minutes, swapping out the paper towels if needed, until they are bone dry. Season generously with salt and pepper right before cooking.
- Heat the Pan: Choose a heavy-bottomed stainless steel or cast iron skillet. Add the high-heat oil and two tablespoons of the butter. Heat the pan over medium-high heat until the oil is shimmering and just beginning to smoke lightly. The pan must be screaming hot.
- Sear Without Moving: Gently place the scallops into the pan, ensuring there is space between each one (do not overcrowd the pan, work in batches if necessary). Immediately lower the heat to medium-high. Do not touch or move the scallops for a full 2 to 3 minutes. This undisturbed time is essential for the deep, golden crust to form.
- The Flip and Baste: Once the bottom crust is deep golden brown, flip the scallops. Reduce the heat to medium-low. Add the remaining 2 tablespoons of butter and the minced garlic to the pan.
- Finish the Cook: Tilt the pan slightly and use a large spoon to continuously scoop the melted garlic butter over the scallops for about 60 to 90 seconds. This ‘basting’ technique finishes cooking them gently while infusing the butter flavor. The scallops are done when they are opaque throughout and feel firm to the touch.
- Serve: Remove the scallops immediately and arrange them on a plate. Pour the warm garlic butter sauce over the top and finish with a sprinkle of fresh parsley. Serve immediately.
Notes
- The essential step is ensuring the scallops are bone dry before seasoning and searing.