
Most homemade tomato soups end up tasting like thin, acidic juice rather than a rich, satisfying meal. You’ve likely experienced that disappointing bowl where the broth separates from the solids, leaving you with a watery mess that lacks depth. This recipe fixes that common frustration by focusing on a velvety, spoon-coating reduction that feels incredibly luxurious on the palate.
The secret to achieving that vibrant orange hue and concentrated flavor lies in the roasting and reduction method. By roasting the vegetables at a high temperature, we evaporate excess water and caramelize the natural sugars. This creates a thick, silky consistency that clings to your spoon every single time, providing a much more intense flavor profile than any canned or quick-simmered version could ever offer.
I’ve found that the real trick to professional-grade soup is the final simmer after blending. While many recipes stop once the vegetables are pureed, taking an extra fifteen minutes to reduce the liquid ensures the texture is dense and creamy. This step transforms a simple vegetable puree into a sophisticated, restaurant-quality soup that serves as the ultimate comfort food.
The Science of Roasting for Maximum Flavor
When you toss tomatoes and peppers into a 400°F oven, you aren’t just softening them; you’re initiating the Maillard reaction. This chemical process creates new flavor compounds as the heat interacts with the amino acids and sugars in the vegetables. Raw tomatoes can be quite sharp and acidic, but the high heat of the oven mellows that bite, turning it into a complex, savory sweetness.
If you enjoy roasting vegetables for depth, discover a similar approach in creamy roasted garlic potato soup.
The addition of a large red bell pepper is a strategic move for both color and body. Bell peppers contain natural fibers and pectins that act as a thickener when blended, allowing you to achieve a heavy texture without relying on flour or cornstarch. As the pepper skins char and the flesh softens, they contribute a smoky undertone that rounds out the brightness of the Roma tomatoes.
Furthermore, roasting the garlic inside its papery skin is a crucial technique. This protects the delicate cloves from the direct heat of the oven, allowing them to steam and soften into a buttery paste. If you were to roast naked garlic at this temperature, it would likely burn and turn bitter, ruining the entire base of your soup. Instead, you get a mellow, nutty garlic flavor that integrates perfectly into the cream.
Essential Components for a Rich Tomato Base
Choosing the right tomato is the first step toward success. I always recommend ripe Roma tomatoes because they have a much lower water content and meatier walls compared to beefsteak or heirloom varieties. Using a watery tomato means you’ll have to spend twice as long reducing the soup on the stove to get the right thickness.
The vegetable broth also plays a vital role in the final texture. While the recipe calls for two cups of flavor, we specifically use a reduced amount of 1.5 cups during the blending phase. Starting with less liquid is a proactive way to ensure your soup never feels like a thin broth. You can always add a splash more liquid later if it’s too thick, but it’s much harder to fix a soup that’s already too runny.
Don’t forget the importance of the pan juices. After roasting, the sheet pan will be covered in a concentrated, syrupy liquid. This is pure flavor gold. Every drop of that liquid should be scraped into the pot, as it contains the essence of the caramelized vegetables and the infused olive oil.
Selecting and Prepping Your Produce
Look for tomatoes that are heavy for their size and have a deep red color all the way to the stem. When prepping, halve the tomatoes lengthwise to maximize the surface area exposed to the heat. This allows moisture to escape more efficiently during the roasting process, which is exactly what we want for a concentrated base. Ensure your onion wedges are roughly the same size as the tomato halves so they cook at an even rate.
The Role of High-Fat Dairy and Emulsification
Heavy cream is the final touch that brings everything together. When you stir the cream into the acidic tomato base, it creates a stable emulsion that results in that signature bright orange color. The fats in the cream coat the tongue, which helps to balance the remaining acidity of the tomatoes. Always add the cream at the very end over low heat to prevent it from breaking or curdling.
Step-by-Step: Roasting and Reducing the Base
The process of making this soup is divided into three distinct phases, each designed to build layers of flavor. Firstly, the high-heat roast focuses on extraction and caramelization. Secondly, the pot integration and blending create the structural foundation. Finally, the reduction phase polishes the texture until it reaches a premium, velvety state.
During the roasting phase, don’t be afraid of a little char. Those blackened edges on the onions and the shriveled, collapsed skins of the tomatoes are where the deep, smoky notes live. If the vegetables look too “pretty” and wet, they haven’t roasted long enough. You want to see the juices bubbling and thickening right on the baking sheet before you even think about taking them out.
Once the vegetables are in the pot with the broth, the blending process begins. If you use an immersion blender, move it in a slow, circular motion to catch every chunk of bell pepper and onion. For those who want a truly commercial-grade smoothness, you can pass the blended soup through a fine-mesh sieve. This removes any lingering bits of tomato skin or seeds, leaving you with a liquid that feels like silk.
For a similarly smooth result, check out how to achieve a creamy texture in creamy roasted cauliflower soup.
The final 15-minute simmer is where the magic happens. As the soup bubbles gently uncovered, the steam escaping is actually the last of the excess water leaving the pot. You’ll notice the color deepen and the soup start to leave a thick coating on the back of a wooden spoon. This “spoon test” is your best indicator of readiness; if you can run your finger through the coating and the line stays clean, your soup is perfect.
Phase 1: Achieving the Char
Keep a close eye on your oven around the 35-minute mark. You are looking for the tomatoes to have completely lost their shape and for the red bell peppers to show dark, blistered spots. These visual cues tell you that the sugars have caramelized. Remember to squeeze the roasted garlic out of its skin carefully; it will be very hot, but that soft paste is essential for the creamy mouthfeel.
Phase 2: Blending for a Silky Mouthfeel
An immersion blender is the most convenient tool for this job, as it allows you to work directly in the pot. However, if you prefer an ultra-smooth texture, a high-speed stand blender is superior. Just be careful when blending hot liquids in a closed container; always remove the center plastic piece of the lid and cover it with a kitchen towel to allow steam to escape safely.
Phase 3: The Critical 15-Minute Simmer
This is the step most people skip, but it’s the most important for texture. Simmering the soup after it has been pureed allows the flavors to marry and the consistency to tighten. Watch for the bubbles to become “lazy”—when the soup is thick, the bubbles will pop more slowly and heavily than they do in a thin, watery liquid.
Crafting the Perfect Sourdough Oregano Croutons
A soup this rich deserves a garnish with some backbone. Sourdough bread is the ideal choice because its natural tanginess cuts through the creamy weight of the tomato base. By toasting the cubes in butter on the stovetop, you create a crunchy exterior while keeping the center slightly chewy. This contrast in texture makes every bite more interesting.
Serving Suggestions
To round out your meal, consider these complementary dishes.
- For a different kind of hearty soup, explore the creamy sausage and white bean soup, offering a different set of comforting flavors.
- If you enjoyed the roasted tomato element, you might also like the creamy roasted tomato soup for another taste of that profile.
I prefer using dried oregano for the croutons rather than fresh. Dried herbs stand up much better to the high heat of the skillet without burning or turning bitter. As the butter foams and coats the bread, the oregano releases its oils, infusing the croutons with an earthy aroma that perfectly complements the roasted garlic in the soup. Toss them frequently to ensure an even, golden-brown finish on all sides.
Flavor Variations and Dietary Swaps
This recipe is quite flexible if you need to adjust for dietary preferences. For a vegan version, you can easily swap the heavy cream for full-fat coconut cream. The high fat content in coconut cream provides a similar richness, though it will add a very subtle tropical note. You can also use olive oil instead of butter for toasting the croutons to keep the entire meal plant-based.
If you enjoy a bit of heat, try adding a half teaspoon of red pepper flakes to the vegetables before roasting. The heat will infuse into the oil and spread evenly throughout the soup. For those who find their tomatoes are particularly acidic, a small splash of balsamic vinegar added at the very end can provide a woody sweetness that balances the flavors beautifully without needing extra sugar.
What to Serve with Creamy Tomato Soup
While a grilled cheese sandwich is the classic partner, you can elevate the meal with other pairings. Sharp cheddar tuiles—small discs of baked cheese—provide a salty crunch that mimics the flavor of a sandwich without the heavy bread. A simple arugula salad with a light lemon vinaigrette also works wonders, as the peppery greens cut right through the richness of the cream.
For an added protein boost, consider topping the soup with crispy roasted chickpeas instead of croutons. They offer a similar crunch but add an earthy flavor that pairs well with the roasted bell peppers. If you want to keep it light, a few shavings of fresh parmesan cheese and a drizzle of high-quality extra virgin olive oil are all you need to finish the dish elegantly.
Troubleshooting Common Soup Issues
If your soup tastes too sour, it’s likely due to the natural acidity of the tomatoes. You can fix this by adding a tiny pinch of sugar or an extra tablespoon of heavy cream to mellow the flavor. Don’t overdo the sugar; you just want to balance the bite, not make the soup sweet. Always taste as you go to ensure the balance is moving in the right direction.
In the event your soup is still too thin after the reduction phase, continue simmering it uncovered. Every minute of simmering removes more moisture. If you are in a rush, you can blend in a small amount of mashed cooked potato, which acts as a natural thickener without changing the flavor profile. To prevent the cream from curdling, ensure the soup is not at a rolling boil when you stir it in; a gentle simmer is much safer for dairy.
Storage, Reheating, and Freezing Protocols
This soup stores beautifully in the refrigerator for up to four days. In fact, the flavors often deepen overnight as the garlic and herbs continue to infuse into the liquid. When reheating, do so over low heat on the stove, stirring occasionally to keep the cream from separating. Avoid using a microwave if possible, as it can heat the soup unevenly and cause the dairy to “break.”
You can freeze this soup for up to three months, but keep in mind that cream-based liquids can sometimes look grainy or separated once thawed. This is a simple fix. After thawing the soup in the fridge, heat it gently on the stove and give it a quick pulse with the immersion blender. This will re-emulsify the fats and restore that perfectly smooth, velvety texture you worked so hard to achieve.
Frequently Asked Questions
How do I store leftovers and can I freeze this soup?
Store the soup in an airtight container in the refrigerator for 3 to 4 days. You can freeze it for up to 3 months in freezer-safe bags or containers. Because this soup contains heavy cream, it may separate slightly when thawed. To fix this, simply reheat the soup slowly on the stove and use an immersion blender for 30 seconds to bring the creamy texture back to life.
Why is my tomato soup still watery after blending?
Watery soup usually happens because the vegetables weren’t roasted long enough or the soup wasn’t reduced after blending. Roasting at 400°F is essential to evaporate the tomatoes’ internal moisture. If it’s still thin after blending, simmer it uncovered for an extra 10 to 15 minutes. This allows the steam to escape, concentrating the solids and thickening the consistency naturally.
Can I use canned tomatoes instead of fresh Roma tomatoes?
Yes, you can use two 28-ounce cans of whole peeled tomatoes if fresh ones aren’t in season. However, you should still roast them! Drain the juice first, lay the canned tomatoes on the sheet pan with the other vegetables, and roast as directed. This helps remove the “canned” taste and adds the necessary caramelization that makes this recipe special.
What can I use instead of heavy cream?
If you want a lighter option, you can use half-and-half, though the soup won’t be quite as thick. For a dairy-free alternative, full-fat coconut cream or cashew cream works best. Avoid using skim milk or almond milk, as they are too thin and may curdle when they hit the acidic tomato base, resulting in a grainy texture rather than a smooth one.
My soup tastes too acidic, how do I fix it?
Tomato acidity varies wildly depending on ripeness. If your soup has a sharp bite, add a half-teaspoon of granulated sugar or a splash more heavy cream. The fat in the cream is the best tool for neutralizing acid. Another chef’s trick is to add a tiny pinch of baking soda (about 1/8 teaspoon); it reacts with the acid to neutralize it instantly, though it may foam slightly at first.
Do I really need to roast the garlic with the skin on?
Yes, this is a vital step. Roasting garlic cloves without their skins at 400°F will cause them to burn and turn bitter within 15 minutes. Keeping the skin on allows the garlic to roast in its own steam, turning it into a sweet, spreadable paste. Once the roasting is done, the garlic will slide right out of the skin with a gentle squeeze, providing a much deeper flavor than raw garlic.

Creamy Tomato Soup
Course: SoupCuisine: AmericanDifficulty: medium4
servings15
minutes45
minutes310
kcal60
MinutesThis Creamy Roasted Tomato Soup achieves a vibrant orange color and silky texture by roasting vegetables to evaporate excess water. Blended with vegetable broth and heavy cream, it is served with homemade oregano sourdough croutons for a comforting meal.
Ingredients
3 pounds ripe Roma tomatoes, halved
1 large white onion, wedged
1 large red bell pepper, deseeded and chopped (for color and body)
4 cloves garlic, unpeeled
3 tablespoons olive oil
1 teaspoon salt
1/2 teaspoon black pepper
1.5 cups vegetable broth (reduced from 2 cups to ensure thickness)
1/2 cup heavy cream
2 cups sourdough bread cubes
2 tablespoons butter
1 teaspoon dried oregano
Freshly cracked black pepper for garnish
Directions
- Preheat your oven to 400 degrees F. This high heat is essential for the roasting step that prevents a watery soup.
- Place tomatoes, onion, bell pepper, and unpeeled garlic cloves on a large sheet pan. Drizzle with olive oil and sprinkle with salt and pepper. Toss to coat thoroughly.
- Roast for 35 to 40 minutes. You are looking for charred edges and collapsed tomatoes. This process removes the raw water content and intensifies the natural sugars.
- While vegetables roast, melt butter in a skillet over medium heat. Add bread cubes and oregano. Toast, tossing frequently, until golden and crunchy. Set aside.
- Squeeze the roasted garlic out of its skins into a heavy pot. Add the roasted tomatoes, onions, peppers, and all the concentrated juices from the pan. Add the vegetable broth.
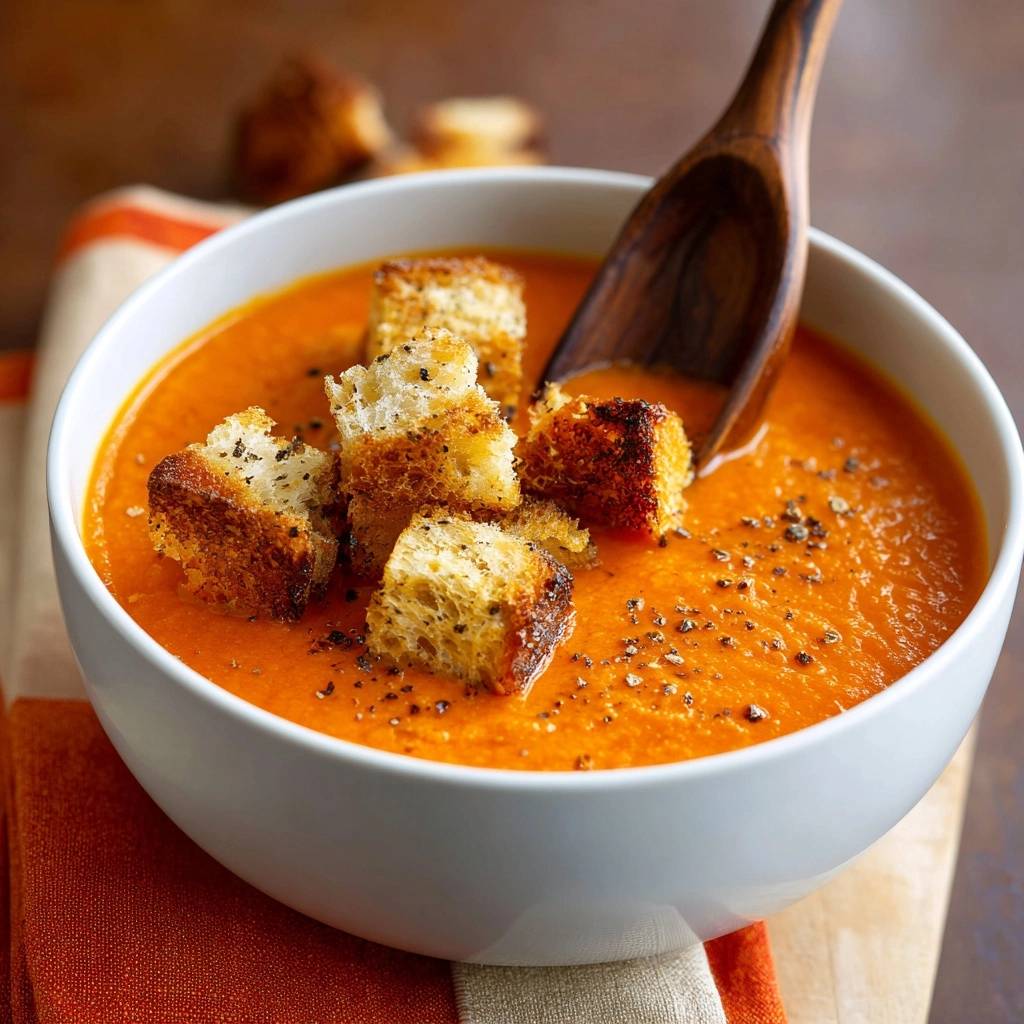
- Use an immersion blender to puree until completely smooth. To achieve the thick, spoon-coating consistency seen in the image, simmer the blended soup uncovered for 10-15 minutes to reduce.
- Stir in the heavy cream and simmer for 2 more minutes until the soup turns a bright, creamy orange.
- Ladle into bowls and top with a generous handful of the toasted croutons and a heavy crack of fresh black pepper to match the visual presentation.
Notes
- Roasting the garlic in its skin prevents it from burning and creates a mellow, sweet flavor. Ensure you simmer the soup uncovered after blending to reach the desired thickness.