Imagine biting into a potato that offers a literal shattering crunch on the outside, only to reveal a center as fluffy as a cloud. That contrast is the holy grail of side dishes, yet so many home cooks end up with a tray of soggy, sad spuds. If you have ever pulled a pan out of the oven only to find your potatoes stuck or mushy, you are not alone.
The secret to Garlic Herb Smashed Potatoes isn’t just about the heat; it is about managing moisture and maximizing the Maillard reaction. Most recipes skip the most vital step of the process, which is the dehydration phase. By mastering the transition from boiling to roasting, you turn a humble root vegetable into a golden, jagged masterpiece that rivals any high-end steakhouse side.
For an equally satisfying crunch, check out garlic butter roasted baby potatoes.
For an even deeper crunch, explore these crispy thyme roasted potatoes.
I’ve found that the real trick lies in the “steam release” period right after boiling. If you smash a potato while it is still dripping with water, you are essentially steaming it in the oven. However, if you let that surface moisture evaporate until the skin looks matte and chalky, the oil can immediately begin “frying” the exterior. This creates that deep, rigid crust we all crave.
The Science of the Perfect Potato Crunch
Why do we use baby gold potatoes instead of a standard Russet? It comes down to the balance of starch and sugar. Gold potatoes have a naturally creamy, waxy texture that holds its structural integrity when smashed. While a Russet might fall apart into a pile of mashed potatoes, the gold variety creates a sturdy “base” with thin, petal-like edges that crisp up beautifully.
Physics also plays a massive role in this recipe. By smashing the potato, you are exponentially increasing the surface area exposed to the hot oil and dry oven air. Those jagged, uneven edges are thin enough to dehydrate rapidly, turning into the “chips” of the potato world while the thicker center stays soft. It is a game of textures that only works if you create enough “nooks and crannies” during the smashing process.
Essential Components for Garlic Herb Smashed Potatoes
You only need a handful of ingredients, so quality is paramount. Start with 1.5 pounds of baby gold potatoes. Look for a bag where the sizes are consistent; this ensures they all finish boiling at the exact same time. If you have a mix of tiny and large ones, the small ones will turn to mush before the large ones are even tender.
Extra virgin olive oil acts as your primary heat conductor here. You want an oil that can stand up to the heat while providing a peppery backbone to the garlic. Fresh thyme is also non-negotiable. Dried herbs often taste dusty after 30 minutes in a hot oven, but fresh thyme leaves release their oils slowly, perfuming the entire kitchen without burning into bitter charcoal bits.
Selecting the Right Potato Variety
While Yukon Golds are the gold standard for their buttery flavor, Red Bliss potatoes are a fantastic runner-up. They have a slightly thinner skin that gets very “snappy” when roasted. Fingerlings can work too, though their elongated shape makes them a bit trickier to smash into a uniform circle. Avoid starchy baking potatoes, as they lack the “glue” needed to keep the smashed flower shape intact.
Fat Ratios: Olive Oil vs. Melted Butter
Olive oil is the workhorse of this recipe because it has a higher smoke point than butter. However, adding a tablespoon of melted butter to your oil mixture can provide a spectacular flavor boost. If you choose to use butter, whisk it with the oil so the fats emulsify. This prevents the milk solids in the butter from browning too quickly while still giving you that rich, dairy-forward finish.
Pre-Roasting: The Boiling and Drying Phase
Always start your potatoes in a pot of cold, heavily salted water. If you drop them into boiling water, the outside will overcook and slough off before the middle is soft. Starting cold ensures the heat penetrates evenly to the core. Don’t be shy with the salt; this is your only chance to season the potato from the inside out. The water should taste like the sea.
The Evaporation Secret: Why Timing Matters
Once your potatoes are fork-tender, drain them immediately. Now, here is the part where most people fail: do not smash them yet. Let them sit in the colander for at least 5 to 8 minutes. You will actually see steam billowing off them. This is the internal moisture escaping.
For a deeper dive into achieving that perfect crisp, explore garlic parmesan smashed potatoes using the steam-dry method.
Watch for the visual cue. The potatoes will go from looking shiny and wet to having a dull, matte, almost white-ish film on the skin. This “chalky” look is exactly what you want. It means the surface is dry enough to bond with the olive oil and start crisping the second it hits the hot pan. If you skip this, that moisture will turn into steam in the oven, leaving you with a soft, pale potato.
Technique: Achieving the “Flower” Smash Pattern
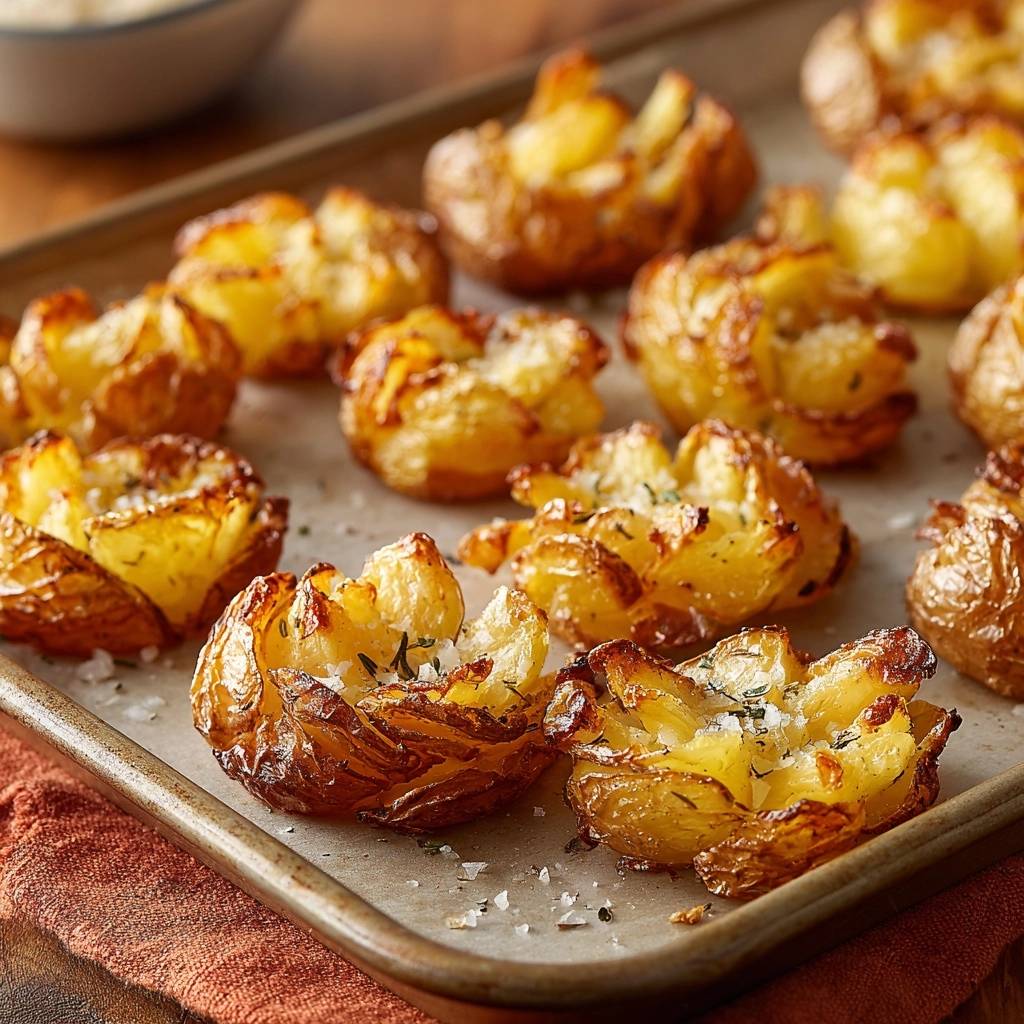
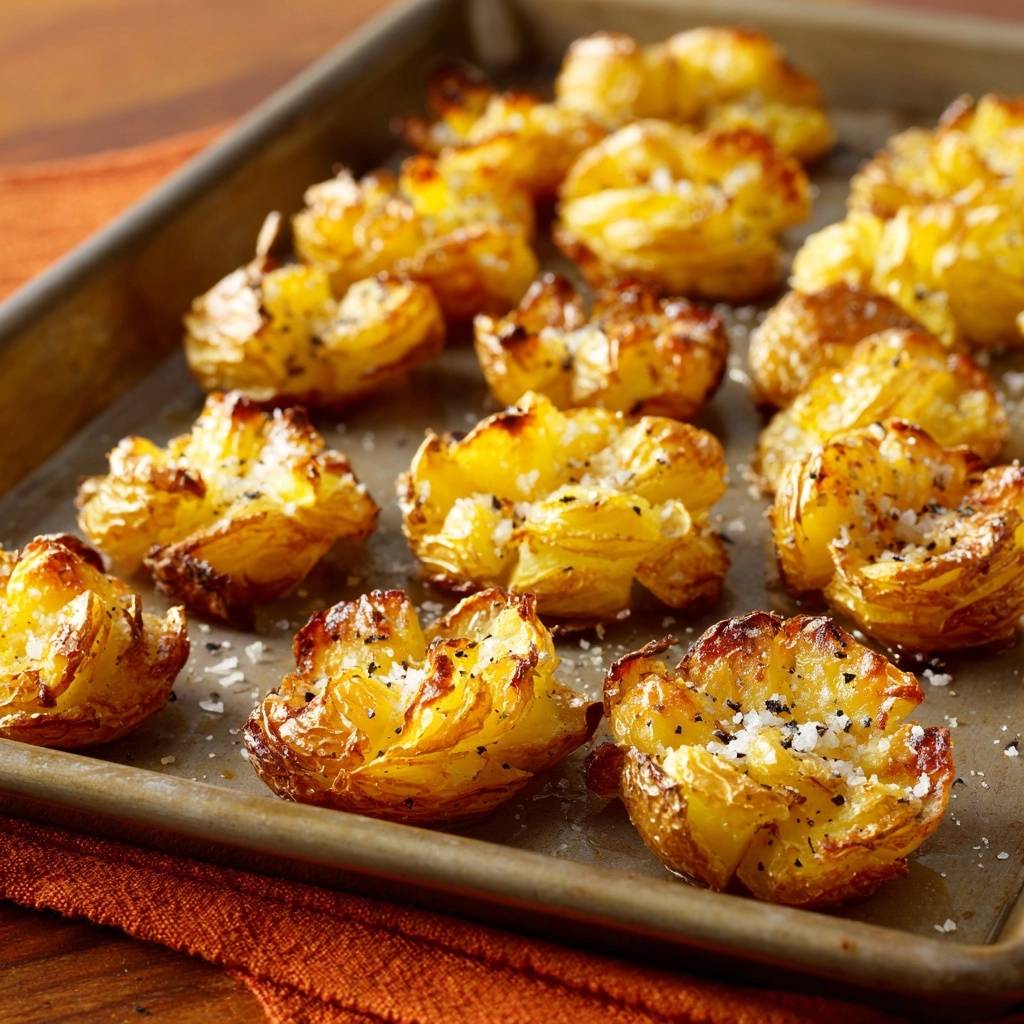
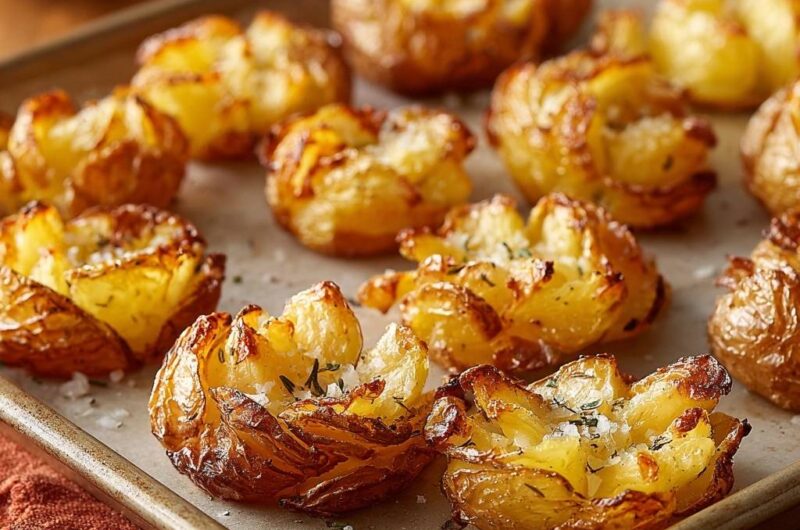
To get those beautiful, jagged edges, use the bottom of a heavy drinking glass or a flat potato masher. Place the dry potato on your oiled baking sheet and press down firmly but slowly. You aren’t trying to pulverize it; you want to split the skin so the yellow flesh fans out like petals.
Aim for a thickness of about half an inch. If you go too thin, the potato will become a hard cracker. If you leave it too thick, it won’t get that signature crunch. Those thin, “shaggy” edges are the best part, as they will become the crispiest bits of the entire dish. Ensure there is enough space between each potato so the air can circulate freely.
Infusing Flavor Without Burning the Garlic
Garlic is notorious for turning bitter if it spends too much time at 450°F. To prevent this, whisk your finely minced garlic directly into the olive oil before drizzling. The oil acts as a heat shield, gently poaching the garlic as the potatoes roast. This allows the garlic flavor to seep into the potato flesh without the bits turning into burnt black specks.
High-Heat Roasting: The No-Flip Method
Position your oven rack in the middle-lower third of the oven. This puts the bottom of the baking sheet closer to the heating element. Because you’ve oiled the pan generously, the bottoms of the potatoes are essentially shallow-frying while the tops roast. This creates a double-sided crunch without you ever having to touch them.
Resist the urge to flip the potatoes halfway through. Flipping often causes the delicate, crispy “petals” to break off and stick to the pan. By leaving them alone for the full 25 to 30 minutes, you allow the bottom crust to fully set and release naturally from the metal. You’ll know they are done when the edges look deep brown and almost translucent.
Troubleshooting Common Smashed Potato Failures
If your potatoes are sticking to the pan, you likely didn’t use enough oil or you tried to move them too early. The potato will “tell” you when it’s ready by releasing from the surface. If they are falling apart into mush, you probably overboiled them. They should be tender enough to pierce with a fork, but they shouldn’t be crumbling in the water.
For uneven browning, check your oven’s hot spots. If one side of the tray is darker than the other, rotate the pan 180 degrees halfway through the roasting time. However, keep the potatoes themselves stationary to preserve those beautiful, fragile edges.
Flavor Variations and Herb Substitutions
If thyme isn’t your favorite, rosemary is a classic alternative that stands up well to high heat. You can also try a Mediterranean twist by using dried oregano and finishing the dish with a squeeze of fresh lemon juice and some lemon zest. For a bit of warmth, a sprinkle of smoked paprika and cumin added to the oil mixture creates a wonderful earthy profile that pairs perfectly with the garlic.
Main Course Pairings for Garlic Herb Smashed Potatoes
These potatoes are incredibly versatile. They are hearty enough to stand up to a thick, seared portobello mushroom steak or a roasted chicken. Because they have such a pronounced crunch, they pair beautifully with softer textures, like a piece of flaky baked fish or a creamy vegetable gratin. They also make a killer appetizer when served with a side of cool garlic aioli or a zesty yogurt dip.
Looking for More?
Here are some ideas to round out your meal.
- For a complementary protein that shines with bright flavors, try these Charred Lemon-Scallion Chicken Thighs.
- If you’re in the mood for more beef and potatoes, these Beef & Potato Skewers offer a satisfying combination.
Storage and Reheating for Retained Texture
Whatever you do, stay away from the microwave when reheating leftovers. The microwave will turn these crispy gems into rubbery lumps. Instead, pop them back into a 400°F oven or an air fryer for about 5 minutes. This will reactivate the oils and bring back that “shatter” crunch. You can store them in an airtight container in the fridge for up to 4 days.
Expert Tips for Large Batch Cooking
If you are cooking for a crowd, do not overcrowd the sheet pan. If the potatoes are touching, the moisture they release will create a steam pocket, and they won’t get crispy. Use two separate baking sheets if you need to. It is better to have two pans with plenty of airflow than one pan where the potatoes are cramped together. Your patience will be rewarded with the loudest crunch you’ve ever heard!
Frequently Asked Questions
Can I use large potatoes instead of baby potatoes?
It is not recommended. Large potatoes need to be cut to be manageable, and once you cut a potato, you lose the structural integrity of the skin that holds the “smash” together. The skin acts like a container for the fluffy interior; without it, the potato will just crumble into a mess on your baking sheet.
Why are my potatoes sticking to the baking sheet?
This usually happens for two reasons: either the pan wasn’t oiled well enough before the potatoes were added, or the oven wasn’t hot enough. A hot oven and a generous layer of oil create a non-stick barrier. Also, make sure you aren’t using a parchment paper that isn’t rated for 450°F, as it can sometimes bond to the potato starches.
Can I prep these a day in advance?
Yes! You can boil and dry the potatoes a day ahead of time. Once they are dry, store them in a sealed container in the refrigerator. When you are ready to eat, proceed with the smashing, oiling, and roasting steps. Cold potatoes actually smash quite well and might even get a bit crispier due to the starch retrogradation that happens in the fridge.
Is it necessary to peel the potatoes?
Absolutely not. In fact, peeling them would ruin the recipe. The skin is what provides the structural “hinge” for the smashed shape and contains much of the texture. When roasted at high heat, the skin becomes incredibly thin and crispy, providing a huge portion of the flavor and “snap” of the dish.
What if I don’t have a potato masher?
No problem at all. The bottom of a heavy glass, a small mason jar, or even a large metal measuring cup works perfectly. Just make sure to grease the bottom of whatever tool you use with a little oil so it doesn’t stick to the potato flesh and pull the potato apart when you lift it up.
Smashed Potatoes
Course: Side DishCuisine: AmericanDifficulty: medium4
servings10
minutes45
minutes210
kcal55
MinutesA foolproof method for achieving shattering, golden-brown smashed potatoes. By focusing on steam release and a specific oil ratio, these potatoes offer a deep golden crust and a fluffy interior without falling apart.
Ingredients
1.5 pounds baby gold potatoes, uniform in size
4 tablespoons extra virgin olive oil (divided)
1.5 teaspoons sea salt flakes
1/2 teaspoon cracked black pepper
1 tablespoon fresh thyme leaves, chopped
3 cloves garlic, finely minced
Optional: 1 tablespoon melted butter for extra browning
Directions
- Place the potatoes in a large pot of cold, heavily salted water. Bring to a boil and cook for 15 to 20 minutes until they are fork-tender but not falling apart.
- The Critical Step: Drain the potatoes and let them sit in the colander for a full 5 to 8 minutes. This allows the surface moisture to evaporate completely. If the potatoes are wet when you smash them, they will steam instead of crisp.
- Preheat your oven to 450°F (230°C). Generously coat a large rimmed baking sheet with 1 tablespoon of the olive oil.
- Place the dry potatoes on the baking sheet. Use the bottom of a heavy glass or a potato masher to gently press down on each potato. To achieve the “flower” look in the image, press firmly in the center so the skin splits and the interior flesh fans out into jagged, thin petals.
- In a small bowl, whisk together the remaining 3 tablespoons of olive oil, minced garlic, and half of the thyme.
- Drizzle the garlic oil generously over each potato, ensuring the oil pools slightly in the center of the “flower” and coats the jagged edges. Sprinkle with sea salt and black pepper.
- Roast for 25 to 30 minutes on the middle-lower rack. Do not flip them. The high heat and the oil on the pan will “fry” the bottoms while the tops become golden and rigid.
- Remove from the oven when the edges are deep brown and translucent. Immediately sprinkle with the remaining fresh thyme and an extra pinch of sea salt. Serve hot for the ultimate crunch.
Notes
- The critical step is letting the potatoes air dry for 5 to 8 minutes after boiling to ensure they crisp rather than steam. For extra browning, you can add 1 tablespoon of melted butter to the oil mixture.