I spent years making homemade curries that tasted great in the sauce, but the chicken itself remained stubbornly bland-a common frustration among home cooks trying to master South Asian cuisine.
I cracked the code: the key to an exceptional Chicken and Pepper Curry lies not just in the spices you use, but precisely when you apply them to the meat.
This reliable, expert method utilizes a vital seasoning and searing technique to ensure every tender bite of chicken is bursting with flavor depth, promising a rich and satisfying dinner.
The Flavor Secret Solved: Why This Chicken and Pepper Curry Works
The Critical Difference: Seasoning the Meat, Not Just the Sauce
The majority of flavor complaints stem from adding unseasoned chicken directly into the simmering sauce, which only flavors the exterior.
The “Flavor Lock-In Prep” ensures the chicken cubes absorb a foundational layer of salt and turmeric before they hit the heat, preventing that flat, one-dimensional taste.
Why Texture Matters: Achieving Perfectly Tender Chicken
The initial sear locks in the moisture of the protein, giving the chicken a slight textural contrast and preventing it from becoming rubbery when it returns to the liquid.

Chicken thighs are the most forgiving choice due to their higher fat content, but this searing method works beautifully to keep lean chicken breasts tender during the final simmer.
The Magic of Blooming: Releasing Deep Spice Aromatics
Dry spices like cumin and coriander must be cooked directly in hot fat before any liquid is introduced.
This process, called blooming, releases the volatile oils, drastically intensifying their aroma and resulting in a depth of flavor that cannot be achieved by simply boiling the spices in water.
The Essential Ingredients: Building a Balanced Curry Profile
Choosing Your Protein: Thighs Versus Breasts
Boneless, skinless chicken thighs are highly recommended because they remain moist and tender, even if slightly overcooked.
Breasts are suitable for those who prefer leaner cuts, but they require stricter monitoring during the final simmer to maintain a soft texture.
The Cornerstone Spices for Depth and Warmth
The careful selection and layering of spices provide the characteristic warmth and complexity of this curry.
Turmeric (Color and Earthiness): Used in the initial seasoning, turmeric imparts its signature golden hue and a subtle, earthy background note.
Cumin and Coriander (The Flavor Engine): These two ground spices are foundational; they provide warm, citrusy, and nutty notes essential for any authentic curry base.
Chili Powder or Paprika (Controlling the Heat): Use high-quality chili powder for heat, or substitute paprika for color and mildness if you prefer a less spicy dish.
Fresh Aromatics and Sweet Peppers
Fresh aromatics like grated ginger and minced garlic are irreplaceable for building a bright, pungent flavor base that complements the dry spices.
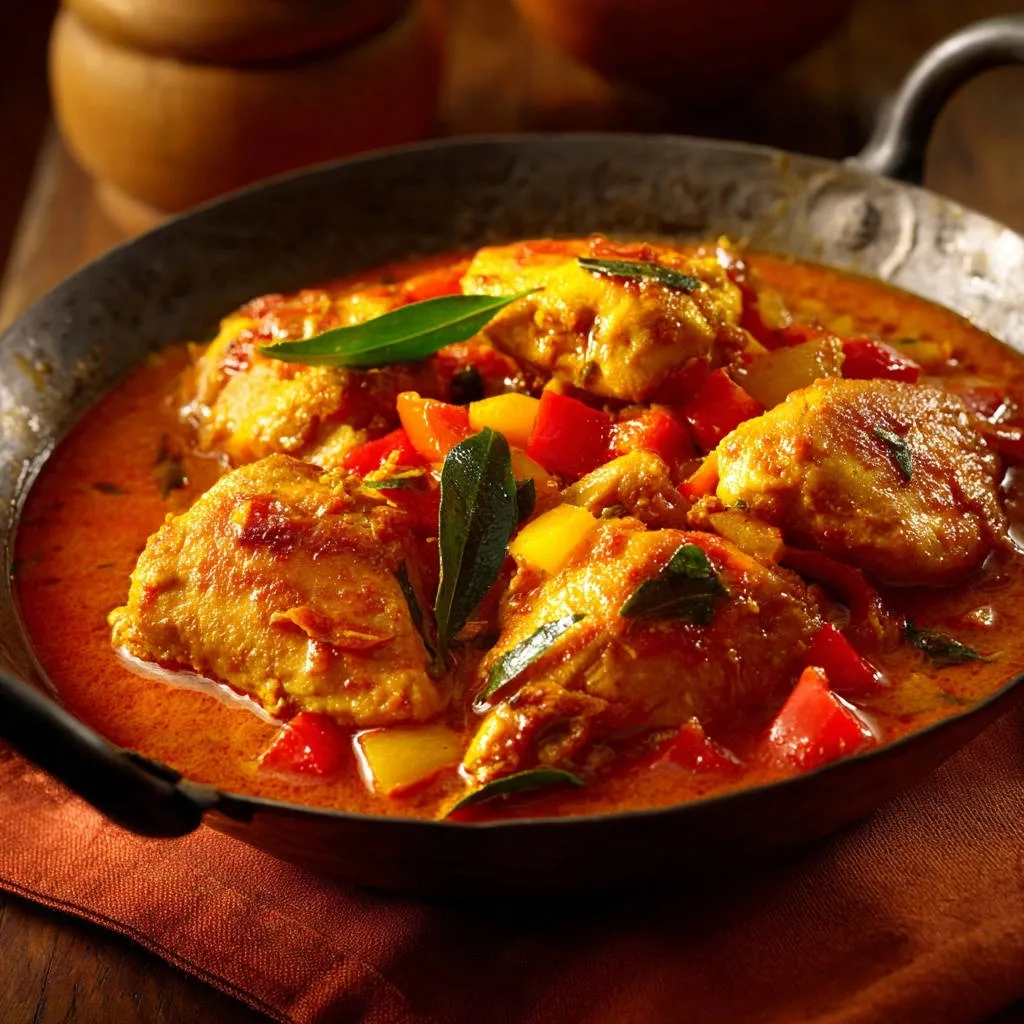
The red and yellow bell peppers provide sweetness, balancing the acidity of the crushed tomatoes and adding necessary crunch and color to the final Chicken and Pepper Curry.
Tools of the Trade: Equipment for Your Curry Success
The Importance of a Heavy-Bottomed Pot or Wok
A heavy-bottomed vessel, such as a Dutch oven or cast-iron pot, is mandatory for two reasons: searing and simmering.
It maintains high, consistent heat for a proper sear without temperature fluctuations and distributes low heat evenly during the long simmer, preventing scorching on the bottom.
Essential Prep Tools (Knife, Cutting Board, Grater)
Efficiency in curry making relies on quick, accurate preparation of the base ingredients.
A sharp chef’s knife and stable cutting board are necessary for cubing the chicken and dicing the vegetables.
A fine microplane or small grater is best for grating ginger, ensuring you get pure flavor without tough fibrous pieces.
Achieving Perfection: The Step-by-Step Flavor Lock-In Method
-
Preparation: Seasoning the Chicken Deeply
Place the cubed chicken in a bowl and coat it thoroughly with half of the salt, pepper, and turmeric powder. This initial coating of turmeric, salt, and pepper is the foundation of the ‘Flavor Lock-In’ technique, ensuring the seasoning penetrates the meat before heat is applied.
-
Achieving the Golden Sear
Heat your oil in a heavy pot over medium-high heat. Add the seasoned chicken in a single layer (work in batches if necessary to avoid crowding) and sear for 2-3 minutes per side.
The high heat sear creates a light crust, sealing in the moisture and adding crucial depth of flavor to the exterior of the chicken cubes.
Do NOT clean the pot afterward; those brown bits (fond) are essential for the sauce’s flavor base.
-
Building the Aromatic Base
Reduce the heat to medium. Add the diced onion to the pot and cook, stirring occasionally, until soft and translucent (about 5-7 minutes).
Slowly sautéing the diced onions until translucent is mandatory before adding the pungent fresh aromatics (ginger and garlic). Cook the ginger and garlic only for 60 seconds until fragrant to prevent burning.
-
The Critical Step: Blooming the Dry Spices
Add the remaining 1/2 teaspoon turmeric, cumin, coriander, and chili powder to the pot.
Add the dry spices to the hot oil and onion mixture. Stir constantly for 60-90 seconds until highly fragrant and a thick paste forms.
This process, known as ‘blooming,’ drastically increases the bioavailability of the spices’ volatile oils, resulting in a much deeper, restaurant-quality curry flavor.
-
Simmering to Perfection and Enriching the Sauce
Stir in the chopped bell peppers, crushed tomatoes, and chicken broth. Bring the mixture to a gentle simmer before returning the seared chicken pieces and any accumulated juices to the pot.
Tuck in the fresh bay leaves or curry leaves. Simmering low and slow for 15-20 minutes tenderizes the chicken and allows the flavors to fully meld into the sauce.
The optional heavy cream or coconut milk, added at the end, provides a velvety mouthfeel without dulling the primary spice notes. Taste and adjust salt just before serving.
Beyond the Recipe: Expert Tips for Next-Level Flavor Depth
Don’t Rush the Sear
Searing must be done in batches. Crowding the pot will steam the chicken instead of searing it, preventing the development of the essential golden crust and flavor layer.
The Power of Fresh vs. Dried Bay Leaves
If you can source fresh curry leaves, they provide an authentic, distinct aroma. If using dried bay leaves, ensure they are fresh and remove them before serving, as they do not break down.
Adjusting the Acidity and Salt Balance
Curries need balance. If the tomato base feels too sharp or acidic, a pinch of sugar can mellow it instantly without making the dish sweet.
Always taste and adjust salt after the sauce has simmered and reduced slightly, as evaporation concentrates existing salt content.
Prepping Ahead for Quick Dinners
The aromatic base (Steps 3 and 4)-onions, ginger, garlic, and bloomed spices-can be prepared up to three days in advance and stored in the refrigerator, drastically cutting down on evening prep time.
Solving Common Curry Mistakes: Troubleshooting Guide
Why is My Chicken Dry and Tough?
Dry chicken usually results from overcooking during the final simmer, especially if using leaner chicken breasts.
To avoid this, ensure the chicken is only seared lightly (not cooked through) in Step 2, and check internal temperature during the simmer; remove the pot from the heat as soon as the meat is tender.
My Curry Tastes Flat and Lacks Depth
The two main culprits for a flat curry are skipping the initial seasoning of the chicken and, more importantly, not sufficiently blooming the dry spices.
Ensure the spices cook vigorously in the hot oil for the full 60-90 seconds until a strong, fragrant aroma is present throughout the kitchen.
How to Fix a Sauce That is Too Thin
If the sauce is too watery, simply remove the lid and allow the curry to simmer gently for an additional 10-15 minutes; this lets the excess liquid evaporate and naturally thicken the sauce.
For a fast fix, mix 1 teaspoon of cornstarch with 2 teaspoons of water (a slurry), stir it into the simmering sauce, and cook for 1 minute until thickened.
Serving Suggestions and Storage Wisdom
Perfect Pairings for Chicken and Pepper Curry
The richness of this curry is perfectly complemented by simple, absorbent sides.
- Fluffy Basmati or jasmine rice
- Warm, buttery naan or chapati bread
- A dollop of cooling plain yogurt or raita
- A sprinkle of fresh cilantro (coriander) for brightness
Make-Ahead and Freezing Guidelines
This Chicken and Pepper Curry improves overnight, as the flavors continue to meld. Store leftovers in an airtight container in the refrigerator for 3-4 days.
It freezes excellently for up to 3 months. Be aware that thawed bell peppers will lose some of their crispness, becoming softer, but the flavor profile remains intact.
Frequently Asked Questions About This Recipe
Can I Make This Chicken and Pepper Curry Vegetarian?
Yes, this recipe structure works wonderfully for vegetarian options.
Substitute the chicken with firm paneer (add during the simmer), chickpeas (stir in with the tomatoes), or cubed extra-firm tofu (sear gently before building the base).
What is the Difference Between Bay Leaves and Curry Leaves?
Standard dried bay leaves (often used in Western stews) provide a subtle herbal background.
In contrast, fresh curry leaves (used frequently in South Indian and Sri Lankan cooking) impart a highly distinct, aromatic, nutty, and slightly citrusy flavor that provides deep authenticity to this curry.
Is it Better to Use Heavy Cream or Coconut Milk?
The choice depends on your desired outcome and dietary needs.
Heavy cream provides a classic, rich, and velvety mouthfeel without altering the spice flavor, while full-fat coconut milk offers a slightly lighter texture and introduces a subtle, sweet tropical complexity to the Chicken and Pepper Curry.
For an even smoother sauce, explore how to achieve that creamy curry texture.
Ready to Impress? Share Your Chicken and Pepper Curry Masterpiece!
No more flat, boring weeknight meals. By embracing the simple yet powerful technique of pre-seasoning and searing the chicken, you guarantee a deeply flavored, satisfying Chicken and Pepper Curry every time.
Trust this process and discover the phenomenal depth achieved through the Flavor Lock-In method. We can’t wait to hear how this master recipe transforms your dinner table!

Chicken and Pepper Curry
Course: Main CourseCuisine: IndianDifficulty: easy4
servings15
minutes35
minutes450
kcal50
minutesStop eating flat-tasting curry! This recipe uses a crucial two-step process—pre-seasoning and searing—to lock intense flavor directly into the chicken meat before simmering. This method, combined with blooming the spices, guarantees an incredible depth of flavor in every bite.
Ingredients
2 pounds boneless, skinless chicken thighs or breasts, cut into large cubes
1 teaspoon turmeric powder, divided
1 teaspoon salt, divided
1/2 teaspoon black pepper
2 tablespoons vegetable oil
1 large yellow onion, diced
1 tablespoon fresh ginger, grated
1 tablespoon garlic, minced
1 red bell pepper, chopped
1 yellow bell pepper, chopped
1 tablespoon cumin powder
1 tablespoon coriander powder
2 teaspoons chili powder or paprika (adjust to heat preference)
1 (14.5 ounce) can crushed tomatoes
1 cup chicken broth
4-6 fresh bay leaves or curry leaves (for garnish and flavor)
1/4 cup heavy cream or full-fat coconut milk (optional, for richness)
Directions
- Flavor Lock-In Prep: Place the cubed chicken into a bowl. Add 1/2 teaspoon of the turmeric powder, 1/2 teaspoon of salt, and the black pepper. Toss well to coat thoroughly. This crucial step seasons the meat itself before cooking begins.
- Sear for Depth: Heat the vegetable oil in a large, heavy-bottomed pot or wok over medium-high heat. Once the oil is shimmering, add the seasoned chicken in a single layer (work in batches if necessary to avoid crowding). Sear the chicken pieces for 2-3 minutes per side until they develop a light golden-brown crust. Remove the chicken and set aside; do not wipe out the pan. This sear locks the spice flavor onto the chicken exterior.
- Build the Base: Reduce the heat to medium. Add the diced onion to the pot and cook for 5-7 minutes until softened and translucent. Add the grated ginger and minced garlic, cooking for 1 minute until fragrant.
- Bloom the Spices: Add the remaining 1/2 teaspoon turmeric, cumin, coriander, and chili powder to the pot. Stir constantly and cook the spices with the onions for 60-90 seconds until a deep paste forms and the fragrance intensifies. If the spices start to stick, add a splash of chicken broth or water. Cooking the dry spices directly in the hot oil/fat is the secret to releasing their deepest flavor.
- Simmer and Finish: Stir in the chopped bell peppers, crushed tomatoes, and remaining chicken broth. Bring the mixture to a simmer. Return the seared chicken pieces and any accumulated juices to the pot. Tuck in the fresh bay leaves or curry leaves. Reduce the heat to low, cover, and let simmer gently for 15-20 minutes, or until the chicken is cooked through and tender.
- Enrich the Sauce: Taste the sauce and adjust the remaining salt as needed. For a richer finish, stir in the heavy cream or coconut milk during the last 5 minutes of simmering. Serve hot over rice or with naan bread.
Notes
- For best results, do not skip the initial step of seasoning and searing the chicken. Heavy cream or coconut milk is optional for added richness.