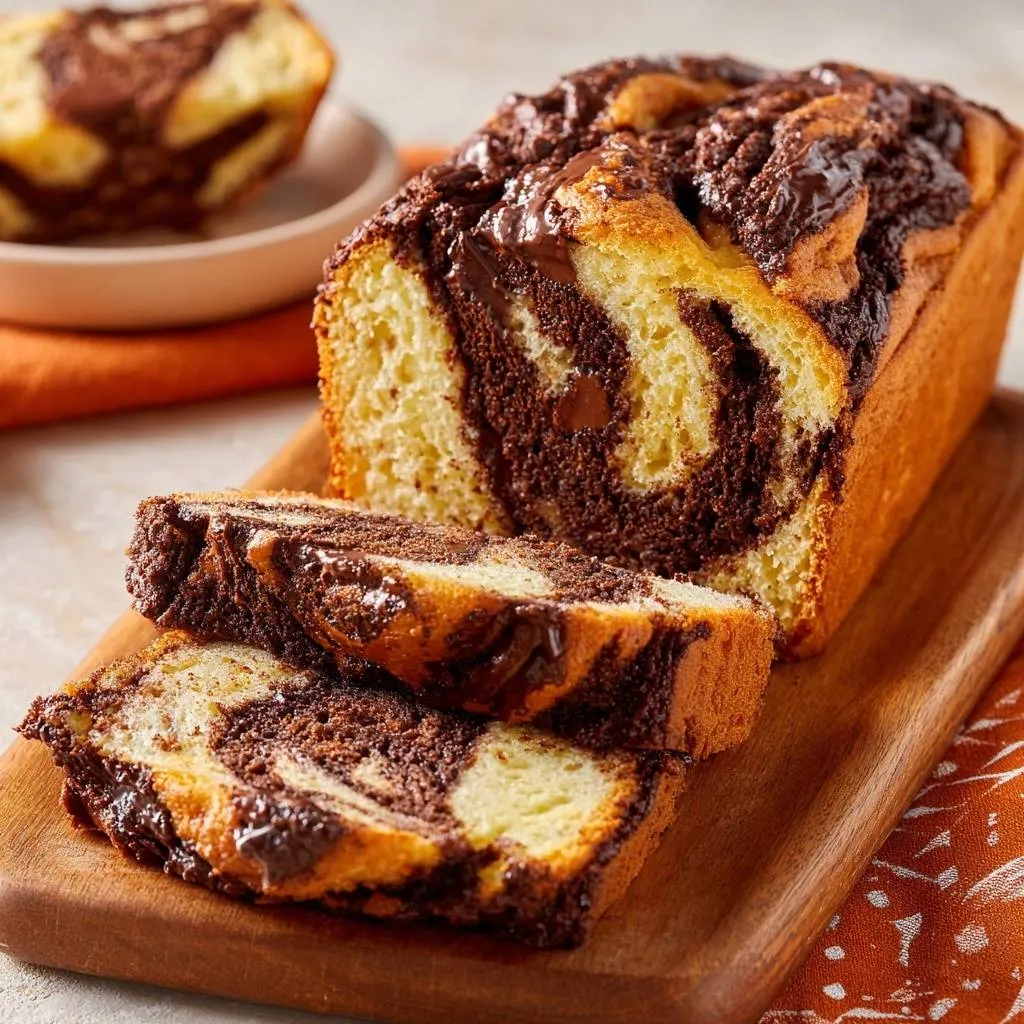
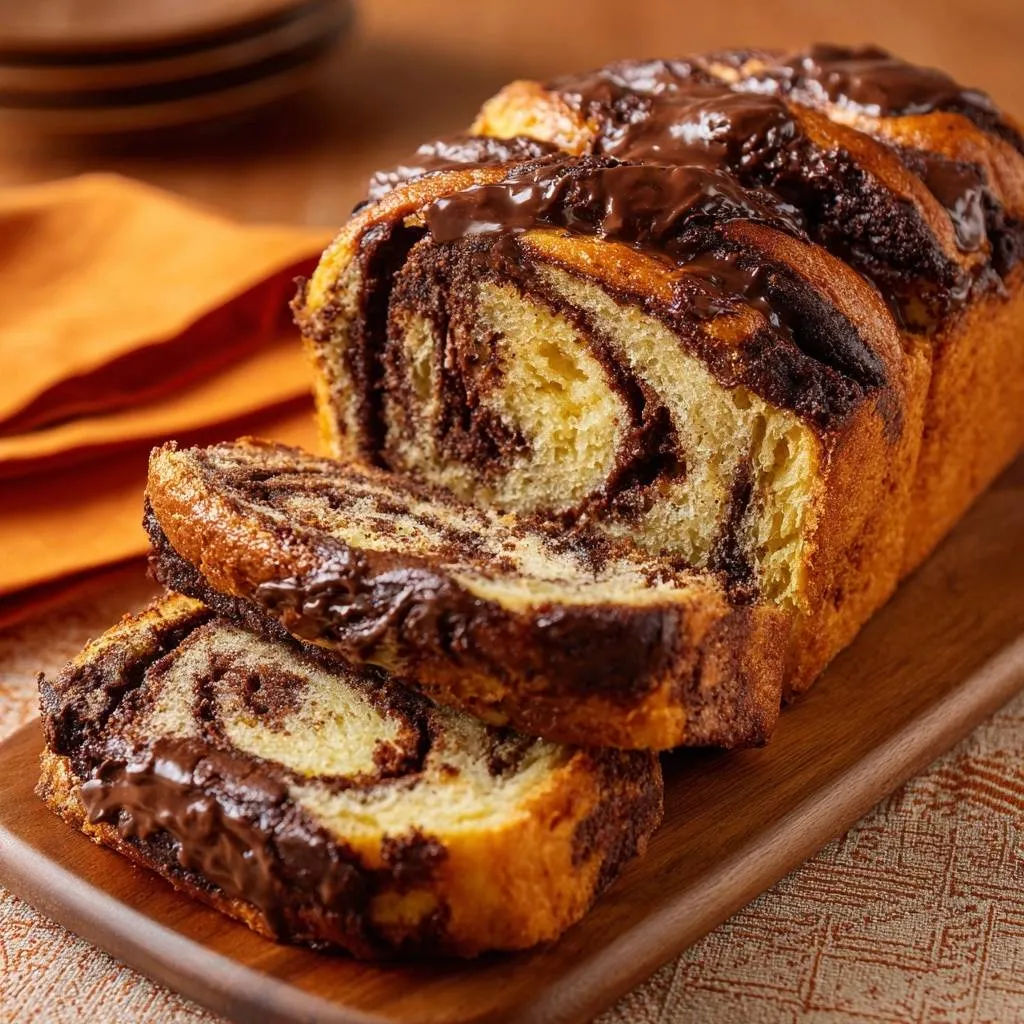
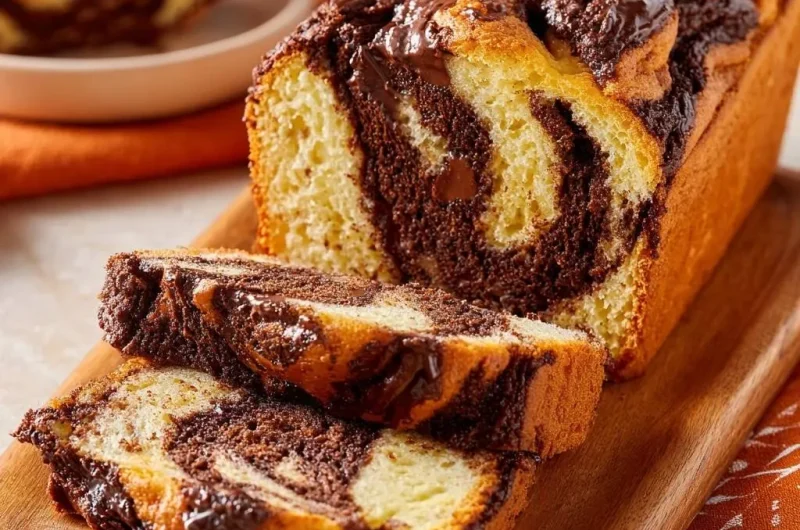
Ever sliced into a chocolate marble loaf cake only to find all the chocolate huddled at the bottom like it’s hiding from the party? You’re not alone. That sinking frustration ruins the whole point of those gorgeous swirls. But this recipe fixes it with a dead-simple layering trick that keeps chocolate and vanilla batters perfectly balanced in every slice.
Here’s why it works so well. You divide the batter evenly and match their thicknesses before layering. No more dense chocolate batter dragging everything down. Instead, you get that stunning marbled effect with a tender crumb that stays moist for days.
The real secret? Bloom the cocoa in hot water first, then cool it slightly before folding into half the batter. This ensures both portions have the exact same spoonable consistency. Suddenly, your chocolate marble loaf cake looks pro-level without any fancy gear. Oh man, that first slice reveals ribbons of chocolate weaving through vanilla, and it melts right in your mouth.
For more decadent chocolate creations, explore our chocolate glazed pistachio layer cake.
Key Ingredients for Even Chocolate Marble Loaf Cake
Flour, Baking Powder, and Salt Balance
You’ll use 2 1/2 cups all-purpose flour here. It gives the chocolate marble loaf cake just the right structure so slices hold those swirls without turning gummy or dense. In addition, the flour prevents the cake from collapsing under the weight of the chocolate.
Next, 2 teaspoons baking powder provides the lift. It reacts with the liquid to create air pockets for that fluffy crumb. Meanwhile, 1/2 teaspoon salt sharpens all the flavors without overpowering the sweetness.
Don’t swap in cake flour, though. It makes the batter too fragile, leading to chewiness and uneven rise. Stick with all-purpose for reliable results every time.
Butter and Sugar for Light Batter Base
Start with 1 cup unsalted butter, softened to room temperature. Cream it with 1 1/2 cups granulated sugar for a full 3 minutes. This traps air bubbles that expand in the oven, giving your chocolate marble loaf cake its light, tender base.
Add 4 large eggs one at a time, also at room temp. Cold eggs cause curdling, which deflates the batter and leads to flat cakes. Beat well after each to build a stable emulsion.
Unsalted butter lets you control the salt level precisely. Salted versions can make the crumb tough. Therefore, this creaming step sets up fluffiness that holds through layering and baking.
Milk, Vanilla, and Cocoa for Consistent Batters
1 cup milk at room temperature hydrates the batter smoothly. It works with 2 teaspoons vanilla extract to infuse pure, floral sweetness into the vanilla half. Room-temp milk prevents shocking the fat, keeping everything emulsified.
For the chocolate, mix 1/4 cup unsweetened cocoa powder into 1/2 cup hot water. This blooms the cocoa for deep flavor and creates a smooth paste. Cool it slightly, then fold into half the batter. Both halves must feel equally thick, like soft frosting, to stop sinking.
Finally, melt 1 cup semisweet chocolate chips for the glaze. It adds shine and richness without sogginess. Pro tip: If your chocolate batter looks thinner, add a teaspoon of flour to match consistencies perfectly.
Science of Sink-Proof Chocolate Marble Loaf Cake
Batter Density and Even Layering Physics
Chocolate sinks because it’s denser than vanilla batter. Cocoa powder adds weight, and if the consistencies don’t match, gravity pulls it down during baking. However, this recipe equalizes them by blooming cocoa in hot water, which dissolves it fully without extra liquid thinning things out.
If you want to avoid a similar issue with dense fillings, check out the red velvet cheesecake method.
Divide the base batter exactly in half first. Then, the chocolate half gets the cooled cocoa mix folded in gently. Both end up with the same viscosity, so they stack without shifting. Think of it like building layers of equal-weight bricks, they stay put.
The creaming earlier creates a stable emulsion. Fat coats the flour proteins, trapping air and moisture. Therefore, even with chocolate’s density, the whole loaf rises uniformly, revealing sharp swirls on every slice.
Swirling Motion and Air Bubble Release
Spoon batters in alternating 1/4 portions, spreading each lightly. Then, zigzag a butter knife end-to-end, just 2-3 passes. Follow with side-to-side motions. This carves tunnels between layers, creating those feathery patterns without blending into mud.
Complementary Bites
To round out your chocolate marble loaf cake experience, consider these savory and sweet additions.
- For a delightful contrast, try these Cheesy Beef Waffles that offer a satisfying crispness.
- If you’re craving more sweet baked goods, the Cinnamon Sugar Waffles provide a lovely spiced sweetness.
Over-swirling mixes colors into a uniform brown mess. Limit passes to preserve contrast. Next, tap the pan firmly on the counter 5 times. This pops trapped air bubbles that could cause tunnels or uneven rise.
Bake at 350°F for 50-55 minutes. The steady heat sets the structure gradually. As a result, your chocolate marble loaf cake emerges with crisp edges, moist center, and swirls intact.
Essential Tools for Chocolate Marble Loaf Cake Success
9×5-Inch Loaf Pan Preparation
Grease and flour a metal 9×5-inch loaf pan thoroughly. This creates a barrier so the cake releases cleanly, preserving those bottom swirls. Parchment sling works too, just overhang the sides for easy lifting.
Avoid glass pans. They heat unevenly, baking the outside too fast while the center lags. Therefore, swirls distort and edges overbrown. A metal pan conducts heat evenly for perfect results.
Mixer and Whisk for Precise Control
A stand mixer excels at creaming butter and sugar to fluffy peaks. Hand mixers tire out faster and incorporate less air. Use the paddle attachment for smooth batter without overworking.
Whisk dry ingredients in a bowl to break lumps. Check milk and eggs with a thermometer, aiming for 68-72°F. This precision keeps batters stable and sink-proof.
Layering Phases for Perfect Chocolate Marble Loaf Cake
Prepping and Dividing the Base Batter
Preheat oven to 350°F. Whisk flour, baking powder, and salt. In addition, beat softened butter and sugar until pale and fluffy, about 3 minutes. You’ll smell sweet vanilla as air incorporates.
Add eggs one by one, beating 30 seconds each. Mix in milk and vanilla until smooth, but don’t overbeat or it toughens. Divide batter evenly into two bowls. Visual check: each half should mound slightly in the spoon.
If one looks off, add a dribble of milk to the thicker side. This ensures perfect matching later.
Creating Chocolate Portion Without Separation
Stir cocoa into hot water until glossy and smooth. Let it cool 2 minutes so it doesn’t cook the eggs. Fold gently into one batter half with a spatula, 10-12 strokes max.
Test consistency by scooping. It should drop in thick ribbons, matching the vanilla. If too thin, stir in 1 teaspoon flour. This step guarantees no sinking in your chocolate marble loaf cake.
Alternating Layers and Zigzag Swirl
Spoon 1/4 vanilla batter into pan bottom, spread gently to edges. Top with 1/4 chocolate, spreading lightly. Repeat for four layers total. You’ll see stripes forming already.
Insert knife at one end, zigzag to the other without hitting bottom. Turn pan, zigzag side-to-side. Just 2-3 passes keep patterns sharp. Tap counter 5 times firmly. Bubbles rise and pop, smoothing the top.
Baking and Cooling for Clean Release
Bake 50-55 minutes. Toothpick in center should exit with moist crumbs, not batter. Cool in pan 10 minutes exact. Rushing causes cracks as steam escapes too fast.
Invert onto rack to finish cooling. Melt chocolate chips gently, drizzle over top. Slices reveal flawless swirls once set.
Avoiding Pitfalls in Chocolate Marble Loaf Cake
Fixing Sinking Chocolate Issues
Cold ingredients make batters separate, causing density mismatches. Always use room-temp everything. If chocolate sinks anyway, your cocoa mix was too thin, next time bloom with less water or add flour.
The layering prevents most issues. Four thin layers interlock better than dumping half-and-half. Therefore, even if slight shifting happens, swirls stay visible throughout.
Over-Swirling and Texture Fixes
Blurred patterns mean too many knife passes. Stick to 2-3 zigzags. Gummy crumb comes from underbaking, so rotate pan midway if your oven has hot spots.
Bake until edges pull from pan sides. This signals doneness and crisp texture.
Batter Curdling and Rise Problems
Curdling happens with cold eggs or milk hitting creamed butter. Warm them in hot water first. Overmixing after adding flour develops gluten, flattening rise.
For high altitudes, reduce baking powder to 1 1/2 teaspoons and increase flour by 2 tablespoons. Even crumb results.
Flavor Twists on Chocolate Marble Loaf Cake
Nutty Additions and Citrus Zests
Fold 1/2 cup chopped walnuts into vanilla batter for crunch. Or grate orange zest into it for bright contrast against chocolate. These add texture without weighing down layers.
Swirl 2 tablespoons raspberry puree into chocolate half. The tartness cuts richness. Keep the layering exact to maintain sink-proof swirls.
Glaze Variations and Spices
Melt white chocolate for drizzle stripes over the semisweet glaze. Add 1/2 teaspoon cinnamon to vanilla batter or espresso powder to cocoa for depth.
Sparkling cranberry juice pairs beautifully with a slice.
Storage Guide for Chocolate Marble Loaf Cake
Room Temp and Freezer Methods
Store airtight at room temp up to 3 days. Wrap tightly in plastic to keep moist. For freezing, slice first, then freeze in single layers between parchment up to 2 months.
Thaw overnight in fridge, then bring to room temp. Swirls stay sharp, texture softens nicely.
Reviving Day-Old Slices
Microwave slices 10 seconds or toast gently. This restores moisture and warmth. Refresh glaze by remelting a few chips.
Pairing Ideas for Chocolate Marble Loaf Cake
Serve with fresh berries for juicy pop against the fudgy swirls. Whipped cream adds lightness, or vanilla ice cream melts into creamy pools.
Coffee’s bitterness highlights chocolate, while milk softens sweetness. Herbal tea works too. For breakfast, toast slices with butter, the swirls crisp up beautifully.
Troubleshooting Chocolate Marble Loaf Cake Queries
Why Does Chocolate Sink in Marble Cake?
Density mismatch from thin chocolate batter or uneven division causes it. This recipe fixes it by blooming cocoa properly and layering in quarters. Consistencies match, so swirls hold through baking.
Can I Use Dutch-Process Cocoa?
No, stick to natural unsweetened cocoa. Dutch-process is less acidic, weakening baking powder’s lift. Your chocolate marble loaf cake would rise poorly and taste flat.
How to Halve for Smaller Loaf?
Halve all ingredients exactly. Use 8×4-inch pan, bake 40-45 minutes. Check early with toothpick. Swirls scale perfectly.
Gluten-Free Chocolate Marble Adaptation?
Swap 1:1 gluten-free flour blend, add 1/2 teaspoon xanthan gum. Check consistencies closely, as GF batter thickens differently. Layering still prevents sinking.
Best Pan Release Without Flour?
Baking spray with flour works best. Or brush with oil and line with parchment. Avoid plain oil alone, it can make bottoms greasy.
Chocolate Marble Loaf Cake
Course: DessertCuisine: AmericanDifficulty: medium1
loaf (10-12 slices)20
minutes55
minutes350
kcal60
MinutesA chocolate marble loaf cake with a simple layering and swirl technique that prevents the chocolate batter from sinking, ensuring beautiful swirls in every slice and a tender crumb.
Ingredients
2 1/2 cups all-purpose flour
2 teaspoons baking powder
1/2 teaspoon salt
1 cup unsalted butter, softened
1 1/2 cups granulated sugar
4 large eggs, room temperature
1 cup milk, room temperature
2 teaspoons vanilla extract
1/4 cup unsweetened cocoa powder
1/2 cup hot water
1 cup semisweet chocolate chips, melted (for glaze)
Directions
- Preheat oven to 350 degrees F. Grease and flour a 9×5-inch loaf pan.
- Whisk flour, baking powder, and salt in a bowl. Set aside.
- Beat butter and sugar until light and fluffy, about 3 minutes. Add eggs one at a time, beating well after each. Mix in milk and vanilla.
- Divide batter in half. Stir cocoa powder into hot water until smooth, cool slightly, then fold into one half of batter for chocolate portion. Both batters should be same thick consistency.
- Spoon 1/4 of vanilla batter into bottom of pan, spreading evenly. Add 1/4 of chocolate batter on top. Repeat layers: vanilla, then chocolate, until all batter is used. This even layering is key to stopping sinking.
- Run a butter knife through batter in a zigzag pattern from end to end, then side to side, just 2-3 passes. Do not over-swirl, or patterns blur. Tap pan on counter 5 times to release air bubbles.
- Bake 50-55 minutes until toothpick in center comes out clean. Cool in pan 10 minutes, then on rack.
- Drizzle with melted chocolate chips for glaze. Slice to reveal perfect swirls!
Notes
- Both batters should be the same thick consistency. Do not over-swirl, or patterns blur. Even layering is key to stopping sinking.