
I spent years battling tough, dry beef in my homemade stews, only to discover the secret to truly fork-tender meat lies in a simple, non-negotiable searing technique that transforms the collagen.
For another tender beef dish, check out this hearty braised beef stew.
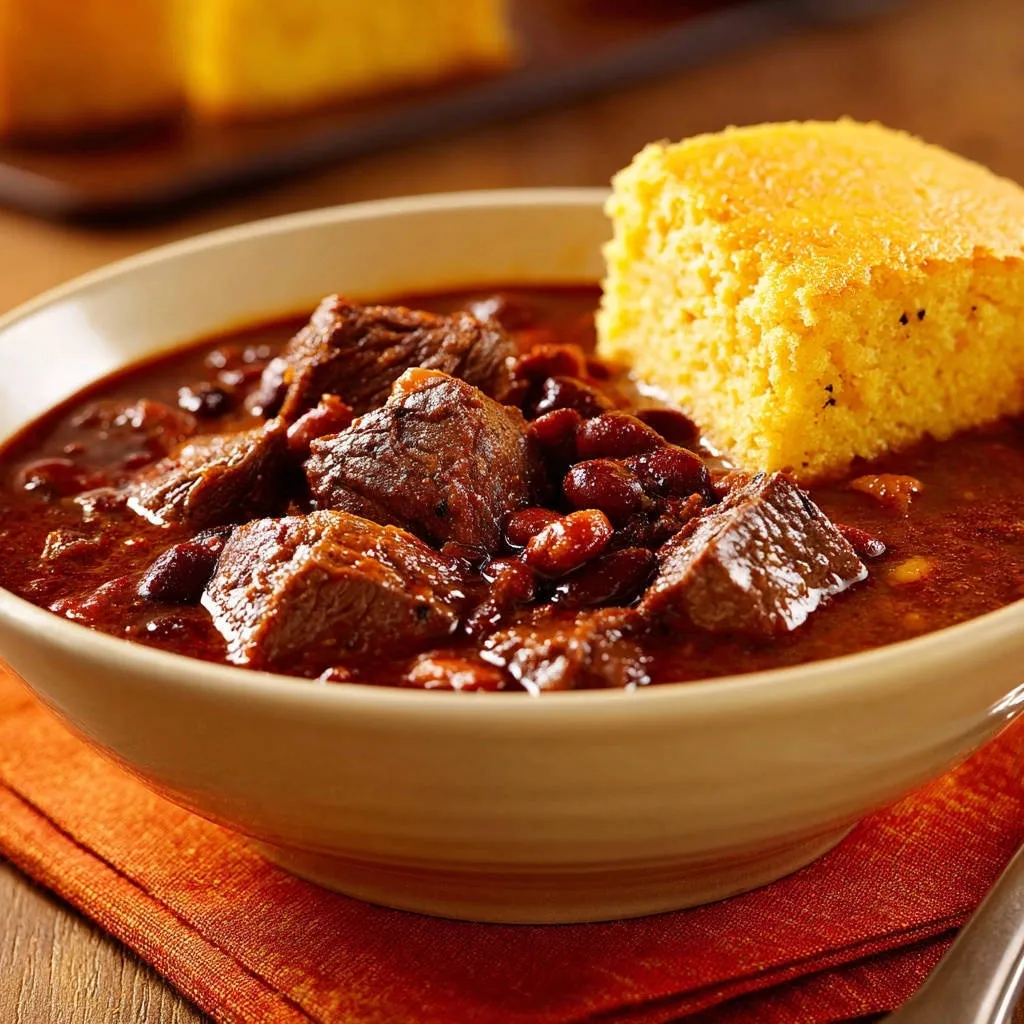
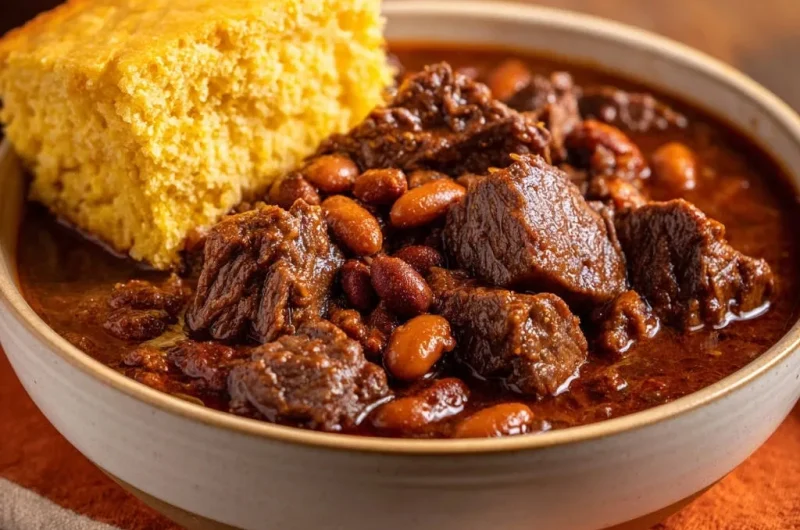
This foolproof method ensures every bite of this Classic Beef and Bean Chili is rich, savory, and perfectly textured, making it the reliable, cold-weather staple my family now demands every time.
The Non-Negotiable Secret to Truly Tender Chili Meat
The single most frustrating element of slow-cooked chili is sinking your spoon into a chunk of meat only to find it chewy and dry.
The solution is twofold: a high-heat sear upfront, followed by an extremely long, low simmer to unlock the meat’s potential.
When beef is cooked low and slow for 2.5 to 3 hours, the tough connective tissue, known as collagen, breaks down entirely.
This collagen then melts into rich, silky gelatin, coating the lean muscle fibers and yielding that buttery, fall-apart texture we crave in a perfect bowl of chili.
Building the Foundation: Essential Ingredients and Substitutions
Choosing Your Cut: Why Chuck Roast Reigns Supreme
Boneless stew beef, typically cut from a chuck roast, is the superior choice for this Classic Beef and Bean Chili because it is rich in collagen and intramuscular fat.
Unlike leaner cuts (like sirloin or round steak), the high collagen content in chuck needs that long, moist heat exposure to dissolve, which is exactly what makes the chili so tender and succulent.
If you absolutely must use a leaner cut or are drastically reducing the cooking time, you must cut the meat into much smaller pieces (1/2-inch cubes) to help them tenderize faster, but be aware the depth of flavor will be reduced.
Layering Aromatics: Onion, Pepper, and Garlic
The base flavor starts with the holy trinity of aromatics: diced yellow onion and green bell pepper.
Cooking these down softens them and helps them release their natural sugars, providing a necessary savory sweetness to balance the heavy chili spices.
Garlic should always be added last and cooked only for about one minute; any longer, and it risks burning and turning bitter, ruining the foundational flavor.
Mastering the Spice Blend: Heat, Smoke, and Depth
The heart of great chili lies in a balanced spice blend that goes beyond simple chili powder.
Cumin provides essential earthiness, dried oregano adds a Mediterranean herbaceousness, and smoked paprika delivers a crucial smoky depth that elevates the entire dish.
Cayenne pepper is primarily for heat, and its quantity is easily adjustable; start with a quarter teaspoon and adjust up only after tasting the finished product.
The Importance of Quality Crushed Tomatoes and Broth
Crushed tomatoes form the primary liquid and bring necessary acidity; choose high-quality brands, like fire-roasted or San Marzano-style, for the best, sweetest tomato flavor.
Using beef broth instead of water ensures the liquid base reinforces the beef flavor, making the chili richer and less diluted.
Opting for low-sodium beef broth allows you to control the final seasoning precisely, adding salt to taste without fear of over-salting.
Essential Equipment for Slow-Cooked Excellence
The Case for the Dutch Oven
A heavy-bottomed Dutch oven, especially enameled cast iron, is the gold standard for chili making.
Its heavy construction ensures superior heat retention and distribution, which is necessary to maintain the high temperature required for a quick, even sear on the beef.
The thick walls also hold the low, steady simmer necessary for the long cooking process, preventing scorching on the bottom.
Other Necessary Kitchen Tools
Sturdy Wooden Spoon or Spatula: Necessary for scraping up the fond (browned bits) without damaging the pot’s surface.
Paper Towels: Absolutely essential for patting the beef dry before searing; moisture is the enemy of a good crust.
Your Path to Classic Beef and Bean Chili Perfection: A Detailed Guide
Preparation: Dry, Season, and Cube
Before cooking, ensure your 1-inch beef cubes are completely dry using paper towels; this is the key starting point for a successful sear.
Season the beef generously with salt and pepper on all sides, allowing the salt to penetrate the surface and prepare the meat for flavor development.
-
Step 1: Sear the Beef in Controlled Batches (Do Not Crowd)
Heat the oil until shimmering, then add only enough beef to cover about one-third of the pot bottom, ensuring space between each cube.
Sear for 2 to 3 minutes per side until a deep, dark brown crust forms; this crust, built through the Maillard reaction, is where the intense savory flavor develops that will permeate the entire Classic Beef and Bean Chili.
Remove the browned beef and repeat until all cubes are seared, reserving the crucial browned bits (fond) in the pot.
-
Step 2: Build the Flavor Base (The Aromatics)
Reduce the heat to medium before adding the onions and bell peppers, cooking until they soften and start to caramelize (about 5-7 minutes).
While they cook, use your spatula to scrape up the sticky, browned fond from the bottom of the pot; this process of deglazing transfers the beef’s intense flavor into the aromatic base.
-
Step 3: Toast the Spices for Fragrance
Add the minced garlic and cook for 60 seconds, then immediately stir in the chili powder, cumin, oregano, and paprika.
Toasting the spices awakens their volatile oils, creating a richer, deeper chili flavor profile-do not skip this one-minute step, but watch carefully to prevent burning.
-
Step 4: The Long, Slow Cook
Return all the seared beef to the pot, stir in the crushed tomatoes and beef broth, and bring the mixture to a gentle simmer.
Reduce the heat to the absolute minimum, cover the pot tightly, and let cook for 2.5 to 3 hours; the low, slow cook time allows the tough collagen in the beef to break down completely.
-
Step 5: Finishing and Thickening the Chili
After the beef is fork-tender, stir in the drained and rinsed pinto and kidney beans.
Continue to simmer the chili uncovered for the final 30 minutes to allow the beans to absorb the rich flavors and encourage natural reduction and thickening of the sauce.
The Art of the Sear: Maximizing Flavor and Preventing Toughness
Why Crowding the Pan is Your Enemy
When you crowd the pot with too much beef at once, the temperature of the oil drops drastically.
This temperature drop prevents the Maillard reaction (searing) and instead causes the meat to release its moisture and steam, resulting in a tough, gray exterior instead of a beautiful brown crust.
Understanding the Power of the Dry Pat
The surface of the beef must be completely moisture-free before searing can begin.
Patting the meat dry significantly speeds up the process, guaranteeing you form a crust within minutes and preventing the meat from steaming in its own liquid.
Spice Level, Bean Swaps, and Customizing Your Classic Beef and Bean Chili
Adjusting the Heat: Managing Cayenne and Chili Powder
If you are unsure of your family’s spice tolerance, reserve the cayenne pepper until the end.
You can always add heat, but you can’t easily take it away; if the final product is too mild, stir in a pinch of cayenne or a few dashes of hot sauce before serving.
Bean Alternatives: Kidney, Pinto, or Black?
This recipe calls for a mix of kidney and pinto beans, offering a varied texture and flavor profile.
Kidney beans hold their shape well, while pinto beans contribute a creamier texture; black beans can also be substituted for pinto beans if you prefer a slightly earthier taste.
Making it Gluten-Free or Dairy-Free
This Classic Beef and Bean Chili recipe is naturally free of gluten and dairy.
However, when purchasing beef broth, always check the label, as some brands may use flavorings or additives that contain gluten or milk products.
Presentation and Pairing: Elevating Your Chili Night
Beyond Cheddar: Creative Toppings for Classic Chili
Crema or Sour Cream: Adds a cooling element and creamy texture, balancing the richness of the beef and taming the heat.
Pickled Jalapeños: Provides crucial acidity and sharp heat, cutting through the heavy flavors for a brighter finish.
Fresh Cilantro and Red Onion: Essential for a necessary pop of vibrant color, freshness, and crunch.
Crushed Tortilla Chips or Fritos: For wonderful texture, salty contrast, and a bit of irresistible crunch.
The Perfect Companion: Why Cornbread is Essential
Warm cornbread serves as the perfect side dish because its crumbly texture is ideal for soaking up the rich, flavorful liquid of the chili.
A savory, non-sweet cornbread often pairs best with this hearty Classic Beef and Bean Chili, allowing the deep, earthy flavors of the stew to remain the star.
Chili Clinic: Solving Common Flavor and Texture Issues
My Chili is Too Runny (How to Thicken)
The simplest way to thicken the chili is to ensure you simmer it uncovered for the last 30 minutes, allowing excess liquid to evaporate naturally.
For a quicker fix, create a slurry of 1 tablespoon of cornstarch mixed with 2 tablespoons of cold water, stir it into the chili, and simmer for 5 minutes until thickened.
Tasting Flat? Balancing Salt, Acid, and Heat
A chili that tastes “flat” often lacks proper balance; it either needs more salt or a hit of acidity to brighten the overall flavor profile.
Stir in a dash of salt, then add a teaspoon of apple cider vinegar or fresh lime juice at the very end to sharpen the flavors without making the chili taste sour.
My Beef is Still Tough After 2 Hours
Tough meat simply means the tough collagen has not yet fully dissolved into gelatin; the chili needs more time, not more heat.
Cover the pot again, ensure the heat is on the absolute lowest setting, and continue cooking for 30-minute increments until a fork can shred the beef easily.
Make-Ahead Magic: Freezing, Storing, and Reheating
Optimal Freezing Techniques for Stews
Allow the Classic Beef and Bean Chili to cool quickly in the refrigerator before portioning it into sturdy, freezer-safe containers.
Leave at least one inch of headspace in each container to allow for expansion during freezing; the chili will maintain optimal quality for 3 to 4 months.
Storage and Reheating
Chili stores exceptionally well in an airtight container in the refrigerator for 3 to 4 days.
The best method for reheating is low and slow on the stovetop, covered, ensuring the beef maintains its hard-won tenderness and doesn’t dry out.
Frequently Asked Questions About Classic Beef and Bean Chili
Can I Use Ground Beef Instead of Cubes?
Yes, you can substitute ground beef, but be aware the texture of the final dish will change from a hearty stew to a more traditional ground beef chili.
If using ground beef, cook it until fully browned and ensure you drain off all the rendered fat before adding the aromatics and proceeding with the recipe.
Is it Better the Next Day?
Absolutely! Resting the chili overnight allows the starches, spices, and fat to fully integrate, resulting in a much deeper, more complex, and perfectly seasoned flavor profile the following day.
What if I don’t have Beef Broth?
While beef broth is recommended for depth, vegetable broth or even water can be used as a substitute.
If substituting, you must increase the initial seasoning slightly, or consider stirring in a teaspoon of a concentrated beef bouillon paste or powder for an added layer of robust, savory flavor.
Your New Favorite Classic Beef and Bean Chili Awaits!
This recipe removes the guesswork and delivers reliably tender beef every time, proving that proper technique-not just time-is the secret to an unforgettable chili.
Try this method tonight and experience the true definition of a deeply flavorful, fall-apart Classic Beef and Bean Chili; we’d love for you to rate the recipe and share your favorite toppings!
Beef and Bean Chili
Course: Soups-StewsCuisine: AmericanDifficulty: medium6
servings25
minutes3
hours450
kcal180
minutesThis chili recipe guarantees buttery, fall-apart tender beef every time, thanks to one critical searing step. A careful blend of spices, tomatoes, and beans simmers low and slow for hours, creating a rich and deeply flavored comfort food classic.
Ingredients
2 pounds boneless stew beef (chuck roast recommended), cut into 1-inch cubes
2 tablespoons vegetable oil
1 large yellow onion, diced
1 green bell pepper, diced
4 cloves garlic, minced
1 tablespoon chili powder
1 teaspoon cumin
1 teaspoon dried oregano
1/2 teaspoon smoked paprika
1/4 teaspoon cayenne pepper (optional)
1 (15-ounce) can pinto beans, drained and rinsed
1 (15-ounce) can kidney beans, drained and rinsed
1 (28-ounce) can crushed tomatoes
1 cup beef broth
Salt and black pepper to taste
Directions
- Prepare the Beef for Maximum Tenderness: Pat the cubed beef thoroughly dry using paper towels. Season generously on all sides with salt and pepper. This is critical for building a crust and locking in moisture.
- Sear the Beef in Batches (The Key Step): Heat the vegetable oil in a large Dutch oven or pot over medium-high heat until shimmering. Add about one third of the beef cubes to the pot, ensuring they are not touching. Sear for 2 to 3 minutes per side until a deep, dark brown crust forms. Do not crowd the pan; crowding will cause the beef to steam instead of sear, resulting in tough meat. Remove the seared beef to a separate bowl and repeat with the remaining beef until all cubes are beautifully browned.
- Build the Base: Reduce the heat to medium. Add the diced onion and bell pepper to the pot, scraping up any browned bits from the beef (this is flavor!). Cook for 5 to 7 minutes until softened. Add the minced garlic and spices (chili powder, cumin, oregano, paprika, cayenne) and cook for 1 minute until fragrant.
- Combine and Simmer: Return all the seared beef to the pot. Stir in the crushed tomatoes and beef broth. Bring the mixture to a gentle simmer.
- Slow Cooking for Tenderness: Once simmering, reduce the heat to low, cover the pot tightly, and let cook for 2.5 to 3 hours, stirring occasionally. The low, slow cook time allows the tough collagen in the beef to break down completely, yielding fork-tender results.
- Finish the Chili: After 2.5 hours, the beef should be falling apart easily. Stir in the drained and rinsed beans and continue to simmer uncovered for the final 30 minutes to thicken the chili slightly and allow the beans to absorb the rich flavors.
- Adjust Seasoning: Taste and adjust salt and pepper as needed. Serve hot, ideally with a side of warm cornbread.
Notes
- Serve hot, ideally with a side of warm cornbread.