Who hasn’t been disappointed by a beautifully baked pot pie with a sadly soggy bottom crust? After countless attempts to perfect this beloved dish, I finally cracked the code to achieving a truly crisp, golden base every single time. This recipe for Classic Comfort Pot Pie brings together tender vegetables in a rich, creamy sauce, all beneath a perfectly flaky puff pastry lid, guaranteeing a delightful culinary experience without the common pitfall.
Beyond Basic: What Makes Our Classic Comfort Pot Pie Stand Out?
The Secret to a Crisp, Golden Bottom Crust
Our method features a crucial blind-baking step that creates a protective barrier, ensuring your bottom crust remains perfectly crisp and never soggy.
Effortless Flaky Puff Pastry Top
Utilizing store-bought puff pastry makes achieving an impressive, golden, and wonderfully flaky top crust incredibly simple, saving you time without sacrificing quality.
Rich, Creamy, & Hearty Vegetable Filling
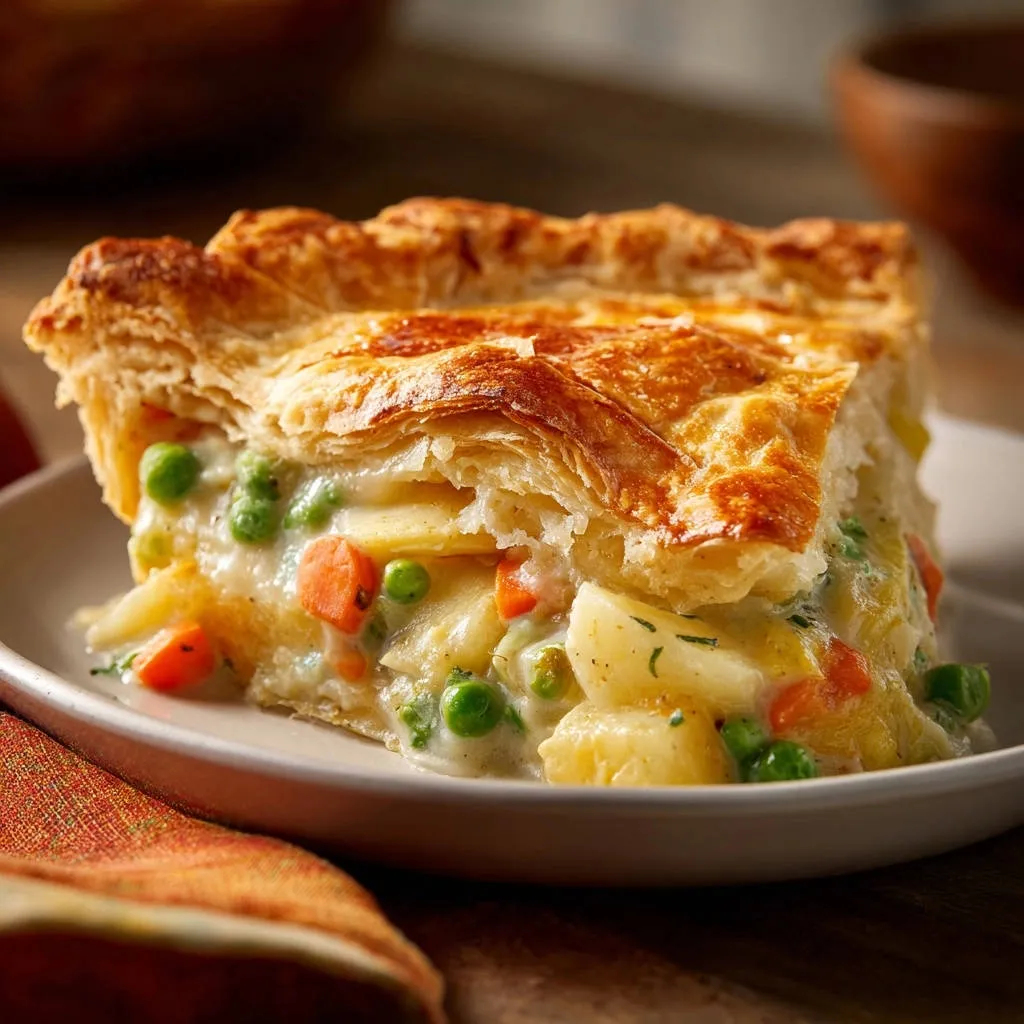
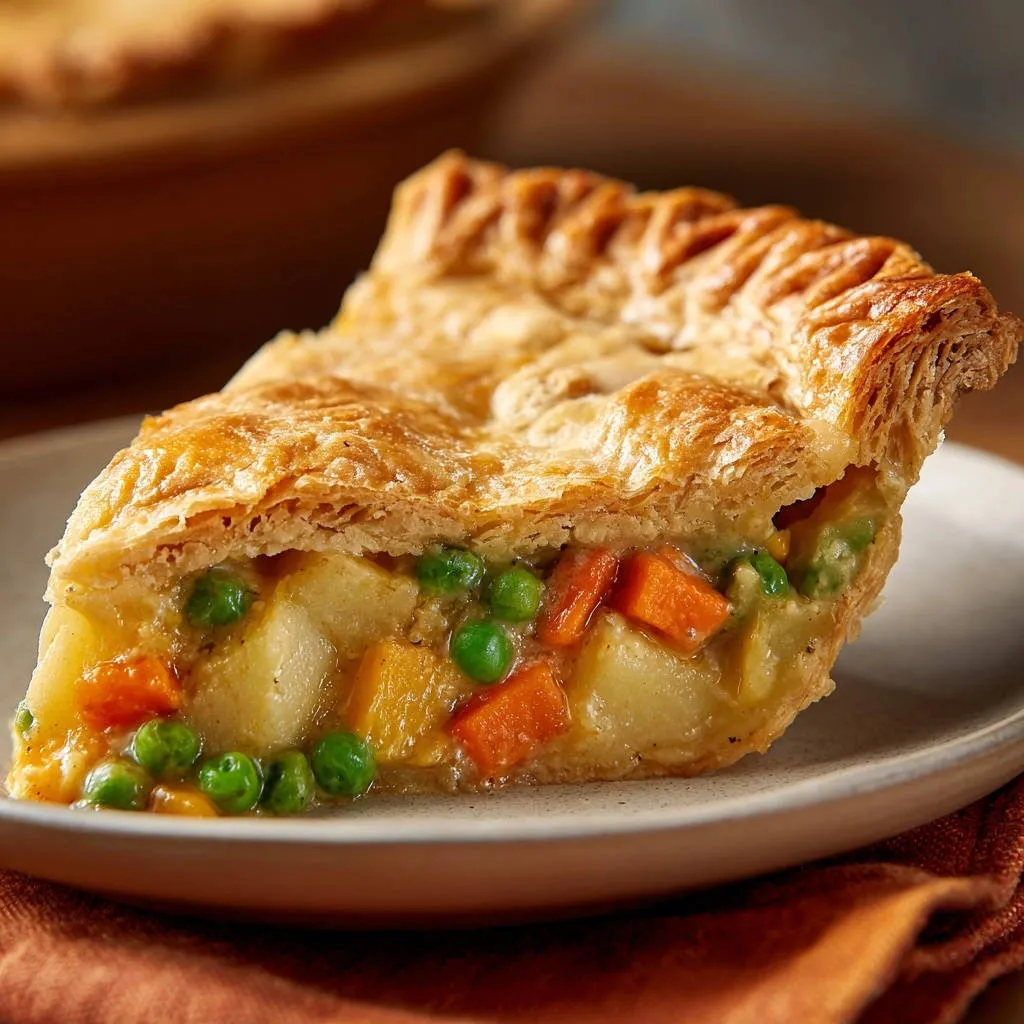
Packed with tender potatoes, carrots, sweet peas, and aromatic herbs in a luscious sauce, this filling is the epitome of comforting savory goodness.
Simple Steps, Impressive Results for Your Family
This recipe breaks down the process into clear, manageable steps, making it accessible for home cooks of all skill levels to create a show-stopping meal.
Gather Your Goodness: Essential Ingredients for Pot Pie Perfection
The Foundation: Crusts That Deliver
We use a refrigerated pie crust for the bottom, offering a sturdy yet tender base that blind baking transforms. Thawed puff pastry creates an effortlessly impressive, flaky golden top.
Hearty Heroes: Fresh & Frozen Vegetables
Finely diced yellow onion and minced garlic provide an aromatic foundation. Diced potatoes and carrots add substance and sweetness, while frozen peas bring a pop of color and tender texture.
Building the Creamy Dream: Dairy & Liquids
Unsalted butter forms the base of our roux, while vegetable broth provides savory depth. Whole or 2% milk contributes to the rich, creamy consistency of the filling.
Flavor Enhancers & Thickeners
All-purpose flour is essential for creating a smooth, thick roux. Salt and black pepper season the filling, and fresh parsley or dill add a vibrant, herbaceous finish.
The Golden Touch: Egg Wash
A simple beaten large egg brushed over the puff pastry ensures a beautifully golden-brown and shiny top crust, adding to the visual appeal.
Tools for Your Pot Pie Adventure
Must-Have Kitchen Essentials
9-inch Pie Dish: This standard size is perfect for baking a family-sized Classic Comfort Pot Pie.
Large Saucepan or Dutch Oven: Ideal for sautéing vegetables and simmering the creamy filling efficiently.
Whisk: Crucial for smoothly incorporating the flour into the butter and liquids, preventing lumps in your sauce.
Measuring Cups and Spoons: Accurate measurements ensure your pot pie filling achieves the perfect balance of flavors and consistency.
Specialized Items for Best Results
Parchment Paper & Pie Weights/Dried Beans: These are indispensable for blind baking, preventing the crust from shrinking and bubbling up unevenly.
Baking Sheet: Placed under your pie dish, it catches any potential drips, keeping your oven clean during baking.
Pastry Brush: Essential for applying an even layer of egg wash, which guarantees a consistent golden hue on your puff pastry.
Your Step-by-Step Guide to a Flawless Classic Comfort Pot Pie
- Blind Bake the Bottom Crust:
Preheat your oven to 400°F (200°C). Carefully unroll the refrigerated pie crust into your 9-inch pie dish and crimp the edges securely. Line the crust with parchment paper, then fill it completely with pie weights or dried beans.
Bake for 15 minutes. This initial weight-assisted bake helps the crust maintain its shape and sets it. Then, remove the parchment and weights, and continue baking for another 5 to 7 minutes until the crust is a light golden color and appears dry. This “secret step” is paramount to creating a barrier against moisture and preventing a soggy bottom. Remove the crust from the oven and reduce the oven temperature to 375°F (190°C).
- Prepare the Vegetables:
While the pie crust is blind baking, melt 2 tablespoons of unsalted butter in a large saucepan or Dutch oven over medium heat. Add the finely diced yellow onion and cook, stirring occasionally, until it softens and becomes translucent, which takes about 5 minutes.
Stir in the minced garlic and cook for just 1 minute more until it becomes wonderfully fragrant. Next, add the diced potatoes and carrots to the pan. Pour in ½ cup of the vegetable broth, cover the pan, and simmer for 10 to 12 minutes, or until the vegetables are tender-crisp. This pre-cooking ensures they will be perfectly cooked in the final pot pie.
- Make the Creamy Filling:
Once the vegetables are tender-crisp, sprinkle ¼ cup of all-purpose flour directly over them in the pan. Stir vigorously for 1 minute, allowing the flour to lightly toast and cook out its raw flavor. This creates your roux, the thickening agent for the sauce.
Gradually whisk in the remaining 1½ cups of vegetable broth and 1 cup of milk. Bring the mixture to a gentle simmer, stirring constantly with your whisk to prevent lumps, until the sauce visibly thickens to a luscious, creamy consistency, typically taking 5 to 7 minutes.
Stir in the 1 cup of frozen peas, ½ teaspoon of salt, ¼ teaspoon of black pepper, and the 2 tablespoons of fresh chopped parsley or dill. Remove the filling from the heat and let it cool for at least 10 to 15 minutes. This cooling step is another critical measure to prevent a soggy bottom by reducing the amount of steam released into the crust.
- Assemble the Pot Pie:
Pour the slightly cooled, creamy vegetable filling evenly into the blind-baked pie crust. Carefully unroll the thawed puff pastry sheet over the top of the filling, ensuring it covers completely. Trim any excess pastry, then crimp the edges firmly to seal the puff pastry to the bottom pie crust.
Using a sharp knife, cut a few small slits in the top of the puff pastry. These vents are essential for allowing steam to escape during baking, which helps the pastry puff up beautifully and prevents the filling from becoming overly watery.
- Egg Wash and Bake:
In a small bowl, lightly beat the large egg. Using a pastry brush, gently and evenly brush the beaten egg over the entire surface of the puff pastry. This egg wash is the secret to a gorgeous, glossy, golden-brown finish.
For a similar golden finish, consider trying our classic apple tartlet.
Place the assembled pot pie on a baking sheet. This step is a smart precaution to catch any potential drips or bubbling over, keeping your oven clean. Bake for 25 to 30 minutes in the preheated 375°F (190°C) oven, or until the puff pastry is dramatically puffed, beautifully golden brown, and the filling is bubbling invitingly around the edges.
- Rest and Serve:
Once baked to perfection, remove the Classic Comfort Pot Pie from the oven and let it rest on a wire rack for 10 to 15 minutes before slicing and serving. This resting period is vital; it allows the hot filling to set slightly, preventing it from being too runny when cut and ensuring neat, beautiful slices.
Achieving the Perfect Bottom: Blind Baking Explained
Sautéing & Simmering: Crafting the Vegetable Base
The Roux & Richness: Developing Your Creamy Filling
Bringing It All Together: Assembling Your Pot Pie
Golden Finish: Egg Wash & Bake
Patience is Key: Rest Before Serving
Chef’s Secrets: Elevate Your Classic Comfort Pot Pie Game
Mastering the Blind Bake for Ultimate Crispness
Don’t Skip the Weights: Using pie weights or dried beans during the initial blind bake is non-negotiable. They evenly distribute heat and prevent the crust from shrinking or bubbling, laying a perfect foundation.
Go for Golden: After removing the weights, continue baking until the crust achieves a truly light golden hue and feels completely dry. This extra browning creates a stronger, more moisture-resistant base.
Preventing a Soggy Bottom (Beyond Blind Baking)
Cool the Filling: As highlighted in the recipe, ensuring your filling is sufficiently cooled before pouring it into the crust drastically reduces steam, a primary culprit for soggy bottoms.
Accurate Oven Temperature: Calibrate your oven if you suspect it runs hot or cold. Starting with the correct initial temperature for the blind bake, then adjusting, is key for a crisp finish.
Customize Your Veggies for Personal Preference
Feel empowered to swap or add other quick-cooking vegetables. Corn, green beans, or finely chopped bell peppers are excellent choices. Always adjust simmering times to ensure they are tender-crisp before adding the roux.
Perfecting Your Puff Pastry Top
For the best puff and flakiest texture, ensure your puff pastry is completely thawed but still quite cold. This helps it handle without tearing and encourages maximum lift in the oven.
Flavor Boosters & Variations
For an even deeper savory profile, consider adding a splash of dry white wine to your vegetable broth while simmering. A pinch of dried thyme or rosemary complements the vegetables wonderfully.
If you’re craving a heartier meal, fold in 1-2 cups of cooked, shredded chicken or turkey to the cooled filling before assembling. This transforms it into a robust creamy chicken and vegetable pot pie, a true crowd-pleaser.
Troubleshooting Your Pot Pie: Common Hurdles & How to Solve Them
My Bottom Crust is Still Soggy!
The most common issue: ensure your blind bake goes beyond just setting the crust. It must be light golden and feel dry. Also, critically, allow your filling to cool thoroughly before pouring it in to minimize internal steam.
The Filling is Too Runny (or Too Thick)!
If too runny, ensure you cook the flour-butter mixture (roux) for a full minute to activate its thickening power, then simmer the sauce until it’s visibly thickened to your desired consistency. If it’s too thick, you can gently thin it with an extra splash of warm vegetable broth or milk while reheating.
Puff Pastry Didn’t Puff Up
Lack of puff usually indicates the pastry wasn’t cold enough or the oven wasn’t at the correct temperature. Make sure your puff pastry is thawed but still chilled, and always confirm your oven is fully preheated before baking.
Pot Pie is Burning on Top Before Fully Cooked
If you notice the top browning too rapidly, simply create a loose “tent” with aluminum foil over the pot pie. This will protect the delicate puff pastry from over-browning while the filling continues to cook through perfectly.
Making the Most of Your Classic Comfort Pot Pie
Delightful Serving Suggestions
Our Classic Comfort Pot Pie is incredibly satisfying on its own, a complete meal in one dish. For a balanced dinner, pair it with a crisp green salad tossed in a light vinaigrette.
Alternatively, serve it alongside a simple side like sweet roasted butternut squash or some crusty artisan bread, perfect for scooping up any extra creamy sauce.
Make-Ahead Magic: Prepare & Bake Later
You can prepare the vegetable filling and blind bake the bottom crust up to a day in advance. Store the cooled filling and blind-baked crust separately in the refrigerator. Assemble the pot pie just before you’re ready to bake for a fresh-from-the-oven experience.
Storing Leftovers for Lasting Comfort
Any leftover Classic Comfort Pot Pie should be stored in an airtight container in the refrigerator. It will keep beautifully for up to 3-4 days, making for wonderful quick lunches or dinners.
Freezing Your Pot Pie for Future Feasts
To freeze, fully assemble the pot pie but omit the egg wash. Cover it tightly with a layer of plastic wrap, then a layer of aluminum foil, and freeze for up to 2-3 months. When ready to bake, transfer directly from the freezer to a preheated 375°F (190°C) oven. Bake for 60-75 minutes, brushing with egg wash halfway through, until golden and bubbling.
Your Classic Comfort Pot Pie Questions Answered
Can I use homemade pie crust for the bottom?
Absolutely! If you have a trusted homemade pie crust recipe, it will make this Classic Comfort Pot Pie even more special. Just be sure to rigorously follow the blind baking steps to guarantee that perfectly crisp, non-soggy bottom.
Can I add meat to this recipe?
Yes, this recipe is incredibly adaptable to include meat. Simply fold in 1 to 2 cups of cooked, shredded chicken, turkey, or even finely diced cooked beef to the cooled vegetable filling when you add the peas. For robust meaty stews, you might enjoy our hearty beef stew recipe as well!
What other vegetables can I use?
Feel free to get creative with your vegetables! Corn kernels, cut green beans, sliced mushrooms, or even small broccoli florets make fantastic additions or substitutions. Just remember to adjust simmering times based on the density of the vegetables to ensure they are tender-crisp.
Is there a dairy-free alternative for the milk?
Indeed! For a dairy-free version of this Classic Comfort Pot Pie, you can substitute unsweetened plant-based milk, such as almond or oat milk, for the regular milk. Also, opt for a high-quality dairy-free butter alternative in place of unsalted butter.
How do I reheat leftover pot pie?
For the best texture, reheat individual slices of pot pie in the oven at 350°F (175°C) for about 15-20 minutes, or until thoroughly warmed. This method helps the crust regain some of its crispness. While convenient, reheating in the microwave may result in a softer crust.
Ready to Bake? Share Your Classic Comfort Pot Pie Masterpiece!
We’ve poured years of experience into this detailed guide, empowering you to create the most delicious and perfectly golden Classic Comfort Pot Pie, free from any soggy bottom woes. There’s truly nothing quite like the comforting aroma of a freshly baked pot pie filling your home, promising warmth and profound satisfaction on a chilly evening.
Now it’s your turn to experience this ultimate comfort food! Don’t forget to share your culinary creations with us; tag us on social media or leave a comment below with your experience. Happy baking!

Pot Pie
Course: Main CourseCuisine: AmericanDifficulty: medium6
servings30
minutes1
hour350
kcal120
minutesTired of soggy pot pie bottoms? This recipe reveals the secret to a perfectly crisp, golden crust every time. Enjoy a comforting, creamy vegetable filling topped with flaky puff pastry.
Ingredients
1 sheet refrigerated pie crust (for the bottom)
1 sheet puff pastry, thawed (for the top)
2 tablespoons unsalted butter
1 small yellow onion, finely diced
2 cloves garlic, minced
2 cups peeled and diced potatoes (about 2 medium)
1 cup diced carrots
1 cup frozen peas
1/4 cup all purpose flour
2 cups vegetable broth
1 cup milk (whole or 2%)
1/2 teaspoon salt
1/4 teaspoon black pepper
2 tablespoons fresh parsley or dill, chopped
1 large egg, beaten (for egg wash)
Directions
- Blind Bake the Bottom Crust: Preheat oven to 400 degrees Fahrenheit (200 degrees Celsius). Carefully unroll the refrigerated pie crust into a 9 inch pie dish. Crimp the edges. Line the crust with parchment paper and fill with pie weights or dried beans. Bake for 15 minutes. Remove the parchment and weights, then bake for another 5 to 7 minutes, until light golden. This is the secret step to preventing a soggy bottom. Remove from oven and reduce oven temperature to 375 degrees Fahrenheit (190 degrees Celsius).
- Prepare the Vegetables: While the crust bakes, in a large saucepan or Dutch oven, melt butter over medium heat. Add diced onion and cook until softened, about 5 minutes. Stir in minced garlic and cook for 1 minute more until fragrant. Add diced potatoes and carrots to the pan. Pour in 1/2 cup of the vegetable broth, cover, and simmer for 10 to 12 minutes, or until vegetables are tender crisp.
- Make the Creamy Filling: Sprinkle flour over the cooked vegetables and stir well, cooking for 1 minute to lightly toast the flour (this forms a roux). Gradually whisk in the remaining 1 1/2 cups vegetable broth and the milk. Bring to a gentle simmer, stirring constantly, until the sauce thickens, about 5 to 7 minutes. Stir in the frozen peas, salt, pepper, and fresh herbs. Remove from heat and let the filling cool for at least 10 to 15 minutes. This cooling step further helps prevent a soggy bottom by reducing steam.
- Assemble the Pot Pie: Pour the slightly cooled vegetable filling into the blind baked pie crust. Carefully unroll the thawed puff pastry sheet over the top of the filling, trimming any excess and crimping the edges to seal it with the bottom crust. Cut a few small slits in the top of the puff pastry to allow steam to escape.
- Egg Wash and Bake: Brush the top of the puff pastry with the beaten egg wash for a beautiful golden finish. Place the pot pie on a baking sheet to catch any drips. Bake for 25 to 30 minutes, or until the puff pastry is golden brown and puffed, and the filling is bubbling.
- Rest and Serve: Let the pot pie rest for 10 to 15 minutes before slicing and serving. This allows the filling to set slightly and prevents it from being too runny.
Notes
- Blind baking the bottom crust and cooling the filling are key steps to prevent a soggy bottom.