I distinctly remember the frustration of homemade donuts coming out dense, a far cry from the light, airy perfection I craved. But once I uncovered the precise techniques that unlock that elusive fluffy texture, making Classic Glazed Donuts at home transformed into pure joy. This recipe isn’t just about ingredients; it’s a trustworthy guide to achieving consistently tender, melt-in-your-mouth donuts, just like your favorite bakery.
Why This Classic Glazed Donuts Recipe Will Be Your New Favorite
The Secret to Unrivaled Lightness and Airiness
Many recipes for glazed donuts fall flat, quite literally, resulting in heavy, bready textures. This method meticulously focuses on proper yeast activation, sufficient kneading for gluten development, and crucially, a second proofing.
These steps work together to create the delicate internal structure needed for an incredibly light and airy donut that truly melts in your mouth.
Effortless Bakery-Quality Results at Home
You don’t need professional training to create impressive donuts. Our clear, detailed instructions break down each stage, offering insights and visual cues.
This ensures you achieve that coveted golden exterior and pillowy interior, making you feel like a seasoned baker in your own kitchen.
A Treat That Brings Joy: Perfect for Any Occasion
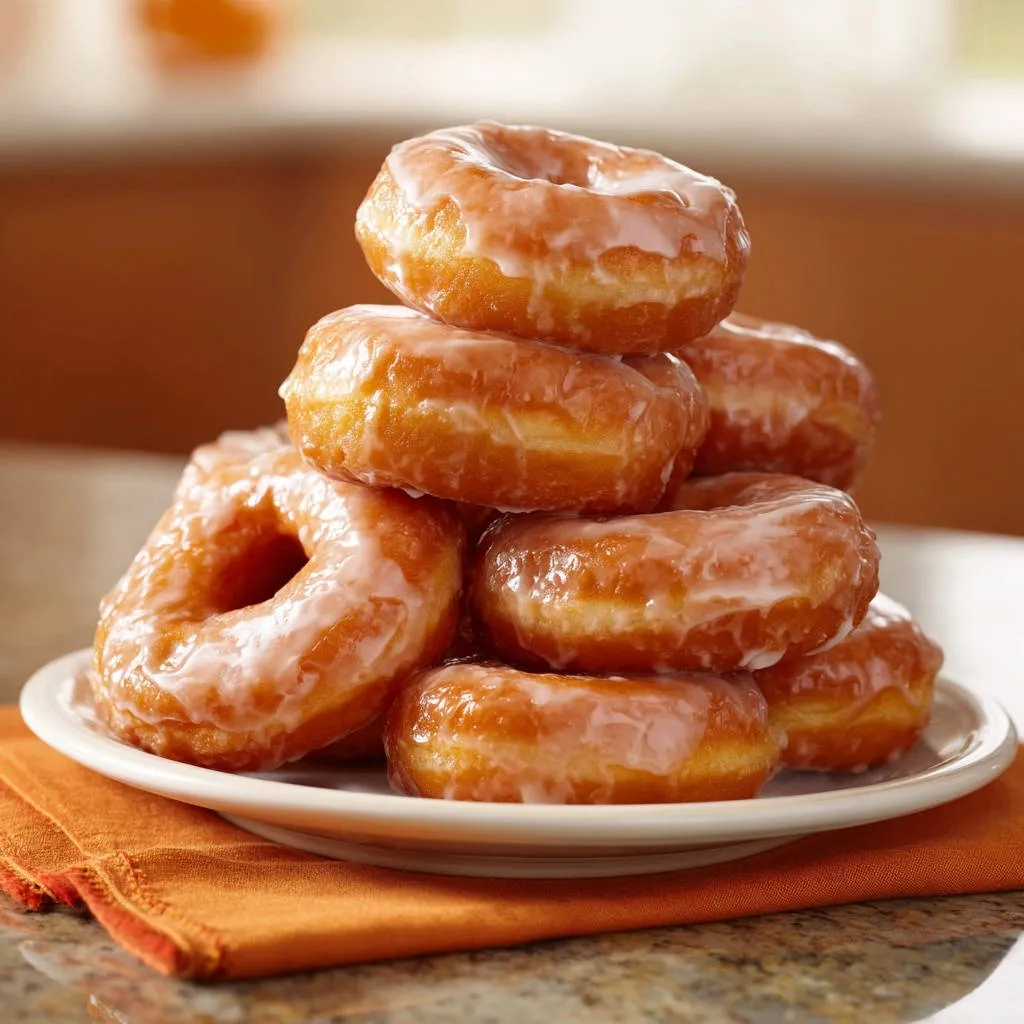
There’s nothing quite like the simple pleasure of a warm, freshly glazed donut. These Classic Glazed Donuts are universally loved, perfect for a special breakfast, a delightful dessert, or a comforting treat to share.
They bring smiles and a touch of nostalgic sweetness to any gathering or quiet moment.
The Essential Ingredients for Heavenly Classic Glazed Donuts
Quality ingredients are the cornerstone of any great recipe, and donuts are no exception. Each component plays a vital role in achieving that perfect texture and flavor.
Dough Fundamentals: Yeast, Flour, and Dairy
Warm Milk (105-115°F): This precise temperature is non-negotiable for waking up your active dry yeast. Too cold, and the yeast won’t activate; too hot, and it will die, leaving you with heavy, flat donuts.
Active Dry Yeast: The magic behind the rise! Always check that your yeast foams when mixed with warm milk and sugar, indicating it’s alive and ready to make your donuts beautifully light.
All-Purpose Flour: Provides the necessary gluten structure for elasticity without making the donuts overly chewy. Measure it accurately by spooning it into a cup and leveling it off.
Richness and Flavor: Egg, Butter, and Vanilla
Large Egg: A lightly beaten egg adds richness, moisture, and helps bind the dough, contributing to a tender crumb. It’s also key for color.
Unsalted Butter (Melted and Cooled): Butter adds incredible flavor and helps create a soft, delicate texture. Ensure it’s cooled before adding, so it doesn’t kill the yeast.
Vanilla Extract: A teaspoon of good quality vanilla extract enhances the overall sweetness and provides a warm, aromatic depth to the donuts themselves.
The Silky Glaze: Powdered Sugar and More
Powdered Sugar: The foundation of our dreamy glaze, powdered sugar dissolves effortlessly to create a smooth, lump-free coating.
Milk: Used to thin the glaze to the perfect dipping consistency. You might adjust the amount slightly to achieve your preferred thickness.
Vanilla Extract: Just like in the dough, a touch of vanilla in the glaze elevates its flavor, making it truly irresistible.
Frying Medium: The Key to Golden Perfection
Vegetable Oil: Opt for a neutral-flavored oil like canola, sunflower, or vegetable oil for frying. You’ll need enough to submerge the donuts, typically about 3 inches deep in your pot.
The right oil choice ensures your donuts achieve a beautiful golden hue and consistent texture without imparting unwanted flavors.
Essential Tools for Your Classic Glazed Donuts Journey
Having the right tools makes the donut-making process smooth and enjoyable, ensuring professional results every time.
Mixing and Rising: Bowls and Covers
You’ll need a large bowl for mixing the dough and a separate, lightly greased bowl for the first rise. Plastic wrap or a clean kitchen towel are essential for covering the dough, creating a warm, humid environment for optimal proofing.
Shaping the Perfect Donut
A dedicated donut cutter makes quick work of shaping, providing consistent results. If you don’t have one, two different-sized round cookie cutters (one larger for the donut, one smaller for the hole) work perfectly.
Frying Safely and Successfully
A heavy-bottomed pot or Dutch oven is crucial for maintaining consistent oil temperature. A candy thermometer is absolutely indispensable for accurate temperature monitoring, preventing greasy or burnt donuts. Finally, a slotted spoon or spider is needed to safely lift the fried donuts from the hot oil.
Glazing and Cooling Essentials
A wire rack set over a baking sheet allows excess oil to drain from freshly fried donuts and helps the glaze set beautifully, preventing a soggy bottom. The baking sheet below catches any drips.
Crafting Your Classic Glazed Donuts: A Step-by-Step Guide
Follow these steps closely to create donuts that are truly a masterpiece of homemade baking.
Activating the Yeast: The Foundation of Fluffiness
In a large bowl, combine 1 cup warm milk (around 105-115°F) with 1/4 cup granulated sugar. Sprinkle 2 1/4 teaspoons of active dry yeast over the surface.
Let this mixture sit for 5-10 minutes. It should become foamy, which is your visual cue that the yeast is active and ready to give your donuts their incredible lift and light texture.
Building the Dough: Mixing and Kneading for Elasticity
Add a lightly beaten large egg, 1/4 cup melted and cooled unsalted butter, and 1 teaspoon vanilla extract to the yeast mixture, stirring well to combine. In a separate bowl, whisk together 3 cups all-purpose flour and 1 teaspoon salt.
Gradually add the dry ingredients to the wet, mixing until a shaggy, somewhat sticky dough forms. Turn the dough out onto a lightly floured surface and knead for a full 8-10 minutes. This extensive kneading develops the gluten, making the dough smooth, elastic, and springy, which is absolutely crucial for creating a truly fluffy donut.
The First Rise: Patience for Proofing Power
Lightly grease a clean bowl, place the kneaded dough in it, and turn it once to coat. Cover the bowl tightly with plastic wrap or a clean kitchen towel.
Allow the dough to rise in a warm place for 1-1.5 hours, or until it has visibly doubled in size. This initial rise allows the yeast to work its magic, building flavor and air pockets.
Shaping Perfection: Cutting Your Donuts
Once the dough has risen, gently punch it down to release the accumulated air. Turn the dough out onto a lightly floured surface.
Using a rolling pin, roll the dough to an even 1/2 inch thickness. Use a donut cutter or two different-sized round cookie cutters (a 3-inch for the donut and a 1-inch for the hole) to cut out your donut shapes.
The Critical Second Rise: Doubling Down on Airiness
Arrange the cut donuts and donut holes on lightly floured baking sheets, ensuring there’s plenty of space between each. This next step is vital for ultimate fluffiness: loosely cover them with plastic wrap or a kitchen towel.
Let them rise again for another 30-45 minutes. They should look noticeably puffy and lighter. Do not skip or rush this second proofing, as it’s the key to achieving that incredibly airy texture.
Achieving Golden Greatness: Frying Techniques
While your donuts are undergoing their second rise, heat about 3 inches of vegetable oil in a large, heavy-bottomed pot or Dutch oven over medium heat. Bring the oil temperature to a precise 350°F.
Utilize a candy thermometer to monitor the temperature; maintaining this exact heat is paramount for preventing greasy donuts and ensuring they cook through evenly, puffing up beautifully without absorbing too much oil. Carefully lower 2-3 donuts into the hot oil, avoiding overcrowding.
Fry for 1-2 minutes per side until they are beautifully golden brown. Adjust the heat as needed to keep the oil temperature consistent. Remove fried donuts with a slotted spoon and place them on a wire rack set over a baking sheet to drain.
If you’re looking for more delicious fried treats, consider making easy fried dough bites for another sweet sensation.
The Irresistible Glaze: Finishing Touches
While the donuts cool slightly on the wire rack, prepare the glaze. In a medium bowl, whisk together 2 cups powdered sugar, 1/4 cup milk, and 1 teaspoon vanilla extract until completely smooth.
Dip each still-warm donut into the glaze, turning to coat both sides if you prefer a thicker layer. Place them back on the wire rack to allow the glaze to set. Serve your perfect, fluffy homemade donuts warm and enjoy!
Chef’s Secrets: Mastering Your Classic Glazed Donuts
Elevate your donut-making skills with these expert tips, ensuring every batch is a triumph.
Oil Temperature: The Ultimate Greasiness Preventer
Consistently maintaining your oil at 350°F is the single most critical factor for perfect donuts. If the oil is too cool, the donuts will absorb excessive oil and become greasy and heavy. If it’s too hot, they’ll brown too quickly on the outside, leaving the inside raw.
Don’t Over-Flour: Keeping Your Dough Tender
When kneading and rolling out your dough, use flour sparingly. Over-flouring can make your dough stiff and difficult to work with, ultimately resulting in dry, tough donuts. Aim for just enough flour to prevent sticking.
The Gentle Touch: Handling Risen Dough
After the second rise, handle your puffy donut shapes with extreme gentleness. Pressing too hard or squishing them will deflate the precious air bubbles that contribute to their light and airy texture. Use a light touch when transferring them to the hot oil.
Glazing Warm: For That Perfect Coating
Dip your donuts into the glaze while they are still slightly warm, but not hot. This warmth helps the glaze adhere beautifully and creates that signature smooth, shiny, and perfectly set coating. If the donuts are too cold, the glaze might not stick as well or could become clumpy.
Flavor Boosters: Elevating Your Glaze
While the classic vanilla glaze is perfection, feel free to experiment! A pinch of cinnamon, a dash of nutmeg, a teaspoon of lemon or orange zest, or even a different extract like almond can add exciting new dimensions to your glaze.
You can also try your hand at other delightful baked goods, like these easy homemade cinnamon rolls, for another indulgent treat.
Common Questions & Classic Glazed Donuts Troubleshooting
Even seasoned bakers encounter challenges. Here are solutions to common donut dilemmas.
Why are my donuts dense or heavy?
This is usually due to inactive yeast, which means your dough didn’t get enough rise. It can also happen if you didn’t knead the dough sufficiently to develop gluten, or if you skipped or rushed the critical first and second rises. Ensure your yeast is foamy before continuing.
Why did my donuts get too greasy?
Greasy donuts are almost always a result of frying oil that is too cool. When the oil isn’t hot enough, the donuts absorb it rather than quickly cooking and puffing up. Overcrowding the pot can also drop the oil temperature too much.
Can I make the dough ahead of time?
Absolutely! After the first rise, gently punch down the dough, place it back in the greased bowl, cover tightly, and refrigerate overnight. Let it come to room temperature for about 30-60 minutes before rolling and cutting.
What if I don’t have a donut cutter?
No problem! You can use two different-sized round cookie cutters (e.g., a 3-inch for the donut and a 1-inch for the hole). Even a drinking glass for the main donut shape and a bottle cap for the hole can work in a pinch.
How do I know if my yeast is active?
When you combine warm milk, sugar, and yeast, let it sit for 5-10 minutes. If a visible layer of foam appears on the surface, your yeast is active and ready to go. If there’s no foam, your yeast is likely expired or the milk temperature was incorrect, and you should start with fresh yeast.
Serving, Storing, and Enjoying Your Classic Glazed Donuts
To fully appreciate your efforts, knowing how to serve and store your donuts is key.
Optimal Serving: Warm and Fresh is Best
For the ultimate experience, serve your Classic Glazed Donuts while they are still warm, shortly after glazing. This is when their texture is at its peak-incredibly soft, airy, and with a perfectly melted glaze.
Storage Solutions for Leftovers
Store any leftover glazed donuts in an airtight container at room temperature. They are best enjoyed within 1-2 days, as their texture will start to firm up over time. Reheating briefly in the microwave for 10-15 seconds can soften them slightly.
Freezing Glazed Donuts: Is It Possible?
Yes, you can freeze glazed donuts! Place cooled, glazed donuts in a single layer on a baking sheet and freeze until solid, then transfer to a freezer-safe bag or container. Thaw at room temperature for a few hours before enjoying. While still tasty, the texture might be slightly different than fresh.
For another delightful breakfast or snack option, don’t forget to check out our fluffy blueberry donuts recipe too!
Ready to Impress? Share Your Classic Glazed Donuts Masterpiece!
Now that you have all the insider tips and a foolproof recipe, there’s nothing stopping you from creating the most incredibly light and fluffy Classic Glazed Donuts right in your own kitchen. This recipe truly transforms a seemingly complex treat into an achievable and deeply satisfying baking project.
Gather your ingredients, trust the process, and get ready to impress everyone with these utterly delightful homemade treats. Don’t forget to share your sweet successes with us!
Glazed Donuts
Course: DessertCuisine: AmericanDifficulty: medium4
12-15 donuts45
minutes20
minutes350
kcal180
minutesDiscover the secret to perfectly light and airy homemade donuts, just like your favorite bakery! This recipe guides you through precise steps to achieve a fluffy texture every time, complete with a simple, sweet glaze. Say goodbye to heavy donuts and hello to irresistible perfection.
Ingredients
1 cup warm milk (about 105-115 degrees F)
2 1/4 teaspoons active dry yeast (one standard packet)
1/4 cup granulated sugar
1 large egg, lightly beaten
1/4 cup unsalted butter, melted and cooled
1 teaspoon vanilla extract
3 cups all-purpose flour, plus more for dusting
1 teaspoon salt
Vegetable oil, for frying
For the Glaze:
2 cups powdered sugar
1/4 cup milk
1 teaspoon vanilla extract
Directions
- In a large bowl, combine the warm milk and granulated sugar. Sprinkle the active dry yeast over the top and let it sit for 5-10 minutes until foamy. This shows your yeast is alive and ready to make your donuts light!
- Add the beaten egg, melted butter, and vanilla extract to the yeast mixture and stir to combine.
- In a separate bowl, whisk together the flour and salt. Gradually add the dry ingredients to the wet ingredients, mixing until a shaggy dough forms.
- Turn the dough out onto a lightly floured surface and knead for 8-10 minutes. The key here is to keep kneading until the dough is smooth, elastic, and bounces back when gently poked. This develops the gluten structure crucial for that fluffy texture.
- Lightly grease a clean bowl, place the dough in it, and turn it once to coat. Cover the bowl with plastic wrap or a clean kitchen towel and let it rise in a warm place for 1-1.5 hours, or until doubled in size.
- Once risen, gently punch down the dough to release the air. Turn it out onto a lightly floured surface. Roll the dough to about 1/2 inch thickness. Use a donut cutter or two different sized round cookie cutters (one larger for the donut, one smaller for the hole) to cut out your donuts.
- Arrange the cut donuts and donut holes on lightly floured baking sheets, leaving some space between each. This is a critical step for fluffiness: cover them loosely with plastic wrap or a kitchen towel and let them rise again for another 30-45 minutes. They should look noticeably puffy. Do not skip or rush this second rise!
- While the donuts are proofing, heat about 3 inches of vegetable oil in a large heavy-bottomed pot or Dutch oven over medium heat to 350 degrees F. Use a candy thermometer to monitor the temperature precisely. Maintaining the correct oil temperature (350 F) is paramount for preventing greasy donuts and ensuring they cook through evenly and puff up beautifully without absorbing too much oil.
- Carefully lower 2-3 donuts into the hot oil, ensuring not to overcrowd the pot. Fry for 1-2 minutes per side, until golden brown. Adjust the heat as needed to keep the oil temperature consistent.
- Remove the fried donuts with a slotted spoon or spider and place them on a wire rack set over a baking sheet to drain any excess oil.
- While the donuts cool slightly, prepare the glaze: whisk together the powdered sugar, milk, and vanilla extract until smooth.
- Dip each still-warm donut into the glaze, turning to coat both sides if desired, then place them back on the wire rack to let the glaze set. Serve warm and enjoy your perfectly fluffy homemade donuts!
Notes
- Key for fluffy donuts: proper kneading, two rises, and consistent oil temperature (350°F) during frying.