For too long, the dream of a truly succulent, fall-apart Classic Pot Roast felt out of reach, often ending in dry, disappointing results. I understand that frustration completely; I used to struggle with it myself.
But through countless experiments, I’ve cracked the code to a foolproof method that guarantees an incredibly juicy and tender pot roast every single time. This recipe is your ticket to a comforting, savory meal that truly lives up to its legendary status, perfect for anyone seeking that ultimate, melt-in-your-mouth experience.
Why This Classic Pot Roast Will Be Your New Go-To
This isn’t just another recipe; it’s the culmination of years of perfecting the art of succulent, flavorful beef. It solves the common problems of dryness and toughness, delivering consistent results you can count on.
The “Never Dry, Always Tender” Promise
Our secret lies in a meticulous searing process followed by an extended, gentle braise. This low-and-slow cooking method, paired with ample liquid, transforms tough connective tissues into gelatin, ensuring your beef is exceptionally juicy and literally falls apart with a fork.
You’ll achieve consistently tender beef, eliminating any worry of a dry roast. This recipe promises reliability and flavor in every hearty bite.
Effortless Elegance for Any Occasion
Despite its impressive, gourmet-level taste and texture, this Classic Pot Roast requires surprisingly little hands-on time. Most of the magic happens in the oven, allowing you to focus on guests or other tasks.
It’s the ideal dish for a relaxed Sunday dinner, yet elegant enough to be the showstopper at a special gathering. The simple steps belie the deeply satisfying, savory gravy and tender vegetables.
Hearty, Wholesome, and Hug-in-a-Bowl Flavor
There’s an undeniable comfort in a well-made Classic Pot Roast; it’s truly a hug in a bowl. Rich, aromatic broth infused with savory goodness permeates the tender beef and vegetables.
This wholesome meal satisfies on every level, bringing warmth and joy to your table with its deep, comforting flavors. It’s the kind of hearty meal everyone eagerly anticipates.
Gather Your Essentials: What You’ll Need
Success starts with quality ingredients. Here’s what you’ll need to create this unforgettable dish, along with insights into their roles.
The Star: Beef Chuck Roast
A 3-pound beef chuck roast is our foundation. This cut is perfect for slow cooking because its rich marbling and connective tissues break down into gelatin, resulting in incredibly tender beef.
Choose a roast with good marbling throughout for maximum flavor and moisture. Tying it, if needed, helps it hold its shape for even cooking.
Flavor Foundations: Aromatics & Liquids
We build our flavor with one large chopped onion and two cloves of minced garlic, which become sweet and fragrant, creating a deep aromatic base. Four cups of rich beef broth provide the essential liquid for braising and infuse the meat with savory depth.
A tablespoon of tomato paste adds a subtle umami note and color, while dried thyme and a bay leaf contribute classic, earthy warmth. These ingredients work synergistically to develop a complex and irresistible sauce.
For an extra layer of fragrant beef, consider trying this rosemary pot roast.
Root Vegetables: Carrots & Potatoes
We use one pound of baby carrots and 1.5 pounds of baby potatoes (scrubbed). These convenient, bite-sized vegetables cook beautifully in the pot roast liquid, absorbing all the wonderful flavors.
Their natural sweetness complements the savory beef, and they emerge perfectly tender alongside the meat.
Gravy Essentials & Seasoning
Two tablespoons of all-purpose flour are crucial for thickening our rich gravy, transforming the cooking liquid into a luxurious sauce. Generous amounts of salt and black pepper are essential for seasoning the beef and later adjusting the gravy to perfection.
Finally, fresh chopped parsley provides a vibrant, fresh garnish and a pop of color, lifting the entire dish. Don’t underestimate the power of these finishing touches.
Tools of the Trade: Equipment for Pot Roast Perfection
Large Dutch Oven or Oven-Safe Pot: Absolutely essential for both searing the roast on the stovetop and then slow-cooking it in the oven. Its heavy construction ensures even heat distribution and moisture retention.
Sturdy Tongs: Perfect for safely turning the heavy chuck roast during searing, ensuring a beautiful brown crust on all sides.
Sharp Knife and Cutting Board: Necessary for prepping your vegetables and, eventually, for slicing or shredding your perfectly tender pot roast.
Whisk: Critical for preparing a smooth, lump-free gravy from the delicious pan drippings at the end.
Measuring Cups and Spoons: For accurate measurement of all your ingredients, ensuring balanced flavors.
Your Journey to a Flawless Classic Pot Roast: Step-by-Step
Follow these detailed steps to achieve a perfectly tender, incredibly flavorful Classic Pot Roast.
- Step 1: Prep & Season the Roast (and Oven)
Preheat your oven to 300 degrees F (150 degrees C) to ensure it’s ready for slow cooking. Pat the beef chuck roast thoroughly dry with paper towels; a dry surface is vital for a good sear.
Season generously all over with salt and black pepper. This initial seasoning penetrates the meat, contributing deeply to the final flavor and helping to keep the beef juicy.
- Step 2: Sear for Deep Flavor
Heat the vegetable oil in a large Dutch oven or oven-safe pot over medium-high heat until it shimmers. Carefully sear the beef roast on all sides until deeply browned, about 3-4 minutes per side.
This browning, known as the Maillard reaction, creates a rich, flavorful crust and builds the foundational taste for your savory gravy. Remove the beef and set it aside.
- Step 3: Build the Aromatic Base
Add the chopped onion to the pot, cooking until softened (about 5-7 minutes), making sure to scrape up any browned bits from the bottom. These “fond” bits are concentrated flavor that will enrich your sauce.
Stir in the minced garlic and cook for another minute until it becomes wonderfully fragrant. Be careful not to burn the garlic.
- Step 4: Deglaze and Submerge
Stir in the tomato paste and dried thyme, cooking for 1 minute to toast the spices and deepen their flavor. Pour in the beef broth and add the bay leaf, bringing the liquid to a gentle simmer.
Return the seared beef roast to the pot, ensuring it’s mostly submerged in the liquid. If needed, add a little more broth to cover adequately.
- Step 5: The “Low & Slow” Magic Begins
Cover the Dutch oven tightly with a lid and transfer it to the preheated oven. Cook for 2.5 hours without peeking.
This low and slow cooking method in a moist environment is the absolute secret to achieving fall-apart tender, juicy meat without it drying out. Do not rush this critical step.
- Step 6: Introduce the Vegetables
After 2.5 hours, carefully remove the pot from the oven. Add the baby carrots and baby potatoes around the roast in the pot.
Stir gently to ensure they are submerged in the delicious cooking liquid, allowing them to absorb flavor and cook perfectly.
- Step 7: Finish Cooking Until Fork-Tender
Return the pot to the oven, covered, and continue cooking for another 1 to 1.5 hours. The roast is ready when the vegetables are tender and the beef is so incredibly tender it easily shreds with a fork.
This extended braising ensures all components are cooked to perfection, resulting in a cohesive and flavorful dish.
- Step 8: Rest for Ultimate Juiciness
Once cooked, carefully remove the roast and vegetables from the pot and transfer them to a platter. Tent loosely with foil and let the meat rest for at least 15 minutes before shredding or slicing.
This resting period is crucial as it allows the juices to redistribute throughout the meat, ensuring maximum juiciness and tenderness in every bite.
- Step 9: Craft the Rich Gravy
While the meat rests, prepare your savory gravy. In a small bowl, whisk together 2 tablespoons of flour with 1/4 cup of cold water until completely smooth, forming a slurry.
Place the Dutch oven with the cooking liquid back on the stovetop over medium heat. Bring the liquid to a gentle simmer, then slowly whisk in the flour mixture, stirring constantly until the gravy thickens to your desired consistency. Taste and adjust seasoning with salt and pepper as needed for perfect flavor balance.
- Step 10: Serve Your Masterpiece
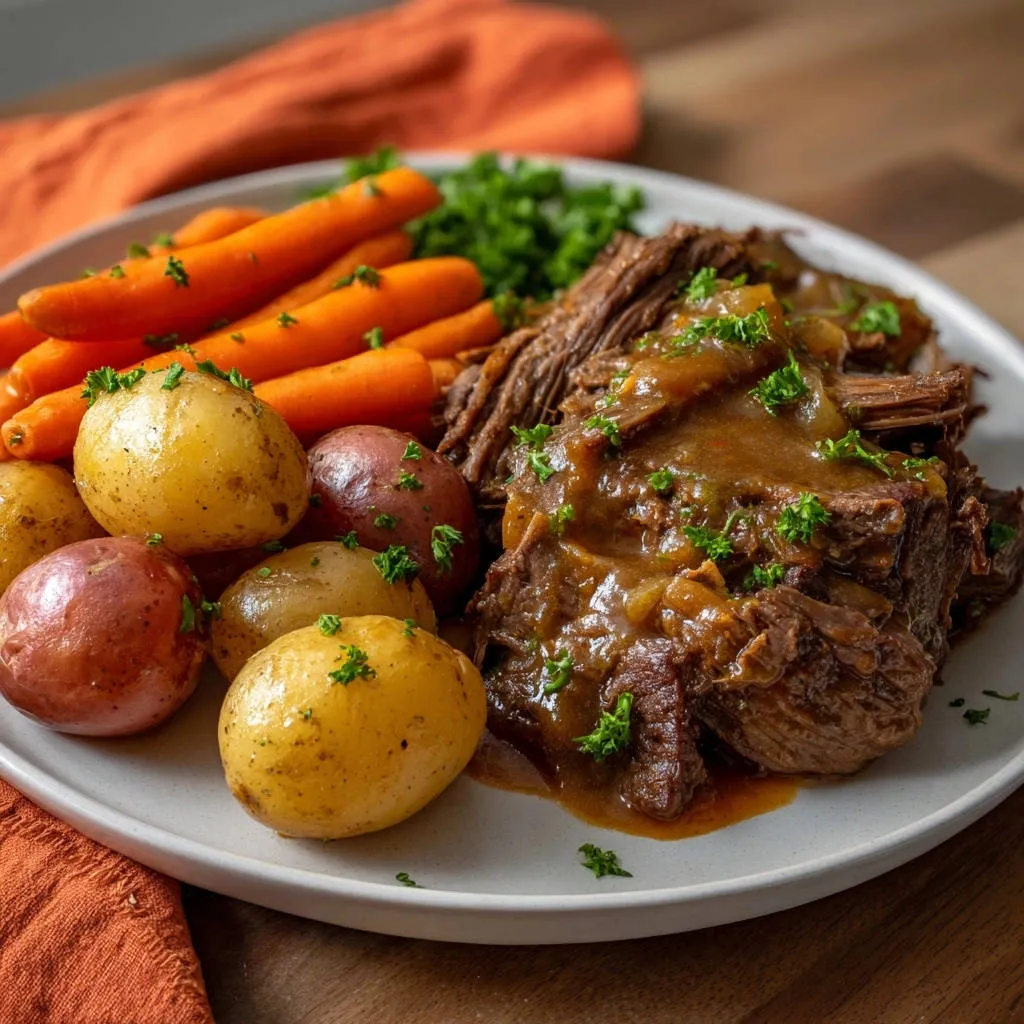
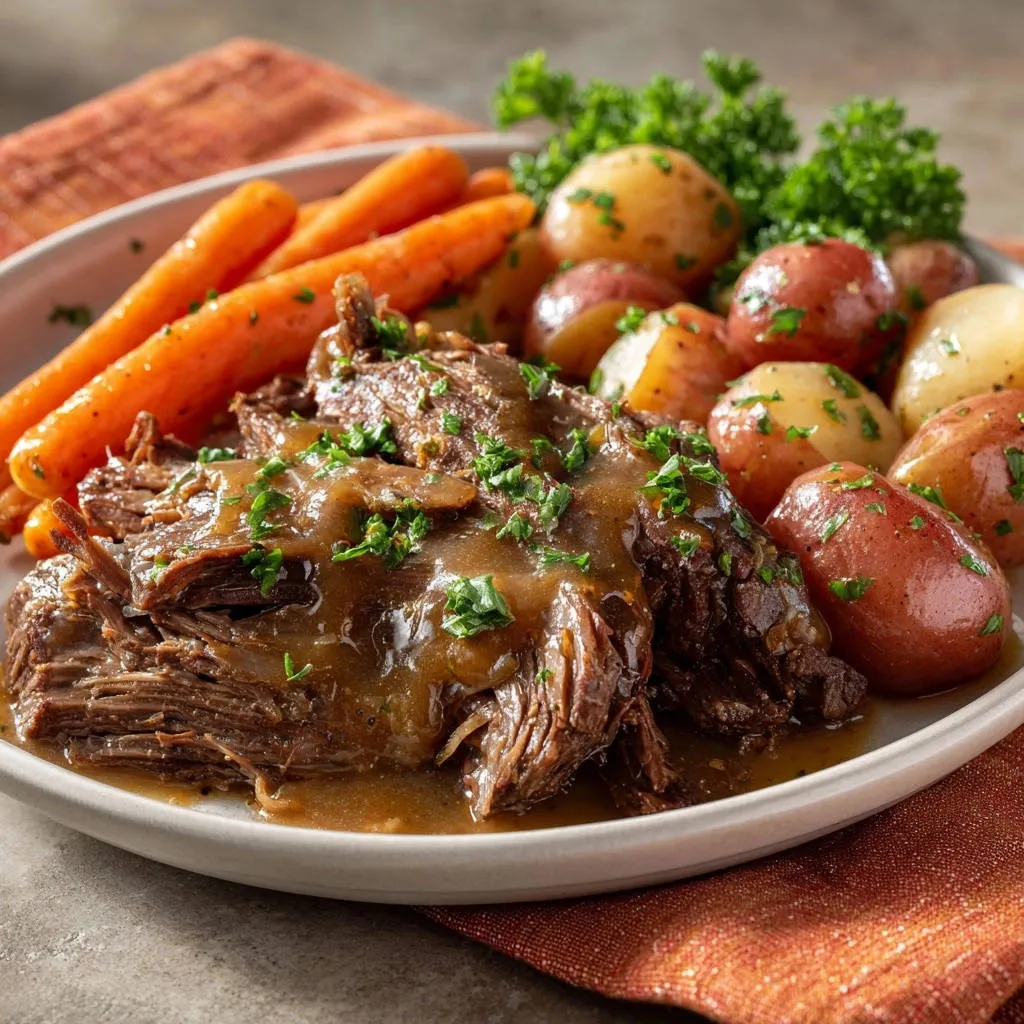
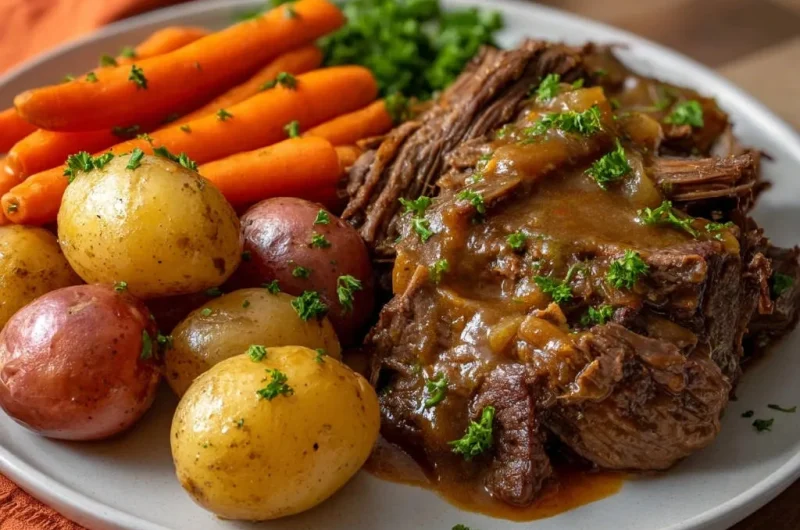
Serve the shredded or sliced Classic Pot Roast with the beautifully cooked carrots and potatoes. Generously spoon the rich, flavorful gravy over everything, ensuring every component is bathed in deliciousness.
Garnish with fresh chopped parsley just before serving for a bright, herbaceous finish. Enjoy your comforting, slow-cooked beef masterpiece!
Chef’s Secrets for an Unforgettable Classic Pot Roast
Don’t Skip the Dry Pat & Generous Seasoning: This isn’t just about initial flavor. A thoroughly dry surface is crucial for achieving a deep, even sear, which contributes significantly to both flavor and preventing a steamed exterior. Salt and pepper also penetrate during cooking, enhancing the overall taste of your slow-cooked beef.
Master the Sear: A truly deep brown crust, developed through the Maillard reaction, is the foundational layer of flavor for your entire pot roast and gravy. Don’t crowd the pan, and ensure the oil is adequately hot before adding the meat, searing in batches if necessary.
Embrace the “Low and Slow” Cooking Method: Resist the urge to increase oven temperature or shorten the cooking time. This gentle, extended heat slowly breaks down tough connective tissues in the chuck roast, resulting in meat that is incredibly fall-apart tender without drying out, defining a truly classic pot roast.
Rest Your Meat – It’s Non-Negotiable: After cooking, allowing the pot roast to rest, tented with foil, for at least 15 minutes is vital. This period allows the muscle fibers to relax and reabsorb all those delicious juices, ensuring every bite of your tender beef is moist and flavorful.
Layering Flavors in the Gravy: Be sure to scrape up all those browned bits (fond) from the bottom of the pot after searing and cooking the onions. These are concentrated flavor bombs that will enrich your savory gravy immensely, adding depth and complexity.
Gravy Consistency Control: Always whisk flour into cold water or broth to create a smooth slurry before adding it to hot liquid. This simple trick prevents lumps and ensures a perfectly smooth, velvety gravy when slowly whisked in, completing your hearty meal.
Common Questions About Classic Pot Roast
Can I make Classic Pot Roast in a slow cooker instead of the oven?
Absolutely! A slow cooker is an excellent alternative for this Classic Pot Roast. You should still sear the beef on the stovetop first to build crucial flavor.
Then, transfer all ingredients to your slow cooker and cook on low for 6-8 hours or on high for 3-4 hours, or until the meat is fork-tender. The gravy can be thickened on the stovetop after the roast is removed.
What if my pot roast isn’t tender enough after the recommended cooking time?
Don’t panic! Tenderness is the ultimate indicator, so if your Classic Pot Roast isn’t falling apart easily with a fork, it simply needs more time. Continue cooking it, covered, in the oven or slow cooker.
Check every 30-60 minutes until it reaches that desired melt-in-your-mouth consistency. The exact cooking time can vary based on your oven, pot, and meat thickness.
Can I add other vegetables to my Classic Pot Roast?
Yes, absolutely! This Classic Pot Roast is very forgiving and can incorporate a variety of root vegetables. Celery, parsnips, turnips, or even mushrooms make wonderful additions.
For harder vegetables like parsnips, add them along with the carrots and potatoes. Softer vegetables like mushrooms can be added during the last hour of cooking to prevent them from getting mushy.
How can I thicken my gravy without using flour?
If you prefer a flour-free gravy for your Classic Pot Roast, you have a couple of excellent options. You can create a cornstarch slurry by whisking 1-2 tablespoons of cornstarch with an equal amount of cold water, then slowly whisking it into your simmering pan drippings until thickened.
Alternatively, simply allow the cooking liquid to reduce on the stovetop over medium-high heat until it naturally thickens to your desired consistency. This method intensifies the flavor beautifully.
Is it possible to freeze leftover Classic Pot Roast for later?
Yes, leftover Classic Pot Roast freezes beautifully, making it perfect for future hearty meals. Allow the roast, vegetables, and gravy to cool completely before transferring to airtight, freezer-safe containers.
It can be stored in the freezer for up to 3 months. When ready to enjoy, thaw overnight in the refrigerator and reheat gently.
Serving Suggestions & Perfect Pairings
While delicious on its own, your Classic Pot Roast can be elevated further with thoughtful pairings and creative serving ideas.
Beyond the Platter: Creative Serving Ideas
Beyond serving on a platter with its accompanying vegetables, consider shredded Classic Pot Roast over creamy mashed potatoes, soft polenta, or even egg noodles for an extra layer of comfort. Leftovers make incredible sandwiches, tacos, or moist shredded beef sliders.
A crusty artisan bread is also perfect for soaking up every last drop of that savory gravy. For another delightful beef dish, you might also enjoy our recipe for a hearty beef stew.
Complementary Sides to Elevate Your Meal
To balance the richness of this hearty meal, serve with simple, fresh accompaniments. A vibrant green salad with a light vinaigrette or some steamed green beans adds a lovely contrast.
Roasted Brussels sprouts or a light quinoa pilaf are also excellent choices, providing texture and freshness without overpowering the star of the show. If you’re looking for another comforting potato dish, consider our perfectly crispy skillet potatoes and onions.
Storing Leftovers and Reheating for Encore Meals
Enjoying your Classic Pot Roast doesn’t have to end after the first meal. Proper storage and reheating ensure delicious encore servings.
Refrigeration & Longevity
Allow any leftover Classic Pot Roast, vegetables, and gravy to cool completely to room temperature (within two hours). Transfer them to airtight containers, ideally keeping the meat submerged in gravy to maintain moisture.
Properly stored, your delicious leftovers will remain fresh and flavorful in the refrigerator for 3-4 days.
Freezing for Future Feasts
For longer storage, freeze your pot roast. It’s best to freeze the meat and gravy together, and vegetables separately if possible, in freezer-safe bags or containers to prevent freezer burn.
Label with the date; it will stay good for up to 3 months. Thaw completely in the refrigerator before reheating for the best results.
Best Ways to Reheat Without Drying Out
To reheat your Classic Pot Roast without drying out the tender beef, the oven is your best bet. Place meat and vegetables with plenty of gravy in an oven-safe dish, cover tightly with foil, and warm at 300°F (150°C) until heated through, adding a splash of extra broth if needed.
Alternatively, gently reheat on the stovetop over low heat, stirring occasionally, or use the microwave for smaller portions, covering to trap steam. Always ensure the internal temperature reaches 165°F (74°C).
Ready to Impress? Share Your Classic Pot Roast Masterpiece!
Now that you have all the insider tips and a truly reliable recipe, you’re ready to create a Classic Pot Roast that will impress everyone at your table. Its comforting aroma and fall-apart tenderness are simply unmatched.
Dive in, enjoy the process, and savor the incredible results. We’d love to see your culinary creations, so don’t forget to tag us on social media!
Pot Roast
Course: Main CourseCuisine: AmericanDifficulty: medium6
servings30
minutes4
hours550
kcal240
minutesDiscover the simple secret to a perfectly juicy and tender pot roast. This recipe ensures a succulent beef chuck roast that melts in your mouth, surrounded by tender vegetables and a rich, savory gravy. Say goodbye to dry pot roast forever!
Ingredients
3 pounds beef chuck roast, tied if needed
2 tablespoons vegetable oil
1 large onion, chopped
2 cloves garlic, minced
4 cups beef broth
1 tablespoon tomato paste
1 teaspoon dried thyme
1 bay leaf
1 pound baby carrots, peeled
1.5 pounds baby potatoes, scrubbed
2 tablespoons all purpose flour (for gravy)
Salt to taste
Black pepper to taste
Fresh parsley, chopped, for garnish
Directions
- Preheat your oven to 300 degrees F (150 degrees C). Pat the beef chuck roast thoroughly dry with paper towels. Season generously all over with salt and black pepper. This step is critical for flavor and helps prevent dryness.
- Heat the vegetable oil in a large Dutch oven or oven-safe pot over medium high heat until shimmering. Sear the beef roast on all sides until deeply browned, about 3-4 minutes per side. Browning creates a flavorful crust and helps build the foundation for a rich gravy. Remove the beef and set aside.
- Add the chopped onion to the pot and cook until softened, about 5-7 minutes, scraping up any browned bits from the bottom of the pot. Stir in the minced garlic and cook for another minute until fragrant.
- Stir in the tomato paste and dried thyme, cooking for 1 minute. Pour in the beef broth and add the bay leaf, bringing the liquid to a simmer. Return the seared beef roast to the pot, ensuring it’s mostly submerged in the liquid. If not, add a little more broth.
- Cover the Dutch oven tightly with a lid and transfer it to the preheated oven. Cook for 2.5 hours. The low and slow cooking method in a moist environment is the absolute secret to achieving fall apart tender, juicy meat without it drying out. Do not rush this step.
- After 2.5 hours, carefully remove the pot from the oven. Add the baby carrots and baby potatoes around the roast in the pot. Stir gently to ensure they are submerged in the liquid.
- Return the pot to the oven, covered, and continue cooking for another 1 to 1.5 hours, or until the vegetables are tender and the beef is incredibly tender and easily shredded with a fork.
- Once cooked, carefully remove the roast and vegetables from the pot and transfer them to a platter. Tent loosely with foil and let the meat rest for at least 15 minutes before shredding or slicing. This resting period allows the juices to redistribute, ensuring maximum juiciness.
- While the meat rests, prepare the gravy. In a small bowl, whisk together 2 tablespoons of flour with 1/4 cup of cold water until smooth. Place the Dutch oven with the cooking liquid back on the stovetop over medium heat. Bring the liquid to a gentle simmer. Slowly whisk in the flour mixture, stirring constantly until the gravy thickens to your desired consistency. Taste and adjust seasoning with salt and pepper as needed.
- Serve the shredded or sliced pot roast with the cooked carrots and potatoes, generously spooning the rich gravy over everything. Garnish with fresh chopped parsley before serving.
Notes
- For an extra flavorful roast, make sure to thoroughly pat your beef dry before searing; this creates a better crust. Don’t skip scraping up those browned bits from the bottom of the pot after searing the beef, as they add immense depth to the sauce.