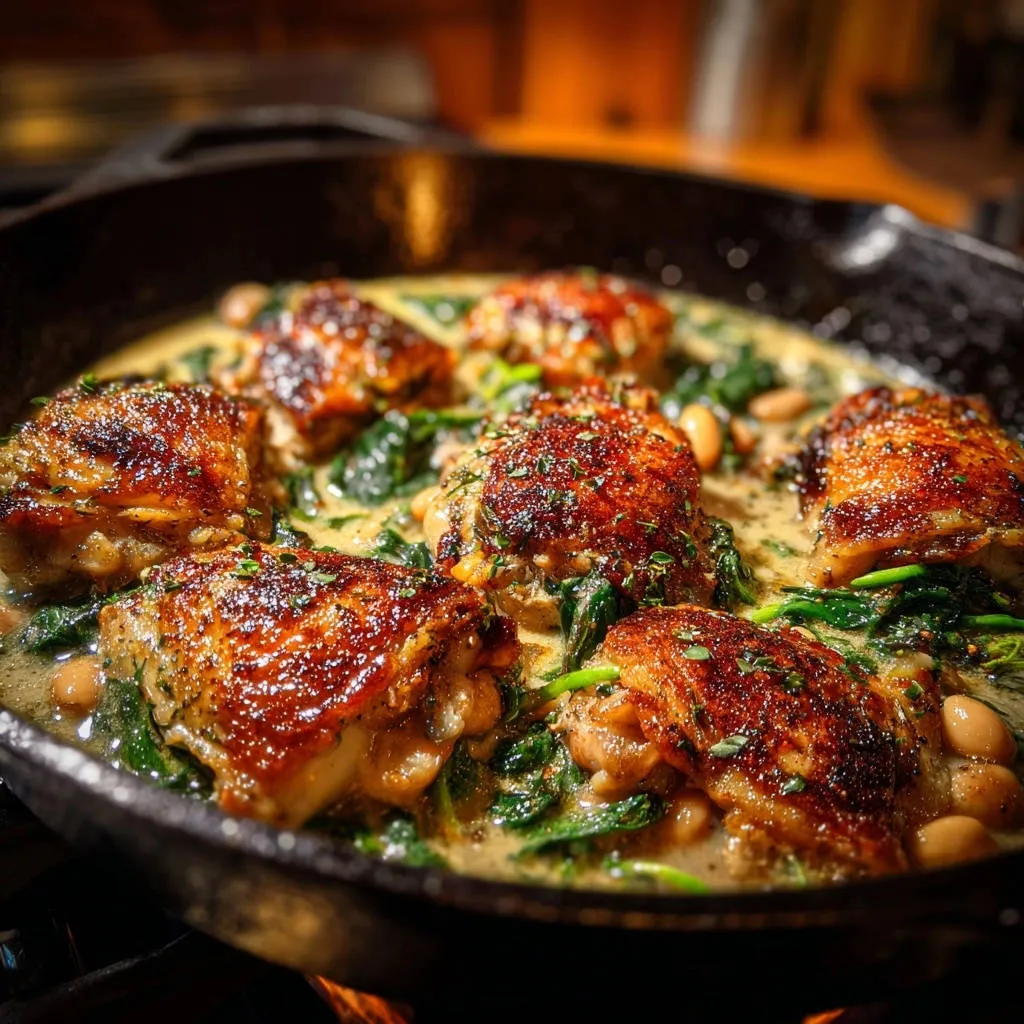
I almost gave up on delicious, creamy skillet dinners because every time I added the sauce, that beautifully seared chicken skin turned instantly soggy. That frustrating challenge is solved forever with this definitive Creamy Garlic Chicken and White Bean Skillet recipe.
This method utilizes a unique searing and placement technique that locks in the ultimate crispness, ensuring your chicken stays crunchy even while swimming in a rich, velvety garlic-herb sauce-a true game-changer for weeknight cooking.
The End of Soggy Skin: Why This Skillet Chicken Recipe Works
Weeknight Dinner Perfection: Speed Meets Comfort
This recipe transforms bone-in chicken thighs into a deeply satisfying meal in under 45 minutes, making it ideal for busy weeknights.
For another take on creamy chicken thighs, explore creamy sun-dried tomato chicken thighs.
The combination of rich heavy cream, aromatic garlic, and hearty beans offers maximum comfort and flavor with minimal hands-on time.
The Fail-Safe Secret to Perfectly Crisp Skin
The secret lies in the sequence: achieve an extreme, uninterrupted sear, reserve the chicken, build the sauce, and then nestle the chicken back in.
By ensuring the crispy skin always sits completely above the liquid line during the final simmer, the fat cannot render back into the liquid, and the crisp texture is preserved until the final bite.
A Balanced Meal, Done in One Pan
The addition of protein-packed cannellini beans and nutrient-dense fresh spinach ensures this is a complete meal requiring no side dishes.
Using a single pan dramatically cuts down on cleanup, which is essential for maximizing relaxation on a weeknight.
The Building Blocks of Flavor: Essential Ingredients
Choosing the Best Bone-In Chicken Thighs
We use bone-in, skin-on chicken thighs because they contain higher fat content, which is necessary for rendering the skin super crisp.
The bone also adds significant flavor depth to the meat while preventing it from drying out during the high-heat searing phase.
The Creamy, Aromatic Sauce Base
Garlic Infusion and Fond Development
The minced garlic provides the essential aromatic foundation for the sauce, offering warmth and complexity.
For a truly luxurious experience, explore this creamy garlic skillet chicken.
Deglazing the pan with vegetable broth allows you to scrape up the rich, browned bits (fond) left behind by the chicken, incorporating incredible savory depth into the sauce base.
Heavy Cream vs. Healthier Alternatives
Heavy cream delivers the luxurious, velvety texture that defines this dish and stabilizes the sauce.
If preferred, you can swap heavy cream for half-and-half or even full-fat canned coconut milk for a slightly lighter or dairy-free alternative, though the texture will be slightly different.
Cannellini Beans and Spinach: Power Pairing
Cannellini beans add satisfying bulk, essential protein, and a smooth, creamy texture that pairs perfectly with the sauce.
Fresh spinach cooks down quickly, adding a boost of greens and wilting neatly into the skillet without overpowering the garlic flavor.
Essential Tools for Your Creamy Garlic Chicken Adventure
12-Inch Cast Iron Skillet: The cast iron is non-negotiable for achieving the high, steady heat necessary for the max crisp sear, ensuring an even, golden crust.
Paper Towels: Absolutely crucial for patting the chicken completely dry before seasoning; moisture is the enemy of crispy skin.
Digital Meat Thermometer: Essential for verifying the chicken reaches 165°F without overcooking, guaranteeing juicy results every time.
Your Path to Creamy Garlic Chicken and White Bean Skillet Perfection: A Detailed Guide
Phase 1: Preparation and the Max Crisp Sear
- Prepare the Chicken for Searing (The Key to Crispness):
Pat the chicken thighs extremely dry using paper towels to remove moisture, which is the enemy of crispy skin. Season liberally on both sides with salt and pepper.
- Achieve the Max Crisp Sear:
Heat the cast iron skillet over medium-high heat with olive oil. Place the chicken skin-side down and DO NOT TOUCH for 8-10 minutes. This uninterrupted time is critical for rendering the fat completely and establishing a deep brown, shatteringly crisp crust.
- Remove and Reserve:
Once the skin is deep golden brown, flip the chicken quickly and sear for only 1 minute on the flesh side. Immediately remove all chicken and set it aside on a plate, ensuring the crispy skin remains facing up to prevent it from steaming and softening.
Phase 2: Building the Rich, Creamy Sauce
- Build the Sauce Base:
Reduce heat to medium. Add the minced garlic and sauté for only 30 seconds until fragrant-do not let it burn! Pour in the vegetable broth and use a wooden spoon to vigorously scrape up all the browned bits (fond). This process, called deglazing, adds deep, savory flavor.
- Add Greens and Beans:
Stir in the remaining spices (Italian herbs and paprika), the drained cannellini beans, and the fresh spinach. Allow the spinach to wilt completely before moving on, which helps ensure excess water evaporates and doesn’t thin the sauce.
- Finish the Sauce:
Stir in the heavy cream until the sauce is uniform and gently simmering. Taste the sauce now and adjust salt and pepper if necessary.
Phase 3: Final Simmer and Perfect Crispness
- Return Chicken (Protecting the Skin):
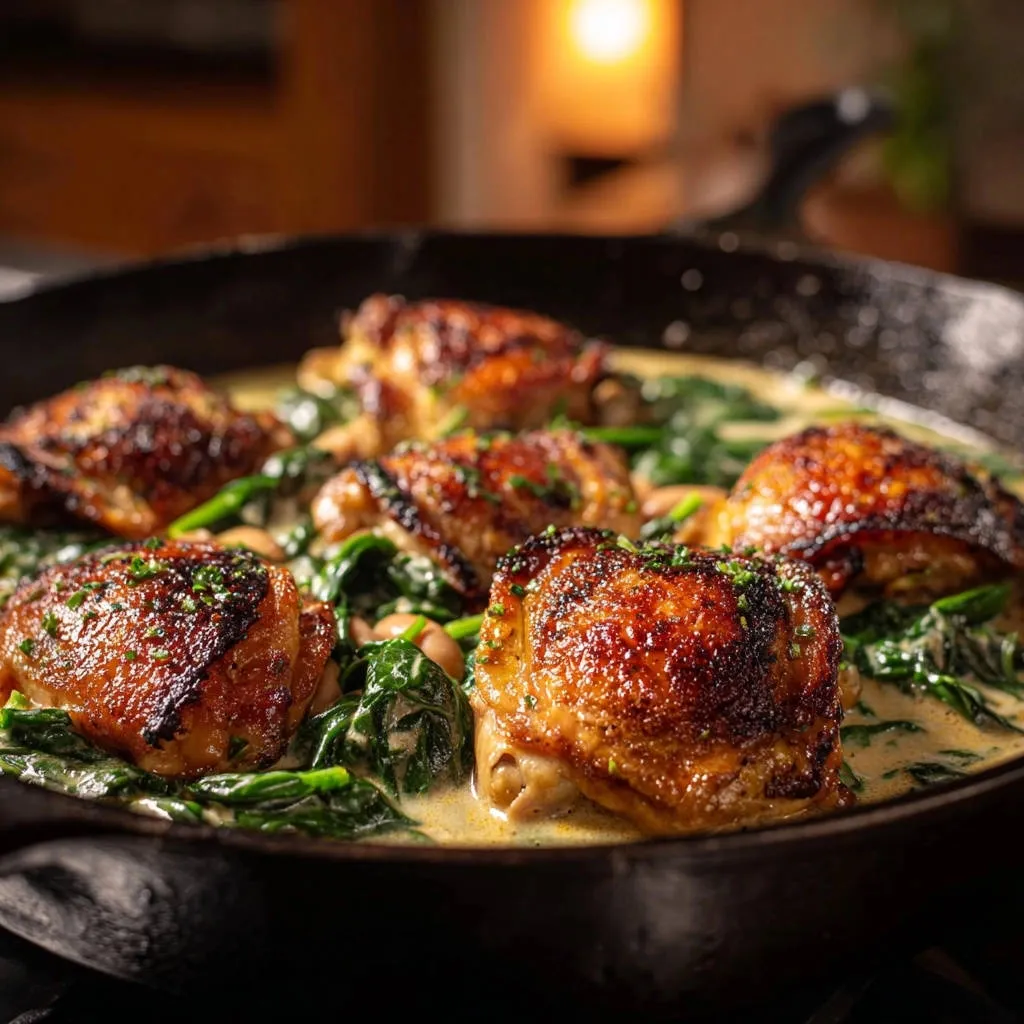
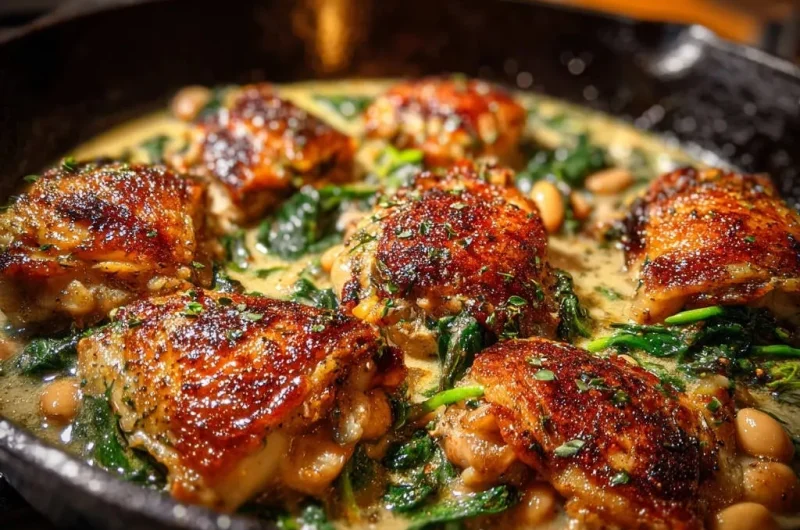
Carefully nestle the seared chicken thighs back into the skillet on top of the sauce. It is essential to ensure the crispy skin remains completely above the liquid line. The skin must not be submerged at all, or it will instantly soften.
- Simmer and Serve:
Reduce the heat to low, cover the skillet loosely, and simmer for 10 to 15 minutes, or until the chicken reaches an internal temperature of 165°F. This step finishes cooking the meat while retaining the beautiful, perfect crispness.
Chef’s Secrets: Elevate Your Skillet Chicken Game
The Temperature Check: Always use a digital thermometer. Chicken thighs finish cooking incredibly fast once returned to the liquid; pulling them precisely at 165°F guarantees maximum juiciness.
Boost Your Broth: Instead of simple vegetable broth, use a concentrated chicken bone broth for a richer, more complex sauce flavor that expertly complements the garlic and herbs.
Rinsing the Beans: Don’t skip rinsing and draining the cannellini beans thoroughly! This removes excess starch that could make the final sauce gummy instead of velvety smooth.
Sautéing the Garlic: Garlic burns quickly! Sauté it for no more than 30 seconds before adding the liquid. Burnt garlic will introduce bitterness and ruin the entire flavor profile of the Creamy Garlic Chicken and White Bean Skillet.
Ingredient Swaps, Customizations, and Flavor Variations
Adapting the Protein and Vegetables
While bone-in thighs are recommended for flavor and the crispy skin technique, boneless chicken breasts can be used, though you will skip the long initial sear.
If using breasts, sear them briefly on both sides (3-4 minutes) before reserving, and ensure they reach 165°F during the final simmer. They will not retain the same high level of crispness.
Kale or Swiss chard can replace spinach, but they may require a longer wilting time. For a bolder flavor, try sun-dried tomatoes instead of greens.
Dairy-Free and Gluten-Free Alternatives
To make the creamy sauce dairy-free, substitute the heavy cream with full-fat canned coconut milk or unsweetened cashew cream.
Since this recipe does not use flour for thickening, it is naturally gluten-free! Ensure your vegetable broth is certified GF if necessary to maintain a completely gluten-free meal.
Expert Troubleshooting for Common Skillet Dinner Challenges
Problem: My Sauce is Too Thin
If the sauce looks too watery after simmering, remove the chicken, increase the heat slightly, and let the sauce reduce and thicken for 2-3 minutes. Alternatively, whisk in a cornstarch slurry (1 tsp cornstarch mixed with 1 tsp cold water) to thicken it immediately.
Problem: The Chicken Skin Lost Its Crispness After Resting
This usually happens if the chicken was covered too tightly after removing it from the pan, causing steam buildup. Always ensure the skin is facing up and uncovered while waiting for the sauce to finish.
Problem: The Chicken is Dry
Dry chicken results from overcooking. Ensure you use the meat thermometer and pull the chicken immediately when the internal temperature hits 165°F. Since the intense searing locks in moisture, the final simmer is purely for finishing the internal temperature, and should be carefully monitored.
Complementary Dishes
To round out your meal, consider these fresh chicken salads.
- For a bright, herbaceous addition, try the Garlic Herb Grilled Chicken Salad, featuring similar savory notes.
- Pair your skillet chicken with the hearty Grilled Chicken Kale and Cabbage Power Salad for added greens.
Serving, Storing, and Enjoying Leftovers
What to Serve Alongside This Creamy Garlic Chicken and White Bean Skillet?
Because the skillet already contains protein and vegetables, focus on a simple starch. Crusty bread is perfect for soaking up the extra creamy sauce, or serve it over fluffy rice or creamy mashed potatoes.
Storing and Reheating Leftovers Safely
Store leftovers in an airtight container in the refrigerator for up to 3 days. Note that the chicken skin will inevitably soften upon refrigeration due to moisture absorption.
To reheat, the oven is best for trying to retain some crispness. Place the chicken on a wire rack over a baking sheet and heat at 350°F (175°C) until warmed through. Alternatively, microwave slowly, understanding the skin will be soft.
Make-Ahead Prep: Getting a Head Start
You can prepare the chicken by patting it dry and seasoning it up to 24 hours in advance. Store it uncovered in the refrigerator (on a plate or small tray) to allow the salt to tenderize the skin further, enhancing the eventual high-heat sear.
Quick Answers: Your Top Questions About Skillet Dinners
Can I use chicken breasts for this recipe?
Yes, but the cooking time must be adjusted. Since they are lean, sear them for only 3-4 minutes per side before returning them to the sauce to finish cooking, making absolutely sure they reach 165°F without delay. You will not achieve the same high level of skin crispness achieved with bone-in, skin-on thighs.
Can I freeze the Creamy Garlic Chicken and White Bean Skillet?
Freezing is not recommended. Dairy-based sauces tend to separate and become grainy upon thawing and reheating. The thawed chicken will also have a rubbery texture due to the structural changes from freezing.
Why is scraping up the ‘fond’ so important?
The fond (the browned bits left at the bottom of the pan after searing the chicken) contains concentrated, savory flavor and caramelized sugars. Deglazing the pan with broth releases these bits, incorporating that depth into the sauce base, which is crucial for a restaurant-quality meal.
Ready to Impress? Share Your Creamy Garlic Chicken Masterpiece!
With the simple, fail-safe technique outlined here, you never have to choose between a creamy, comforting skillet dinner and perfectly crisp chicken skin again. This Creamy Garlic Chicken and White Bean Skillet recipe proves you can have the best of both worlds-texture, convenience, and unparalleled flavor.
We encourage you to try this method this week and experience the difference. Don’t forget to share your cooking triumph and results with us; we love seeing your crispy, creamy creations!
Creamy Garlic Chicken White Bean Skillet
Course: Main CourseCuisine: AmericanDifficulty: easy6
servings15
minutes30
minutes450
kcal45
minutesThis one-pan dinner solves the age-old problem of soggy chicken skin in creamy skillet meals. Learn the fail-safe technique for locking in glorious crispness before nestling the chicken into a luxurious sauce of garlic, cannellini beans, and spinach. This simple method guarantees juicy meat and perfectly crunchy skin every time.
Ingredients
6 bone-in, skin-on chicken thighs
2 tablespoons olive oil
1 teaspoon salt, divided
1/2 teaspoon black pepper, divided
4 cloves garlic, minced
1/2 cup vegetable broth
1 (15 ounce) can cannellini beans, rinsed and drained
2 cups fresh spinach
1/2 cup heavy cream
1 teaspoon dried Italian herbs
1 teaspoon paprika
Directions
- Prepare the Chicken for Searing (The Key to Crispness): Pat the chicken thighs extremely dry using paper towels. This removes surface moisture which is the enemy of crispy skin. Season liberally on both sides with 1/2 teaspoon salt and 1/4 teaspoon pepper.
- Achieve the Max Crisp Sear: Heat a 12-inch cast iron skillet over medium-high heat until hot. Add olive oil. Once shimmering, place the chicken thighs in the skillet, skin-side down. Crucial Step: Do not touch or move the chicken for 8 to 10 minutes. This uninterrupted, high-heat sear is what renders the fat and locks in the texture. Press down occasionally with a spatula to ensure maximum contact with the pan. The skin should be deep golden brown and extremely crisp.
- Remove and Reserve: Once the skin is beautifully crisped, flip the chicken pieces quickly and sear for only 1 minute on the flesh side. Remove all chicken from the skillet and set aside on a plate, skin-side up (this prevents the newly crisped skin from steaming).
- Build the Sauce Base: Reduce heat to medium. Add the minced garlic and saute for 30 seconds until fragrant. Pour in the vegetable broth and use a wooden spoon to scrape up any browned bits (fond) from the bottom of the pan. Stir in the remaining salt, pepper, Italian herbs, and paprika.
- Add Greens and Beans: Stir in the drained beans and the fresh spinach. Allow the spinach to wilt completely, which usually takes 2 to 3 minutes.
- Finish the Sauce: Stir in the heavy cream until the sauce is uniform and simmering gently.
- Return Chicken (Protecting the Skin): Carefully nestle the seared chicken thighs back into the skillet on top of the sauce, ensuring the crispy skin remains completely above the liquid line. The skin should not be submerged at all.
- Simmer and Serve: Reduce the heat to low, cover the skillet loosely, and simmer for 10 to 15 minutes, or until the chicken reaches an internal temperature of 165 degrees Fahrenheit. Because the skin never submerged in the simmering liquid, it retains its beautiful, perfect crispness right up until the moment you serve it.
Notes
- Ensure chicken is patted extremely dry before searing. The uninterrupted 8-10 minute sear is vital for rendering fat and achieving maximum crispness.