There is nothing worse than biting into a beautiful chicken parmesan only to find that the breading has turned into a sad, mushy layer underneath the sauce and cheese. If you have struggled with that soggy battle, I have the definitive solution: this exceptional Crispy Baked Chicken Parm Penne uses a critical two-step baking method that guarantees crunch and keeps that amazing texture locked in.
The Anti-Soggy Revelation: Why This Chicken Parm Stays Crisp
The Power of Pre-Baking: Hardening the Breading Barrier
The core innovation here is baking the breaded cutlets completely dry before they ever touch the marinara sauce. This high-heat exposure seals the coating, transforming it into a hardened, non-porous moisture barrier.
Once this barrier is established, the breading will resist absorbing the liquid from the sauce and the pasta below, maintaining its structural integrity and exceptional crunch, even when sitting in the final baked dish.
Crispy Baked Chicken Parm Penne: Baked vs. Fried Efficiency
While shallow frying can yield crispy results, it often leaves oil residue and can trap steam beneath the breading, which later contributes to sogginess in the oven.
Baking, particularly the initial high-heat phase, provides controlled, dry heat that effectively dehydrates the coating, locking in a consistent crispness that holds up far better under the weight of cheese and sauce.
Achieving the Perfect Cutlet Thickness
The ideal cutlet thickness for this recipe is about 1/4 to 1/2 inch (approximately 4 ounces each). Thin cutlets are essential because they cook quickly and evenly, ensuring the internal temperature reaches 165°F at the exact moment the breading achieves peak golden crispness.
If you start with thicker chicken breasts, you must pound them evenly between sheets of plastic wrap until they reach the desired thinness. This promotes rapid cooking and avoids a tough texture.
The Building Blocks of Flavor: Sourcing Your Ingredients
The Importance of Panko Breadcrumbs for Maximum Crispiness
Panko is non-negotiable for achieving this level of crispness. Unlike standard breadcrumbs, Panko is made from crustless white bread and processed into large, flaky shards that absorb less oil and create superior air pockets, resulting in a lighter, crunchier texture.
Choosing the Right Marinara Sauce
Using a good quality jarred sauce simplifies prep, but its thickness matters significantly. Look for a dense, slow-simmered marinara, as thin, watery sauces will release more moisture during baking and compromise the anti-soggy effort.
Selecting the Best Cheese: Fresh vs. Shredded Mozzarella
For a truly gourmet finish, use fresh mozzarella, cut into thick slices. While it releases slightly more water, its superior melt and milky flavor elevate the dish dramatically.
Alternatively, low-moisture, whole-milk shredded mozzarella will offer better browning and release minimal moisture, offering a more predictable, drier bake.
Enhancing the Coating: The Seasoning Blend
The seasoning blend-comprised of Italian seasoning, garlic powder, grated Parmesan, salt, and pepper-is crucial because it is the primary flavor layer surrounding the chicken itself.
Ensure the grated Parmesan is finely milled so it integrates smoothly into the Panko mixture without creating clumps, aiding even browning and flavor penetration.
Essential Kitchen Gear for the Ultimate Crisp
Sturdy Baking Sheet: Crucial for the initial crisping step. Use a heavy-gauge sheet that won’t warp and provides excellent, even heat distribution.
Shallow Dishes for Breading: Essential for maintaining an efficient, clean breading station setup (flour, egg, Panko).
9×13 Inch Baking Dish: Ideal size for assembling the pasta base and final bake. Choose glass or ceramic for good heat retention.
Meat Thermometer: Necessary for ensuring the cutlets reach 165°F internal temperature before saucing, guaranteeing safety and perfect moisture.
Your Detailed Guide to Crispy Baked Chicken Parm Penne Perfection
- Preheat and Prep the Pans:
Preheat your oven to 400 degrees F. Lightly grease your baking sheet with 1 tablespoon of olive oil. Ensure the sheet is lightly coated, not saturated, to promote direct heat transfer and deep crisping of the breading.
- Set Up the Breading Station:
Prepare the three shallow dishes: one with all-purpose flour, one with the beaten egg and water mixture, and the third with the combined Panko, Parmesan, Italian seasoning, garlic powder, salt, and pepper. Organizing this setup streamlines the process and ensures even, consistent coating.
- Dredge the Cutlets Completely:
Working one cutlet at a time, coat it fully in flour, shaking off all excess, as too much flour creates gumminess. Dip in egg wash, allowing excess to drip, and finally press firmly into the seasoned Panko mixture. Pressing ensures the thickest, crunchiest coating possible that adheres well during baking.
- Phase 1: The Critical Anti-Soggy Pre-Bake:
Bake the breaded cutlets for 15 to 18 minutes at 400°F until they are fully cooked, deeply golden brown, and feel extremely crisp to the touch. This specialized step hardens the exterior so it can withstand the sauce later; DO NOT skip this pre-bake if you want true crispness.
If you’re enjoying this crispy chicken, discover the perfectly juicy results of seared chicken in another great penne dish.
- Cook the Penne and Prepare the Base:
While the chicken bakes, cook the penne according to package directions until perfectly al dente-it must retain a slight firmness since it will cook briefly again later in the sauce. Drain the pasta, then toss it immediately with 1/4 cup of the marinara sauce and the remaining olive oil. Spread this evenly across the bottom of the 9×13 baking dish.
- Adjust Heat and Assemble the Dish:
Remove the crisp cutlets from the oven and immediately reduce the oven temperature to 375°F. Place the cutlets directly over the bed of pasta. Spoon a minimal amount of marinara (about 2 tablespoons) ONLY onto the center of each cutlet, deliberately leaving the outer perimeter of the crisp breading exposed as a visual and tactile border.
- Phase 2: The Fast Finish and Broiler Watch:
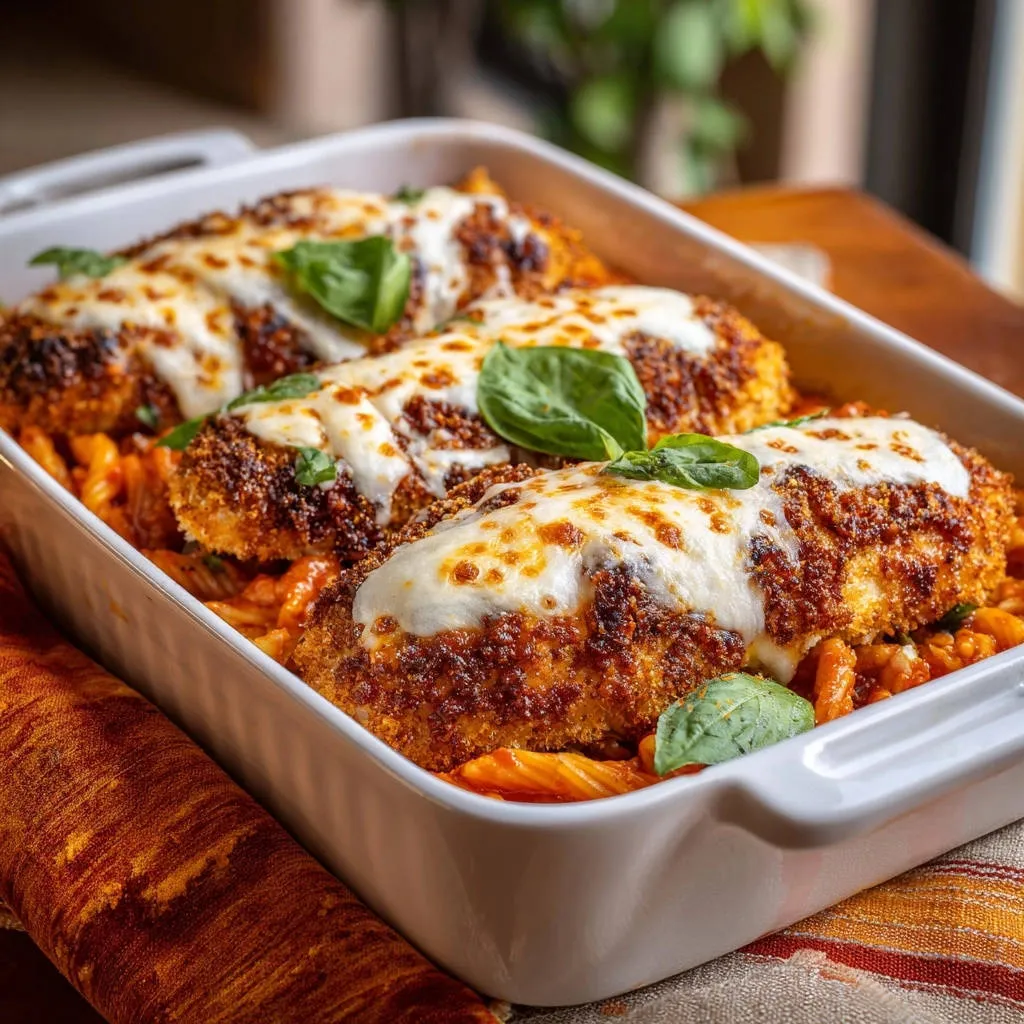
Top each cutlet with your mozzarella cheese. Return the dish to the oven and broil on medium-high (or bake at 375°F) for only 2 to 4 minutes. You must watch CONSTANTLY to ensure the cheese melts and bubbles without burning or allowing the base of the cutlet to absorb too much moisture from the pasta base.
- Garnish and Serve Hot:
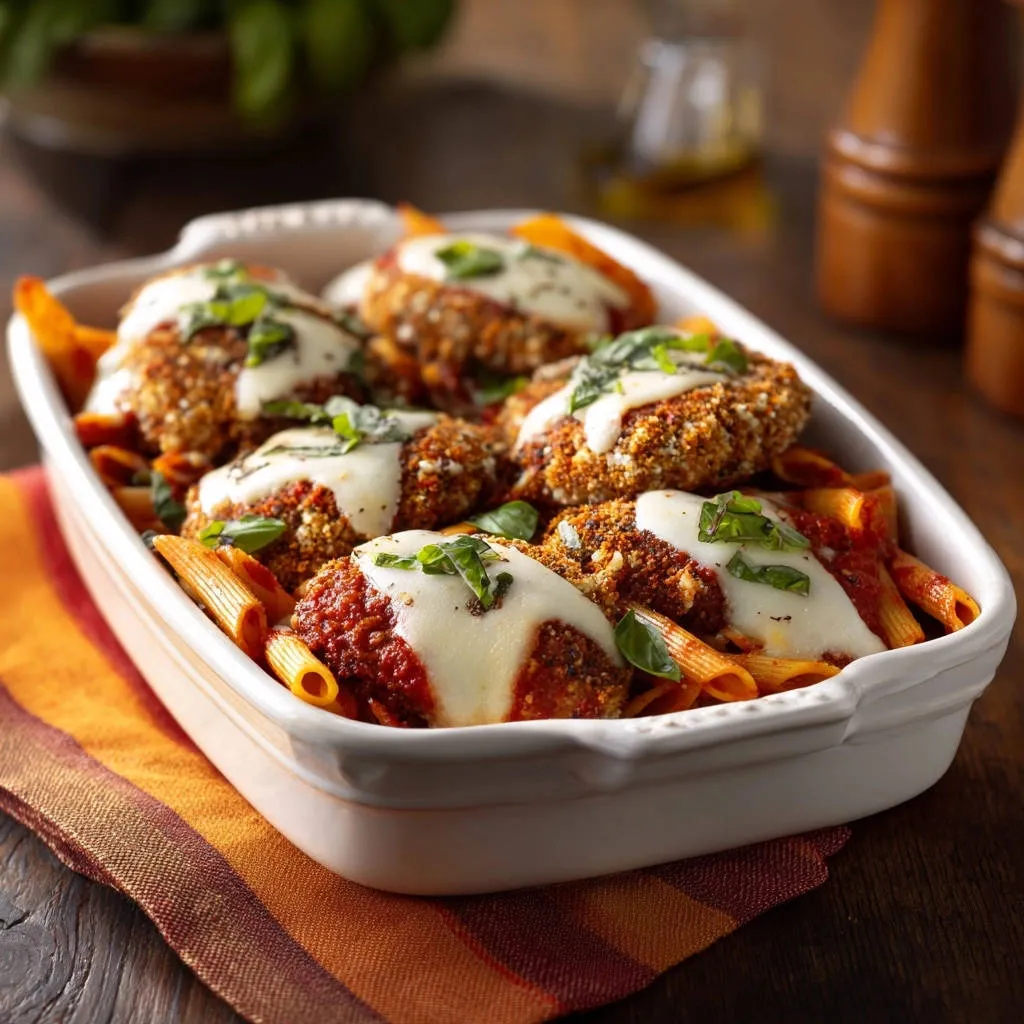
Remove the Crispy Baked Chicken Parm Penne from the oven, allow it to rest for 2 minutes to settle the cheese, and garnish with fresh chopped basil for brightness and aromatic flavor. Serve immediately while the cutlets are at their crispiest.
Chef’s Corner: Mastering Texture and Troubleshooting Common Mishaps
Why Did My Breading Still Fall Off?
Breading fall-off usually occurs if the cutlet is wet before the flour stage or if there is excess flour left on the chicken. Always ensure you shake off all excess flour after the first dredge, and remember to press the Panko firmly onto the chicken to help it adhere.
Achieving a Deeper Golden Color Without Overcooking
Ensure your oven temperature is accurate (400°F is hot enough to brown the Panko quickly). For a guaranteed deep color, use a clean spray bottle of olive oil or cooking spray and lightly mist the top of the breaded cutlets just before they go into the initial bake (Step 4).
Preventing Pasta from Drying Out in the Oven
The pasta needs sufficient moisture before the final bake. Tossing the penne with both oil and a portion of the marinara sauce ensures every noodle is coated. If you find the pasta is drying out, ensure you are using a quality, thick marinara and that the baking time is kept brief.
The Key to Flavorful, Moist Chicken Cutlets
To maximize the flavor and moisture of the thin cutlets, consider brining the chicken for 15 minutes in a simple solution of highly salted water before breading. This technique draws moisture into the meat and helps ensure it stays tender throughout the high-heat cooking phases.
Beyond the Bake: Serving Suggestions and Storage
Ideal Side Dishes and Wine Pairings
Pair this hearty meal with a light, crisp side dish to cut through the richness of the cheese and sauce. A simple arugula salad dressed with lemon and olive oil, or lightly charred roasted asparagus, works perfectly.
For a wine pairing, a medium-bodied Italian red like a Chianti or a bright, chilled white like Pinot Grigio provides a refreshing balance to the tomato and cheese.
Storing and Reheating Leftovers
Cool any leftover Crispy Baked Chicken Parm Penne quickly and store it in an airtight container for up to three days. For best results, scrape off excess sauce before storing.
The ideal way to reheat is not the microwave, which steams the breading. Use a toaster oven or air fryer at 350°F for about 10 minutes to bring the cutlets back to life and restore the crunch.
Can I Make This Crispy Baked Chicken Parm Penne Ahead of Time?
Yes, but only partially. The best make-ahead strategy is to complete the critical anti-soggy pre-bake (Step 4) completely. Let the crisp cutlets cool fully, and store them airtight in the refrigerator.
Assemble the pasta base and top with the pre-baked cutlets just before you are ready to apply the minimal sauce and cheese for the final Phase 2 bake.
Frequently Asked Questions About Baking Chicken Parm
Is it necessary to use a broiler for the final step?
While the broiler offers a quick, superior melt and beautiful golden browning in just a few minutes, minimizing the time the chicken sits in the sauce, a standard 375°F bake works as well. If baking, ensure you watch it carefully and remove it immediately once the cheese is bubbly to prevent the breading from soaking up moisture.
Can I substitute a different type of pasta for penne?
Absolutely. Alternatives like ziti, rigatoni, or even cavatappi work wonderfully. The key is using a sturdy, tubular pasta that catches the marinara sauce well and provides a solid base for the chicken cutlets.
How do I ensure the chicken is cooked safely?
Always use a reliable meat thermometer. Insert it into the thickest part of the cutlet at the end of the initial 400°F bake (Step 4) to confirm an internal temperature of 165°F before proceeding to the final assembly and cheese melt.
What is the recommended sauce volume per cutlet?
Using minimal sauce is essential for maintaining crispness. Aim for just two tablespoons of sauce placed centrally on the cutlet. This creates enough moisture for the cheese to melt and adhere while keeping the majority of the crucial crisp perimeter dry.
Time to Enjoy Your Irresistibly Crispy Weeknight Masterpiece
This method truly transforms the classic Italian-American dish, guaranteeing you a chicken parm experience where the breading stays beautifully crisp right up to the very last bite. Say goodbye to soggy frustration and hello to guaranteed texture.
If you’re ready to master the perfect baked cutlet, give this recipe a try this week. We’d love to hear how the anti-soggy secret worked for you, so please come back and share your results!
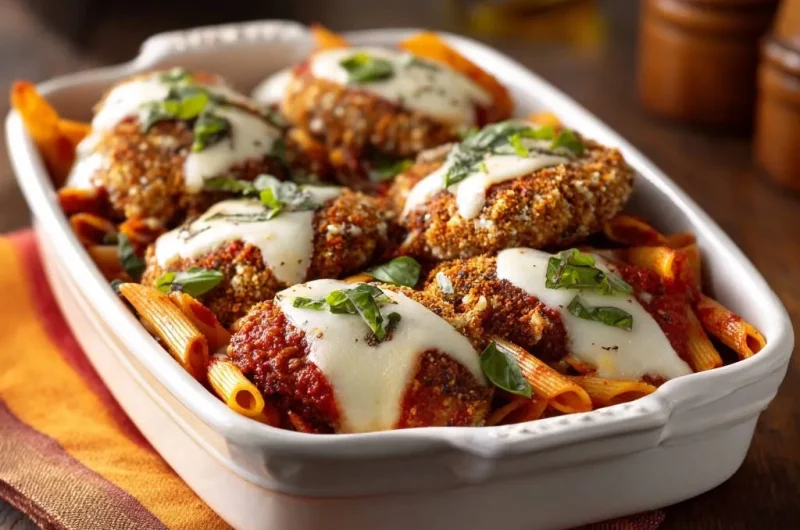
Crispy Baked Chicken Parm Penne
Course: Main CourseCuisine: Italian-AmericanDifficulty: easy4
servings20
minutes30
minutes650
kcal50
minutesNever suffer from soggy chicken parmesan again! This recipe features an easy pre-baking trick that ensures the panko breading remains deeply golden brown and very crisp, even when topped with sauce and cheese. Served family-style over a bed of marinara-tossed penne pasta.
Ingredients
4 Boneless, skinless chicken breast cutlets (about 4 ounces each)
1 cup Panko breadcrumbs (for maximum crispiness)
1/2 cup Grated Parmesan cheese
1 teaspoon Italian seasoning blend
1/2 teaspoon Garlic powder
Salt and black pepper to taste
1/4 cup All-purpose flour
1 large Egg, beaten with 1 tablespoon water
1 cup Marinara sauce (good quality jarred sauce works great)
1/2 pound Penne pasta
4 slices Fresh mozzarella cheese, or 1/2 cup shredded
2 tablespoons Olive oil
Fresh basil leaves, chopped (for garnish)
Directions
- Prepare the chicken cutlets. Preheat your oven to 400 degrees F. Lightly grease a baking sheet with 1 tablespoon of olive oil.
- Set up a standard breading station: Place flour in a shallow dish, the beaten egg mixture in a second dish, and combine the Panko, Parmesan, Italian seasoning, garlic powder, salt, and pepper in a third dish.
- Dredge each chicken cutlet first in the flour (shaking off excess), then dip in the egg wash, and finally coat thoroughly in the seasoned Panko mixture, pressing firmly to adhere. Place the breaded cutlets on the prepared baking sheet.
- The Anti-Soggy Breading Trick: Bake the breaded chicken cutlets in the 400 degree F oven for 15 to 18 minutes, or until they are fully cooked through and the breading is deeply golden brown and very crisp. This step ensures the coating is hardened and dried out before it meets the sauce.
- While the chicken bakes, cook the penne pasta according to package directions until perfectly al dente. Drain the pasta and toss it lightly with about 1/4 cup of the marinara sauce and the remaining 1 tablespoon of olive oil. Spread the sauced pasta evenly across the bottom of a 9×13 inch baking dish.
- Once the cutlets are crisp, remove them from the oven. Reduce the oven temperature to 375 degrees F and switch the setting to broil on medium-high (if your oven allows, otherwise keep it at 375 degrees F).
- Place the crispy chicken cutlets directly over the bed of pasta in the dish. Spoon a small amount of marinara sauce (about 2 tablespoons) onto the center of each cutlet, just enough to cover the top but leaving a crisp border exposed.
- Top each sauced cutlet with a slice or scattering of mozzarella cheese.
- Return the dish to the oven and broil (or bake) for 2 to 4 minutes, watching carefully until the cheese is melted, bubbly, and slightly golden. The short finish time prevents the base of the cutlet from soaking up the sauce.
- Remove from the oven, garnish immediately with fresh chopped basil, and serve hot.
Notes
- Pre-baking the cutlets is the critical anti-soggy step.