There is nothing more frustrating than pulling a cutlet out of the oil only to find the beautiful breading sliding right off the meat, leaving a patchy mess. If you have ever struggled with this common disappointment, this recipe for Crispy Chicken Cutlets with Creamy Onions is your solution.
I rely on three simple, expert prep techniques-including a mandatory resting period-that ensure the coating stays perfectly locked on, yielding the most satisfying, enduring crunch every single time.
The Secret Weapon Against Soggy Cutlets: Why This Recipe Works
The core benefit of this method lies in guaranteeing permanent adhesion between the chicken and the crust, solving the number one frustration of home cooks attempting cutlets or schnitzel.
Beyond the technical perfection, this meal elevates standard fried chicken with the addition of buttery, slow-cooked creamy onions. Their soft, savory sweetness provides the essential contrast needed to balance the intense crispness of the cutlet, resulting in a perfectly layered flavor profile.
Three Non-Negotiable Steps for Perfect Breading Adhesion
Patting Dry is Not Optional: Moisture is the ultimate enemy of flour adherence; if the surface is wet, the flour will turn to paste and slide off during frying. Patting the cutlets completely dry with paper towels creates the necessary blank canvas for the dry coating to stick initially.
The Firm Press Technique: Lightly dipping the cutlet into the breadcrumbs allows for gaps and loose spots. When applying the final coating, firmly press the breadcrumbs into the chicken using the heel of your hand to create a dense, mechanically bonded, tight exterior.
The Crucial 15-Minute Rest: This resting time is the absolute key to success. Allowing the cutlets to rest for 15 to 30 minutes gives the proteins in the egg wash time to bond the flour and crumbs to the chicken surface, setting a rigid crust before it ever hits the hot oil.
Building the Perfect Plate: Ingredients for Cutlets and Creamy Onions
The Foundation: Selecting and Prepping the Chicken
Boneless, skinless chicken breasts are used here because they are lean and easily pounded into uniform cutlets. Pounding them down to 1/4 inch thickness is essential for quick cooking, ensuring the exterior is golden and crisp exactly when the interior reaches 165°F.
If you don’t own a meat mallet, you can easily use the smooth bottom of a small, heavy frying pan or a rolling pin. Always pound the chicken between two sheets of parchment or plastic wrap to keep the process clean.
The Magic Trio: Flour, Egg Wash, and Panko Power
Always season your flour and your breadcrumbs separately, as this ensures flavor penetration at every layer, preventing a bland crust.
Adding a splash of milk or water to the beaten egg wash slightly thins the mixture, preventing the creation of a thick, gummy layer that can cause the breading to separate.
We recommend using panko breadcrumbs over traditional plain crumbs for a more irregular, jagged texture that guarantees optimal crispness and resists oil absorption during shallow frying.
Unlocking the Jammy Flavor of Slow-Cooked Onions
Small gold potatoes are the preferred starch as they roast beautifully, maintaining a creamy interior texture and slightly sweet profile that complements the chicken.
The secret to truly creamy onions is the “low and slow” method, using butter instead of oil to facilitate the softening process. Cooking gently over medium-low heat transforms the onions into a savory, jammy texture without causing rapid browning or crispness.
Essential Tools for Stress-Free Frying and Roasting
Wire Cooling Rack: This tool is critical both for the resting stage and the post-fry drain. Placing the hot cutlets on a wire rack immediately after frying ensures air circulates around the bottom, preventing trapped heat from steaming the crust soggy.
Meat Mallet (or heavy pan): Achieving a uniform thickness of 1/4 inch is paramount for even cooking. This tool ensures your Crispy Chicken Cutlets cook quickly and consistently.
Heavy-Bottomed Skillet (Cast Iron or Stainless Steel): When shallow frying, a stable temperature is necessary. Heavy pans, especially cast iron, retain heat exceptionally well, preventing drastic temperature drops when you add the cold cutlets.
From Prep to Plate: Mastering the Crispy Chicken Cutlets Process
Part 1: Setting Up the Supporting Cast (Potatoes and Onions)
Start the Roast: Preheat your oven to 400°F (200°C). Toss the small gold potatoes with olive oil, salt, and pepper, then roast them for 25 to 30 minutes until they are tender and slightly golden brown.
Cook the Creamy Onions (Low and Slow): Melt the butter in a separate skillet over medium-low heat. Add the very thinly sliced onion and a pinch of salt.
Cook slowly for 10 to 15 minutes, stirring occasionally, until the onions are fully collapsed, translucent, and incredibly soft, having reached a wonderful jammy consistency.
Part 2: The Critical Breading Station Protocol (Following the Adhesion Strategy)
Establish Your Assembly Line: Set up three shallow dishes in order: Dish 1 contains flour seasoned with salt and pepper; Dish 2 holds the beaten eggs whisked with milk; and Dish 3 contains the breadcrumbs mixed with garlic powder and additional seasoning.
Dredge, Dip, and Firmly Press: First, dredge the dry cutlet completely in flour, shaking off all excess. Second, dip it fully into the egg wash, letting any excess drip away before immediately moving it to the breadcrumbs.
Finally, bury the cutlet in the breadcrumbs and use the palm of your hand to firmly press the crumbs deeply into both sides of the meat. This guarantees a dense, protective coating.
The Non-Negotiable Rest: Place all coated cutlets on a clean wire rack set over a baking sheet. Allow them to rest, uncovered, for a minimum of 15 minutes.
This rest time activates the egg proteins, permanently locking the breading onto the cutlet and preventing any peeling once the cutlet is subjected to the high heat of the frying oil.
Part 3: Achieving Gold: Temperature and Timing for Perfect Frying
Preheat the Oil Safely: Pour about 1/2 inch of vegetable oil into your heavy skillet. Heat the oil over medium-high heat until it shimmers slightly or registers around 350°F.
Fry Without Overcrowding: Carefully place only 1 or 2 cutlets into the hot oil at a time; overcrowding dramatically lowers the temperature, leading to greasy cutlets.
Fry for about 2 to 3 minutes per side until the breading is a deep, uniform golden brown and crispy, ensuring the chicken’s internal temperature hits 165°F.
The Final Wire Rack Drain: Immediately remove the finished cutlets and place them on a clean wire rack to drain excess oil. Never place them on paper towels, as they will trap moisture and compromise the crispness.
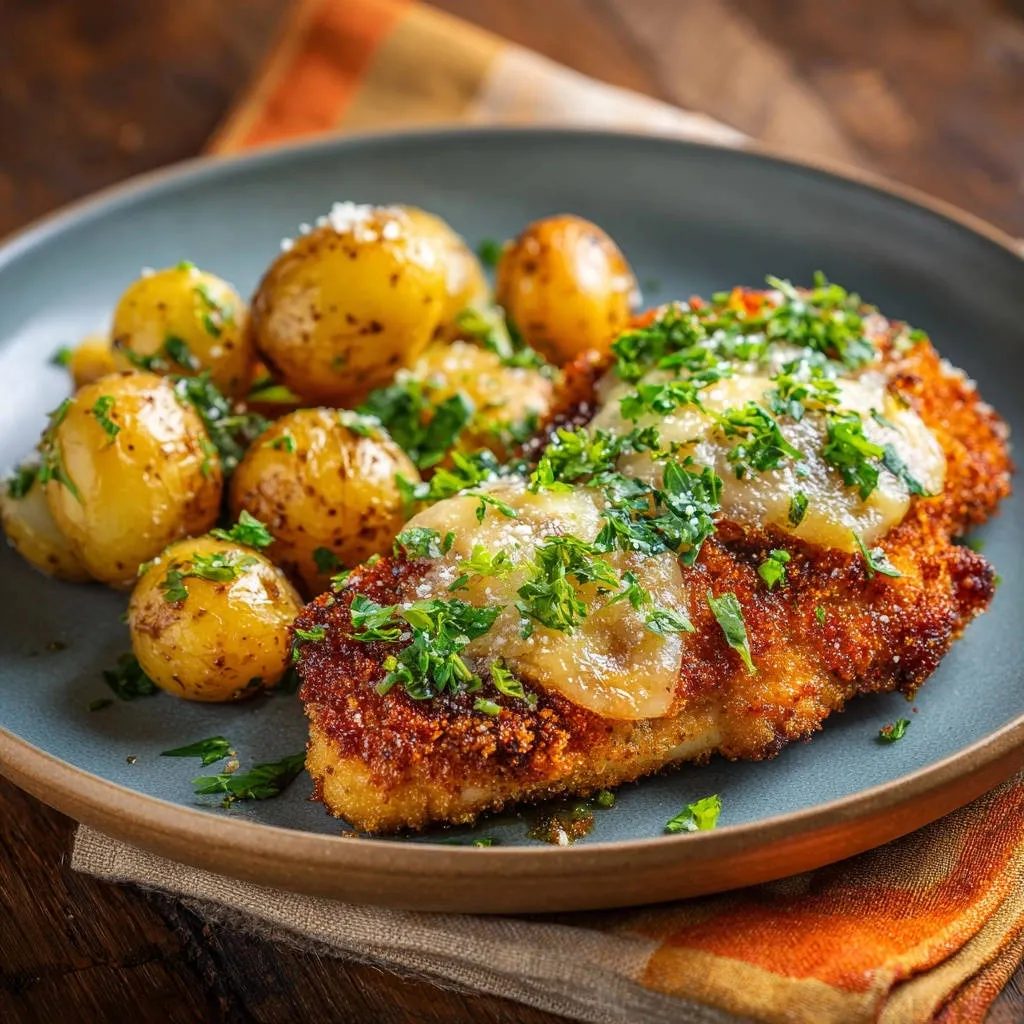
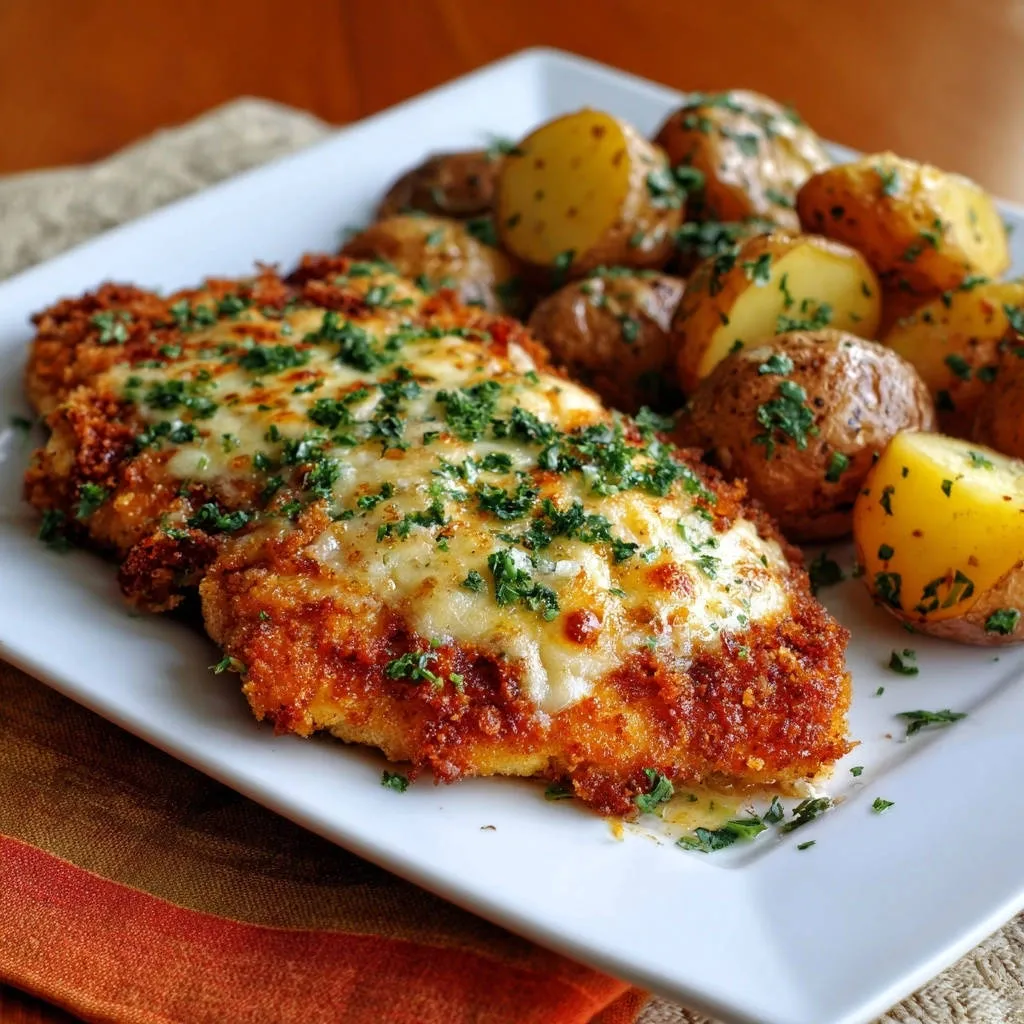
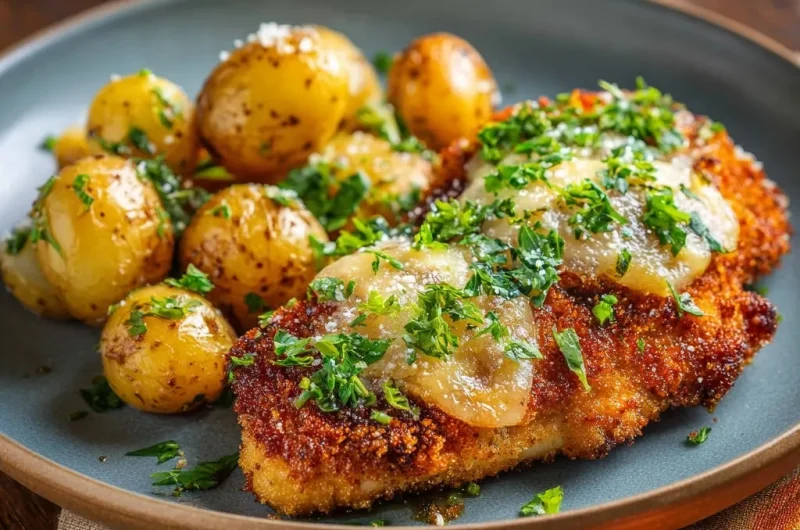
Serving: Serve your perfectly crispy chicken cutlets immediately. Top each one generously with a spoonful of the soft, creamy onions, a sprinkle of fresh chopped parsley, and a light dusting of grated Parmesan cheese alongside the roasted potatoes.
For a similar crispy coating, check out this classic chicken parmesan recipe.
Troubleshooting Your Frying: Common Problems and Quick Fixes
Problem: Breading Peels Off or is Patchy
If the breading separates, the surface of the chicken was likely too wet. Ensure you pat the chicken absolutely dry before applying the flour layer.
For consistently crispy results, consider trying these crispy pan-fried chicken cutlets.
Skipping the crucial 15-minute rest also causes peeling. Without this setting time, the coating is too weak to handle the rapid temperature change upon hitting the hot oil.
What to Serve with Your Crispy Chicken
Round out your meal with these complementary dishes that pair well with crispy chicken.
- For a fresh contrast, try this arugula and seared pear salad, featuring a bright glaze that complements the richness of the chicken.
- Add a tangy kick with spicy jalapeño marinated carrots, offering a zesty counterpoint to the creamy onions.
Problem: Cutlets Are Absorbing Too Much Oil
Oily cutlets are a direct result of the oil temperature being too low, typically below 325°F. The crust needs to seal instantly to prevent the meat from soaking up the fat, so confirm the oil is shimmering hot (around 350°F) before frying.
Overcrowding the pan immediately cools the oil. Always fry in small batches, allowing the oil to recover its temperature between additions.
Problem: Chicken is Burnt Outside, Raw Inside
This common issue means your chicken cutlets were too thick. If they exceed 1/4 inch, the exterior will brown long before the interior reaches a safe temperature of 165°F.
Alternatively, the oil may be too hot (above 375°F). If the oil smokes heavily, reduce the heat immediately to prevent rapid burning while allowing the chicken time to cook through.
Chef’s Corner: Advanced Tips to Elevate Your Cutlets and Creamy Onions
Keeping the Oil Clean and Consistent
Use a fine mesh strainer to actively skim any loose breadcrumbs that float to the surface between frying batches. These stray crumbs will quickly burn, imparting a bitter, acrid flavor to subsequent cutlets and degrading the oil quality.
After removing a batch, always allow the oil temperature to stabilize before adding more cutlets. This brief pause ensures consistent optimal crispness across all portions.
Choosing Your Crunch Factor: Panko vs. Standard Breadcrumbs
While the adhesion method ensures success with any breadcrumb, Panko breadcrumbs provide a distinctly superior texture. Their light, flaky structure creates a much airier, more jagged crust that remains crunchy longer than traditional breadcrumbs.
Flavor Boosters for the Creamy Onions
To add deep complexity to the creamy onions, consider deglazing the pan with a small splash of dry vermouth or chicken broth after the butter melts. Allow the liquid to mostly evaporate before adding the sliced onions, incorporating concentrated flavor into the base.
Meal Planning and Serving: Make-Ahead, Storage, and Pairings
Can I Freeze Coated Cutlets? Storage Tips
The cutlets can be fully prepared and frozen raw, which is an excellent meal-prep technique. Once coated and rested, arrange them on a sheet pan and freeze until solid.
Transfer the frozen cutlets to a freezer bag, separated by parchment paper, and fry them directly from frozen. You will need to add an extra 3 to 4 minutes to the total cooking time.
Reheating Leftovers While Maintaining Maximum Crispness
Never reheat leftover cutlets in the microwave, as steam will instantly ruin the crisp texture. The best method is to reheat them in a preheated oven or air fryer.
Place the cutlets on a wire rack at 375°F (190°C) for 8 to 10 minutes until they are heated through and the crust has reactivated its satisfying crunch.
The Best Sides to Complement the Richness
The richness of the Crispy Chicken Cutlets with Creamy Onions pairs wonderfully with an acidic counterpoint. Try a simple Arugula Salad dressed with a tart lemon vinaigrette.
Alternatively, quickly blanched and seasoned green beans or asparagus offer a light, clean texture that cuts through the savory butteriness of the main dish.
Your Quick Questions Answered: FAQs About Crispy Chicken Cutlets
Can I use an air fryer instead of shallow frying?
Absolutely, the air fryer is a great alternative for reducing fat content. Preheat your air fryer to 380°F (195°C), lightly spritz the coated cutlets with oil spray, and cook for 8 to 10 minutes, flipping halfway.
The resulting texture will be slightly different from shallow frying, but it still provides a highly satisfying crunch.
Is the 15-minute rest absolutely required?
The resting period is the most important step for guaranteeing perfect breading adherence. If time is severely limited, 10 minutes is the absolute minimum, but skipping this step entirely significantly increases the risk of peeling.
What is the best type of oil for shallow frying cutlets?
Vegetable, canola, or peanut oil are the best choices for shallow frying. They all have high smoke points and neutral flavors, ensuring they do not impart unwanted taste to your delicate chicken cutlets.
Ready to Master Your Crispy Chicken Cutlets with Creamy Onions?
Once you implement these easy, expert techniques-especially the critical 15-minute rest-you will never again struggle with peeling, patchy breading or greasy results. This method is the culinary insurance policy you need for consistently perfect results.
Bring these tender, golden Crispy Chicken Cutlets with Creamy Onions to your family table; it is an easy weeknight meal that carries the elegance of a classic European schnitzel but with guaranteed reliability and outstanding flavor.
Crispy Chicken Cutlets
Course: Main CourseCuisine: InternationalDifficulty: medium4
servings45
minutes45
minutes1100
kcal60
minutesThis recipe guarantees non-peeling, super-crispy breading thanks to a crucial 15-minute rest period before frying. Served alongside tender roasted potatoes and sweet, jammy pan-fried onions, this is a satisfying and flavorful main course.
Ingredients
4 boneless skinless chicken breasts, sliced horizontally and pounded thin (about 1/4 inch thick)
1 cup all-purpose flour
2 large eggs, lightly beaten
1 tablespoon whole milk or water (for the egg wash)
2 cups plain breadcrumbs (or panko for extra crisp)
1 teaspoon garlic powder
Salt and freshly ground black pepper
2 cups vegetable oil, for shallow frying
1 pound small gold potatoes
1 tablespoon olive oil
1 medium onion, very thinly sliced
2 tablespoons unsalted butter
1 tablespoon fresh chopped parsley
1/4 cup grated Parmesan cheese (for garnish)
Directions
- Prepare the Potatoes: Preheat oven to 400 degrees F. Toss the potatoes with 1 tablespoon of olive oil, salt, and pepper. Roast for 25 to 30 minutes until tender and golden brown. Set aside and toss with a sprinkle of parsley just before serving.
- Prep the Chicken (The Adhesion Solution): Lay the pounded chicken cutlets on paper towels and pat them completely dry. This is essential to help the flour adhere. Season both sides generously with salt and pepper.
- Set Up the Breading Station: Prepare three shallow dishes.
- Dish 1: Flour mixed with 1/2 teaspoon of salt and 1/4 teaspoon pepper.
- Dish 2: Eggs whisked with 1 tablespoon of milk or water (this thins the glue slightly).
- Dish 3: Breadcrumbs mixed with garlic powder, 1/2 teaspoon salt, and 1/4 teaspoon pepper.
- Dredge and Press: Working one cutlet at a time, first dredge completely in the flour, shaking off excess. Second, dip fully into the egg mixture, allowing excess to drip off. Third, bury the cutlet in the breadcrumbs. Here is the trick: firmly press the breadcrumbs into the chicken on both sides using the palm of your hand. You want a tight, dense coating.
- REST (Crucial Step): Place the coated cutlets on a wire rack set over a baking sheet. Let them rest uncovered for at least 15 minutes, or up to 30 minutes in the refrigerator. This rest time allows the egg proteins to bond the flour and crumbs to the chicken, preventing peeling when they hit the hot oil.
- Cook the Onions: While the chicken rests, melt butter in a small skillet over medium heat. Add the sliced onion and a pinch of salt. Cook low and slow for about 10 to 15 minutes, stirring occasionally, until the onions are very soft, jammy, and slightly translucent. Keep warm.
- Fry the Cutlets: Heat the vegetable oil in a large skillet (it should be about 1/2 inch deep) over medium-high heat until it shimmers (about 350 degrees F). Carefully place 1 or 2 cutlets in the hot oil (do not overcrowd the pan). Fry for about 2 to 3 minutes per side until the breading is deep golden brown and crispy and the internal temperature reaches 165 degrees F.
- Serve: Remove the cutlets and place them immediately on a clean wire rack to drain excess oil. Serve immediately alongside the roasted potatoes, topped with a generous spoonful of the soft, creamy onions, a sprinkle of fresh chopped parsley, and a dusting of Parmesan cheese.
Notes
- The 15-minute rest period for the coated cutlets is essential for successful breading adhesion and maximum crispness.