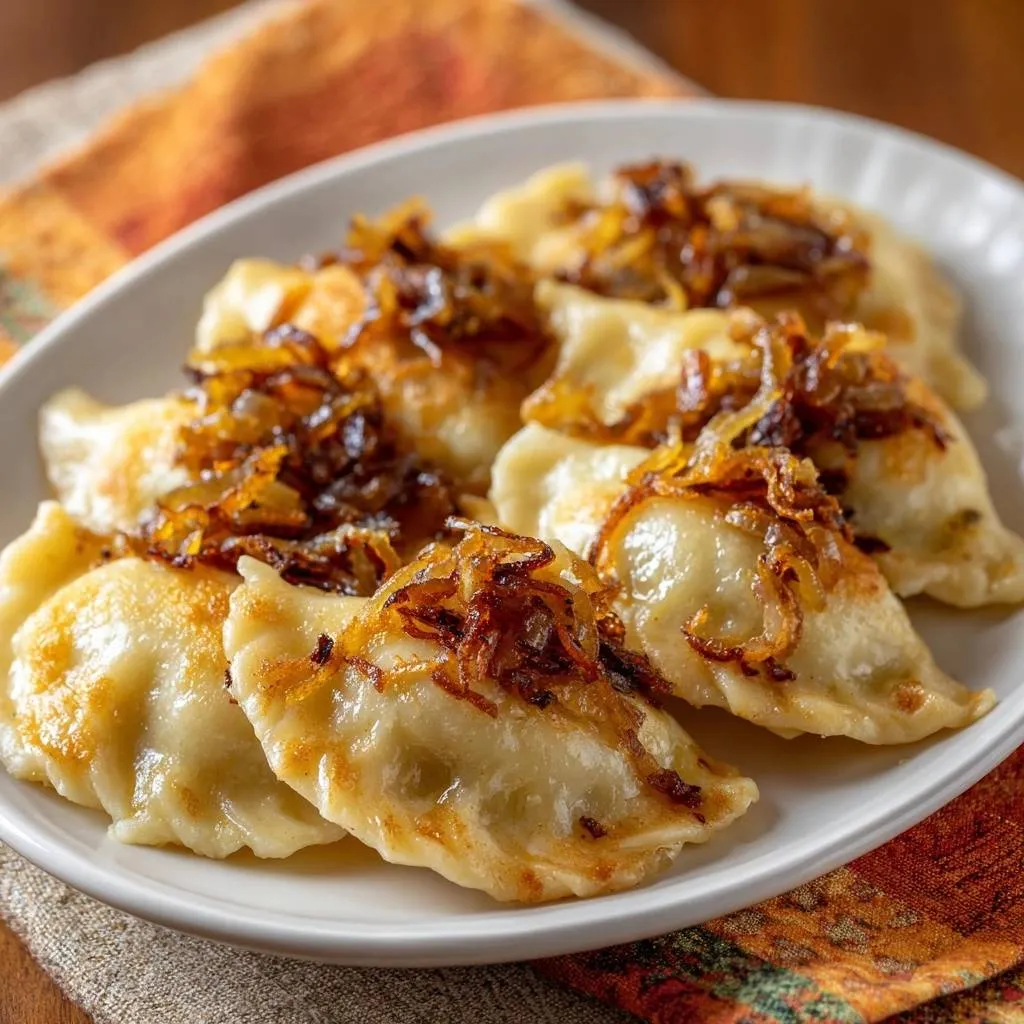
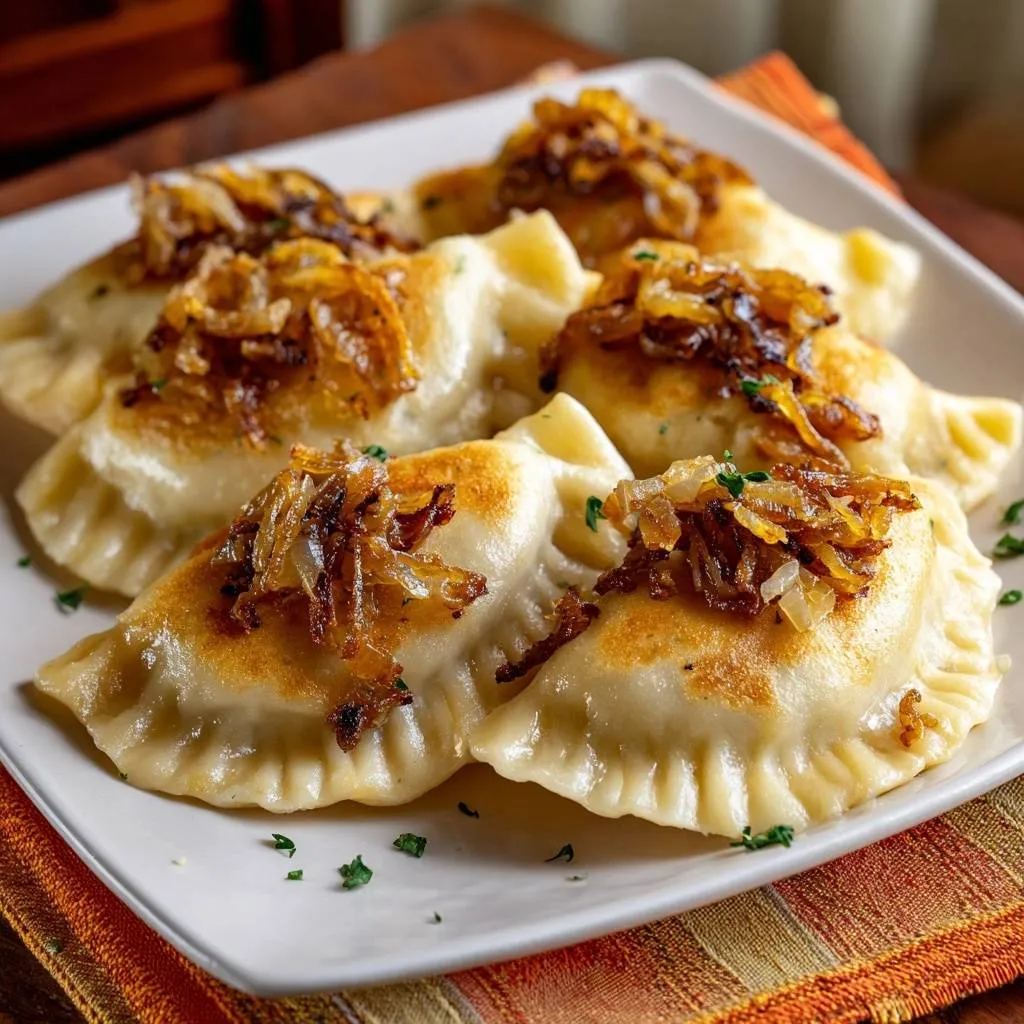
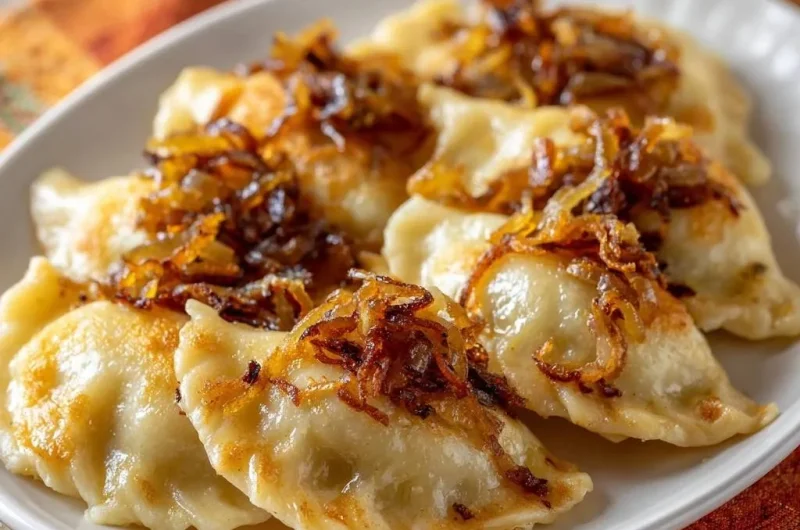
Homemade pierogi always promise that perfect bite of crispy outside and creamy filling inside. But too often, they end up soggy and limp right after frying. This Crispy Pan-Fried Potato Cheese Pierogi recipe changes everything with one game-changing drying step that locks in golden edges every time.
Therefore, you get tender potato cheese dumplings that hold their shape without steaming in the pan. In addition, the total time clocks in around an hour for authentic Polish comfort food. Imagine the crunch giving way to warm, cheesy goodness.
Here’s the expertise booster: after boiling, pat those pierogi completely dry on towels for five minutes. That simple move evaporates surface moisture. As a result, your pan-fry delivers deep golden crispness instead of mush.
Understanding Pierogi Dough Foundations
Selecting Flour for Elastic Texture
All-purpose flour works best here because its protein content around 10-12% creates just the right chewiness. Bread flour gets too tough with higher gluten, so stick to all-purpose. Meanwhile, warm water hydrates it evenly for smooth gluten development.
The room-temperature egg binds everything tightly. Therefore, it prevents cracks during rolling. If your dough feels off, add flour one tablespoon at a time to hit that elastic sweet spot.
Kneading Technique for Smooth Results
Start in a large bowl with flour and salt, then beat in the egg and warm water. Turn it onto a floured surface and knead for 5-7 minutes. You’ll feel it transform from shaggy to smooth and springy.
However, if it’s sticky, sprinkle flour sparingly. The rest for 30 minutes relaxes the gluten, so your potato cheese dumplings dough rolls thin without tearing. Test doneness with the windowpane method: stretch a piece thin enough to see light through without breaking.
Building Creamy Potato Cheese Filling
Boiling Potatoes to Perfect Mash
Grab starchy russets, about 1 pound, and dice them into even 1-inch pieces for quick, uniform cooking. Boil in salted water until fork-tender, around 10 minutes. Drain well, then mash hot for the smoothest texture.
For a similar satisfying potato topping, check out Shepherd’s Pie with No-Sinking Mash.
Avoid overworking, or they turn gummy. Salt goes in now for even seasoning. This base sets up a fluffy filling that pairs perfectly with cheese.
Sautéing Onions for Depth
Finely chop one small onion so it melts into the filling without big chunks. Melt 1 tablespoon unsalted butter over medium heat. Cook until soft and fragrant, about 5 minutes, but keep it low to avoid browning too soon.
Therefore, you get sweet depth that boosts the cheese. Add pepper to taste; it cuts the richness. Ricotta swaps fine for farmer’s cheese if needed.
Cheese Crumbling and Mixing Method
Farmer’s cheese crumbles easily for lump-free mixing, unlike ricotta which can get watery. Stir it into the warm mashed potatoes with the onions. Taste and adjust salt right away.
However, cool the filling completely before using. This prevents dough tears when filling your crispy pan-fried pierogi. Pro tip: make extra and freeze for quick meals.
Science of Crispy Pan-Fried Pierogi Texture
Why Boiling Precedes Frying
Boiling gelatinizes the starch in the dough for a tender chew. Drop them into salted boiling water in batches; they float after 2-3 minutes, signaling air pockets and doneness. Scoop with a slotted spoon right away.
In addition, this step sets the structure. Without it, frying alone leaves dense, raw dough. Now they’re prepped for crispiness.
Critical Drying Step Removes Moisture
Boiled pierogi release surface starch and water that turns to steam in the pan, causing sogginess. Spread them in a single layer on clean kitchen towels. Pat the tops dry with more towels, then air-dry 5 minutes.
This crispy pan-fried potato cheese pierogi trick lets the Maillard reaction happen for golden crunch. I’ve skipped it before and regretted the mush; don’t you. Test it side-by-side next time.
For another chance at a great crust, explore skillet chicken pot pie.
High-Heat Frying for Golden Crust
Heat butter in a skillet until it foams, signaling high enough temp without burning. Add pierogi in a single layer. Fry undisturbed 3-4 minutes for deep golden bottoms.
Flip and cook 2 more minutes. Therefore, even browning builds flavor from the fond. Work in batches to keep heat steady.
Equipment Choices for Pierogi Success
Best Rolling Pin and Surface
A wooden rolling pin grips the dough better than marble for even pressure. Dust your surface lightly with flour to prevent sticking. Roll to exactly 1/8-inch thick; use a ruler if needed.
Cut 3-inch circles with a cookie cutter or glass. Re-roll scraps efficiently for 30-40 pierogi. Precision here means uniform cooking.
Skillet Types for Even Crisping
Cast iron holds heat like a champ for steady crisping, while nonstick eases flipping. Wipe the skillet clean after onions to avoid burnt bits. Grab a slotted spoon for boil drainage.
These choices make success foolproof. No fancy gear required.
Step-by-Step: Assembling and Sealing Pierogi
Rolling Dough to Uniform Circles
Divide rested dough in half for easier handling. Roll each on a floured surface to 1/8-inch. Cut 3-inch circles quickly to minimize drying.
Therefore, you get about 30-40 pierogi. Re-roll scraps once; more toughens them. Keep extras covered.
Filling, Folding, and Fork-Sealing
Scoop 1 teaspoon filling per circle; too much causes bursts. Fold over and pinch edges tightly. Press with fork tines for an airtight seal.
However, pinch out air bubbles first. This prevents leaks during boiling. They’ll look like perfect half-moons ready to cook.
Mastering the Boil-to-Fry Process
Batch Boiling Without Crowding
Boil in a large pot of well-salted water like pasta. Add 8-10 pierogi per batch max. Cook 2-3 minutes until floating.
Scoop immediately with slotted spoon. Repeat quickly. Salty water seasons the dough inside.
Pat-Dry Technique in Detail
Lay boiled pierogi single-layer on towels. Pat both sides dry, then let sit 5 minutes. Scale up with multiple towels for big batches.
This step recaps the moisture removal magic. Your reward is pure crunch.
Caramelizing Onions for Pierogi Topping
Slow-Cook Method for Sweetness
Thinly slice two large onions evenly for uniform cooking. Melt 2 tablespoons butter over medium-low with a pinch of salt. Stir occasionally 10-12 minutes.
Watch colors shift from pale to deep gold; patience prevents burning. The sweet aroma fills your kitchen. Perfection for topping.
Butter Quantity and Skillet Prep
Use divided butter to time it right: onions first, then pierogi. Transfer onions to a bowl. Wipe skillet before final fry.
This keeps pierogi crisp, not soggy. Reheat onions gently if needed.
Frying Pierogi to Crispy Perfection
Medium-High Heat Butter Sear
Melt 1 tablespoon butter until foaming. Add dried pierogi single-layer. Sear 3-4 minutes undisturbed for crisp bottoms.
Flip, cook 2 minutes. Rotate batches evenly. Oh man, that sizzle promises gold.
Plating with Hot Onions
Top hot pierogi with warm caramelized onions right away. Sprinkle salt finish. Serve on a big platter family-style.
The warmth transfers perfectly. Dig in steaming hot.
Pierogi History and Polish Traditions
Origins in Eastern Europe
Pierogi trace to ‘piruhi’ in medieval times, stuffed with whatever was around. Potatoes and cheese became peasant staples after New World imports. Regional twists abound, from sweet to savory.
However, pan-fried versions highlight that crispy edge. They’re comfort elevated.
Family Recipes and Festive Roles
Christmas Eve calls for boiled ‘uszy’ shapes, but everyday frying rules. Families pass down tweaks for perfect filling. Modern crisping keeps the tradition alive.
It’s all about gathering over plates of these gems.
Avoiding Common Pierogi Pitfalls
Preventing Dough Tears and Leaks
Overfilling shows as bulging edges; use less. Under-kneaded dough tears easily, so knead fully. Test fork seals by gently boiling one first.
Pinch tighter next time. Solid seals mean no leaks.
Fixing Undercooked or Soggy Results
Short boils leave doughy centers; time to float. Skipping dry leads to steam-sog. Rescue with extra frying.
Burnt onions? Lower heat next batch. Easy fixes keep you winning.
Flavor Variations for Potato Cheese Pierogi
Cheese and Herb Swaps
Sharp cheddar adds bite over mild farmer’s. Goat cheese brings tang. Snip in dill or chives for fresh pop.
Vegan? Blend soaked cashews smooth. Endless tweaks.
Filling Add-Ins for Twist
Mushrooms sautéed deep add umami. Sauerkraut gives tang without overpowering. Keep spices mild to let potato shine.
Mix and match freely.
Make-Ahead and Freezing Pierogi
Parboil and Freeze Strategy
Boil, dry, then flash-freeze single-layer on a sheet. Bag up to 3 months. Fry from frozen, adding a minute.
No thawing needed. Weeknight hero.
Dough and Filling Prep Schedules
Fridge dough 24 hours ahead. Filling lasts 2 days sealed. Batch big for 60+ pierogi.
Prep once, eat for days.
Pairing Sides with Crispy Pierogi
Simple Salads and Veggies
Cucumber dill salad cuts richness with crunch. Braised cabbage adds earthiness. Sour cream dollop is tradition.
Complementary Dishes
Continue your comforting potato and cheese experience with these other satisfying dishes.
- If you’re craving more cheesy potato goodness, try the Loaded Cheesy Potato Casserole for a rich and creamy addition.
- For another take on baked potatoes with plenty of cheese, consider the Cheesy Potato Casserole with Crispy Fried Onions, offering a delightful crunch.
Light and balanced.
Beverage and Relish Matches
Herbal tea warms it up. Kefir brings tang. Pickle spears add acidity pop.
Perfect complements.
Troubleshooting Crispy Pan-Fried Potato Cheese Pierogi
Dough Too Tough or Sticky?
Tough means over-kneaded or cold rest; let it relax longer. Sticky from too much water? Add flour gradually. Use all-purpose always.
Filling Too Dry or Runny?
Dry from over-mashed potatoes; mash less. Runny cheese? Crumble drier types. Adjust with potato moisture.
Onions Not Caramelizing?
High heat burns them; stay medium-low. Thick slices cook uneven. Salt early draws moisture.
Pierogi Sticking to Pan?
Skimped butter or dirty skillet. Wipe clean, use full amount. Hot enough pan helps release.
Not Crispy Enough After Frying?
Skipped drying or low heat. Pat thoroughly, crank medium-high. Extra minute undisturbed fixes it.
FAQ
How do I store leftover Crispy Pan-Fried Potato Cheese Pierogi?
Cool completely, then store in an airtight container in the fridge up to 3 days. Reheat in a hot skillet with butter for crisp revival; microwave softens them. They freeze well post-boil and dry: single-layer flash-freeze, then bag for 3 months. Fry from frozen, no thaw needed, adding 1-2 minutes per side.
Why are my pierogi soggy after frying?
Surface moisture from boiling steams them in the pan, blocking crisp Maillard browning. Always pat dry thoroughly on towels for 5 minutes both sides. If skipped, refry in fresh hot butter 2-3 minutes per side to rescue. Medium-high heat and single-layer batches prevent steaming too.
Can I substitute the farmer’s cheese in potato cheese pierogi?
Yes, ricotta works but drain it first to avoid watery filling; crumble dry cottage cheese as another swap. For sharper flavor, use cheddar shredded fine. Vegan option: blend soaked cashews with salt and lemon for creamy texture. Taste before filling to balance salt.
Why is my pierogi dough tough or tearing?
Under-kneading or no rest makes it inelastic; knead 5-7 minutes to smooth, rest 30 minutes for gluten relax. Over-resting dries it out, so cover well. Roll to exact 1/8-inch; thicker tears less. Add water 1 teaspoon if crumbly, flour if sticky.
How do I make pierogi ahead for a crowd?
Prep dough and filling separately: dough fridge 24 hours, filling 2 days. Assemble, boil, dry, flash-freeze all. Yields 30-40; double for parties. Fry day-of from frozen in batches. Caramelize onions fresh for best flavor.
Can I bake pierogi instead of frying?
Bake at 425°F on parchment with oil brush after boiling and drying, 15-20 minutes flipping halfway. They crisp less than pan-fried but golden edges form. Brush extra oil for better results; watch closely to avoid drying out the filling.
Potato Cheese Pierogi
Course: Main CourseCuisine: PolishDifficulty: medium4
30 pierogi45
minutes30
minutes350
kcal60
MinutesHomemade pierogi often turn out soggy and limp after frying. This recipe fixes that forever with one simple drying step before the pan fry, guaranteeing crispy golden edges and tender filling every time.
Ingredients
Dough:
3 cups all-purpose flour
1 large egg
3/4 cup warm water
1/2 teaspoon salt
Filling:
2 medium potatoes, peeled and diced (about 1 lb)
1 small onion, finely chopped
4 oz farmer’s cheese or ricotta, crumbled
2 tablespoons butter
Salt and pepper to taste
Topping and frying:
2 large onions, thinly sliced
4 tablespoons butter, divided
Salt to taste
Directions
- Make the dough: In a large bowl, mix flour and salt. Add egg and warm water. Knead 5-7 minutes until smooth and elastic (not sticky; add flour 1 tablespoon at a time if needed). Wrap in plastic and rest 30 minutes.
- Cook the filling: Boil potatoes until tender, 10 minutes. Drain and mash. In a skillet, melt 1 tablespoon butter over medium heat, saute chopped onion until soft, 5 minutes. Mix into mashed potatoes with cheese, salt, and pepper. Cool.
- Roll and fill: Divide dough in half. Roll each to 1/8-inch thick on floured surface. Cut 3-inch circles. Place 1 teaspoon filling in center, fold and pinch edges tightly to seal (use fork for extra seal). Repeat.
- Boil pierogi: Bring large pot of salted water to boil. Add pierogi in batches (do not crowd). Boil 2-3 minutes until they float. Scoop out with slotted spoon.
- Anti-soggy trick (the game-changer): Spread boiled pierogi on clean kitchen towels or paper towels in single layer. Pat tops dry thoroughly with more towels, 5 minutes. This removes surface moisture so they crisp up perfectly without steaming in the pan.
- Fry onions: In large skillet, melt 2 tablespoons butter over medium-low heat. Add sliced onions and pinch of salt. Cook 10-12 minutes, stirring occasionally, until deep golden and caramelized (do not rush or they burn). Remove to bowl.
- Crisp the pierogi: Wipe skillet clean. Add remaining 1 tablespoon butter over medium-high heat until foaming. Add pierogi in single layer (work in batches). Fry undisturbed 3-4 minutes until deep golden and crispy on bottom. Flip and fry 2 minutes more. Top with caramelized onions. Serve hot.
Notes
- The anti-soggy trick is key: dry boiled pierogi thoroughly on towels before frying to ensure they crisp up perfectly without steaming.