Few things in the kitchen feel as devastating as spending an hour crafting a beautiful batter, only to have your cake emerge from the oven in three jagged pieces. You flip the pan with bated breath, but the intricate design stays stuck to the metal while the center of the cake collapses onto the cooling rack. It’s a heartbreak every baker knows, but it’s also entirely preventable with the right strategy.
This lemon zest bundt cake isn’t just about that bright, citrus punch; it’s a masterclass in structural integrity and release. We’re aiming for a tight, velvety crumb that holds its shape under a thick, opaque glaze. The texture is substantial yet tender, offering a moist mouthfeel that lingers long after the first bite. You’ll notice the aroma of fresh oils from the zest filling your kitchen before the timer even goes off.
For a taste of warming spices, explore the old-fashioned gingerbread cake.
The secret to this success lies in a homemade “cake goop” that creates a physical barrier between the batter and the pan. While many rely on store-bought sprays, they often contain lecithin that builds up over time and actually causes sticking. By whisking together a simple paste of flour, oil, and butter, you ensure every nook and cranny of your decorative pan is shielded, allowing the cake to slide out with its sharp edges perfectly intact.
For another rich chocolate treat, try this moist chocolate bundt cake.
The Physics of the Perfect Bundt Release
When you bake a cake in a bundt pan, you’re dealing with a massive amount of surface area compared to a standard round tin. As the sugar in the batter heats up, it undergoes caramelization, essentially turning into a delicious but very sticky glue. If that sugar makes direct contact with the metal, it bonds to the surface. Steam also plays a role; as the cake cools, moisture can get trapped between the crust and the pan, making the exterior soft and prone to tearing.
Our “cake goop” solves this by providing a triple-threat defense. The melted butter adds flavor and helps with browning, while the neutral oil provides a high-heat “slip” that doesn’t dry out during the long bake time. Finally, the flour suspended in the fats creates a microscopic physical wall. This mixture fills the tiny pores of the cast aluminum, ensuring the caramelized sugars have nothing to grab onto.
Unlike commercial sprays that can pool in the bottom of the ridges, this paste stays exactly where you brush it. You want to use a pastry brush to paint the mixture into every single groove. If you see a puddle of oil at the bottom, you’ve used too much; if the metal is shining through, you’ve used too little. A thin, even coat is the key to a professional, sharp-edged finish.
Essential Components for a Bright Lemon Crumb
To get that signature bright flavor and a crumb that doesn’t crumble the moment you slice it, ingredient temperature and quality are paramount. I always insist on room temperature eggs. Cold eggs will seize the creamed butter, causing the batter to break and resulting in a heavy, dense cake. When eggs are at room temperature, they emulsify smoothly, trapping the air bubbles you worked so hard to create during the creaming process.
Complementary Sweet Treats
Round out your meal with these delightful breakfast classics that pair wonderfully with sweet baked goods.
- For a perfect morning treat alongside your cake, consider making these fluffy diner-style pancakes, known for their pillowy texture.
- If you’re after that ultimate fluffiness, these fluffy golden pancakes offer a similar comforting appeal.
The combination of sour cream and whole milk is a deliberate choice for texture. Sour cream is thick and acidic, which helps break down long gluten strands. This results in a cake that is incredibly tender but still sturdy enough to support a heavy glaze. While milk provides the necessary hydration, the fat content in the sour cream ensures the cake stays moist for days rather than drying out by the next morning.
Never reach for the bottled lemon juice here. Freshly zested lemons contain essential oils that provide a complex, floral citrus profile that extracts simply cannot mimic. We use all-purpose flour instead of cake flour because this is a large, heavy cake. We need the protein structure of all-purpose flour to hold up the height of the bundt and the weight of the thick cream glaze without the cake collapsing under its own richness.
Sourcing and Preparing Your Citrus
When you’re at the grocery store, look for lemons that feel heavy for their size. A heavy lemon usually indicates a thinner skin and more juice inside. Give them a gentle squeeze; they should have a little give. If they’re hard as rocks, they’ll be difficult to juice and likely lack flavor.
Before you start zesting, give your lemons a good scrub under warm water. Most supermarket citrus is coated in a thin layer of food-grade wax to preserve freshness, which can dull the flavor of your zest. Use a microplane to take off only the yellow part of the skin. Stop as soon as you hit the white pith, as that layer is incredibly bitter and will ruin the sweetness of your batter.
Step-by-Step: Mastering the Lemon Zest Bundt Cake
The first phase is the creaming method, and it’s where most people rush. You need to beat the butter and sugar for a full 3 to 5 minutes. You’re looking for the mixture to turn almost white and look noticeably aerated. This process creates millions of tiny air pockets that the baking powder will later expand. If you don’t cream long enough, your cake will be flat and oily.
Once you begin adding your eggs and sour cream, do it slowly. You’re essentially creating an emulsion. If the batter starts to look curdled or “broken,” don’t panic. Add a tablespoon of your flour mixture to help it come back together. The goal is a smooth, pale yellow base that looks like thick custard before the dry ingredients ever touch the bowl.
When it’s time for the flour and milk, use the “Dry-Milk-Dry” alternation. Start with a third of the flour, then half the milk, and repeat. This technique prevents the batter from becoming saturated with liquid, which can lead to over-mixing. You want to mix on the lowest speed just until the white streaks of flour disappear. Over-mixing at this stage develops too much gluten, turning your tender cake into something resembling bread.
Before the pan goes into the oven, give it three sharp taps on the counter. You’ll see tiny bubbles rise to the surface and pop. This prevents “tunneling,” those large, unsightly holes that can appear in the middle of your cake slices. Smoothing the top with a spatula ensures the cake rises evenly, giving you a flat base once it’s inverted.
The Ten-Minute Cooling Window
Timing the release is the most stressful part of bundt baking, but there is a “Goldilocks” zone. You must let the cake sit in the pan for exactly 10 minutes. During this time, the cake’s structure firms up as it slightly pulls away from the edges of the pan. If you flip it immediately, the cake is too fragile and will likely break apart under its own weight.
However, if you wait too long, the cooling sugar will begin to act like cement. After 10 minutes, give the pan a gentle side-to-side shake. You should feel the cake “thump” against the sides, indicating it’s completely loose. If it doesn’t move, let it sit for another two minutes, then try the shake again. Once it’s free, place your wire rack over the pan and flip it in one confident motion.
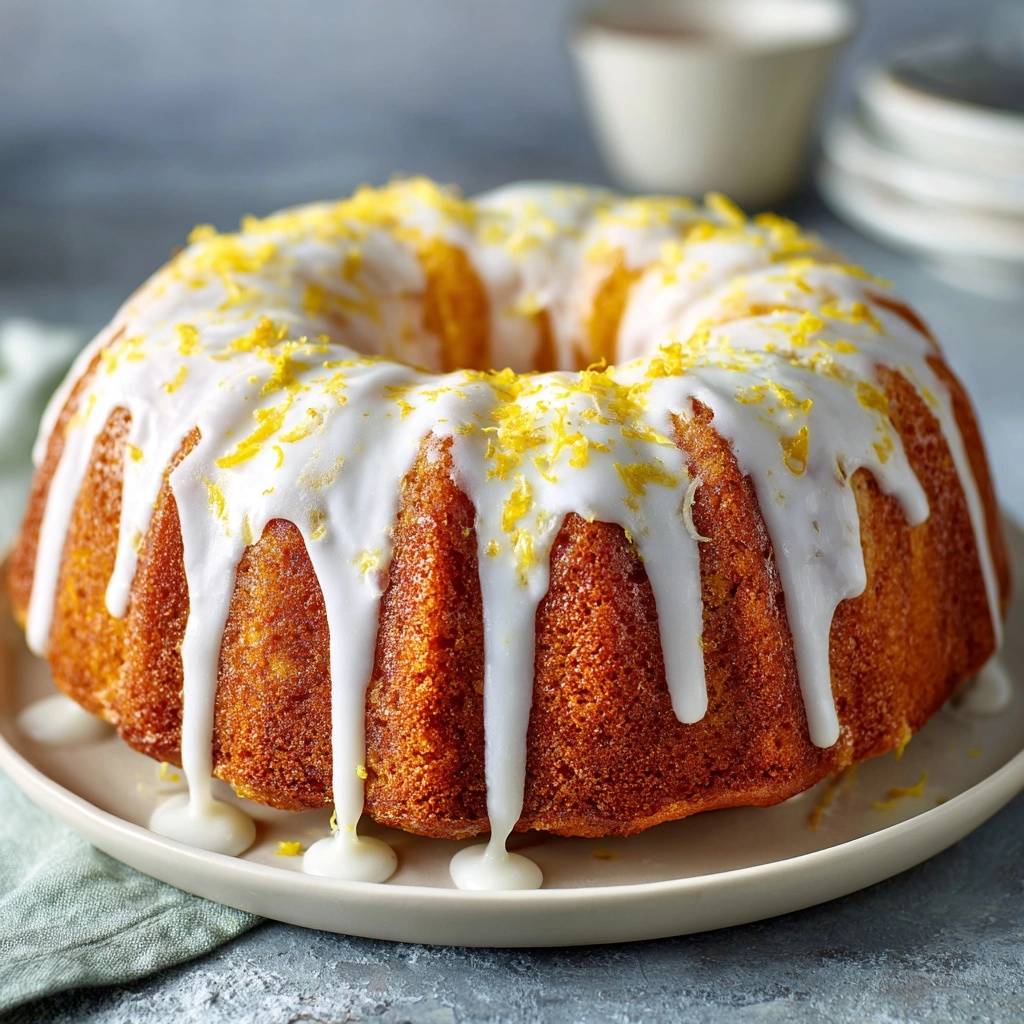
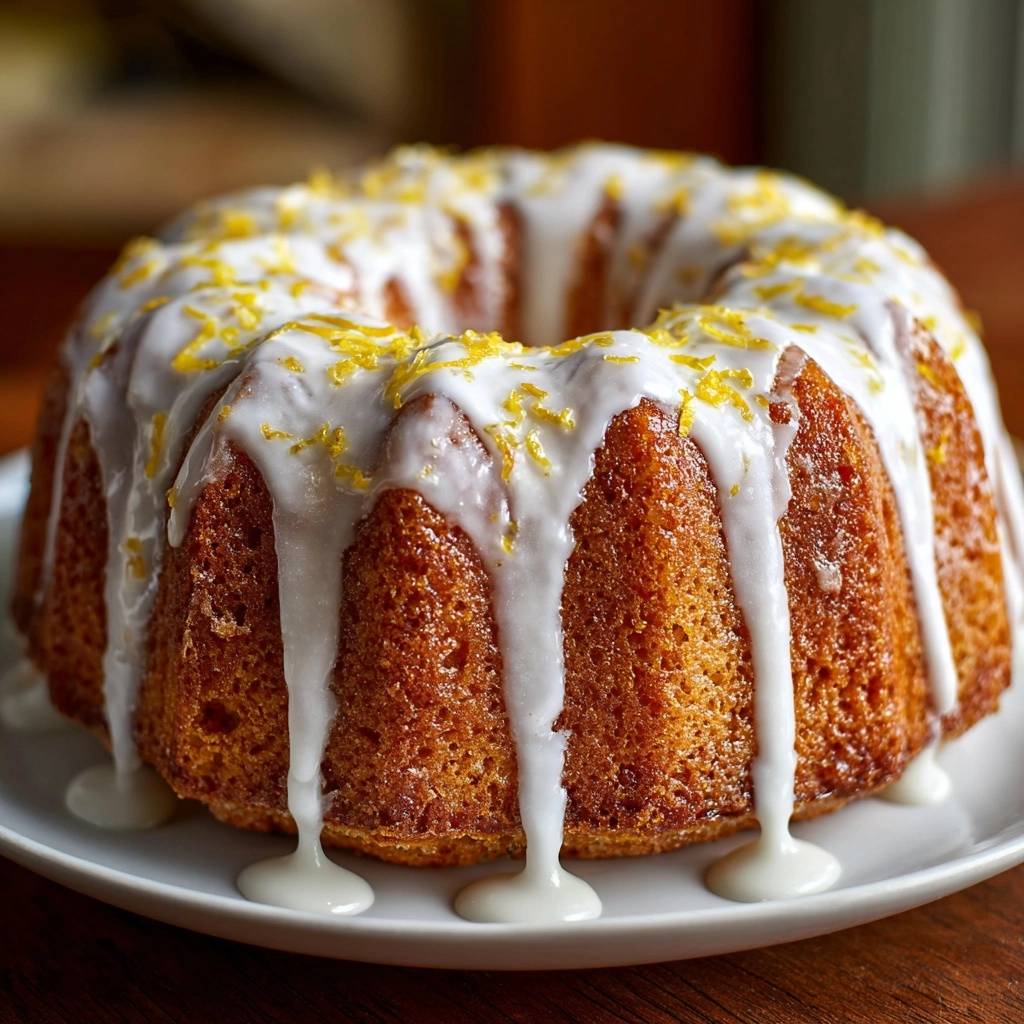
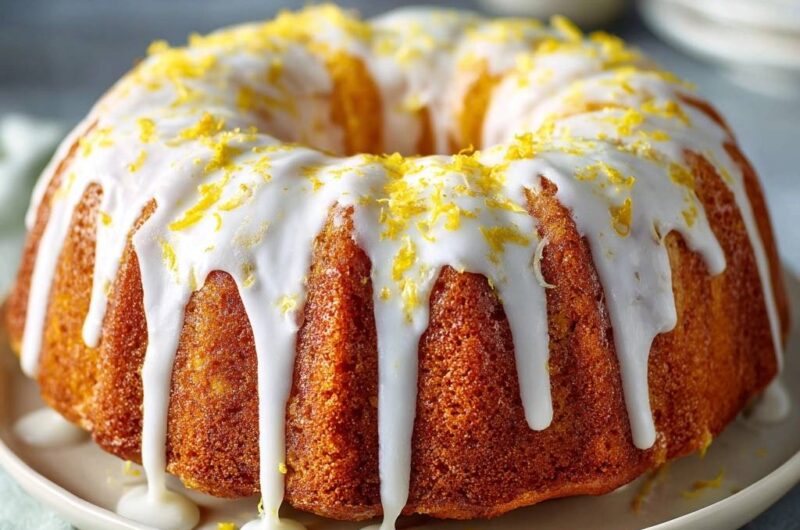
Achieving the Opaque White Glaze Aesthetic
A great lemon cake deserves a glaze that looks as good as it tastes. To get that stark, opaque white look, we use heavy cream instead of milk or water. The higher fat content in the cream prevents the sugar from becoming translucent. You want a consistency that mimics white school glue. It should be thick enough to hold its shape when it drips down the sides of the cake.
If your glaze is too runny, it will simply soak into the cake, leaving it soggy and looking “wet” rather than frosted. Always wait until the cake is completely cool to the touch before glazing. If the cake is even slightly warm, the glaze will melt and run right off the plate. Drizzle it slowly over the highest points of the ridges and let gravity do the work for that perfect, professional drip.
Troubleshooting Common Bundt Baking Hurdles
If you cut into your cake and find large tunnels, you likely over-mixed the batter or didn’t tap the pan well enough. Next time, be more aggressive with the counter taps. If the bottom of your cake (the part facing up in the pan) looks gummy or “soggy,” it’s often due to under-baking. Bundt cakes are dense; always use a long skewer to check the very center, as the top can look done while the middle is still tacky.
Sometimes, despite your best efforts, a small “bald spot” might occur where a piece of the crust sticks to the pan. Don’t worry! You can carefully peel that piece out of the pan and press it back onto the cake while it’s still warm. The sugar will act as a natural glue, and once you pour that thick white glaze over the top, no one will ever know it was there.
If you notice the top of the cake browning too quickly in the oven, loosely drape a piece of aluminum foil over the pan. This “tents” the cake, allowing the center to finish cooking without scorching the delicate citrus oils on the surface. Lemon zest can turn bitter if it’s burnt, so keeping that golden-brown crust protected is vital for the best flavor profile.
Equipment: Why Heavy-Gauge Pans Matter
The quality of your pan is just as important as the ingredients. Thin, dark tin pans absorb heat too quickly, which often leads to over-browned exteriors and raw centers. I highly recommend a heavy-gauge cast aluminum pan. These pans distribute heat evenly, ensuring the cake rises at a steady rate and develops a beautiful, thin crust that holds the detail of the mold.
A good pastry brush is also a non-negotiable tool for this recipe. Silicone brushes are okay, but a natural bristle brush or a high-quality synthetic one allows you to really work the “cake goop” into the tight corners of the pan. If you can’t reach the bottom of a deep ridge with your brush, the cake will likely stick in that exact spot.
Preserving Freshness and Storage Techniques
Because of the sour cream and lemon juice, this cake has a high moisture content. It stays fresh at room temperature for about three days if kept under a cake dome or wrapped tightly in plastic wrap. Avoid refrigerating the cake if possible; the cold air in a fridge tends to pull moisture out of the crumb, making it feel dry and crumbly even though the fat content is high.
If you want to save some for later, this cake freezes beautifully. I recommend freezing individual slices on a parchment-lined tray until firm, then wrapping them in plastic wrap and foil. When a citrus craving hits, just let a slice thaw on the counter for about 30 minutes. The glaze might lose a bit of its shine, but the flavor and texture of the cake will remain perfectly intact.
Frequently Asked Technical Questions
Can I substitute Greek yogurt for sour cream?
Yes, you can use full-fat Greek yogurt as a 1:1 substitute for sour cream. However, make sure it is not “non-fat” or “low-fat,” as the cake needs that specific fat content to maintain its tender crumb. The acidity in Greek yogurt will still react with the baking soda to provide lift and tenderness, though the final result may be slightly tangier than the original version.
Why did my glaze turn translucent?
Translucent glaze usually happens for two reasons: the cake was too warm when you applied it, or the ratio of liquid to sugar was too high. If the glaze looks clear, whisk in more powdered sugar, one tablespoon at a time, until it reaches a thick, paste-like consistency. Remember, it should look like heavy white glue. Using heavy cream instead of milk also provides the fat solids needed for that bright white, opaque finish.
Can I use bottled lemon juice?
I strongly advise against using bottled lemon juice for this recipe. Bottled juice is pasteurized and often contains preservatives that give it a muted, slightly metallic aftertaste. Since lemon is the primary flavor profile here, you need the bright, sharp acidity and fresh enzymes found only in a freshly squeezed lemon. Plus, you need the fresh lemons anyway for the three tablespoons of zest required for the batter.
How do I scale this for a mini-bundt pan?
This batter works perfectly for mini-bundt pans, but you must adjust your baking time significantly. Most mini-bundts will bake in 18 to 22 minutes at the same temperature (350°F). Use the same “cake goop” to prep the small pans, as they are often even more prone to sticking due to the tighter corners. Start checking for doneness with a toothpick at the 15-minute mark to ensure they don’t dry out.
Why is my cake dense instead of fluffy?
A dense bundt cake is usually the result of under-creaming the butter and sugar or using cold ingredients. If the butter and sugar aren’t beaten until pale and fluffy, there aren’t enough air pockets for the leavening agents to expand. Additionally, ensure your baking powder and baking soda aren’t expired. You can test them by dropping a pinch into hot water (for powder) or vinegar (for soda); if they don’t bubble vigorously, it’s time to buy new ones.
Glazed Lemon Zest Bundt Cake
Course: DessertCuisine: AmericanDifficulty: medium12
servings20
minutes50
minutes380
kcal70
MinutesThis lemon bundt cake combines a moist crumb structure with a vibrant citrus flavor. The highlight is a double-barrier pan coating method that prevents sticking, finished with a heavy cream and lemon glaze.
Ingredients
3 cups all-purpose flour
2 cups granulated sugar
1 tablespoon baking powder
1/2 teaspoon baking soda
1/2 teaspoon salt
1 cup (2 sticks) unsalted butter, softened
1/2 cup sour cream (for moisture and crumb structure)
1/2 cup whole milk
4 large eggs, room temperature
3 tablespoons lemon zest (about 3 lemons)
1/4 cup fresh lemon juice
1 teaspoon vanilla extract
For the Opaque White Glaze:
2 1/2 cups powdered sugar, sifted
3-4 tablespoons heavy cream (provides the thick, white opacity seen in the image)
1 tablespoon fresh lemon juice
Extra lemon zest for garnish
For the Foolproof Pan Release:
2 tablespoons melted butter
2 tablespoons neutral oil
2 tablespoons all-purpose flour
Directions
- Preheat your oven to 350°F (175°C).
- Prepare the pan: In a small bowl, whisk the 2 tablespoons melted butter, 2 tablespoons oil, and 2 tablespoons flour into a smooth paste. Use a pastry brush to coat every single ridge and the center tube of your bundt pan thoroughly. This “cake goop” is superior to spray and ensures a clean release.
- In a large bowl or stand mixer, cream the softened butter and granulated sugar together on medium-high speed for 3-5 minutes until very light and fluffy.
- Add eggs one at a time, beating well after each addition. Scrape down the sides of the bowl.
- Stir in the lemon zest, lemon juice, vanilla extract, and sour cream until combined.
- In a separate bowl, whisk together the flour, baking powder, baking soda, and salt.
- Gradually add the dry ingredients to the wet ingredients, alternating with the milk (Dry-Milk-Dry). Mix on low speed just until combined; do not overmix or the cake will be tough.
- Pour the batter into the prepared bundt pan, smoothing the top with a spatula. Tap the pan firmly on the counter three times to release large air bubbles.
- Bake for 45 to 55 minutes, or until a skewer inserted into the thickest part comes out clean.
- Crucial Release Step: Let the cake cool in the pan for exactly 10 minutes. After 10 minutes, gently shake the pan side-to-side to feel the cake move, then invert onto a wire rack to cool completely.
- Prepare the Glaze: Whisk the powdered sugar, heavy cream, and lemon juice. The consistency should be thick like white glue so it holds the “drip” pattern shown in the image. If too thin, add more sugar; if too thick, add a teaspoon of cream.
- Drizzle the glaze over the completely cooled cake, allowing it to pool slightly at the bottom of the ridges. Immediately top with a generous amount of fresh lemon zest.
Notes
- The cake goop is a superior alternative to spray. Ensure the cake cools in the pan for exactly 10 minutes before inverting for the best results. Use heavy cream in the glaze to achieve a thick, opaque white appearance.