Most home cooks struggle with a frustrating trade-off: you either get crispy chicken skin with no sauce, or a flavorful glaze that turns the skin into a rubbery, pale mess. It’s a common disappointment when the steam from the vegetables and broth softens that hard-earned golden crust. However, you don’t have to choose between texture and taste if you change your approach to the pan.
The secret lies in a specific two-stage searing and reduction method that protects the integrity of the skin while building a deep, savory mushroom base. By controlling the moisture levels and the physical placement of the meat, you create a barrier that stays crunchy even as it sits in a pool of honey-soy reduction. It’s all about managing the “liquid line” in your skillet.
For more pepper and mushroom ideas, see this chicken pepper mushroom stir-fry.
I’ve found that the real trick to this dish is the “dry-brine” effect of seasoning your chicken at least ten minutes before it hits the heat. This draws out surface moisture, which you then wipe away, ensuring the skin fries in the oil rather than steaming in its own juices. When you hear that aggressive sizzle and see the fat rendering out, you’ll know you’re on the right track for a perfect crunch.
The Science of Achieving Crispy Chicken Skin
Achieving that glass-like shatter on chicken skin isn’t luck; it’s physics. The Maillard reaction, which creates those complex savory flavors and brown colors, cannot happen in the presence of excess water. Therefore, your primary goal is to eliminate moisture from the surface of the thigh before it touches the oil. If the skin is damp, the energy from the pan goes into evaporating water instead of browning the proteins.
Rendering fat is the second half of the equation. Chicken skin is loaded with subcutaneous fat and collagen. If you cook it too fast over high heat, the skin burns before the fat has a chance to melt away, leaving you with a greasy, flabby texture. By using a steady medium-high heat, you slowly liquefy that fat, essentially shallow-frying the skin in its own oils until the collagen breaks down and hardens into a crisp shell.
While many people reach for chicken breasts, bone-in, skin-on thighs are the superior choice for this glazing technique. Thighs contain more connective tissue and fat, which keeps the meat succulent during the reduction phase. Furthermore, the bone acts as a heat conductor, helping the chicken cook evenly from the inside out while the skin side faces the intense heat of the pan.
Essential Components for Glazed Mushroom and Pepper Chicken Thighs
Quality ingredients make the difference between a flat sauce and a multi-dimensional glaze. I always recommend cremini mushrooms over standard white buttons. Creminis are just slightly more mature, meaning they have a lower water content and a much deeper, earthier flavor that stands up well to the bold soy and honey mixture.
When selecting your broth, low-sodium is a non-negotiable requirement. As the sauce simmers and reduces by half, the salt concentration doubles. If you start with full-sodium broth, the final glaze will be unpleasantly salty. Additionally, the tomato paste isn’t there to make a tomato sauce; it provides a concentrated hit of umami and acts as a natural thickener to give the glaze “body” so it clings to the meat.
Selecting and Preparing the Poultry
Before you even think about the stove, grab the paper towels. You need to pat the chicken thighs until they feel tacky to the touch. If you have time, let them sit uncovered in the fridge for an hour; the cold air acts as a natural dehydrator for the skin. This preparation ensures that the moment the meat hits the oil, it begins to sear rather than boil.
It’s also helpful to let the chicken sit on the counter for about 15 minutes to take the chill off. Cold meat can cause the temperature of your skillet to drop too quickly, which interrupts the rendering process. A room-temperature thigh cooks more predictably, ensuring the meat near the bone is done at the same time the skin reaches peak crispness.
The Aromatics: Peppers, Onions, and Spices
The spice blend here relies heavily on smoked paprika, which provides a woody depth that complements the earthy mushrooms. Unlike sweet paprika, the smoked version adds a “grilled” quality to the dish even though it’s made entirely on the stovetop. It bridges the gap between the sweetness of the honey and the saltiness of the soy sauce.
Layering your aromatics is equally important. By separating the white bases of the green onions from the green tops, you get two distinct uses from one vegetable. The whites sauté with the peppers to create a sweet, mellow foundation, while the raw greens added at the end provide a sharp, fresh bite that cuts through the richness of the rendered chicken fat.
Step-by-Step: Mastering the Two-Stage Searing Process
Success with this recipe depends on patience during the first ten minutes. You are building a foundation of flavor and texture that cannot be rushed. If you try to flip the chicken too early, the skin will tear and stick to the pan, ruining the presentation and the crunch.
Phase 1: The Cold-Pan Start and Fat Rendering
Place your seasoned thighs skin-side down into the hot oil. Now, the hardest part: don’t touch them. You might be tempted to peek or move them around, but every time you lift the chicken, you lose contact with the heat source. You want to hear a consistent, lively sizzle that sounds like rain on a tin roof.
After about 8 minutes, you’ll notice the edges of the skin turning a dark, mahogany brown. The chicken will actually “signal” when it’s ready by releasing naturally from the pan. If you feel resistance when you try to slide a spatula underneath, it needs another minute or two. Once flipped, a quick 2-minute sear on the flesh side locks in the juices before you move the thighs to a side plate.
Phase 2: Sautéing Mushrooms and Reducing the Glaze
The bottom of your pan should now be covered in “fond,” those little brown bits of caramelized protein. Don’t wash the pan! Toss in your mushrooms and peppers immediately. The mushrooms will act like little sponges, soaking up the rendered chicken fat and scraping up that flavorful fond as they release their own moisture.
Once the vegetables are browned, whisk in your liquid components. This is where the transformation happens. As the broth, soy, and honey boil, the water evaporates, leaving behind a concentrated syrup. You’re looking for large, glossy bubbles that move slowly. When the sauce can coat the back of a spoon, it’s ready for the chicken to return.
Phase 3: The Nestling Technique for Final Cooking
This is the “Anti-Soggy” secret in action. Instead of submerging the chicken, you want to nestle the thighs into the mushrooms so only the bottom third of the meat is touching the sauce. The skin should remain high and dry, exposed to the air. This allows the meat to finish cooking in the flavorful steam of the sauce without compromising the crust you just built.
Cover the pan for a few minutes to ensure the heat reaches the center of the bone. However, always remove the lid for the final two minutes of cooking. This allows any trapped steam to escape, which “re-crisps” the skin one last time before serving. Spoon the sauce carefully around the chicken, not over the top, to keep that golden surface pristine.
Troubleshooting Common Searing and Glazing Issues
If your glaze looks too thin or watery, don’t panic. Simply remove the chicken again and turn the heat to high for 60 seconds. A vigorous boil will quickly reduce the liquid into a thick syrup. Conversely, if the sauce becomes too thick or “tacky” like candy, whisk in a tablespoon of water or a squeeze of lime juice to loosen it back up.
Sometimes the honey in the glaze can begin to smell like it’s burning if the heat is too high. If you see the sauce darkening too quickly or smelling slightly bitter, immediately turn the heat to low and add a splash of broth. This lowers the temperature of the sugar and prevents it from scorching while the chicken finishes through the middle.
Optimal Side Dishes for Savory Chicken Thighs
Since the mushroom glaze is the star of the show, you want side dishes that act as a canvas. A fluffy bed of jasmine rice or a creamy cauliflower purée is perfect for catching every drop of the honey-soy reduction. These neutral bases balance the intense umami of the mushrooms without competing for your palate’s attention.
Round Out Your Meal
To complement your glazed chicken, consider these dishes that share similar flavors or offer a pleasing contrast.
- For a fresh counterpoint to the rich chicken, try the Harvest Apple and Walnut Salad, bringing bright, crisp notes.
- Add a touch of warmth and spice with the Hot Honey Jalapeño Cornbread, perfect for soaking up any extra glaze.
To balance the richness of the chicken fat and the sweetness of the glaze, consider something bright and acidic. A simple arugula salad with a lemon vinaigrette or steamed bok choy provides a necessary “crunch” and bitterness. The contrast between the warm, savory chicken and a crisp, tart side dish makes the whole meal feel much lighter.
Storage and Reheating Without Losing the Crunch
Leftovers will stay fresh in an airtight container for up to three days. However, the refrigerator is the enemy of crispy skin. The moisture in the sauce will naturally migrate into the skin as it sits. Therefore, you should store the chicken and the extra mushroom sauce together, but accept that the texture will soften overnight.
To bring that crunch back to life, avoid the microwave at all costs. Instead, place the chicken in an air fryer or a 375°F oven for about 8 to 10 minutes. This dry heat evaporates the absorbed moisture and recrisps the skin. If you’re using an oven, place the chicken on a wire rack over a baking sheet so the hot air can circulate entirely around the thigh.
Expert Tips for Glazed Mushroom and Pepper Chicken Thighs
Can I use chicken breasts instead of thighs?
You can, but it’s much riskier. Breasts lack the fat and connective tissue of thighs, meaning they dry out quickly during the reduction phase. If you use breasts, I recommend cutting the simmering time in half and using a meat thermometer to ensure you don’t go past 165°F, or the meat will become stringy and tough.
What if I don’t have a cast-iron skillet?
A stainless steel pan is actually excellent for this dish because it develops a great “fond” (the brown bits). If you only have a non-stick skillet, you can still get a good sear, but you won’t get as much flavor development in the sauce. Avoid using thin aluminum pans, as they have hot spots that might burn the honey glaze before the chicken is cooked.
For even crispier results on chicken skin, check out this skillet roasted lemon garlic chicken technique.
How do I know the chicken is cooked through without a thermometer?
The most reliable visual cue is the juices. Pierce the thickest part of the thigh with a knife; if the juices run clear, it’s done. If they are pink, it needs more time. You will also notice the meat starting to pull away or “shrink” slightly from the bone end, which is a classic sign that the proteins have fully set.
Can I substitute the honey with maple syrup or brown sugar?
Maple syrup works beautifully and adds a lovely autumnal flavor, though it is thinner than honey, so you may need to reduce the sauce for an extra minute. Brown sugar is also an option, but it has a higher risk of burning. If using sugar, keep the heat on medium-low during the final simmering stage to prevent the sauce from turning into hard caramel.
Why did my mushrooms turn out slimy instead of browned?
This usually happens because of pan crowding. If you put too many mushrooms in the pan at once, they release their water and end up boiling in their own liquid. Cook them in two batches if necessary, and don’t add salt until they have already started to brown. Salt draws out moisture, so adding it too early creates a puddle in your pan.

Chicken Thighs
Course: Main CourseCuisine: AmericanDifficulty: easy4
servings15
minutes35
minutes440
kcal50
MinutesA specialized two-stage searing and reduction method designed to deliver perfectly crisp, golden chicken skin paired with a rich mushroom and bell pepper glaze.
Ingredients
4 large bone-in, skin-on chicken thighs
2 cups sliced cremini mushrooms
1 red bell pepper, finely diced
3 green onions, sliced (whites and greens separated)
2 tablespoons olive oil
1/2 cup low-sodium chicken broth
2 tablespoons soy sauce
2 tablespoons honey
1 tablespoon tomato paste (for color and body)
1 teaspoon smoked paprika
1/2 teaspoon garlic powder
1/2 teaspoon onion powder
Salt and black pepper to taste
Directions
- Pat the chicken thighs extremely dry with paper towels. This is the most critical step for the Anti-Soggy Skin Secret. Moisture on the surface is the enemy of crispiness. Season both sides with salt, pepper, paprika, garlic powder, and onion powder.
- Heat olive oil in a large skillet over medium-high heat. Place chicken skin-side down. Do not move them for at least 8 to 10 minutes. This allows the fat to render out completely, creating a naturally non-stick, deeply browned, crispy barrier.
- Once the skin is deep golden brown and releases easily from the pan, flip the thighs and cook for 2 minutes on the flesh side. Remove the chicken from the pan and set aside on a plate (skin-side up) to keep the skin dry.
- In the same pan with the rendered chicken fat, add the sliced mushrooms and diced red peppers. Sauté over medium-high heat until the mushrooms are browned and their moisture has evaporated. Add the white parts of the green onions and the tomato paste, stirring for 1 minute until fragrant.
- Whisk the chicken broth, soy sauce, and honey together. Pour the mixture into the pan with the vegetables. Bring to a vigorous simmer and let the liquid reduce by half until it begins to look like a thick, syrupy glaze.
- Return the chicken thighs to the pan, nestling them into the mushrooms and sauce, but keep the top 2/3 of the chicken (the skin) above the liquid line. Reduce heat to medium-low. Cover the pan with a lid for 5-7 minutes to ensure the chicken is cooked through to 165°F, then remove the lid for the final 2 minutes to let any steam escape.
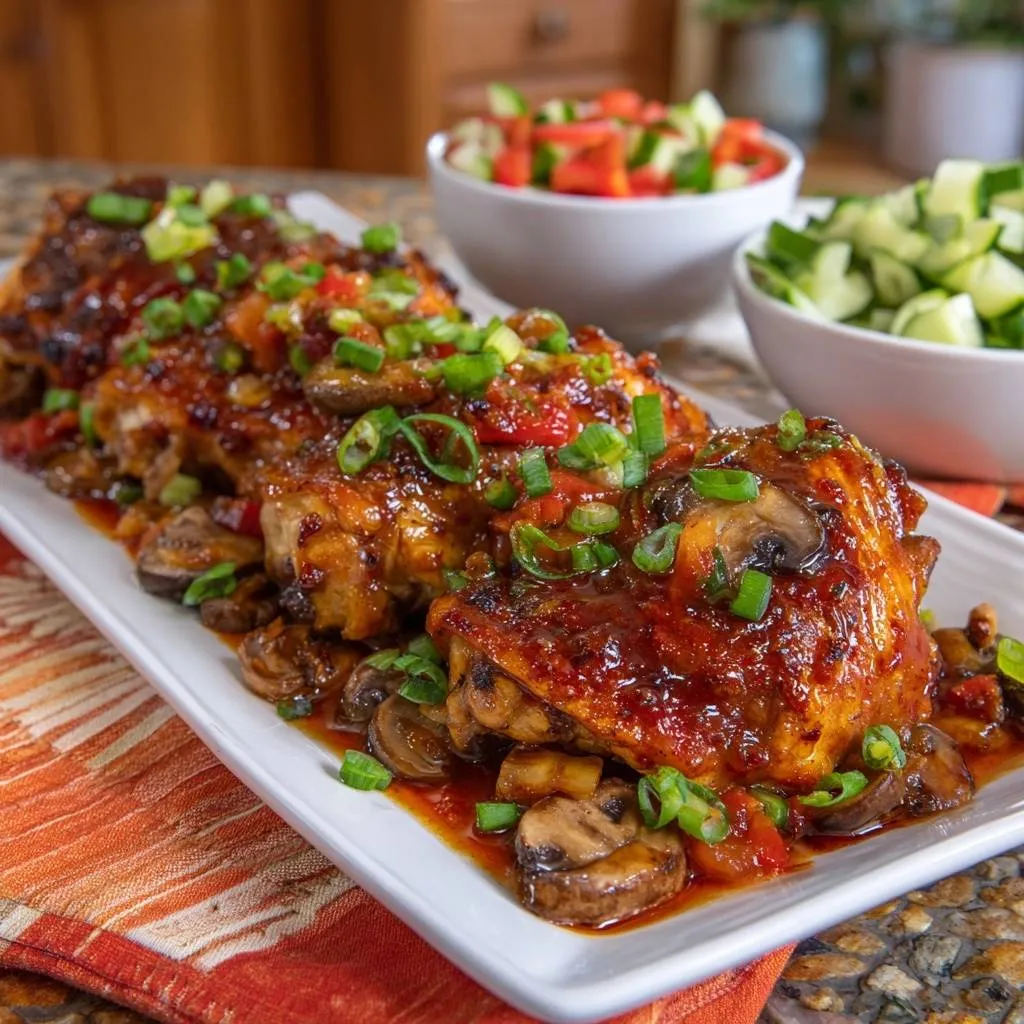
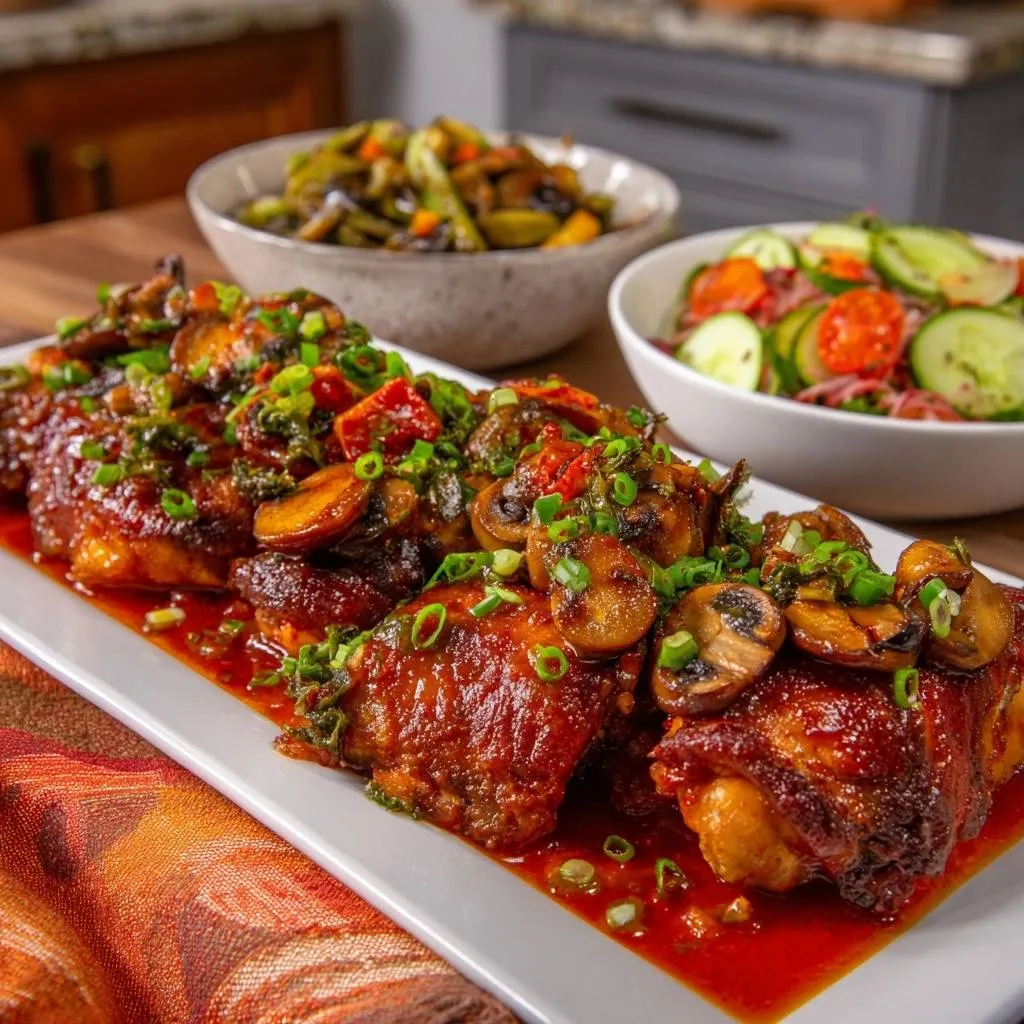
- Spoon the thickened glaze and mushrooms over the chicken, leaving the very top of the skin exposed to maintain that crunch. Garnish heavily with the green onion tops and serve immediately.
Notes
- The ‘Anti-Soggy Skin Secret’ relies on patting the chicken extremely dry and ensuring the skin remains above the liquid line when returning the meat to the pan.