I spent years frustrated by tough, stringy beef stew, no matter how long I cooked it, until I finally cracked the code on true tenderness.
This specific method finally transforms inexpensive chuck roast into buttery-smooth perfection, making it the foolproof recipe for a truly unforgettable Hearty Braised Beef Stew.
For even more tender results, explore slow-braised beef short ribs.
Once you master this combination of high-heat searing and slow oven braising, you will achieve fall-apart texture every single time.
The Secret to Buttery-Smooth Beef: Why This Hearty Braised Stew Works
Tackling Tough Stew: Mastering the Chuck Roast
Chuck roast is inherently tough because it is densely marbled with connective tissue and collagen, which resists quick cooking.
However, this high collagen content makes chuck the absolute ideal cut for slow, wet cooking methods like braising.
For extra tender results with tough cuts, learn how to achieve slow braised beef short ribs.
When handled correctly, that tough tissue slowly melts away, lubricating the meat fibers and yielding an incredibly moist, tender result.
The 3.5-Hour Transformation: Utilizing Low and Slow Oven Heat
We use a precise oven temperature of 325°F because it is gentle enough to allow the collagen to slowly break down into gelatin without drying out the meat.
Too high a heat causes the muscle fibers to seize up prematurely, resulting in the dry, chewy beef that is the hallmark of poor stew technique.
This long, low-temperature cook ensures the meat fully absorbs the rich flavor of the braising liquid while achieving that coveted fall-apart texture.
Building the Deep Flavor Profile: Critical Ingredients and Layering
The Foundation of Flavor: Selecting and Preparing the Beef Cubes
Using 2 pounds of beef cut into 1.5-inch cubes maximizes the surface area for searing and ensures the meat retains its size during the long cook.
Patting the beef cubes completely dry is absolutely critical before seasoning them; any surface moisture prevents proper browning.
The light coating of flour, salt, and pepper helps the beef achieve a deep, caramelized crust quickly and protects the fibers from moisture loss during the intense initial sear.
The Crucial Base: Aromatics and Caramelizing the Tomato Paste
The chopped yellow onion and minced garlic provide the fundamental aromatic base that forms the soul of any deeply savory stew.
Caramelizing the tomato paste-cooking it until it darkens slightly and sticks to the pan-is essential as it removes the metallic taste and concentrates the natural sugars.
This critical step dramatically boosts the savory, umami flavor, providing complexity that raw tomato paste simply cannot offer.
The Braising Liquid and Herb Selection
The combination of beef broth and crushed tomatoes provides the necessary acidic balance and liquid depth for the braise, resulting in a rich, slightly tangy sauce.
Bay leaves and dried thyme are timeless partners for braised beef, offering earthy, warm notes that balance the richness of the meat and the acidity of the tomatoes.
Essential Tools for Your Hearty Braised Beef Stew Adventure
The Importance of a Heavy Dutch Oven (Enameled Preferred)
A heavy, thick-walled Dutch oven maintains highly stable heat, which is vital for both the high-heat searing and the long, low-temperature braise in the oven.
A tight-fitting lid prevents the braising liquid from evaporating, keeping the beef moist and the sauce concentrated during the hours of oven cooking.
A Reliable Whisk and Sturdy Wooden Spoon
Sharp Knife and Cutting Board
Crafting Fall-Apart Hearty Braised Beef Stew: Detailed Step-by-Step Method
Ingredients List (For Reference)
- 2 pounds beef chuck roast, cut into 1.5-inch cubes
- 2 tablespoons all-purpose flour
- 2 teaspoons coarse salt, divided
- 1 teaspoon black pepper
- 2 tablespoons olive oil, divided
- 1 large yellow onion, chopped
- 4 cloves garlic, minced
- 1/4 cup tomato paste
- 1 cup beef broth
- 2 cups crushed tomatoes or tomato sauce
- 4 large carrots, peeled and cut into 2-inch chunks
- 2 bay leaves
- 1 teaspoon dried thyme
- Fresh parsley, chopped for garnish
Phase 1: Why Coating and Drying the Beef is Non-Negotiable
- Preparation and Initial Seasoning:
Pat the beef cubes very dry with paper towels; any surface moisture prevents proper searing and causes the meat to steam instead of browning.
Toss the dried beef with the flour, 1 teaspoon of salt, and pepper until lightly coated; this protective layer helps the beef brown deeply and retains its juices during cooking.
Phase 2: Achieving the Ultimate Flavor Crust (The Crucial Searing Secret)
- The Critical Searing Step:
Preheat your Dutch oven over high heat with 1 tablespoon of olive oil until it is shimmering hot, indicating that the oil is ready to sear.
Add the beef in a single layer, working in small batches to avoid overcrowding the pot, and absolutely do not move the beef for 3 full minutes.
Turn and sear the remaining sides until deeply browned; this crust builds incredible flavor depth (the fond) that transfers throughout the stew and locks moisture inside the meat.
Remove all seared beef and set it aside; reducing the batch size is the key to mastering this essential flavor crust.
Phase 3: Building the Fond and Caramelizing the Paste
- Building the Flavor Base:
Reduce the heat to medium, add the remaining 1 tablespoon of olive oil, the chopped onion, and the remaining 1 teaspoon of salt.
Cook the onions for 5 to 7 minutes until they are soft, then add the minced garlic and tomato paste.
Cook this mixture, stirring constantly for 2 minutes, until the tomato paste darkens slightly, successfully caramelizing and boosting its savory profile.
- Deglazing the Pot:
Pour in the beef broth and use a sturdy wooden spoon or spatula to scrape up every bit of the browned residue (the “fond”) stuck to the bottom of the pot.
Dissolving the fond into the liquid is a non-negotiable step because this concentrated residue is where the majority of your rich, complex stew flavor resides.
Phase 4: The Low-and-Slow Oven Braise (Guaranteeing Tenderness)
- Setting Up the Braise:
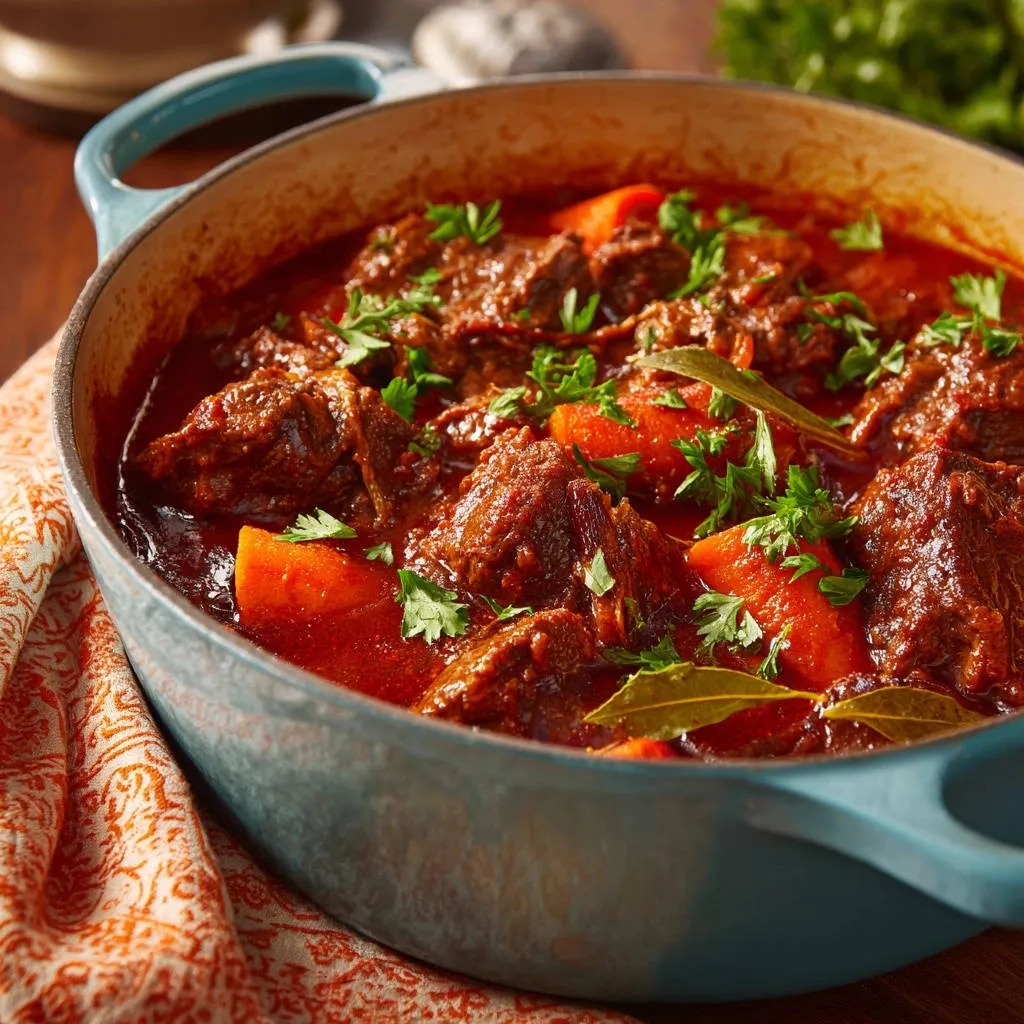
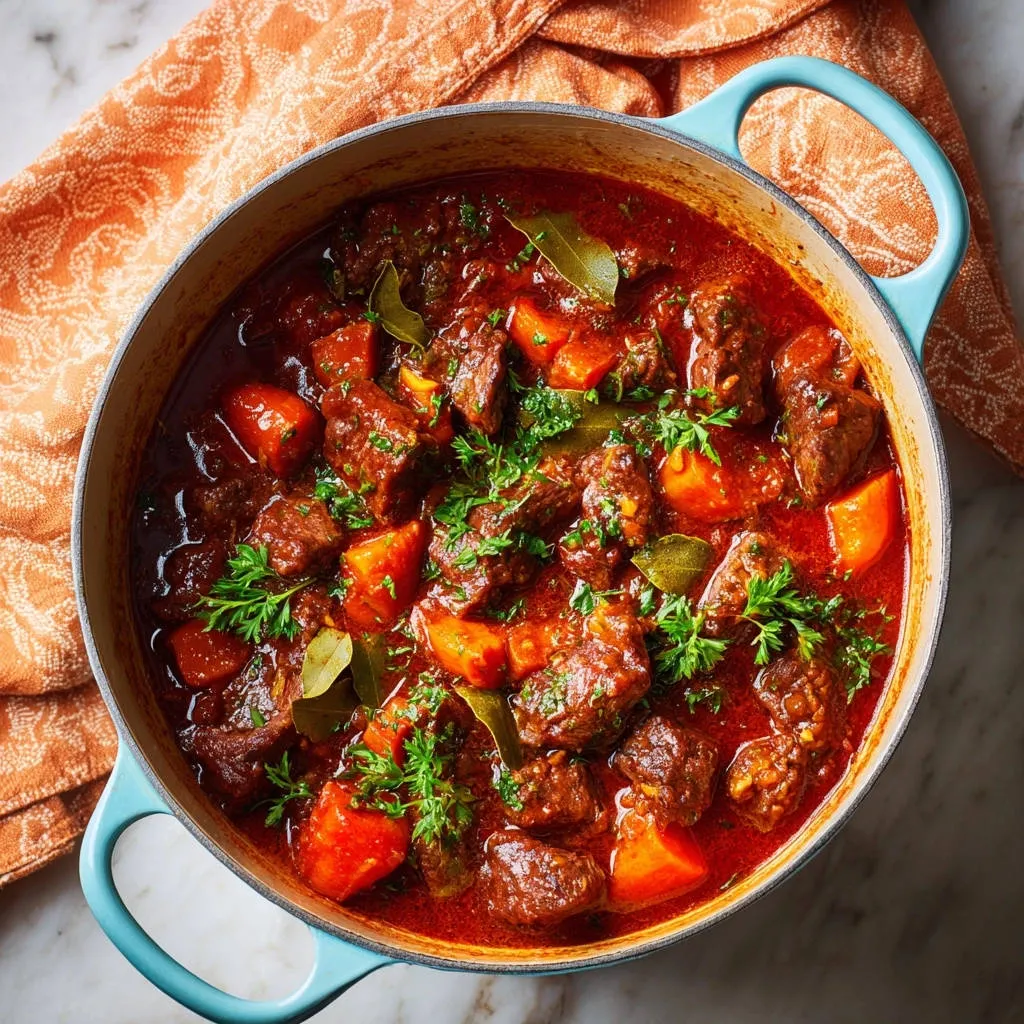
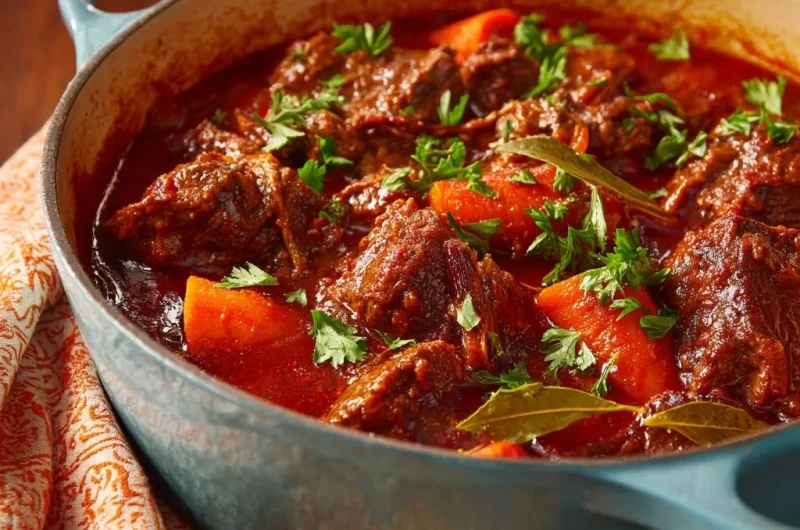
Stir in the crushed tomatoes, bay leaves, and thyme, then return the seared beef to the pot, nestling the chunks into the liquid.
Bring the stew mixture to a very gentle simmer on the stovetop, then immediately cover the pot tightly and transfer it to the preheated 325°F oven.
- The Initial Cook Time:
Bake for 2 hours uninterrupted; this long, low temperature cook allows the tough collagen in the chuck roast to slowly dissolve into tender, lubricating gelatin.
The low oven temperature ensures even heat application from all sides, creating a consistent and tender result.
- Finishing the Stew:
After the initial 2 hours, carefully add the carrot chunks to the stew and gently stir them into the liquid.
Cover and return to the oven for another 1 to 1.5 hours, or until the carrots are fork-tender and the beef shreds effortlessly with a fork.
Adding the carrots late prevents them from overcooking and ensures they contribute fresh flavor and texture rather than turning into mush.
Phase 5: Serving
- Garnish and Serve:
Remove and discard the bay leaves, as they have done their job and should not be eaten.
Garnish generously with freshly chopped parsley just before serving for brightness and color contrast against the dark, rich Hearty Braised Beef Stew.
Troubleshooting and Expert Tips for the Ultimate Stew
Searing Smarter: Avoiding an Overcrowded Pot
Crowding the pot lowers the temperature instantly, which forces the meat to release moisture, causing it to steam instead of sear.
A true sear requires dry, high heat; working in small batches is essential for developing that necessary dark, flavorful crust.
Preventing Burnt Fond: Heat Management During Base Building
When you reduce the heat to medium for the aromatics, maintain focus, especially when cooking the tomato paste and garlic.
If the pot seems excessively hot from the searing phase, reduce the heat momentarily to ensure everything caramelizes gently without scorching the garlic, which would lead to a bitter stew.
Adjusting Consistency: Thickening or Thinning Post-Braise
If the sauce is too thin after the total cook time, make a quick slurry of 1 tablespoon cornstarch mixed with 2 tablespoons cold water and whisk it into the simmering stew on the stovetop until thickened.
If the stew is too tight or thick, simply add a splash of hot beef broth or water until the desired spoonable consistency is achieved.
The Salt Test: Final Seasoning Before Serving
Braising reduces the liquid volume over several hours, which concentrates all the initial seasonings.
Always conduct a final taste test right before serving, as a small final pinch of salt can significantly brighten and finish the flavor profile.
Make-Ahead Mastery: Freezing, Storage, and Reheating
Optimal Cooling and Refrigerator Storage
Ensure the stew cools rapidly before transferring it to airtight containers to maintain food safety.
Properly sealed, this rich meal will last wonderfully in the refrigerator for up to 3 to 4 days.
Can You Freeze This Hearty Braised Beef Stew?
Yes, beef stew freezes exceptionally well; once cooled, store it in freezer-safe containers, leaving an inch of headspace for liquid expansion.
To reheat, thaw overnight in the refrigerator, then warm gently on the stovetop, adding a splash of broth if the sauce has thickened too much during freezing.
Does Beef Stew Taste Better the Next Day?
Absolutely; as the stew rests and cools, the flavors continue to meld and deepen dramatically.
The second day allows the acids to mellow and the aromatics to fully saturate the tender beef, resulting in a richer, more complex flavor than serving it immediately.
Serving Suggestions and Perfect Pairings for a Cozy Meal
Starchy Sides: Mashed Potatoes, Egg Noodles, or Creamy Polenta?
Starchy side dishes are essential partners for this robust stew, providing the ideal medium for soaking up the deeply flavored braising liquid.
Complementary Dishes to Try
Round out your meal with these light and fresh options.
- For a bright counterpoint to your hearty stew, consider this Garlic Herb Grilled Chicken Salad, bringing vibrant herbs and a touch of zest.
- If you enjoy grilled chicken in your salads, this Grilled Chicken Kale and Cabbage Power Salad offers a robust mix of greens and satisfying protein.
While creamy mashed potatoes are a classic choice, wide, buttery egg noodles or soft, rich polenta provide wonderful textural contrast to the tender beef chunks.
Balancing the Richness: Fresh Greens and Crusty Bread
To cut through the richness of the stew, serve alongside a simple side salad tossed in a sharp, acidic vinaigrette.
Never underestimate the necessity of thick slices of crusty artisan bread, which is perfect for dipping and ensuring none of the precious sauce goes to waste.
Hearty Braised Beef Stew FAQs
Can I use a different cut of beef besides chuck roast?
While chuck is ideal, you can substitute other tough cuts with high collagen content, such as beef round or brisket.
However, avoid leaner cuts like sirloin or tenderloin, as they lack the necessary connective tissue and will dry out before the liquid has time to develop flavor.
Why did the recipe wait so long to add the carrots?
Carrots are dense vegetables that need to cook fully, but if added too early, they would cook for the full 3.5 hours and dissolve into mush.
Adding them 1 to 1.5 hours before the end ensures they remain tender yet retain their shape and provide pleasant texture.
Is it possible to make this recipe in a slow cooker or pressure cooker?
Yes, but you must complete the crucial searing and base-building steps (Phases 1-3) on the stovetop first, as these steps create the essential depth of flavor.
For a slow cooker, cook the stew on low for 6-8 hours; for a pressure cooker, cook for 45-50 minutes, followed by a natural pressure release.
Ready to Impress? Share Your Tender Beef Stew Masterpiece!
This recipe provides a true culinary solution, transforming the common challenge of tough stew into a guaranteed, comforting triumph.
Once you taste the deep, developed flavor and experience that buttery, fall-apart texture, you will understand why this slow oven braise is truly the superior method for Hearty Braised Beef Stew.
Get your Dutch oven ready, trust the searing secret, and share your photos when you create this perfect, cozy meal!
Braised Beef Stew
Course: Soups-StewsCuisine: AmericanDifficulty: medium6
servings30
minutes3
hours30
minutes450
kcal240
minutesNever worry about tough stew meat again! This recipe uses a crucial searing and slow braising technique to turn beef chuck roast into buttery-smooth, fall-apart perfection. Get ready for truly cozy, deep-flavored stew.
Ingredients
2 pounds beef chuck roast, cut into 1.5-inch cubes
2 tablespoons all-purpose flour
2 teaspoons coarse salt, divided
1 teaspoon black pepper
2 tablespoons olive oil, divided
1 large yellow onion, chopped
4 cloves garlic, minced
1/4 cup tomato paste
1 cup beef broth
2 cups crushed tomatoes or tomato sauce
4 large carrots, peeled and cut into 2-inch chunks
2 bay leaves
1 teaspoon dried thyme
Fresh parsley, chopped for garnish
Directions
- Prepare the Beef for Tenderness: Pat the beef cubes very dry with paper towels. In a large bowl, toss the beef with the flour, 1 teaspoon of salt, and the pepper until lightly coated. This coating helps achieve a deep, rich sear and protects the meat from drying out.
- The Crucial Searing Step: Preheat your large Dutch oven over high heat with 1 tablespoon of olive oil until shimmering. Add the beef in a single layer, working in batches so as not to overcrowd the pot. Do not move the beef for 3 full minutes. Turn and sear the remaining sides until deeply browned on all surfaces. This deep crust builds flavor depth and locks in moisture. Remove the seared beef and set aside.
- Build the Base: Reduce the heat to medium. Add the remaining 1 tablespoon of olive oil, the chopped onion, and the remaining 1 teaspoon of salt. Cook for 5 to 7 minutes until the onion is soft. Add the minced garlic and tomato paste and cook, stirring constantly for 2 minutes until the tomato paste darkens slightly. This step caramelizes the tomato paste and boosts the savory flavor profile.
- Deglaze and Combine: Pour in the beef broth and scrape up any browned bits from the bottom of the pot (the fond). Stir in the crushed tomatoes, bay leaves, and thyme.
- The Slow Braise Technique (Guaranteeing Tenderness): Return the seared beef to the pot. Preheat oven to 325 degrees F. Bring the stew mixture to a very gentle simmer on the stovetop, then immediately cover the pot tightly with the lid. Transfer the Dutch oven to the preheated 325 degree F oven.
- Cook Low and Slow: Bake for 2 hours. This long, low temperature cook allows the tough collagen in the chuck roast to slowly dissolve into gelatin, which makes the meat incredibly moist and tender.
- Finish the Stew: After 2 hours, carefully add the carrot chunks to the stew and gently stir them into the liquid. Cover and return to the oven for another 1 to 1.5 hours, or until the carrots are tender and the beef shreds easily with a fork. Total cooking time will be approximately 3 to 3.5 hours.
- Serve: Remove the bay leaves. Garnish generously with fresh parsley before serving.
Notes
- The low and slow 325°F oven cook is essential for dissolving the collagen and achieving maximum tenderness.