Imagine biting into a cloud that suddenly shatters into a thousand sweet, crisp shards before melting away on your tongue. That is the magic of a perfect meringue. These Chocolate Chip Meringue Cookies offer a stunning contrast between a delicate, snowy exterior and the rich, earthy crunch of semi-sweet chocolate. It is a sophisticated treat that feels incredibly indulgent, yet surprisingly, each cookie clocks in at only about 45 calories.
However, many home bakers shy away from meringues because they seem temperamental. You might have dealt with cookies that weep syrupy tears or collapse into flat puddles the moment you add the chocolate. The frustration is real, but it is also entirely avoidable. By mastering a few simple scientific principles, you can create a stable, “no-deflate” structure every single time.
The secret to this recipe lies in the slow, methodical stabilization of egg proteins. We aren’t just whipping air into whites; we are building a reinforced sugar-protein matrix. This specific technique ensures your cookies stay tall and proud, even when weighed down by delicious chocolate chips. Once you understand the “why” behind the bubbles, you will never fear a meringue again.
The Chemistry of Stable Egg White Proteins
Creating a meringue is essentially an act of edible engineering. When you beat egg whites, you are physically stretching out the tightly coiled protein strands, a process called denaturation. As these proteins uncurl, they trap air bubbles, creating the foam we see in the bowl. However, these bubbles are fragile and want to pop.
This is where your equipment and stabilizers become critical. Any trace of fat is a total dealbreaker. Even a microscopic speck of egg yolk or a film of oil on your whisk will prevent those protein strands from bonding. It acts like a chemical saboteur, popping the bubbles as fast as you can create them. This is why starting with a pristine, grease-free bowl is the most important rule of the game.
To help those proteins hold their shape, we use cream of tartar. This acidic ingredient lowers the pH of the egg whites, which prevents the proteins from over-bonding and becoming “clumpy” or dry. It acts like a flexible glue, allowing the foam to expand without breaking. Therefore, the cream of tartar is your insurance policy against a grainy, collapsed mess.
Essential Components for Chocolate Chip Meringue Cookies
You only need five basic ingredients for these cookies, so quality and temperature are everything. Firstly, ensure your egg whites are at room temperature. Cold whites are more stable, but room-temperature whites stretch much further, giving you that massive, billowy volume that makes a meringue look impressive. If you forgot to take them out of the fridge, just set the whole eggs in a bowl of warm water for five minutes.
Secondly, the type of sugar you use dictates the final mouthfeel. Superfine sugar is the gold standard here because the tiny crystals dissolve almost instantly into the egg whites. If you only have standard granulated sugar, don’t worry. Simply pulse it in a blender for 30 seconds until it feels like fine sand. This prevents the “gritty” texture that ruins many homemade batches.
Finally, let’s talk about the chocolate. You must use mini semi-sweet chocolate chips rather than standard-sized ones. Standard chips are too heavy for the delicate foam and will sink to the bottom of your piped mounds. Mini chips distribute evenly throughout the cookie, ensuring you get a hit of chocolate in every single bite without compromising the structural integrity of the meringue.
Why Sugar Granule Size Dictates Texture
If you have ever eaten a meringue that felt sandy or had little beads of syrup on the outside, you’ve encountered the “grittiness” problem. This happens when sugar granules fail to dissolve completely. During baking, that undissolved sugar draws moisture out of the air, causing the cookie to “weep” or leak syrup.
To avoid this, use the tactile test. After you have added all your sugar and the mixture looks glossy, rub a small amount of the meringue between your thumb and forefinger. If it feels perfectly smooth, you are ready to bake. If you feel even a single grain of sugar, keep whisking for another minute and test again.
Critical Tools for Meringue Success
Your choice of bowl can make or break this recipe. Always reach for glass or stainless steel. Plastic bowls are porous and tend to hang onto oily residues even after a trip through the dishwasher. That hidden film of oil will deflate your egg whites instantly. If you want to be extra safe, wipe your bowl and whisk with a paper towel dipped in a little lemon juice or white vinegar before starting.
A stand mixer is your best friend for this process. You will be whisking for a significant amount of time to achieve the proper stability, and a hand mixer can get quite heavy. Additionally, skip the silicone baking mats for this specific recipe. Parchment paper is superior because it doesn’t retain moisture, helping the bottoms of the cookies dry out and crisp up perfectly.
Step-by-Step: Building the Perfect Meringue Base
Start by beating your egg whites and cream of tartar on medium-low speed. You are looking for the “foaming” stage, where the mixture looks like the top of a latte with small, uniform bubbles. Do not rush this. Starting at a lower speed creates a stronger, more stable foundation of bubbles that won’t collapse later when you add the heavy sugar.
Once you have a consistent foam, it is time for the most critical step: adding the sugar. You must add the sugar one tablespoon at a time. I usually count to fifteen or twenty between each spoonful. If you dump the sugar in all at once, the weight will crush the air out of the whites, and the sugar won’t have time to dissolve. Patience here is the difference between a flat cookie and a masterpiece.
Achieving and Identifying Stiff Peaks
As you continue to whisk, the mixture will transform from a dull foam into a brilliant, snowy white cream with a high-gloss sheen. This shine is a visual cue that the sugar has fully bonded with the proteins. To check for stiff peaks, stop the mixer and lift the whisk attachment straight up.
The meringue should form a sharp point that stands straight up like a mountain peak. If the tip droops over like a soft-serve ice cream cone, you are at “soft peaks” and need to keep whisking. You want that peak to be firm and unmoving. This strength is what allows the cookie to hold its shape in the hot oven.
For more on achieving those perfect peaks, check out this guide to foolproof crispy meringue cookies.
The Folding Technique: Incorporating Chocolate Chips
Folding is the highest-risk phase of the entire recipe. You have spent ten minutes building up all that beautiful air, and now you are about to add heavy chocolate. Use a large rubber spatula and employ the “J-fold” motion. Cut down through the center of the bowl, scrape across the bottom, and lift the batter over the top, turning the bowl slightly with each stroke.
The pro tip here is to only fold in half of your chocolate chips. By folding in just 1/4 cup, you minimize the amount of “deflating” work you have to do. The remaining chips will be sprinkled on top later. This keeps the interior of the cookie light and airy while still giving you plenty of chocolate flavor in every mouthful.
Piping and Shaping for Maximum Crispness
While you can certainly spoon the meringue onto the tray, using a piping bag with a large star tip creates a much better eating experience. The ridges created by the star tip increase the surface area of the cookie. More surface area means more crisp, crunchy edges, which is the hallmark of a great meringue.
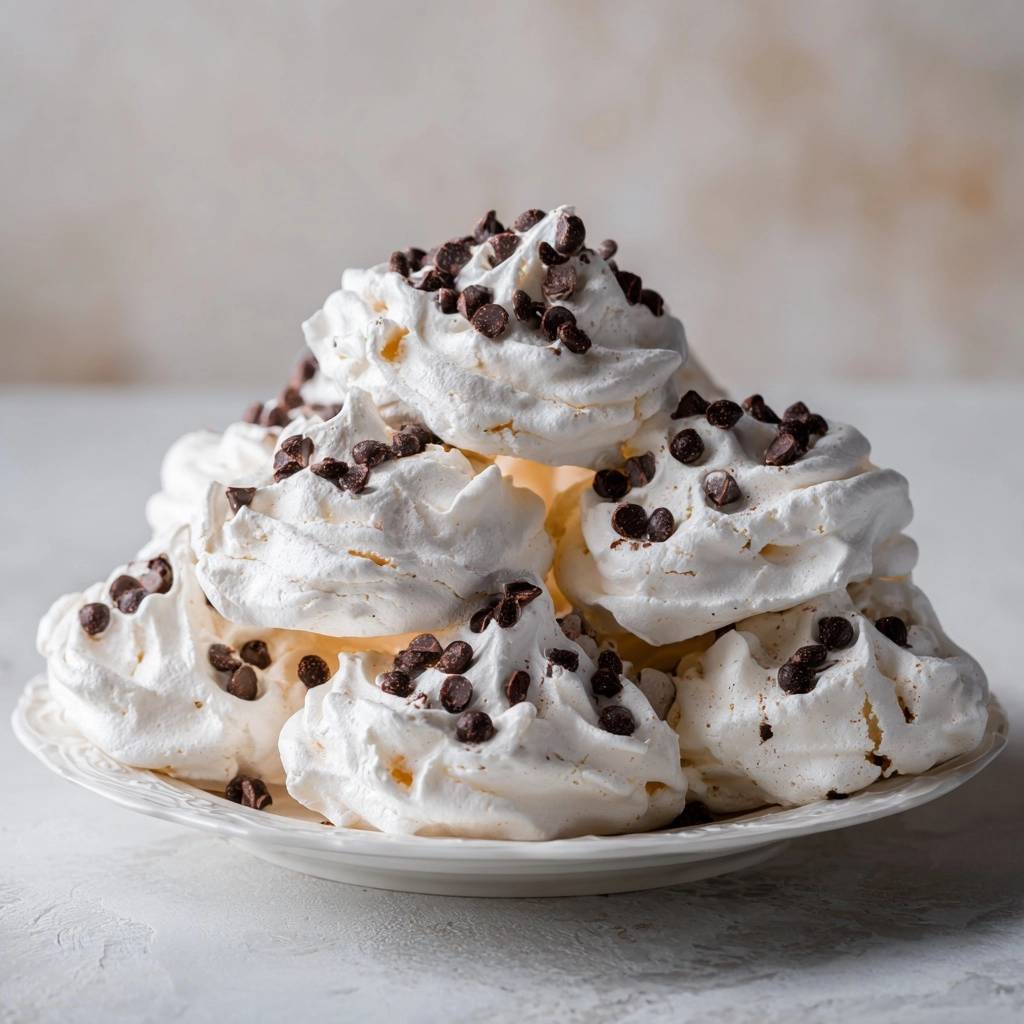
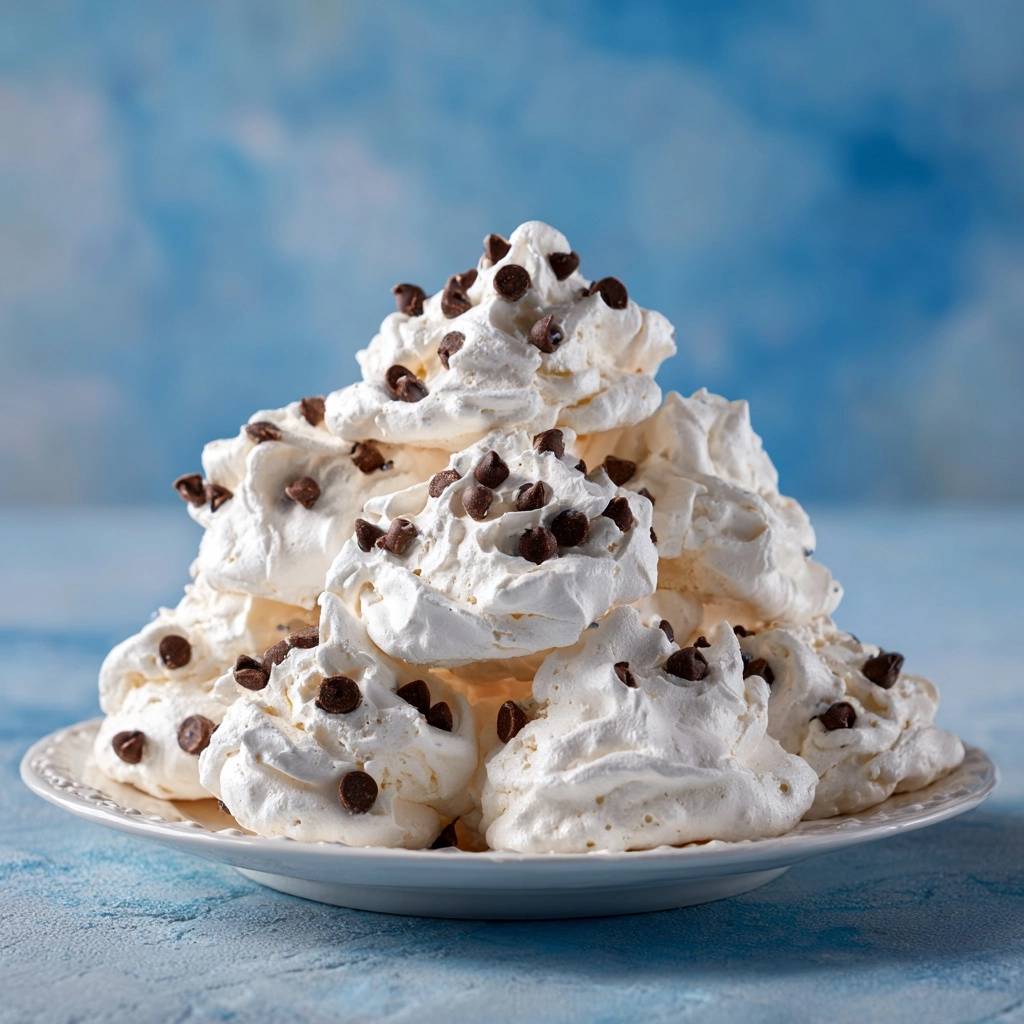
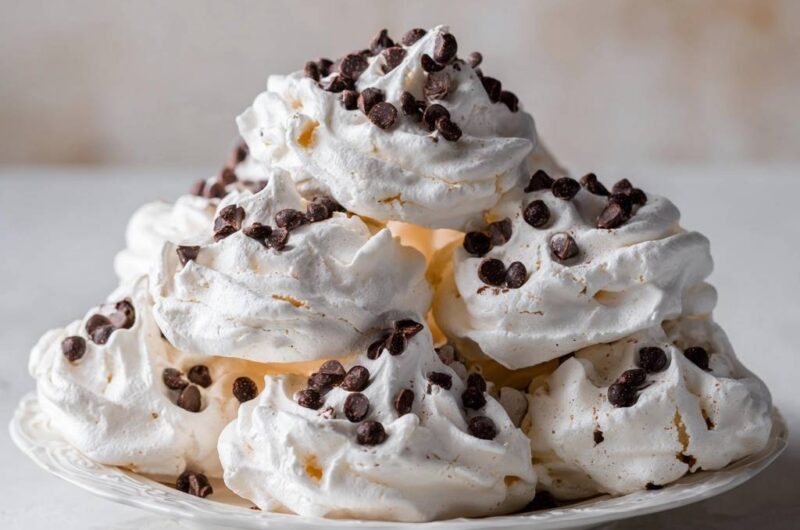
Pipe your mounds about two inches wide, leaving an inch of space between them. They won’t spread much in the oven, but they need good airflow to dry out properly. Once they are piped, generously sprinkle those remaining chocolate chips over the tops. They will stick perfectly to the tacky surface of the unbaked meringue.
The Low and Slow Dehydration Process
It is helpful to think of this process as “drying” rather than “baking.” We set the oven to a low 225 degrees F to evaporate the moisture without browning the sugar. If the oven is too hot, the sugar will caramelize, turning your snowy white cookies a dull tan color. We want them to stay bright and pristine.
The most important rule during the 90-minute bake time is: do not open the oven door. Not even for a peek! A sudden rush of cool air can cause the delicate structures to contract and shatter. Trust the process and let the low heat do its work. You are looking for the cookies to feel firm and dry to the touch at the end of the cycle.
The “Cure” Phase: Why Post-Bake Cooling Matters
Once the timer goes off, turn the oven off but leave the cookies inside. This “cure” phase is vital. As the oven cools down slowly over the next hour or two, the last bits of moisture escape from the center of the cookies. This gradual temperature decline prevents the internal steam from expanding and cracking the outer shell, ensuring a smooth, beautiful finish.
Troubleshooting Common Meringue Failures
If your cookies come out chewy instead of crisp, they likely haven’t dried out enough. This often happens on humid or rainy days because the sugar in the meringue literally pulls moisture out of the air. If this happens, you can usually fix them by putting them back in a 225-degree oven for another 15 to 20 minutes to re-dry.
If you see brown edges, your oven might be running hot. Every oven is different, so using an oven thermometer can help you verify the actual temperature. For “weeping” or beads of moisture, remember to slow down the sugar addition next time. That syrup is just undissolved sugar that didn’t get a chance to bond with the egg whites properly.
Storage Strategies to Combat Humidity
Meringues are hygroscopic, meaning they are like little sponges for moisture. As soon as they are completely cool, move them into an airtight container. If you leave them out on the counter for a few hours, especially in a humid kitchen, they will turn tacky and soft.
Never store these cookies in the refrigerator, as the high humidity will turn them into a sticky mess instantly. Keep them in a cool, dry pantry. If they do lose their crunch over time, you can “re-crisp” them by placing them in a 200-degree oven for about 10 minutes. They will come back to life and taste just as fresh as the day you baked them.
Flavor Variations and Additions
Once you master the base, you can get creative with flavors. You might try swapping the vanilla extract for peppermint extract during the holidays for a candy-cane vibe. Alternatively, adding a teaspoon of espresso powder to the sugar creates a mocha meringue that pairs perfectly with the chocolate chips.
If you want to add nuts or toasted coconut, just make sure they are finely chopped. Heavy additions will weigh down the foam and cause the cookies to spread. As long as you keep your “add-ins” lightweight and fold them in with a gentle hand, the “no-deflate” method will keep your cookies tall, crisp, and absolutely delicious.
How should I store these cookies to keep them crisp?
You must store chocolate chip meringue cookies in a strictly airtight container at room temperature. Because sugar absorbs moisture from the air, any exposure to humidity will make them soft and sticky. They will stay fresh and crunchy for up to two weeks if kept in a dry environment. Never refrigerate them, as the moisture in the fridge will ruin the texture immediately.
Why did my meringues turn out chewy instead of crunchy?
Chewiness is usually caused by one of two things: humidity or under-baking. If it is a rainy day, the cookies may absorb moisture before you can even get them into a container. If the weather is dry, you likely didn’t leave them in the oven long enough to fully dehydrate. You can often fix this by “re-drying” them in a 225-degree oven for 15-20 minutes and letting them cool in the oven again.
Can I use a different type of sugar if I don’t have superfine?
Yes, you can use regular granulated sugar, but you should pulse it in a food processor or blender for about 30 seconds first. This creates a DIY superfine sugar. If you use regular large-grain sugar without processing it, it may not dissolve completely, leading to a gritty texture or “weeping,” where small beads of syrup leak out of the cookies during baking.
What is the best way to fold in the chocolate chips without deflating the whites?
The key is to use a “J-fold” motion with a flexible rubber spatula. Cut through the center of the mixture, scrape along the bottom, and fold the batter over the top. Do this gently and stop the moment the chips are distributed. This recipe also suggests only folding in half the chips and sprinkling the rest on top to minimize the amount of folding needed, which protects the air bubbles.
Can I make these without cream of tartar?
If you don’t have cream of tartar, you can substitute it with an equal amount of white vinegar or lemon juice. The acid is necessary to stabilize the egg white proteins, which prevents the meringue from collapsing. However, cream of tartar is preferred by most bakers because it provides stability without adding extra liquid to the foam.
Why do I need to leave the cookies in the oven after it’s turned off?
This is called the “cure” or “drying” phase. Meringues are very sensitive to temperature shocks. If you take them out of a hot oven into a cool kitchen immediately, the sudden change can cause the delicate structure to crack. Leaving them in the oven allows them to cool down very slowly, ensuring the centers are completely dry and the shells remain smooth and intact.
Meringue Cookies
Course: DessertCuisine: AmericanDifficulty: medium24
cookies15
minutes1
hour30
minutes80
kcal165
MinutesThese light and airy meringue cookies use a specific sugar-incorporation technique and cream of tartar to ensure a stable structure that won’t collapse, even with the addition of semi-sweet chocolate chips.
Ingredients
4 large egg whites, room temperature
1 cup superfine sugar (or granulated sugar pulsed in a blender)
1/4 teaspoon cream of tartar
1/2 teaspoon vanilla extract
1/2 cup mini semi-sweet chocolate chips
Directions
- Preheat your oven to 225 degrees F and line two large baking sheets with parchment paper.
- In a perfectly clean, grease-free glass or metal bowl, beat the egg whites and cream of tartar on medium-low speed until the mixture is foamy and bubbles are small and uniform.
- Increase the mixer speed to medium-high. To solve the deflation problem, add the sugar one tablespoon at a time, waiting about 15-20 seconds between each addition. This ensures the sugar dissolves completely and stabilizes the protein structure. Beat until the mixture is thick, glossy, and holds stiff, upright peaks that do not droop when the whisk is lifted.
- Gently fold in the vanilla extract.
- Using a rubber spatula, very carefully fold in only 1/4 cup of the mini chocolate chips. Use a light hand to keep the air trapped in the whites.
- Fit a piping bag with a large star tip (to achieve the ridged texture shown in the image). Pipe the meringue into mounds about 2 inches wide onto the prepared baking sheets.
- Sprinkle the remaining 1/4 cup of chocolate chips generously over the tops of the piped mounds before baking.
- Bake for 90 minutes. Do not open the oven door during this time.
- Turn off the oven and leave the cookies inside with the door closed for at least another hour (or up to 4 hours). This slow cooling process prevents the cookies from cracking due to sudden temperature changes.
- Once completely cool and crisp to the touch, remove from the oven and store in an airtight container immediately to prevent humidity from softening them.
Notes
- The secret to preventing deflation is adding sugar one tablespoon at a time and allowing the cookies to cool completely inside the closed oven for at least one hour to prevent cracking.