
Imagine breaking into a warm scone that shatters slightly on the outside but reveals a soft, steaming, and pillowy center. The bright tang of dried apricots and the deep sweetness of raisins provide a perfect contrast to the buttery crumb. This isn’t just a quick breakfast; it’s a centerpiece of the British tea tradition brought right into your kitchen.
However, many home bakers struggle with scones that turn out more like hockey pucks than clouds. The culprit is usually excess moisture from the fruit or overworking the dough. By using the “Anti-Soggy Fruit Secret,” you can ensure your fruit stays plump without turning the surrounding dough into a gummy mess.
The real trick to this recipe lies in how we treat the dried fruit before it ever touches the flour. By creating a dry barrier around each piece of apricot and raisin, we control the hydration of the dough. This professional technique ensures a clean, vertical rise and a crumb that stays light and airy even after baking.
The Science of Flaky Buttermilk Scone Texture
Baking is a series of chemical reactions, and the scone is a perfect example of acid-base chemistry. When the acidic buttermilk hits the baking powder, it triggers an immediate release of carbon dioxide. This gas creates tiny bubbles that expand in the heat of the oven, giving the scones their initial lift.
In addition to the leavening, the fat content plays a vital role in the final mouthfeel. The butter acts as a “shortening” agent, which literally means it shortens the gluten strands. This prevents the dough from becoming stretchy and bread-like, ensuring every bite is tender and melts on your tongue.
Why Cold Butter is Non-Negotiable
You must use butter straight from the fridge. When cold bits of butter hit the hot oven, the water inside the butter evaporates instantly, creating pockets of steam. This steam is what pushes the layers of dough apart to create those sought-after flakes.
If your butter is too soft or melts while you’re mixing, it simply soaks into the flour. Instead of flaky layers, you’ll end up with a greasy, flat scone that spreads across the baking sheet. Look for “pea-sized” chunks of butter in your dry mix; those visible bits are your ticket to success.
The Role of Buttermilk in Hydration
Buttermilk is significantly thicker and more viscous than regular milk. This thickness is a huge advantage because it hydrates the flour more slowly, reducing the risk of over-saturation. It provides a rich, tangy flavor that balances the sugar and the sweetness of the dried fruit.
Furthermore, the enzymes in buttermilk help break down gluten, which further guarantees a tender result. If you find your dough is a bit shaggy, don’t panic. That slight dryness is exactly what keeps the internal structure from becoming heavy and dense.
Essential Components for Apricot and Raisin Buttermilk Scones
The quality of your ingredients directly dictates the quality of your scone. Since this recipe has a relatively short list of components, each one needs to pull its weight. Using fresh, high-quality pantry staples will make the difference between an average bake and a bakery-style masterpiece.
I always recommend using a high-quality vanilla extract rather than imitation flavoring. The vanilla acts as a bridge between the tartness of the buttermilk and the floral notes of the dried apricots. It rounds out the flavor profile and makes the kitchen smell incredible while they bake.
Selecting High-Quality Dried Fruits
Turkish apricots are generally preferred for baking because they are dried whole and remain much moister than California apricots. They have a honey-like sweetness that pairs beautifully with the raisins. When choosing raisins, look for ones that are dark and plump; if they feel hard in the box, they may draw too much moisture from your dough.
If your fruit feels particularly dry, you can soak them in warm water for five minutes, but you must dry them thoroughly before proceeding. Any residual water on the surface of the fruit will interfere with the flour coating and lead to those dreaded soggy spots.
Flour Choice and Protein Content
All-purpose flour is the gold standard here because it has a moderate protein content. Bread flour has too much protein, which would make the scones tough, while cake flour lacks the strength to hold up the heavy fruit. It provides the perfect structural balance for a tall rise.
For the most consistent results, I recommend measuring your flour by weight if you have a kitchen scale. If you’re using cups, fluff the flour with a spoon first and level it off with a knife. Packing the flour into the cup is the fastest way to end up with a dry, crumbly scone.
The Anti-Soggy Secret: Coating Your Fruit
This is the most important step in the entire process. Dried fruits are naturally hygroscopic, meaning they love to soak up and release moisture. As the scones bake, the sugars in the apricots and raisins begin to macerate, creating a sticky syrup that can bleed into the surrounding dough.
By tossing your chopped apricots and raisins in a tablespoon of flour, you are creating a protective “barrier method.” This thin coating of flour absorbs any surface moisture and prevents the fruit from sinking to the bottom of the scone. It also stops the fruit sugars from turning the dough gummy.
When you fold the coated fruit into the dry ingredients, you’ll notice they distribute much more evenly. They won’t clump together, ensuring that every single bite of your scone has a perfect ratio of fruit to pastry. It’s a small step that yields a massive professional difference.
Step-by-Step: Mixing and Shaping the Dough
Once your ingredients are prepped, the goal is speed and a light touch. You want to work the dough just enough to bring it together but not so much that the heat from your hands melts the butter. A “shaggy mass” is exactly what you’re looking for before you turn it out onto the counter.
Avoid the temptation to use an electric mixer for this recipe. The mechanical action is too aggressive and will develop the gluten far too much. A simple fork or a sturdy spatula is all you need to incorporate the liquids into the dry mix gently.
Incorporating the Wet Ingredients
Create a large well in the center of your flour and fruit mixture before pouring in the buttermilk and egg. This allows you to gradually pull the flour from the edges into the center. Using a fork helps keep the mixture aerated and prevents you from mashing the butter bits.
Stop mixing the moment there are no more large pockets of dry flour. The dough should look a bit messy and uneven. If it looks perfectly smooth like bread dough, you’ve likely overmixed it, and the resulting scones will be tough rather than tender.
The Letter-Fold Technique for Maximum Height
To get those beautiful, tall layers you see in professional bakeries, use the letter-fold technique. Once the dough is on the counter, gently pat it out and fold it over itself three or four times. This is a simplified version of lamination, the process used to make croissants.
For another simple bake with a satisfying crumb, try these star-shaped shortbread cookies.
Each fold creates a physical layer of butter and flour. As the scones bake, these layers separate and lift, creating a scone that you can easily pull apart horizontally. Be gentle during this process; you don’t want to crush the air out of the dough.
Precision Cutting for a Vertical Rise
How you cut your scones is just as important as how you mix them. Use a very sharp knife or a bench scraper and press straight down through the dough in one clean motion. This keeps the edges “open” so the steam can escape and push the dough upward.
Never use a sawing motion or twist your cutter. If you saw back and forth, you effectively “seal” the edges of the dough. When the steam tries to escape, it will be trapped by the sealed edges, causing the scone to bulge sideways or come out lopsided instead of rising tall.
Baking and Achieving the Golden Crust
A hot oven is essential for a good scone. At 400°F, the exterior sets quickly, which supports the structure while the inside finishes cooking. This high heat also caramelizes the natural sugars in the buttermilk and the dusting of sugar on top, creating a beautiful golden-brown crust.
Keep a close eye on them around the 18-minute mark. You are looking for the edges to be deeply browned and the tops to feel firm to a light touch. If the centers still feel a bit soft or squishy, give them another two minutes. Let them rest on the hot pan for a few minutes after pulling them out to finish the carry-over cooking.
Troubleshooting Common Scone Failures
Even experienced bakers run into trouble sometimes. If your scones didn’t turn out exactly as planned, it’s usually a small technical error that is easily fixed for the next batch. Most issues stem from temperature or handling techniques.
Remember that baking is a skill that improves with practice. Pay attention to how the dough feels in your hands. Over time, you’ll learn exactly when to stop mixing and how much buttermilk your specific brand of flour needs to reach the perfect consistency.
Why My Scones Came Out Heavy and Dense
The most common reason for a heavy scone is over-mixing the dough, which develops too much gluten. Another culprit could be expired baking powder; if your leavening agent is old, it won’t produce the gas needed for lift. Always check the date on your tin before starting.
Additionally, if your buttermilk or egg was at room temperature, the butter may have started to melt during the mixing process. Keeping everything as cold as possible is the best way to ensure a light, airy crumb. You can even chill your flour and bowl in the fridge for 15 minutes if your kitchen is particularly warm.
Preventing the “Leaning Tower” Effect
If your scones are toppling over in the oven, it’s usually due to uneven thickness when you patted out the dough. Use a rolling pin gently or your palms to ensure the rectangle is a consistent 1.5 inches thick all the way across. This ensures the heat penetrates the dough evenly.
Another reason for leaning is improper cutting. If you press down harder on one side of the knife than the other, you compress the dough unevenly. Aim for a straight, vertical drop with your blade to give the scone a balanced foundation for its rise.
Flavor Variations and Ingredient Swaps
Once you master this base recipe, the possibilities are endless. You can swap the raisins for dried currants for a more traditional British feel, or try dried figs and a hint of honey. The buttermilk base is incredibly versatile and handles different mix-ins beautifully.
For an aromatic boost, try rubbing some orange or lemon zest into the granulated sugar before you mix it with the flour. The oils from the citrus will permeate the entire scone, adding a bright, fresh layer of flavor that complements the dried apricots perfectly.
Make Ahead and Storage Protocols
Scones are best enjoyed fresh from the oven, but you can definitely prepare them in advance. You can cut the raw dough into wedges and freeze them on a tray. Once frozen solid, transfer them to a freezer bag; you can bake them straight from the freezer by adding about 3 minutes to the bake time.
If you have leftovers, store them in an airtight container at room temperature for up to two days. To restore that “just-baked” texture, avoid the microwave, which can make them rubbery. Instead, pop them in a 350°F oven for 5 to 8 minutes until the exterior crisps up again.
Serving Suggestions for a Traditional Tea
To serve these properly, you need a generous amount of clotted cream or a very thick whipped cream. In the UK, there is a famous debate between Devon and Cornwall about whether the cream or the jam goes on first. Since these scones are already packed with fruit, a simple dollop of cream is often all you need.
Pair these scones with a robust tea like Earl Grey or a malty Assam. The tannins in the tea help cleanse the palate between bites of the rich, buttery pastry. It’s a sophisticated way to enjoy a mid-afternoon break or a special weekend brunch with friends.
Expert Baking FAQ
Can I use Greek yogurt instead of buttermilk?
Yes, you can substitute Greek yogurt for buttermilk, but you will need to thin it out first. Mix 1/2 cup of plain Greek yogurt with about 2-3 tablespoons of water or milk until it reaches the consistency of heavy cream. The acidity in the yogurt will still react with the baking powder to provide that necessary lift.
Why did my raisins burn on the outside?
Raisins have a high sugar content and can scorch if they are exposed on the surface of the scone. To prevent this, try to tuck any protruding raisins back into the dough before baking. The flour-coating technique also helps by providing a slight buffer, but keeping the fruit mostly encased in dough is the best protection.
Can I make these gluten-free?
You can make these with a high-quality 1:1 gluten-free flour blend that contains xanthan gum. However, gluten-free dough tends to be thirstier, so you might need an extra tablespoon or two of buttermilk. Be aware that the texture will be slightly more crumbly and won’t have the same layered “pull-apart” quality as wheat-based scones.
How do I get a shinier top?
For a matte, rustic look, stick with the buttermilk wash. If you want a high-gloss, golden finish, brush the tops with an egg wash (one egg beaten with a teaspoon of water) instead of buttermilk. This creates a protein-rich coating that browns beautifully and gives the scones a professional, polished appearance.
Is it better to use a baking stone or a metal sheet?
A heavy-duty metal baking sheet lined with parchment paper is actually superior for scones. Metal conducts heat quickly, which is vital for getting that immediate “oven spring” from the cold butter. A baking stone can sometimes hold too much heat and burn the bottoms of the scones before the centers are fully cooked.
Apricot Raisin Scones
Course: Breakfast and BrunchCuisine: BritishDifficulty: easy8
scones15
minutes20
minutes310
kcal35
MinutesThese scones are designed to stay light and airy by coating dried apricots and raisins in flour before mixing. This prevents moisture from the fruit from making the dough gummy, resulting in a perfectly flaky texture served best with clotted cream.
Ingredients
2 1/2 cups all-purpose flour (plus extra for dusting)
1/4 cup granulated sugar
1 tablespoon baking powder
1/2 teaspoon salt
1/2 cup (1 stick) cold unsalted butter, cubed
1/2 cup dried apricots, chopped into 1/2-inch pieces
1/2 cup raisins
2/3 cup cold buttermilk (plus 1 tablespoon for brushing)
1 large egg
1 teaspoon vanilla extract
Powdered sugar for dusting
Clotted cream or thick whipped cream for serving
Directions
- Preheat your oven to 400°F (200°C) and line a baking sheet with parchment paper.
- In a small bowl, toss the chopped apricots and raisins with 1 tablespoon of the measured flour. This is the critical step: coating the fruit in flour creates a dry barrier that prevents the fruit sugars from bleeding into the dough, which is the primary cause of soggy, dense scones.
- In a large bowl, whisk together the remaining flour, sugar, baking powder, and salt.
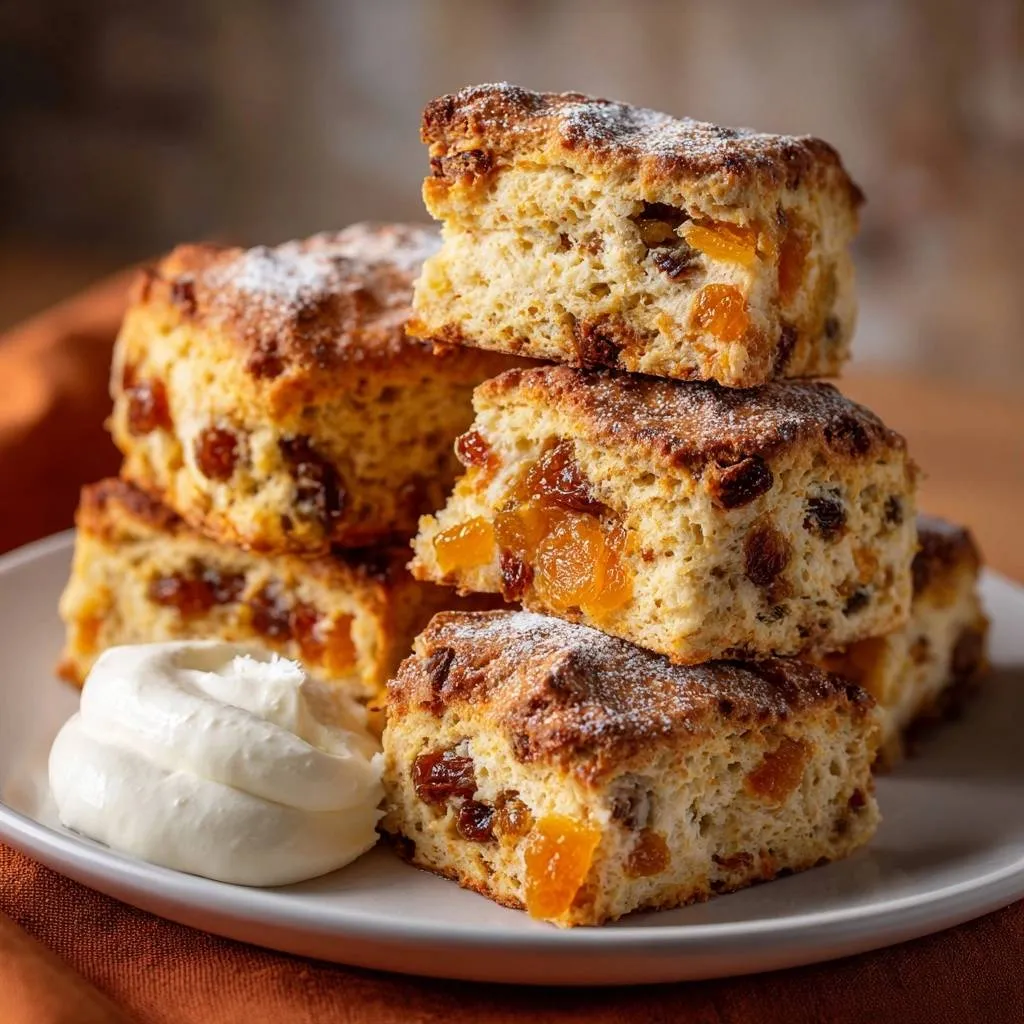
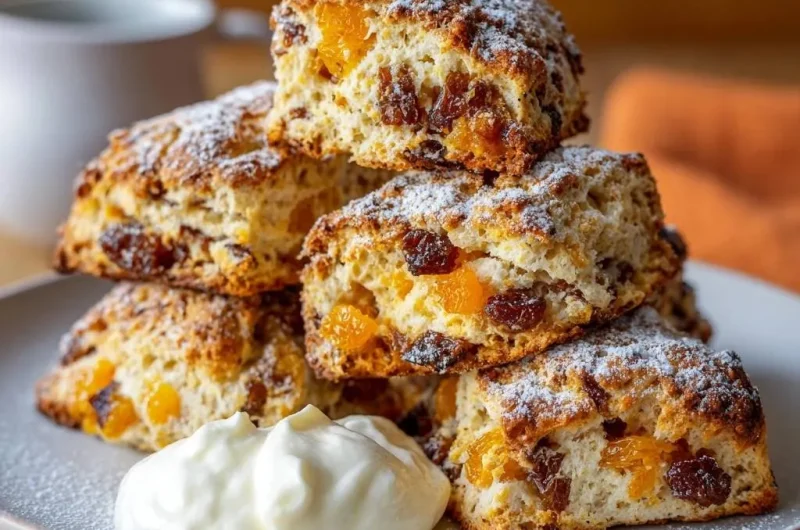
- Use a pastry cutter or your fingers to work the cold butter into the flour mixture until it resembles coarse crumbs with some pea-sized pieces remaining. Do not overwork; the visible bits of butter create the flaky texture seen in the image.
- Gently fold the flour-coated fruit into the dry mixture until evenly distributed.
- In a separate measuring cup, whisk the buttermilk, egg, and vanilla together.
- Pour the liquid into the center of the flour mixture. Use a fork to stir just until a shaggy dough forms. If the dough is too dry to hold together, add one additional tablespoon of buttermilk.
- Turn the dough onto a lightly floured surface. Gently fold the dough over itself 3-4 times (this creates the tall, layered lift). Pat it into a square or rectangle about 1.5 inches thick.
- Using a sharp knife, cut the dough into 8 square or rectangular pieces (as shown in the image). Avoid “sawing” the dough, which seals the edges and prevents rising.
- Place the scones on the prepared baking sheet. Lightly brush the tops with a little buttermilk.
- Bake for 18 to 22 minutes or until the edges are deeply golden brown and the centers are set.
- Let the scones cool on the pan for 5 minutes. Dust generously with powdered sugar while still slightly warm so it adheres. Serve with a large dollop of clotted cream.
Notes
- The critical step is coating the chopped fruit in flour to create a dry barrier. Avoid sawing the dough when cutting to ensure a proper rise, and use cold butter for maximum flakiness.