The perfect vanilla custard slice is a study in dramatic contrasts. You want a pastry that shatters into a thousand buttery shards the moment your fork hits it, followed immediately by a silky, cool cloud of vanilla cream. Most versions you find at the grocery store are a disappointment, featuring rubbery pastry and a gelatinous filling that feels more like plastic than dessert.
This “Anti-Soggy Bottom” method changes the game by focusing on moisture control and structural integrity. We aren’t just making a sandwich; we are engineering a dessert that maintains its crunch for hours. By using a stabilized diplomat cream and a specific high-heat baking technique, you get that professional bakery finish right in your own kitchen.
The secret to success lies in the cooling process. Most bakers rush to assemble the slices while the pastry is still slightly warm, which traps steam and turns the layers gummy. You must let the pastry cool completely on a wire rack to ensure every bit of moisture evaporates, leaving behind a crisp, airy skeleton ready to hold the rich custard.
The Anatomy of a Perfect Vanilla Custard Slice
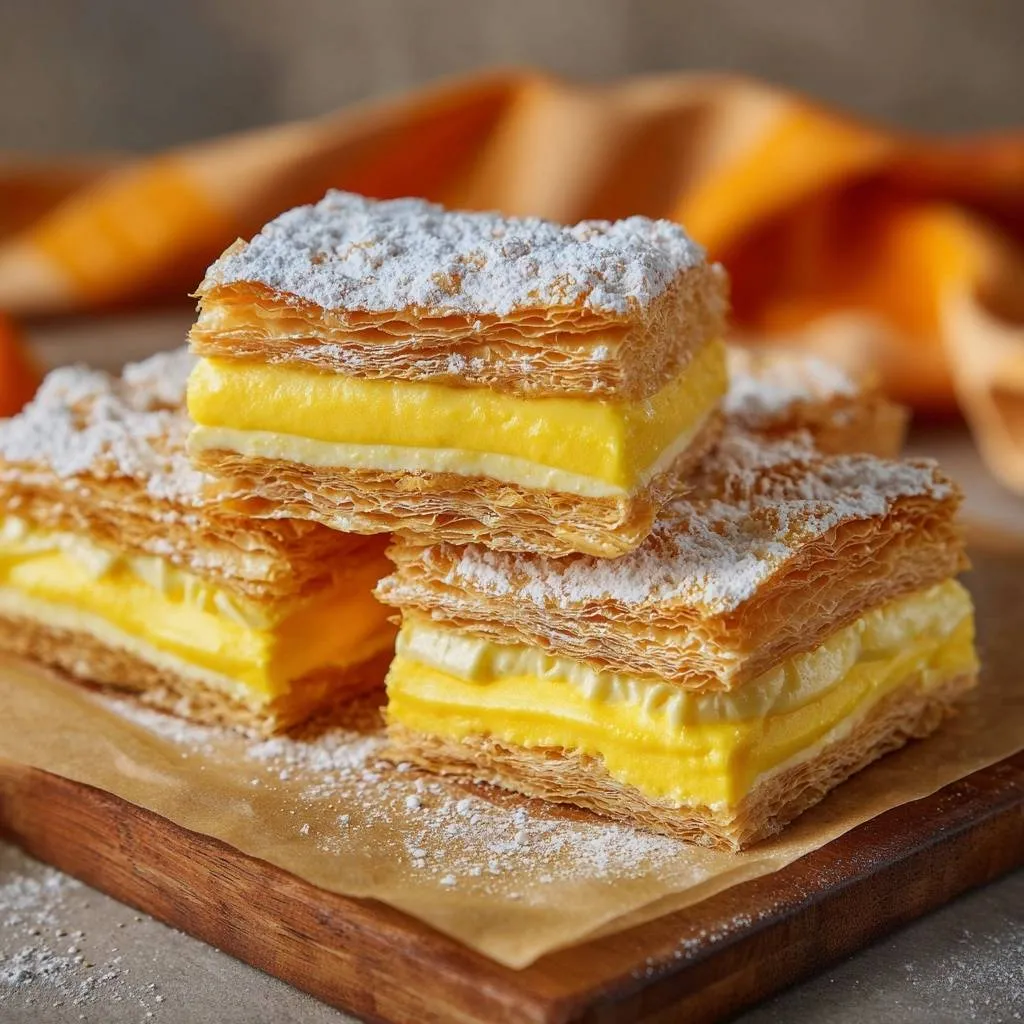
A truly great custard slice relies on three distinct pillars: the skyscraper pastry, the stabilized filling, and the snowy finish. The pastry must be baked until it reaches a deep mahogany gold, ensuring the flour is fully toasted and the butter has created distinct, visible laminations. If the pastry is pale, it will lack the structural strength to support the weight of the cream.
The filling is a “Diplomat Cream,” which is a sophisticated hybrid of thick pastry cream and airy whipped cream. This provides a mouthfeel that is much lighter than a traditional custard but far more stable than plain whipped cream. Finally, a heavy dusting of powdered sugar provides a hit of immediate sweetness that balances the mellow, floral notes of the vanilla bean extract.
Essential Components for Classic Vanilla Custard Slices
Quality ingredients are the foundation of this dish. You should use whole milk with at least 3.5% fat content to ensure the custard has a velvety mouthfeel. The four egg yolks are non-negotiable; they provide the natural yellow hue and the lecithin needed to emulsify the fats into a smooth, pourable dream. However, the real hero here is the cornstarch.

While many recipes use flour as a thickener, cornstarch provides a cleaner flavor profile and a more rigid set. We have slightly increased the amount of cornstarch in this recipe to ensure the slices don’t “bulge” when you cut into them. In addition, using a high-quality vanilla extract or paste will elevate the flavor from “sweet” to “sophisticated.”
Selecting High-Quality Puff Pastry
When shopping for puff pastry, always check the ingredient label for butter. Many commercial brands use vegetable oils or shortening, which lack the flavor and the “melt-in-your-mouth” quality of real dairy. Butter-based pastry also creates better steam, which is what gives you those high, flaky layers.
Keep your pastry in the refrigerator until the very second you are ready to roll it out. If the butter inside the dough gets too soft before it hits the oven, it will leak out rather than creating steam. This results in a flat, greasy cracker instead of a tall, puffed pastry sheet.
The Role of Heavy Cream in Diplomat Filling
Standard pastry cream is delicious, but it can be quite dense and heavy on the palate. By folding in heavy cream that has been whipped to stiff peaks, you introduce millions of tiny air bubbles into the mixture. This aeration transforms the custard into a diplomat cream.
This step is vital for the “Anti-Soggy” philosophy. The whipped cream lightens the overall density, meaning the pastry isn’t being crushed by a heavy, wet weight. Therefore, the bottom layer stays crisp much longer than it would with a traditional, heavy custard filling.
If you’re enjoying this custard technique, you’ll appreciate the same attention to detail in strawberry heart pastries.
The Science of the Open-Rise Pastry Technique
Most traditional recipes tell you to bake puff pastry between two baking sheets to keep it flat. We are doing the exact opposite. By using an “open-rise” technique, we allow the pastry to reach its full vertical potential. This creates a “skyscraper” effect where the layers are separated by pockets of air, providing a much more satisfying crunch.
As the pastry bakes at 400°F, the water in the butter layers turns to steam instantly. This steam forces the dough layers upward. If you weigh it down, you compress those layers, making them denser and more likely to absorb moisture from the custard later. An open rise ensures the pastry remains a dry, crisp barrier.
Pricking vs. Docking: Managing the Rise
To prevent the pastry from turning into one giant, uneven bubble, you must prick it with a fork every two inches. This is a controlled form of “docking.” It allows just enough steam to escape so the pastry rises evenly across the entire sheet rather than ballooning in the center.
Don’t over-prick the dough, though. If you turn it into a pincushion, you’ll lose too much steam and the pastry won’t rise at all. A light touch every few inches is the sweet spot for achieving that tall, professional lamination you see in high-end patisseries.
Achieving the Deep Golden Maillard Reaction
Do not be afraid of a dark bake. You want the pastry to be a deep, golden brown, almost bordering on bronze. This color indicates that the Maillard reaction has occurred, which brings out nutty, toasted flavors that contrast beautifully with the sweet vanilla custard.
An 18-22 minute bake at 400°F is essential for drying out the inner layers of the puff pastry. If you pull it out too early, the center will still be slightly raw and doughy. That residual moisture is the primary cause of a soggy bottom, so let it get dark and crispy!
Step-by-Step: Building the Stabilized Custard Base
Creating the custard requires your full attention for about ten minutes. Firstly, you must heat the milk until it just begins to simmer; look for tiny bubbles forming around the edges of the pan. Do not let it reach a rolling boil, as this can scorch the milk and ruin the delicate vanilla flavor.
Once the milk is hot, you will slowly pour it into your egg yolk and cornstarch mixture. This is the most critical phase of the recipe. You are looking for the custard to transform from a liquid into a thick, glossy paste that coats the back of a spoon heavily. It should look like thick pudding before you take it off the heat.
Tempering Yolks Without Scrambling
Tempering is the process of slowly raising the temperature of the egg yolks so they don’t curdle. Start by adding just a tablespoon of hot milk to the yolks while whisking vigorously. Continue adding the milk drop by drop, then in a slow stream, until the yolk mixture is warm to the touch.
If you do happen to see a few small lumps, don’t panic. Simply pour the finished custard through a fine-mesh sieve into a clean bowl. This will catch any bits of cooked egg and ensure your final vanilla slices have a perfectly smooth, professional texture.
The Cooling Phase: Preventing the Skin
As custard cools, the proteins on the surface dry out and form a tough “skin.” To prevent this, press a piece of plastic wrap directly onto the surface of the hot custard. There should be no air gap between the cream and the plastic.
The custard must be completely cold before you attempt to fold in the whipped cream. If the base is even slightly warm, it will melt the fat in the whipped cream. This causes the entire filling to collapse into a runny mess that will leak out of your pastry slices.
Assembling Your Classic Vanilla Custard Slices
Assembly is where your patience pays off. If your pastry has puffed up unevenly, use a sharp serrated knife to gently “shave” or level the top of the bottom piece. This creates a flat stage for your custard to sit on, ensuring an even distribution of filling in every bite.
When you place the top layer of pastry onto the cream, use a very light touch. You want the pastry to adhere to the custard, but you don’t want to apply so much pressure that the cream squishes out the sides. Think of it as a gentle “marriage” of the two components.
Folding Techniques for Maximum Volume
When it is time to combine the whipped cream and the cold custard, use a large rubber spatula and a “J-fold” motion. Cut through the center of the bowl, scrape along the bottom, and lift the mixture over the top. Rotate the bowl as you go.
Stop folding the moment you no longer see white streaks of cream. Over-mixing will deflate the air bubbles you worked so hard to create. You want the filling to feel like a stable mousse—firm enough to hold its shape but light enough to melt on the tongue.
The Critical Two-Hour Set Time
It is tempting to cut into the slices immediately, but they need at least two hours in the fridge. During this time, the cornstarch and the butter in the custard firm up completely. This “setting” phase is what allows you to get those clean, sharp edges when you finally slice them.
The cold environment also allows the pastry to slightly bond with the cream. This prevents the top layer from sliding off when you take your first bite. However, don’t leave them in the fridge for more than 24 hours, or the pastry will eventually lose its signature crunch.
Troubleshooting Common Custard Slice Failures
The most common issue is the “custard blowout,” where the filling oozes out the sides during slicing. This usually happens because the custard wasn’t cooked long enough to fully activate the cornstarch. Ensure the mixture reaches a thick, paste-like consistency on the stove before you stop cooking.
Another frequent complaint is soft pastry. If your pastry isn’t crunchy, it likely wasn’t baked long enough or it wasn’t cooled on a wire rack. Steam is the enemy of crispness; if you cool the pastry on a flat plate, the steam gets trapped underneath and softens the bottom layer instantly.
Preventing the “Soggy Bottom” Syndrome
To truly guarantee a crisp base, you can lightly dust the bottom pastry layer with a thin coating of powdered sugar before adding the custard. The sugar acts as a microscopic moisture barrier. Additionally, always ensure your custard is chilled to refrigerator temperature before assembly.
If you are making these for a party, assemble them as close to serving time as possible. While the diplomat cream is stable, the pastry is a sponge for moisture. Three to four hours in the fridge is the “sweet spot” for the perfect texture balance.
Achieving Clean, Professional Edges
To get those perfect bakery-style squares, you must use a serrated knife. Do not try to chop straight down through the slice. Instead, use a gentle sawing motion to cut through the top pastry layer first. Once you are through the crust, you can press down firmly through the custard and the base.
Keep a tall glass of warm water and a clean towel nearby. Dip your knife in the water and wipe it clean after every single cut. This prevents the custard from smearing onto the pastry layers, keeping your edges sharp and your presentation flawless.
Storage and Make-Ahead Logistics
You can easily make the custard base up to 24 hours in advance. In fact, letting the pastry cream sit in the fridge overnight often improves the flavor as the vanilla has more time to bloom. Just be sure to give it a quick whisk to loosen it up before folding in the whipped cream.
Leftover slices should be stored in an airtight container in the refrigerator. They will stay safe to eat for up to three days, though the pastry will gradually soften after the first 12 hours. These do not freeze well; the delicate cell structure of the diplomat cream will break down upon thawing, resulting in a watery mess.
Expert Tips for the Ultimate Vanilla Finish
The final dusting of powdered sugar is more than just a garnish; it provides a beautiful visual contrast against the dark pastry. Use a fine-mesh sieve to get an even, snow-like coating. If you want to be extra fancy, do a light dusting, wait five minutes for it to settle, and then do a second “heavy” dusting right before serving.
For a truly professional look, trim the very edges of your large pastry rectangle before cutting it into individual squares. This removes any uneven bits and reveals the beautiful layers of cream and pastry inside. It might feel wasteful, but those “chef’s snacks” are the best part of the process!
How do I store leftovers?
Store any remaining custard slices in an airtight container in the refrigerator for up to 2 days. Note that the puff pastry will naturally lose its crispness the longer it sits against the moist custard. For the best experience, eat them within 12 hours of assembly. Do not freeze this dish, as the custard and cream will separate and become grainy when thawed.
Why is my custard runny and not holding its shape?
A runny custard usually stems from one of two things: undercooking the base or over-mixing the whipped cream. You must cook the egg yolk and milk mixture until it is a very thick, heavy paste. If it looks like a thin sauce, it won’t set. Additionally, when folding in the whipped cream, use a gentle hand. If you stir too vigorously, you’ll deflate the air and turn the filling into a liquid.
Can I use a different type of pastry?
While puff pastry is the traditional choice for its height and flakiness, you could technically use phyllo dough for a different texture. However, phyllo is much more fragile and won’t provide the same “heft” as puff pastry. Avoid using shortcrust pastry, as it is too dense and will make the dessert feel heavy and difficult to eat with a fork.
What can I use if I don’t have cornstarch?
If you are out of cornstarch, you can substitute it with all-purpose flour, but you will need to double the amount (use 2/3 cup of flour). Be aware that flour-based custards need to be cooked a bit longer to remove the “raw” flour taste. The resulting custard will also be slightly more opaque and less glossy than one made with cornstarch.
Why did my pastry shrink during baking?
Puff pastry often shrinks if it hasn’t had enough time to “relax” after being rolled or handled. If you unfolded or rolled your pastry, let it sit in the fridge for 15 minutes before putting it in the oven. This allows the gluten to relax, ensuring the pastry rises upward rather than pulling inward and shrinking.
How do I get the top layer of sugar to stay white and not melt?
Powdered sugar melts when it comes into contact with moisture. To keep that bright white finish, ensure the top of your pastry is completely cold before dusting. If you are serving these later, wait to do the final dusting until the very last second. You can also find “non-melting” powdered sugar (often called donut sugar) at specialty baking stores which is designed to stay white even on moist surfaces.

Vanilla Custard Slices
Course: DessertCuisine: EuropeanDifficulty: medium9
squares20
minutes25
minutes310
kcal45
MinutesThese custard slices use an open-rise baking technique for tall, flaky pastry layers and a rich, stabilized vanilla diplomat cream to ensure a professional finish and lasting crispness.
Ingredients
1 package (17.3 oz) high-quality frozen puff pastry, thawed but cold
2 cups whole milk
1/2 cup granulated sugar
1/3 cup cornstarch (increased for stability)
4 large egg yolks
2 teaspoons vanilla extract
2 tablespoons unsalted butter
1/2 cup heavy cream, chilled
1/4 cup powdered sugar (for the cream)
Extra powdered sugar for heavy dusting
Directions
- Preheat your oven to 400°F (200°C). Line a baking sheet with parchment paper.
- Unfold the puff pastry. To achieve the high, visible lamination shown in the image, do NOT weigh the pastry down with a second tray. Instead, prick the pastry lightly with a fork every 2 inches to allow for an even, tall rise. Cut into two equal rectangles and bake for 18-22 minutes until deep golden brown and puffed high.
- While the pastry is hot, use a sharp serrated knife to gently “level” the top of the bottom piece if it is too domed. Let the pastry cool completely on a wire rack. This allows steam to escape, preventing sogginess.
- In a medium bowl, whisk egg yolks, sugar, and cornstarch until pale. In a saucepan, heat milk until it just begins to simmer.
- Slowly temper the milk into the egg mixture, whisking constantly. Return the mixture to the saucepan and cook over medium heat, whisking vigorously until it thickens into a dense paste. Remove from heat; stir in vanilla and butter.
- Transfer the custard to a bowl, cover the surface directly with plastic wrap to prevent a skin, and refrigerate until completely cold.
- Once cold, whip the heavy cream with 1/4 cup powdered sugar to very stiff peaks. Fold the whipped cream into the chilled custard. This creates the “Diplomat Cream” texture seen in the image-light yet structurally sound.
- Place the bottom pastry sheet on a board. Spread the thick custard mixture evenly over the surface. Top with the second pastry sheet, pressing down very gently.
- Refrigerate for at least 2 hours to set. Before serving, dust the top generously with a thick layer of powdered sugar.
- Use a sharp serrated knife to saw through the top pastry layer first, then press down to cut through the custard and base for clean, professional edges.
Notes
- To ensure clean edges, use a serrated knife to saw through the top pastry layer before cutting through the custard. Do not weigh down the pastry during baking to achieve maximum height and lamination.