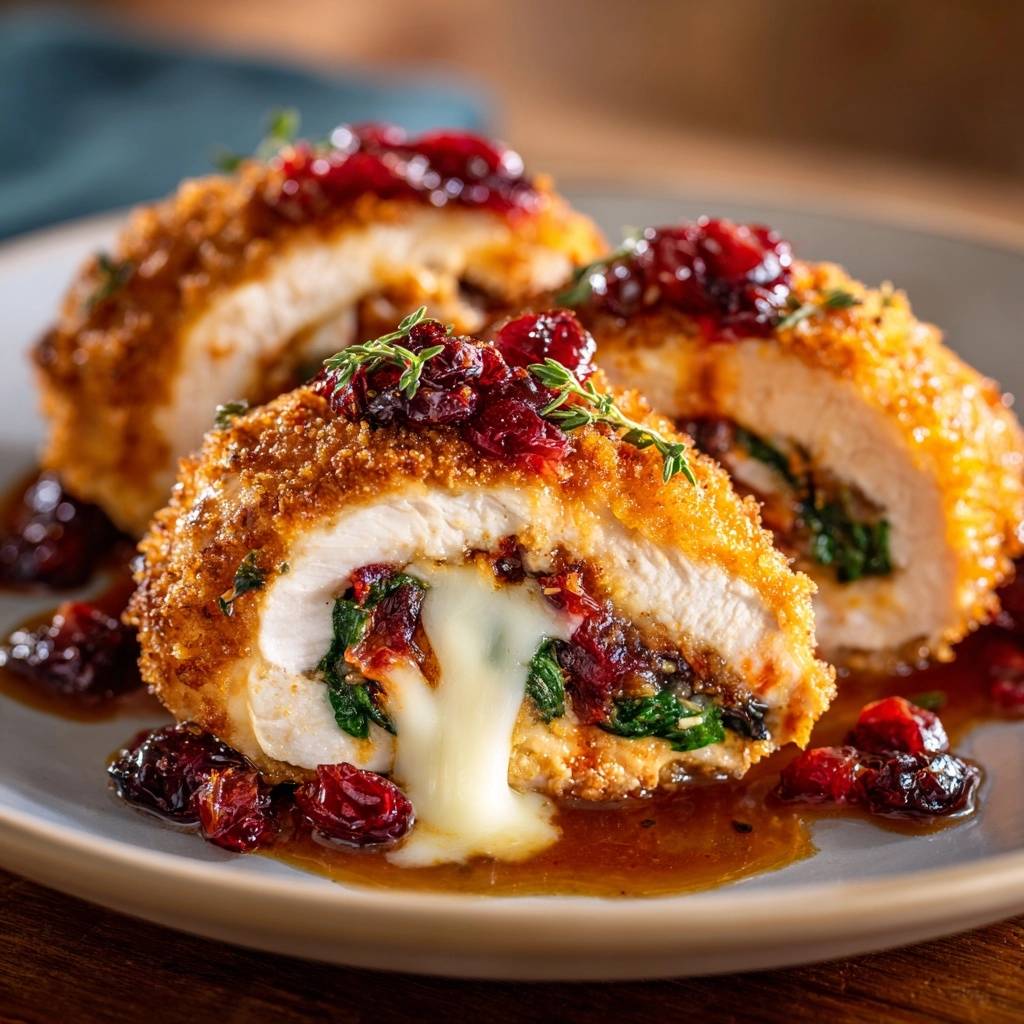
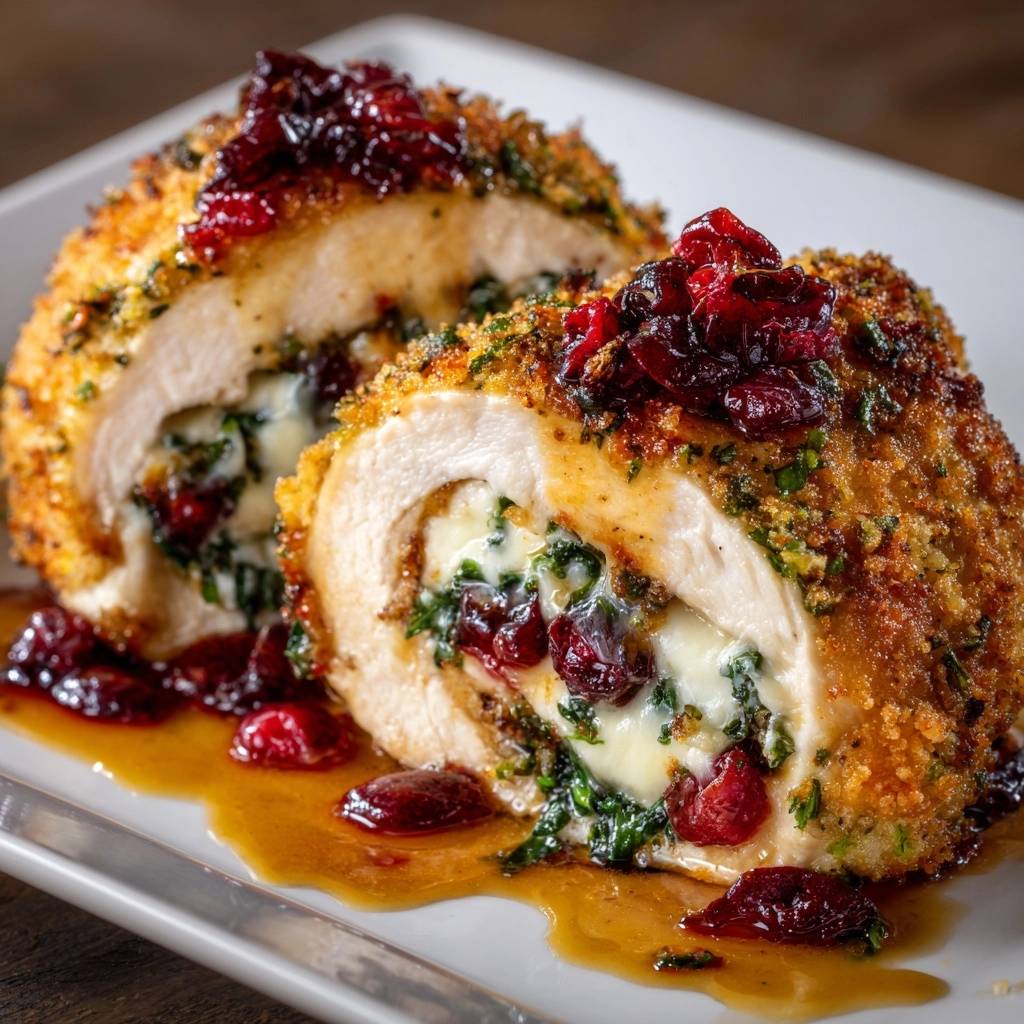
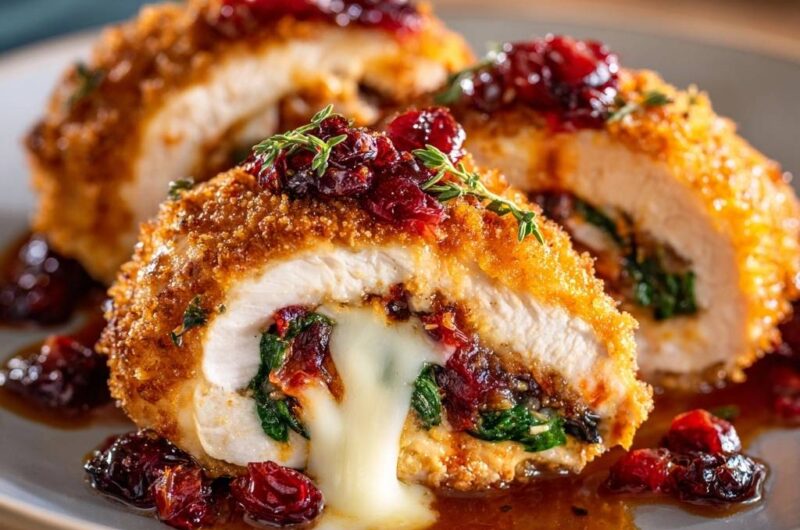
Imagine slicing into a golden, crispy chicken breast and finding a perfectly contained center of molten cheese, earthy spinach, and tart cranberries. The contrast between the crunch of the Panko crust and the velvety, sweet-and-savory filling is what makes Cranberry and Spinach Stuffed Chicken Breasts a true showstopper. However, many home cooks avoid this dish because they’ve been burned by “cheese blowout,” where the filling escapes into the pan, leaving the meat dry and the flavor lost.
This recipe solves that frustration by focusing on technical precision and structural integrity. We aren’t just rolling meat; we’re engineering a flavor vessel that stays intact from the skillet to the dinner plate. By balancing the acidity of the cranberries with the richness of high-quality cheese, you create a restaurant-level experience that feels sophisticated yet deeply comforting. It’s the kind of meal that looks like it took hours of professional training, but it’s actually about mastering a few simple physical cues.
The real secret to success lies in the moisture management of your greens. If you put raw or wet spinach inside the chicken, the steam created during cooking will build pressure and force the seams of the meat apart. By properly wilting and drying the spinach beforehand, you remove that internal pressure, ensuring the cheese stays exactly where it belongs. Let’s dive into how you can achieve this flawless result every single time.
The Science of the No-Leak Cheese Seal
When chicken cooks, the protein fibers contract and tighten, which naturally puts pressure on whatever is inside. If there is any gap in your “seal,” the melting cheese will follow the path of least resistance and leak out. This is often exacerbated by steam pressure from the vegetables. To combat this, we use a pressurized layering technique that works with the physics of the meat rather than against it.
By leaving a one-inch border of meat around your filling, you allow the chicken to “velcro” to itself as it hits the heat. The proteins bond together, creating a natural fleshy barrier. We then reinforce this with toothpicks, which act as structural anchors to prevent the meat from unrolling as it shrinks. Think of the toothpicks as the rebar in a concrete wall; they provide the tension needed to keep the shape under the stress of the oven’s heat.
Finally, the Panko and Parmesan crust acts as a structural exoskeleton. As the cheese in the breading melts and the breadcrumbs toast, they form a rigid shell. This shell provides a secondary layer of protection, catching any tiny drips of cheese and sealing them into the crust itself. This multi-layered approach ensures that the “lava” stays inside the mountain until you’re ready to erupt it with your knife.
Essential Components for Cranberry and Spinach Stuffed Chicken Breasts
Quality ingredients are the foundation of this dish, starting with the chicken. You need large, boneless, skinless breasts to provide enough surface area for a secure roll. Smaller breasts often tear during the pounding process, which creates “leak points” that are impossible to fix later. Look for meat that is plump and has a consistent pink hue without excessive bruising.
The filling relies on the interplay between dried cranberries and fresh baby spinach. Dried cranberries are preferred over fresh ones because they offer a concentrated sweetness and a chewy texture that doesn’t release excess juice. For the cheese, a thick slice of high-quality mozzarella or provolone is essential. These cheeses have the perfect “stretch” factor and a mild flavor that doesn’t overpower the delicate herbs in the breading.
Selecting and Preparing the Poultry
When you’re at the grocery store, try to pick a pack where the breasts are roughly the same size. This ensures they all finish cooking at the same time in the oven. Before you start pounding, take a sharp knife and trim away any dangling bits of fat or the tough silver skin. A clean, rectangular shape is much easier to roll than an irregular piece of meat with ragged edges.
The Role of Panko and Parmesan in the Crust
Panko is superior to traditional breadcrumbs here because its large, flaky surface area creates more “crunch” per bite. It doesn’t absorb oil as quickly as fine crumbs, so the crust stays light and airy. Adding finely grated Parmesan to the mix isn’t just for flavor; the cheese acts as a binder that helps the Panko stick to the chicken, creating a more durable coating.
Step-by-Step: Preparing the Chicken for Stuffing
Pounding the chicken is the most important mechanical step in this recipe. Place the breast between two large sheets of plastic wrap to prevent the meat from tearing and to keep your kitchen clean. Using the flat side of a meat mallet, start from the center and work your way out toward the edges with firm, even strokes.
You are aiming for a thickness of exactly 1/4 inch. If the meat is too thick, it won’t roll tightly and the center will stay raw while the outside burns. If it’s too thin, it will develop holes that let the cheese escape. Once pounded, the chicken should look like a large, even “shingle” of meat ready to be seasoned and filled.
Managing Moisture: The Secret to Intact Fillings
Spinach is nearly 90% water, and that water is the enemy of a stuffed chicken breast. When you wilt the spinach in a pan, you’re beginning the process of removing that moisture. However, simply wilting it isn’t enough. You must take the extra step of placing the cooked spinach in a paper towel and squeezing it until it’s almost dry to the touch.
This “paper towel squeeze” prevents the “steam-leak” phenomenon. Without this step, the water in the spinach would turn to steam inside the chicken roll, creating internal pressure that would blow out your seams. By using dry, concentrated spinach, you ensure the filling stays compact and the chicken stays juicy rather than soggy.
The Assembly: Layering for Maximum Retention
To assemble, lay your seasoned chicken flat and place the cheese slice right in the center. Remember the “one-inch rule”: leave plenty of space on all sides of the cheese. Pile the dried spinach and cranberries on top of the cheese. This order is intentional, as the cheese will melt around the greens and fruit, acting as a delicious glue.
Fold the short sides of the chicken inward first, then roll from the bottom like a burrito. This “tucking” method seals the ends completely. Use three to four toothpicks to pin the seam and the ends shut. Don’t be shy with the toothpicks; it’s better to have an extra one for security than to watch your cheese disappear into the frying oil.
The Three-Stage Dredging and Coating Process
The standard breading procedure is vital for a professional finish. First, coat the roll in flour seasoned with smoked paprika. The flour dries the surface of the meat so the egg can actually stick. Shake off any excess; you want a light dusting, not a heavy paste. Next, dip the roll into the beaten eggs, ensuring every nook and cranny is coated.
Finally, press the chicken firmly into the Panko and Parmesan mixture. Don’t just toss it in the bowl; use your hands to physically press the crumbs into the egg wash. This creates a thick, reinforced barrier. This “shell” is your final line of defense against leaks and provides that satisfying, audible crunch when you finally take a bite.
Searing and Roasting for Optimal Texture
We use a two-stage cooking method to get the best of both worlds. Start by shallow frying the rolls in shimmering vegetable oil. You only need about 4-5 minutes per side. You aren’t trying to cook the chicken all the way through here; you are simply setting the crust and developing that deep, golden-brown color through the Maillard reaction.
Once the crust is crispy, move the chicken to a 375°F oven. The oven provides gentle, surrounding heat that finishes cooking the center of the roll without burning the breadcrumbs. Use a meat thermometer to check for an internal temperature of 165°F. This hybrid approach ensures the meat is tender and the filling is hot and melted.
Why Resting the Meat is Non-Negotiable
When the chicken comes out of the oven, the cheese inside is in a completely liquid state and the juices are bubbling. If you cut into it immediately, the cheese will pour out like water. You must let the chicken rest for at least 5 to 8 minutes. This allows the proteins to relax and the cheese to “set” into a creamy, stable consistency.
During this resting period, the residual heat finishes the cooking process and the juices redistribute throughout the meat. This ensures that when you finally slice the chicken crosswise, the filling stays perfectly in place, creating those beautiful, concentric circles of color that make this dish so visually appealing.
Troubleshooting Common Stuffed Chicken Issues
If your breading is falling off, it’s usually because the chicken was too wet before the flour stage or you didn’t press the Panko firmly enough. Always pat the meat dry before you start the dredging process. If the chicken ends up dry, you likely skipped the resting phase or overcooked it in the oven. A digital thermometer is your best friend to prevent this.
For those who still experience a cheese leak, check your toothpick placement. The ends of the roll are the most common failure points, so make sure they are pinned tightly. If the center of your chicken is cold but the outside is brown, it means your chicken was too thick. Next time, spend an extra minute pounding the meat to that crucial 1/4 inch thickness.
Flavor Variations and Ingredient Swaps
While the cranberry and spinach combo is a classic, you can easily swap ingredients to suit your taste. If you prefer a sharper bite, try using provolone or even a creamy feta instead of mozzarella. Just ensure the cheese is “high-melt” so it becomes gooey in the oven. For the greens, kale or Swiss chard work beautifully as long as you follow the same wilting and drying process.
If you aren’t a fan of cranberries, dried cherries or even chopped dried apricots provide a similar sweet-tart balance. You can also experiment with the herbs in the breading. Swapping the thyme for rosemary or oregano can completely change the profile of the dish, making it lean more toward a Mediterranean or rustic farmhouse flavor.
For a different way to enjoy that sweet and tart fruit, check out these cranberry glazed chicken thighs.
Side Dish Pairings for a Balanced Plate
Because this chicken is rich and savory, it pairs best with sides that offer a bit of acidity or earthiness. Garlic mashed potatoes are a natural fit, providing a creamy base for the cranberry sauce topping. For a lighter option, a wild rice pilaf with toasted almonds adds a nice nutty crunch that echoes the textures in the chicken stuffing.
Roasted root vegetables, like carrots or parsnips, bring out the natural sweetness of the dried cranberries. If you want to cut through the richness of the cheese, try a side of roasted Brussels sprouts with a drizzle of balsamic glaze. The slight bitterness of the sprouts balances the savory chicken and sweet fruit perfectly, creating a well-rounded meal.
Expert Tips for Make-Ahead and Storage
You can actually prep these chicken rolls up to 24 hours in advance. Simply pound, stuff, roll, and secure them with toothpicks, then store them in an airtight container in the fridge. Wait to do the flour, egg, and Panko dredging until right before you are ready to fry them to ensure the crust stays as crispy as possible.
If you have leftovers, the best way to reheat them is in the oven or an air fryer at 350°F for about 10 minutes. Avoid the microwave if possible, as it will make the Panko crust soggy and can cause the chicken to become rubbery. For long-term storage, you can freeze the stuffed rolls raw; just thaw them completely in the refrigerator before breading and cooking.
How do I store leftovers and can I freeze this dish?
Store any leftover chicken in an airtight container in the refrigerator for up to 3 days. To maintain the crispy texture, reheat in a 350°F oven or air fryer until warmed through. You can freeze the stuffed chicken rolls, but it is best to do so before they are cooked and breaded. Wrap the raw, stuffed, and toothpick-secured rolls tightly in plastic wrap and foil, then freeze for up to 2 months. Thaw overnight in the fridge before breading and frying.
Why did my cheese leak out during cooking?
Cheese leakage usually happens for two reasons: improper sealing or internal steam pressure. Ensure you leave a 1-inch border of meat around the filling and use enough toothpicks to close the ends completely. Additionally, if the spinach isn’t squeezed dry, the steam will force the chicken seams open. Following the “paper towel squeeze” and the “border rule” will solve this problem.
Can I use frozen spinach instead of fresh?
Yes, you can use frozen spinach, but you must be even more diligent about removing moisture. Thaw the spinach completely and squeeze it through a fine-mesh sieve or a clean kitchen towel until it is very dry. Since frozen spinach is already blanched, you don’t need to wilt it in a pan; just season it and add it to your stuffing.
What can I use if I don’t have a meat mallet?
If you don’t have a mallet, a heavy rolling pin or even the bottom of a heavy skillet will work. Just be sure to keep the plastic wrap over the chicken to prevent the meat from sticking to your tool or tearing. Use firm, glancing blows rather than straight-down crushing force to spread the meat fibers evenly.
Is there a substitute for Panko breadcrumbs?
If you can’t find Panko, you can use regular breadcrumbs, though the crust will be denser and less crunchy. Another great alternative is crushed crackers or even crushed cornflakes. If you need a gluten-free option, many brands make excellent gluten-free Panko, or you can use almond flour mixed with extra Parmesan cheese for a similar structural effect.
How do I know when the chicken is fully cooked without cutting it?
The only foolproof way to check for doneness without losing the juices is to use an instant-read meat thermometer. Insert the probe into the thickest part of the chicken roll, making sure you are hitting the meat and not just the hollow cheese center. Once it reaches 165°F, it is safe to eat and will be perfectly juicy.
Stuffed Chicken Breasts
Course: Main CourseCuisine: AmericanDifficulty: medium4
servings25
minutes25
minutes460
kcal50
MinutesA delicious and foolproof method for making stuffed chicken breasts that keeps the cheese inside. These breasts are filled with mozzarella, wilted spinach, and dried cranberries, then breaded and shallow fried before finishing in the oven for a juicy, flavorful meal.
Ingredients
4 large boneless skinless chicken breasts
2 cups fresh baby spinach
1/2 cup dried cranberries
4 thick slices high-quality mozzarella or provolone cheese
1 cup Panko breadcrumbs
1/2 cup finely grated parmesan cheese
2 large eggs, beaten
1/2 cup all-purpose flour
1 teaspoon garlic powder
1 teaspoon dried thyme
1/2 teaspoon smoked paprika
Salt and black pepper to taste
1/2 cup vegetable oil (for shallow frying)
1/2 cup whole berry cranberry sauce (for topping)
Fresh thyme sprigs for garnish
Directions
- Place each chicken breast between two sheets of plastic wrap. Use a meat mallet to pound them to an even 1/4 inch thickness. This is the first step to preventing leaks; an even thickness ensures the meat cooks quickly and rolls tightly without gaps.
- In a small pan over medium heat, wilt the spinach with a pinch of salt for 1 minute. Squeeze out all excess moisture with a paper towel. This prevents the “steam-leak” that often forces cheese out of the chicken.
- Season the inside of the chicken with salt, pepper, and garlic powder.
- To solve the leaking cheese problem, place the cheese slice in the very center of the chicken, leaving a 1-inch border of meat all around. Top the cheese with the wilted spinach and dried cranberries.
- Fold the sides of the chicken over the filling, then roll tightly from the bottom up. Secure the seam and both ends with 3 to 4 toothpicks. By sealing the ends of the roll with toothpicks, you create a physical barrier that prevents the cheese from escaping.
- Set up three bowls: one with flour and paprika, one with beaten eggs, and one with a mix of Panko, parmesan, and thyme.
- Dredge each roll in flour, dip in egg, and coat thoroughly in the Panko mixture, pressing firmly to adhere. This thick breading acts as a secondary seal to keep moisture in.
- Heat the oil in a large skillet over medium heat. Once shimmering, shallow fry the chicken rolls for 4-5 minutes per side, turning carefully with tongs, until the crust is deep golden brown and crispy.
- Transfer the skillet (or move chicken to a baking sheet) to a preheated oven at 375°F. Bake for 10-12 minutes until the internal temperature reaches 165°F.
- Let the chicken rest for 5-8 minutes. This is crucial; resting allows the cheese to set slightly so it stays inside when you slice it.
- Remove toothpicks. Slice the chicken crosswise to reveal the center. Serve immediately topped with a spoonful of cranberry sauce and fresh thyme sprigs to match the visual presentation.
Notes
- To prevent cheese from leaking, ensure you squeeze all moisture from the wilted spinach and use toothpicks to seal the ends of the chicken rolls. Resting the chicken for 5 to 8 minutes after cooking is essential for the cheese to set.