We have all been there: you pull a tray of chicken out of the oven, hoping for a juicy masterpiece, only to find a plate of rubbery, stringy meat swimming in a watery mess. It is incredibly frustrating when the cheese browns beautifully but the chicken underneath dries out completely. This recipe changes that dynamic by focusing on a high-moisture interior protected by a savory, deeply browned crust.
The secret lies in the functional chemistry of the ingredients. Instead of just adding flavor, the heavy cream and mayonnaise act as a thermal shield. They create a moisture barrier that prevents the natural juices of the poultry from evaporating into the dry heat of the oven. You get the best of both worlds: a succulent, tender bite and a golden, bubbly topping that packs a serious punch.
Expertise in the kitchen often comes down to one simple trick: the sear. By browning the meat in a hot skillet before it ever touches the baking dish, you lock in the flavor and shorten the oven time. This prevents the “boiled” texture that plagues most baked chicken recipes. You are going to love how the creamy sauce reduces into a thick, velvety glaze while the chicken stays perfectly moist.
The Science of Moisture Retention in Poultry
Chicken breast is notoriously lean, meaning it lacks the intramuscular fat that keeps cuts like thighs juicy. Once the internal temperature hits 150°F, the muscle fibers begin to contract tightly, squeezing out water like a wrung-out sponge. If you cook it too long, that water evaporates, leaving you with a dry, woody texture that no amount of sauce can truly fix.
To combat this, we use a “Moisture Barrier” strategy. The high fat content in the heavy cream and mayonnaise creates an insulating layer around the proteins. This fat slows down the heat transfer and prevents the surface of the meat from losing its natural moisture to the air. It essentially braises the bottom of the chicken while roasting the top, ensuring every fiber remains hydrated.
Carry-over cooking is the final piece of the puzzle. You must pull the chicken out of the oven when it reaches 160°F. Even though the USDA recommends 165°F, the internal temperature will continue to rise during the five-minute resting period. If you wait until it hits 165°F in the oven, it will likely climb to 170°F or higher on the counter, resulting in that dreaded stringy mouthfeel.
Why Pounding Chicken to Even Thickness Matters
Physics plays a massive role in a successful bake. A standard chicken breast is shaped like a teardrop, with a thick “head” and a very thin “tail.” If you cook them as-is, the thin end will be overcooked and tough by the time the thick center is safe to eat. This is the primary reason people struggle with uneven textures in their meals.
To fix this, place your chicken breasts between two sheets of plastic wrap or inside a gallon-sized freezer bag. Use a meat mallet or even a heavy rolling pin to gently pound the thickest parts until the entire piece is a uniform one-inch thickness. This ensures that every square inch of the meat reaches the target temperature at the exact same moment.
Essential Components for the Garlic Parmesan Sauce
Quality ingredients are the foundation of this savory umami base. When selecting your cheese, avoid the pre-shredded bags found in the dairy aisle. Those products are coated in potato starch or cellulose to prevent clumping, which also prevents them from melting smoothly into the sauce. Freshly grated Parmesan Reggiano provides a sharp, salty bite and a superior melt that integrates perfectly with the cream.
The aromatics are just as important. While fresh garlic provides the pungent kick we love, the addition of onion powder and dried oregano builds a complex flavor profile. Onion powder offers a concentrated sweetness that fresh onions cannot match in a short bake time, while the oregano adds an earthy, herbal note that cuts through the richness of the dairy.
The Role of Mayonnaise in a Golden Crust
Many people are surprised to see mayonnaise in a chicken recipe, but it is a culinary powerhouse for browning. Mayonnaise is a stable emulsion of oil and egg yolks. Because oil has a higher smoke point than butter, and eggs are rich in protein, this mixture browns much more efficiently and evenly than plain cheese ever could.
Furthermore, the mayo acts as a “culinary glue.” If you simply sprinkle cheese on top of raw chicken, it often slides off into the pan as it melts. By mixing the Parmesan and mozzarella into a thick mayonnaise paste, you ensure the topping stays exactly where you put it. This creates that iconic, thick, “skyscraper” crust that looks like it came from a high-end bistro.
Selecting the Right Heavy Cream
Fat content is your friend when it comes to high-heat baking. You should always reach for heavy whipping cream rather than half-and-half or whole milk. Lower-fat dairy is prone to curdling or “breaking” when it encounters the high acidity of the garlic or the intense heat of a 400°F oven, leaving you with a grainy, separated sauce.
For the best results, let your cream sit on the counter for about fifteen minutes before using it. Adding ice-cold cream to a hot, seared skillet can cause the sauce to break instantly. Using room-temperature cream ensures a smooth, velvety emulsion that coats the back of a spoon and clings beautifully to the chicken.
Step-by-Step: Searing for Flavor and Texture
The Maillard reaction is the chemical process that gives browned food its distinctive flavor. An oven, which uses dry air, cannot trigger this reaction as effectively as a hot skillet in a short amount of time. By searing the chicken for three minutes per side, you develop a deep golden crust and a complex savoriness that the oven simply cannot replicate.
Before the chicken hits the oil, you must pat it completely dry with paper towels. Any surface moisture will turn into steam, which prevents browning and leads to gray, rubbery meat. Once the oil is shimmering and hot, lay the chicken down and do not move it. You are looking for a rich, mahogany color that signals the flavor has been locked in.
Assembling the Creamy Garlic Parmesan Baked Chicken
The assembly process is where the “Island Method” comes into play. You want to place your seared chicken breasts into the baking dish so they are not crowded. Pour the garlic-infused cream mixture into the bottom of the dish, around the chicken, rather than over the top. This allows the bottom of the meat to simmer in the flavorful liquid while the top remains dry for roasting.
Next, take your thick cheese and mayo paste and spread it generously over the top of each breast. Think of it like frosting a cake. This separation of textures is vital. The bottom stays tender and braised, while the top becomes a crispy, savory lid. This layering creates a depth of flavor and a variety of textures in every single bite.
Precision Timing and the Broiler Finish
Because you have already seared the chicken, the oven time is remarkably short. Start checking the internal temperature at the twelve-minute mark. You are looking for a visual cue of bubbling sauce and slightly softened cheese. Using an instant-read thermometer is the only way to guarantee perfection; poke it into the thickest part of the breast to ensure it has reached 160°F.
For another take on tender, creamy chicken, check out this creamy baked mushroom chicken.
The final touch is the broiler. Switch your oven to the broil setting for the last sixty to ninety seconds of cooking. Watch it like a hawk! You want to see dark brown, toasted spots forming on the cheese. These “leopard spots” provide a smoky, charred flavor that balances the creamy sauce. As soon as it bubbles and browns, pull it out immediately to avoid burning.
Troubleshooting Common Baked Chicken Issues
If you end up with a watery sauce, the culprit is usually surface moisture or low-fat dairy. Ensure you are patting the chicken dry and using heavy cream. Another common cause is “plumped” chicken from the grocery store, which is injected with a salt-water solution. This extra liquid releases during cooking, thinning out your sauce. Look for “air-chilled” chicken for the best results.
Tough meat is almost always a result of overcooking. If you find the chicken is stringy, you likely missed the 160°F pull-off point. Remember that the temperature continues to rise after you remove it from the heat. If the flavor seems bland, try seasoning the raw meat more aggressively with salt and pepper before searing. The sauce is flavorful, but the meat itself needs that initial base layer of seasoning.
If the cheese topping slides off, your mayo-to-cheese ratio might be off, or the chicken was too wet when the paste was applied. Make sure the paste is thick—almost like a dough—and that the top of the seared chicken isn’t swimming in oil before you apply the topping. A quick dab with a paper towel after searing can help the cheese stick better.
Optimal Side Dishes for Creamy Garlic Sauces
Because this dish is incredibly rich and savory, you want side dishes that provide balance. High-acid vegetables are a perfect match. Try roasted asparagus finished with a squeeze of fresh lemon juice or a crisp arugula salad with a sharp vinaigrette. These bright flavors cut through the heavy fats of the Parmesan and cream, refreshing your palate between bites.
For starches, look for “sauce sponges.” Roasted baby potatoes with crispy skins are excellent for soaking up the garlic cream. Alternatively, serve the chicken over a bed of al dente linguine or alongside a thick slice of crusty sourdough bread. The bread is particularly useful for cleaning up every last drop of that velvety sauce from your plate.
Preparation Shortcuts and Storage Logistics
This is a fantastic meal for busy weeknights because you can do the prep work in advance. You can pound the chicken, season it, and mix the cheese paste the night before. Store them in separate airtight containers in the fridge. When you get home, all you have to do is sear, assemble, and bake, cutting your active kitchen time down to almost nothing.
Leftovers should be stored in an airtight container for up to three days. However, be aware that the cream sauce may thicken significantly in the fridge. When you are ready to eat, avoid the microwave if possible. Microwaves heat unevenly and can cause the chicken to become rubbery and the sauce to break into a greasy mess.
How to Reheat Without Drying the Meat
The best way to reheat this dish is on the stovetop. Place the chicken and sauce in a small skillet over low heat. Add a tablespoon of water or a splash of cream to the pan to help loosen the sauce. Cover the skillet with a lid to create a steam chamber. This gently warms the meat through without stripping away its moisture, preserving that succulent texture.
Expert Tips for Maximum Flavor Impact
Never underestimate the power of the rest period. Letting the chicken sit for five minutes after it leaves the oven is non-negotiable. During this time, the juices redistribute within the meat, and the cream sauce thickens as it cools slightly. If you cut into it immediately, the juices will run out onto the plate, leaving the meat dry and the sauce thin.
Finally, add a hit of fresh acidity just before serving. A sprinkle of fresh, chopped parsley adds a pop of color and a clean, peppery finish. If the dish feels too heavy, a tiny squeeze of lemon juice over the top can brighten the entire flavor profile. These small finishing touches are what separate a good home-cooked meal from a professional-quality dinner.
How long can I store leftovers in the fridge?
You can store this chicken in an airtight container for up to 3 days. The sauce will thicken as it cools, so it may look solid when you take it out of the fridge. This is normal due to the high fat content in the cream and cheese. Do not freeze this dish, as the cream sauce will likely separate and become grainy upon thawing.
Why did my sauce turn out thin or watery?
A thin sauce usually happens if the chicken wasn’t patted dry before searing or if you used a lower-fat dairy like milk instead of heavy cream. Additionally, if you skip the searing step, the chicken releases all its natural juices into the baking dish, which dilutes the cream. For the thickest sauce, stick to heavy cream and ensure a good sear.
Can I use chicken thighs instead of breasts?
Yes, boneless skinless chicken thighs work beautifully with this recipe. Thighs are more forgiving and stay juicy even if slightly overcooked. However, they may require an extra 5-7 minutes of baking time compared to pounded breasts. Ensure they reach an internal temperature of 175°F for the best texture, as dark meat benefits from a higher finishing temp.
What can I use if I don’t have mayonnaise?
If you are out of mayonnaise, you can substitute it with Greek yogurt or sour cream. Keep in mind that these options are more acidic and have less fat, so the crust won’t brown quite as deeply or be as rich. To help with browning when using yogurt, you might want to add an extra tablespoon of Parmesan to the mixture.
How do I know the chicken is fully cooked without a thermometer?
While a meat thermometer is the most reliable tool, you can check by piercing the thickest part of the chicken with a knife. The juices should run completely clear, not pink. The meat should also feel firm to the touch and be opaque all the way through. However, to avoid the “rubbery” texture mentioned earlier, a thermometer is highly recommended to prevent overcooking.
Can I make this dish ahead of time?
You can prep the components (pound the chicken and mix the cheese paste) up to 24 hours in advance. I do not recommend searing or baking the chicken ahead of time, as reheating it twice will almost certainly dry out the meat. For the best experience, perform the final sear and bake right before you plan to serve dinner.
Baked Chicken
Course: Main CourseCuisine: AmericanDifficulty: easy4
servings10
minutes25
minutes445
kcal35
MinutesThis recipe eliminates rubbery chicken by using a quick sear and a heavy cream base. Topped with a thick Parmesan and mayonnaise crust, the chicken stays moist while the cheese becomes perfectly golden and bubbly.
Ingredients
4 large boneless skinless chicken breasts (pounded to even thickness)
1 cup heavy cream
1/2 cup freshly grated Parmesan cheese
1/2 cup shredded mozzarella cheese
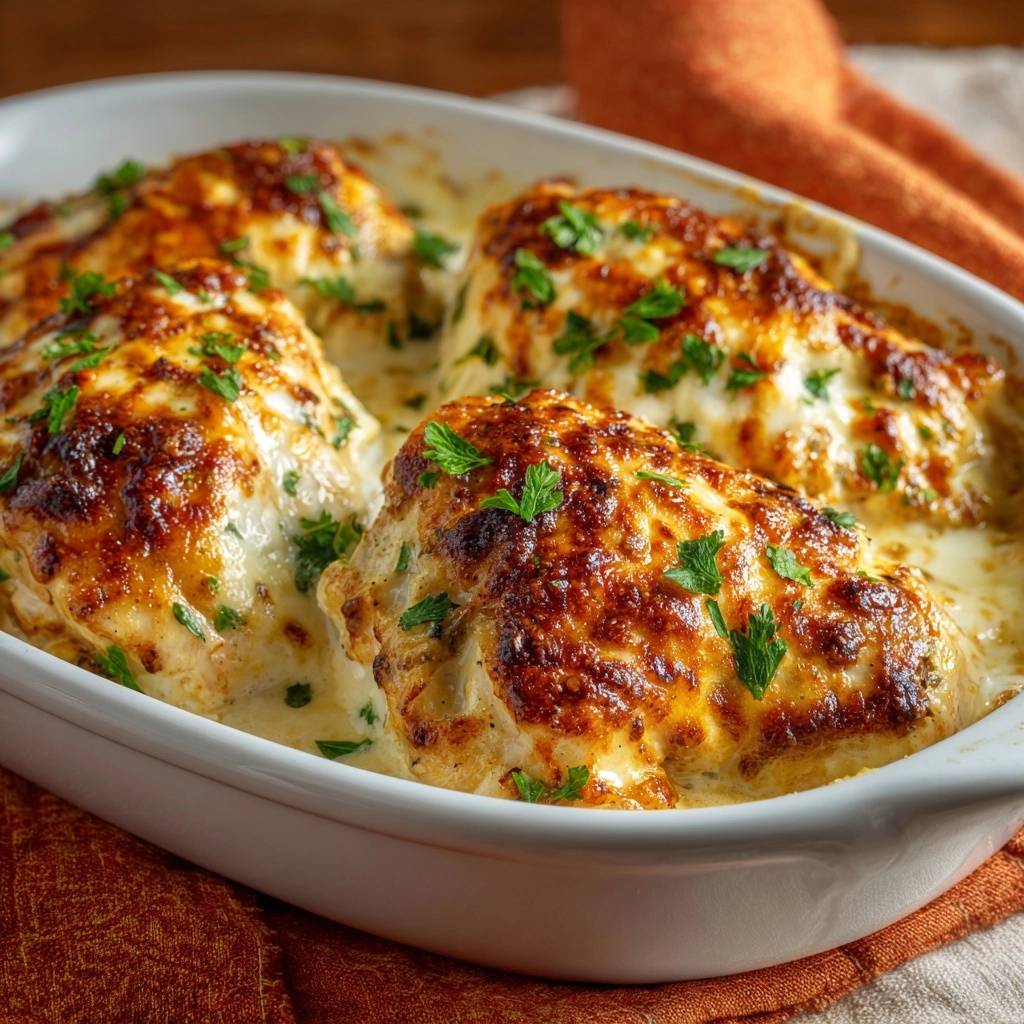
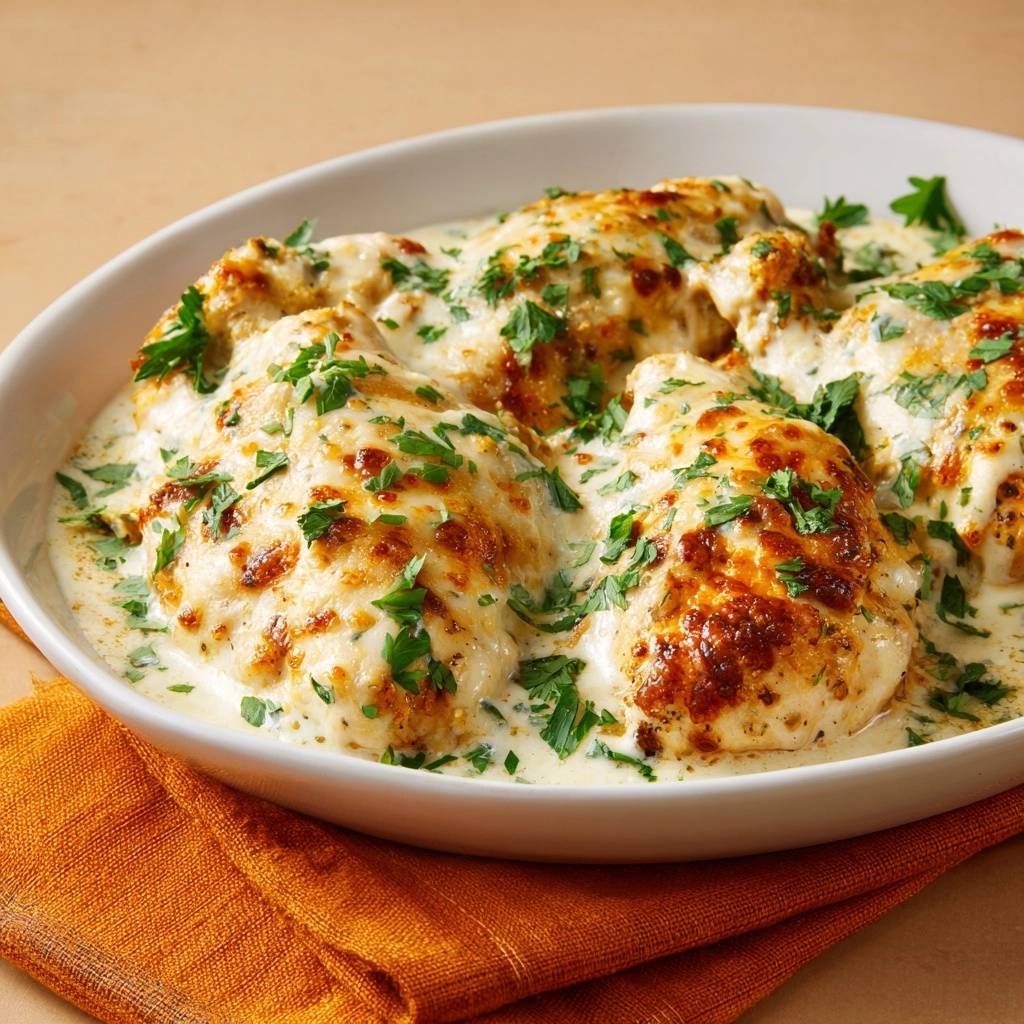
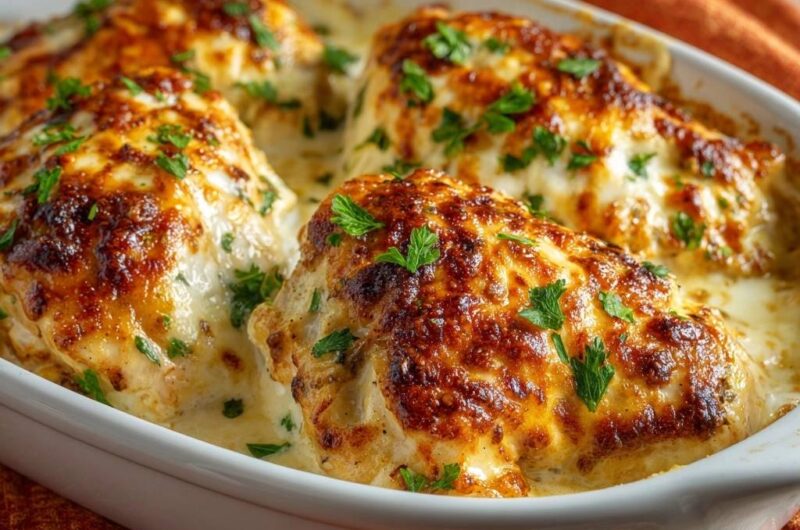
1/4 cup mayonnaise (The secret to the thick, golden crust shown in the image)
3 cloves garlic, minced
1 teaspoon onion powder
1 teaspoon dried oregano
1/2 teaspoon paprika
2 tablespoons olive oil
Salt and black pepper to taste
Fresh parsley, chopped for garnish
Directions
- Preheat your oven to 400°F (200°C).
- Pat the chicken breasts completely dry with paper towels. Season both sides generously with salt, pepper, and paprika.
- Heat olive oil in a large skillet over medium-high heat. Sear the chicken for 3 minutes per side until a deep golden crust forms. This locks in juices and ensures the meat isn’t “boiled” in the sauce.
- In a small bowl, whisk together the heavy cream, minced garlic, onion powder, and oregano.
- In a separate small bowl, mix the mayonnaise with the shredded mozzarella and grated Parmesan to create a thick paste. This ensures the cheese stays on top of the chicken rather than sliding into the sauce.
- Place the seared chicken into a baking dish. Pour the cream mixture into the bottom of the dish around the chicken.
- Spread the cheese and mayo mixture thickly over the top of each chicken breast.
- Bake for 12-15 minutes. Because the chicken was seared, it needs less time in the oven. Use a meat thermometer to pull the chicken out when it hits 160°F (it will rise to 165°F while resting).
- Turn on the broiler for the final 2 minutes to achieve the dark, bubbly toasted cheese spots seen in the image.
- Let the chicken rest in the sauce for 5 minutes before serving. This allows the cream to thicken and the juices to redistribute. Garnish with plenty of fresh parsley.
Notes
- The secret to the thick, golden crust is the mayonnaise. Use a meat thermometer to pull the chicken at 160 degrees Fahrenheit to ensure it stays juicy after resting.