The secret to a restaurant-quality sauce that actually clings to your chicken is a combination of a proper flour dredge and a controlled reduction of the cream. Most home cooks struggle with cream sauces that end up thin, watery, or separated on the plate. This recipe solves that by using the residual starch from the chicken to emulsify the fats into a thick, luxurious coating.
You’ll love the contrast between the deep golden, savory crust of the meat and the velvety, garlic-heavy sauce. By searing the chicken first, you lock in the juices while creating a flavorful base for the cream to build upon. It’s a sophisticated meal that feels like a splurge but comes together in a single skillet in under thirty minutes.
The real trick to success here is patience during the reduction phase. I’ve found that rushing the heat causes the cream to break, leaving you with an oily mess. Instead, keep the simmer gentle and wait for that “nappe” consistency where the sauce coats the back of a spoon like liquid silk. That’s when you know it’s ready to serve.
The Science of the Flour Dredge
Dredging the chicken in all-purpose flour serves two vital purposes. First, it creates a thin, protective barrier that prevents the lean breast meat from drying out under high heat. This ensures every bite remains tender and juicy rather than stringy or tough.
Secondly, the flour reacts with the oil and butter to trigger the Maillard reaction, giving you that beautiful mahogany crust. As the chicken simmers in the cream later, the toasted flour on the surface acts as a natural thickener. This stabilizes the heavy cream and prevents it from turning watery once it hits the plate.
For the best results, you must pat the chicken completely dry with paper towels before dredging. If the surface is damp, the flour will turn into a gummy paste instead of a crisp coating. Shake off any excess flour so you have a fine, even veil over the meat.
Why Pounding Chicken Breasts Ensures Even Cooking
Chicken breasts are naturally asymmetrical, with one thick end and one tapered end. If you toss them in the pan as-is, the thin side will turn into rubber by the time the center reaches a safe temperature. Pounding them to a uniform thickness of about half an inch is the only way to guarantee even cooking.
Place the chicken between two sheets of plastic wrap or inside a heavy-duty freezer bag. Use the flat side of a meat mallet or even a heavy skillet to gently firm up the thickness. Work from the center outward to avoid tearing the delicate muscle fibers.
Essential Components for Creamy Garlic Skillet Chicken
Quality ingredients make or break a simple skillet meal. When it comes to the cheese, skip the green shaker bottle or the pre-shredded bags. Pre-shredded cheese is coated in potato starch or cellulose to prevent clumping, which can make your sauce feel gritty or sandy.
Freshly grated Parmesan from a wedge melts much more smoothly into the cream. Additionally, using unsalted butter allows you to control the seasoning perfectly. Since the Parmesan and chicken broth both contain salt, starting with unsalted butter prevents the final reduction from becoming an oversalted salt bomb.
Selecting the Right Heavy Cream and Broth
Heavy cream is non-negotiable for this specific texture. While you might be tempted to use half-and-half or whole milk to save calories, lower-fat dairy lacks the stability to handle the heat and the acidity of the garlic. It will likely curdle or break, leaving you with a thin, broken liquid.
For the broth, a high-quality chicken stock or low-sodium broth works best. It provides the liquid needed to deglaze the pan and lift up all those flavorful browned bits. The broth adds a savory backbone that prevents the heavy cream from feeling too cloying or one-dimensional.
The Role of Aromatics: Garlic, Oregano, and Paprika
Garlic is the star of the show here, and six cloves might seem like a lot, but the cream mellows the sharp bite into a sweet, nutty flavor. Dried oregano is used during the dredging phase because it stands up better to the high heat of searing than fresh herbs, which would simply burn and turn bitter.
The paprika isn’t just for a hint of warmth; it provides that “restaurant-gold” hue to the crust. Without it, the chicken can look pale and unappetizing under the white sauce. Together, these aromatics create a profile that is deeply savory and aromatic.
Step-by-Step: Achieving the Perfect Golden Sear
Start by heating your oil and butter until the butter is foaming and just starting to turn silent. This is the signal that the water has evaporated and the pan is hot enough to sear. Carefully lay the chicken away from you to avoid any oil splatters.
The most important rule is: do not crowd the pan. If the chicken pieces are touching, they will steam instead of sear, and you’ll lose that crisp crust. If your skillet isn’t large enough, work in two batches to maintain the high heat needed for browning.
Let the chicken cook undisturbed for at least 5 minutes. If you try to flip it and it sticks, it’s not ready. Once a deep, golden-brown crust has formed, it will release naturally from the pan. Flip and repeat until the internal temperature hits 165°F.
Deglazing the Skillet: Capturing the Fond
After removing the chicken, you’ll see brown bits stuck to the bottom of the skillet. This is called “fond,” and it is concentrated flavor gold. Do not wash the pan! This is the foundation of your sauce’s color and umami depth.
Add your remaining butter and garlic, then pour in the chicken broth. Use a wooden spoon to scrape the bottom of the pan vigorously. You’ll see the liquid turn a rich amber color as the fond dissolves into the broth. This step ensures that every bit of flavor from the sear ends up in the final sauce.
The Reduction Phase: Building a Velvet Texture
Once the broth has slightly reduced, pour in the heavy cream. Lower the heat to a gentle simmer. You want to see small bubbles around the edges, not a rolling boil. As the water in the cream evaporates, the sauce will naturally thicken and intensify in flavor.
Whisk in the Parmesan cheese slowly. The cheese should melt into the liquid, creating a seamless emulsion. You are looking for the “nappe” stage, where the sauce is thick enough to coat the back of a spoon. If you run your finger through the sauce on the spoon, the line should stay clean and sharp.
Troubleshooting Common Sauce Mistakes
If your sauce becomes too thick or starts to look like a paste, don’t panic. Simply whisk in a tablespoon or two of chicken broth or water to loosen it back up. This often happens if the heat is too high or if the sauce sits on the burner for too long.
If the sauce looks oily or separated, it has likely “broken” due to excessive heat. You can usually fix this by removing the pan from the heat and whisking in a splash of cold heavy cream. This helps re-emulsify the fats and brings the sauce back together into a smooth state.
Optimal Pairings for Creamy Garlic Skillet Chicken
Because this sauce is so rich and decadent, you want sides that can either soak up the cream or cut through the fat. Mashed potatoes or a simple bed of orzo are classic choices for capturing every drop of that garlic gold. A thick slice of crusty sourdough is also perfect for dipping.
Round Out Your Meal
To complement your creamy garlic chicken, consider these dishes that share similar flavors or offer a fresh contrast.
- For a bright and flavorful salad, check out the Garlic Herb Grilled Chicken Salad, perfect for a lighter addition.
- If you’re craving something warm and savory to soak up the sauce, try the Garlic Cheddar Chive Drop Biscuits.
To balance the meal, I love serving this with something bright and acidic. A simple arugula salad dressed with lemon juice and olive oil provides a sharp contrast to the heavy cream. Steamed broccoli or roasted asparagus also work well, as their earthy notes complement the garlic and Parmesan.
For a different take on creamy chicken, check out this creamy sun-dried tomato chicken thighs recipe.
Flavor Variations and Ingredient Swaps
You can easily adapt this base recipe to suit your cravings. For a “Tuscan” vibe, stir in a handful of chopped sun-dried tomatoes and a few cups of fresh baby spinach during the final simmer. The spinach will wilt into the sauce, adding color and nutrients.
If you prefer a French-inspired profile, swap the oregano for fresh tarragon and add a squeeze of lemon juice at the very end. You can also sauté sliced mushrooms in the butter before adding the garlic to create a deep, earthy mushroom cream sauce that pairs beautifully with the chicken.
For another chicken option with a bright, zesty twist, try these creamy lemon herb chicken thighs.
Storage and Reheating Without Breaking the Sauce
Cream sauces can be tricky to reheat because the microwave tends to separate the fats, leaving you with a puddle of oil. Store leftovers in an airtight container in the fridge for up to three days. I don’t recommend freezing this dish, as the cream and cheese texture can become grainy once thawed.
To reheat, place the chicken and sauce in a small skillet over low heat. Add a splash of water or milk to the pan. Cover it with a lid and heat slowly, stirring the sauce occasionally to encourage it to re-emulsify. This gentle method keeps the chicken moist and the sauce creamy.
Expert Tips for Professional Results
For the absolute best crust, use a cast-iron skillet. Cast iron retains heat much better than stainless steel or non-stick, which helps maintain a consistent sear even when you add the cold meat. It also makes deglazing more effective as the surface holds onto the fond beautifully.
Always let your chicken rest for about two minutes before you nestle it back into the sauce or slice it. This allows the juices to redistribute within the meat. Finally, don’t skip the fresh parsley and coarse black pepper at the end. The fresh herbs provide a necessary pop of color and a clean finish to the rich sauce.
Using the Right Skillet: Cast Iron vs. Stainless Steel
While stainless steel is great for many things, cast iron is the king of the skillet chicken. Non-stick pans are actually the worst choice for this recipe because they are designed to prevent things from sticking. Without that slight sticking, you won’t develop the fond necessary for a deep, savory sauce.
If you use stainless steel, be prepared to use a bit more oil to prevent the flour coating from tearing. Cast iron, once seasoned, provides a natural release that makes flipping the dredged chicken much easier while still giving you those delicious browned bits for the deglazing step.
Frequently Asked Questions
Can I use chicken thighs instead of breasts?
Yes, boneless skinless chicken thighs work beautifully in this recipe. Thighs are more forgiving and stay juicy even if cooked slightly longer. However, they do take about 2-3 minutes longer per side to reach the safe internal temperature of 165°F. If using skin-on thighs, sear the skin side first to render the fat and get it extra crispy.
How do I prevent the garlic from turning bitter?
Garlic burns very quickly, especially when minced finely. The key is to add it to the pan only after you’ve removed the chicken and lowered the heat to medium-low. Sauté it for no more than 60 seconds—just until it smells fragrant. As soon as you pour in the chicken broth, the temperature drops and the cooking process for the garlic slows down, preventing it from scorching.
Is there a dairy-free substitute for the heavy cream?
You can substitute the heavy cream with full-fat canned coconut milk or a heavy cream alternative made from oats or cashews. Keep in mind that coconut milk will add a distinct coconut flavor to the dish. If using a dairy-free option, you may need to add a small cornstarch slurry (1 teaspoon cornstarch mixed with 1 teaspoon water) to help the sauce reach the desired thickness, as plant-based milks don’t reduce quite the same way.
What if my sauce is still too watery?
If your sauce hasn’t thickened after simmering for 4-5 minutes, it usually just needs more time to reduce. However, if you’re in a rush, you can whisk in an extra tablespoon of grated Parmesan or a small cornstarch slurry. Make sure the sauce is at a simmer when you add the slurry, and whisk constantly for one minute until it tightens up. Remember that the sauce will also thicken slightly as it cools on the plate.
Can I make this dish ahead of time for meal prep?
You can make this ahead, but the texture is best when fresh. If meal prepping, I suggest undercooking the chicken by just a minute or two. When you reheat it later in the microwave or on the stove, the chicken will finish cooking without becoming rubbery. Store the sauce and chicken together so the meat stays hydrated, and always add a tiny splash of water before reheating to loosen the cream.
Creamy Garlic Chicken
Course: Main CourseCuisine: AmericanDifficulty: easy4
servings10
minutes20
minutes415
kcal30
MinutesA foolproof method for achieving a deep golden crust and a thick, clingy garlic cream sauce. By dredging the chicken in flour and reducing the cream with Parmesan, you ensure a rich texture that avoids the common pitfall of watery sauces.
Ingredients
4 boneless skinless chicken breasts (pounded to even thickness)
1/4 cup all-purpose flour (for dredging)
1 tablespoon olive oil
3 tablespoons unsalted butter, divided
6 cloves garlic, minced
1 cup heavy cream
1/2 cup chicken broth
1/2 cup freshly grated Parmesan cheese
1 teaspoon onion powder
1 teaspoon dried oregano
1/2 teaspoon paprika
Salt and plenty of coarse cracked black pepper to taste
1/2 cup fresh curly parsley, finely chopped
Directions
- In a shallow bowl, mix the flour, paprika, and a pinch of salt and pepper. Pat the chicken breasts completely dry with paper towels. Season the chicken with onion powder and oregano, then dredge each piece in the flour mixture, shaking off the excess. This flour coating is essential for the golden crust and for thickening the sauce later.
- Heat the olive oil and 1 tablespoon of butter in a large cast iron skillet over medium-high heat. Once the butter is foaming, add the chicken. Sear for 5-7 minutes per side until a deep golden-brown crust forms and the chicken is cooked through (165°F). Remove chicken from the pan and set aside on a plate.
- Reduce the heat to medium-low. Add the remaining 2 tablespoons of butter to the skillet. Once melted, add the minced garlic and sauté for 1 minute, being careful not to burn it.
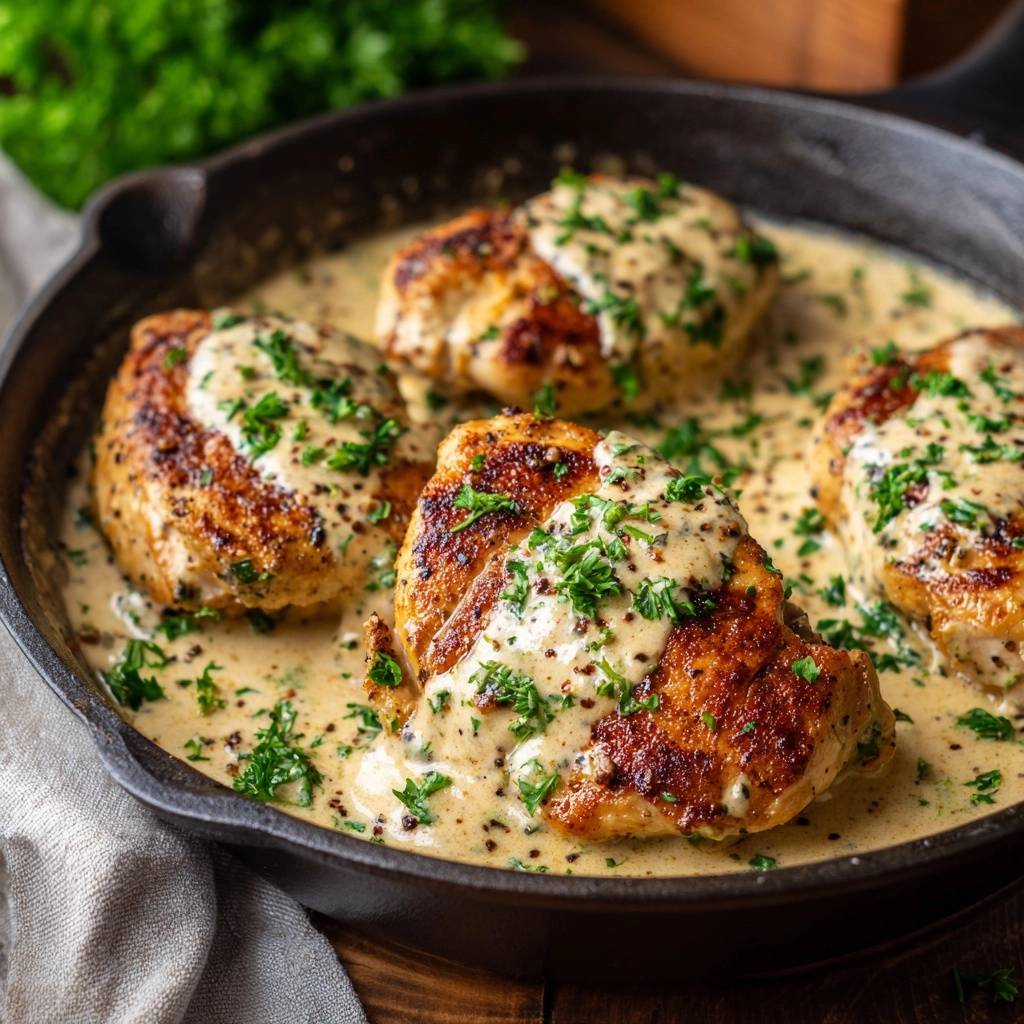
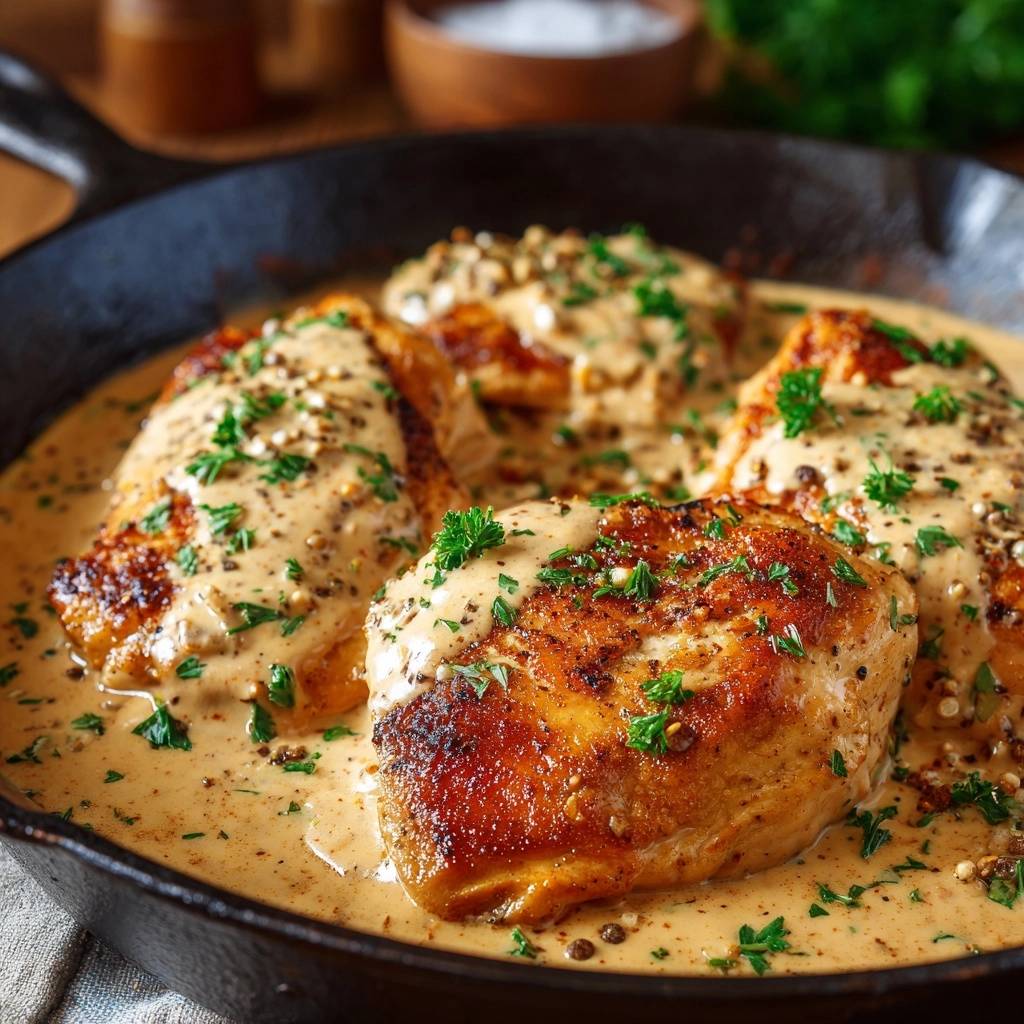
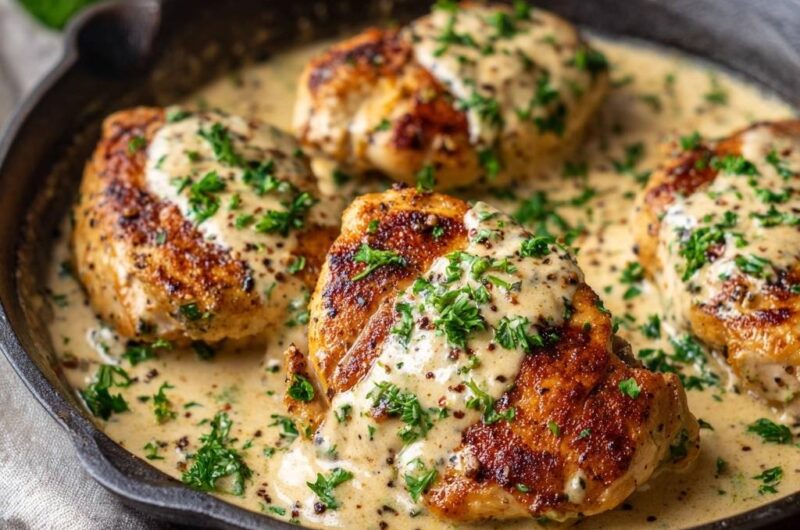
- Pour in the chicken broth. Use a wooden spoon to scrape up all the browned bits (fond) from the bottom of the pan; this provides the color and savory depth seen in the photo.
- Pour in the heavy cream and bring to a gentle simmer. Let the liquid bubble for 3-4 minutes to reduce. Whisk in the grated Parmesan cheese until melted and smooth. The cheese and the residual flour from the chicken will naturally thicken the sauce into a rich velvet.
- Once the sauce coats the back of a spoon, nestle the chicken back into the skillet. Spoon the sauce generously over the top of each breast. Simmer for 1-2 minutes until the sauce is bubbling and thick.
- Garnish heavily with fresh chopped parsley and extra coarse cracked black pepper to match the visual finish. Serve immediately.
Notes
- The flour coating on the chicken is essential for both the golden crust and for thickening the sauce. Ensure you scrape the browned bits from the pan to add depth and color to the final dish.