
Most homemade squash soups end up thin, watery, or lacking that deep savory punch. You take a spoonful expecting a rich, autumnal hug, but instead, it feels like flavored water. The secret to a velvety, restaurant-quality texture isn’t more cream; it’s roasting the squash until it’s deeply caramelized rather than boiling it in broth.
Roasting locks in the natural sugars and prevents the squash from absorbing excess water during the cooking process. This ensures a thick, concentrated base every single time. When you combine that roasted sweetness with the salty crunch of crispy toppings, you get a bowl of soup that actually feels like a meal.
The real pro move here is using the rendered fat from the toppings to sauté your aromatics. By building the soup in the same pot where you crisped the garnish, you layer flavors from the bottom up. This creates a complex, savory backbone that balances the natural sweetness of the butternut squash perfectly.
The Secret to Concentrated Squash Flavor
When you boil squash, you’re essentially diluting its flavor with water. However, when you toss those cubes into a 400°F oven, something called the Maillard reaction takes over. This chemical reaction browns the natural sugars, creating a nutty, complex flavor profile that boiling simply can’t replicate.
High-heat roasting also evaporates the internal moisture of the vegetable. Therefore, when you finally blend the squash with your broth, the resulting puree is dense and creamy rather than grainy. You’ll notice the edges of the squash turning a deep golden brown; that’s exactly where the “magic” happens.
Essential Components for a Velvety Base
Success starts with the squash itself. You want a large butternut squash, roughly 3 pounds, that feels heavy for its size. A heavier squash usually indicates higher sugar content and better moisture levels for roasting. If the skin is matte and tough, you’ve found a winner.
In addition to the squash, the choice of liquid is vital. Using a low-sodium broth allows you to control the salt levels precisely. Since we’re reducing the liquid to concentrate the flavor, standard broth can often become too salty by the time the soup is finished. Heavy cream provides the final luxurious mouthfeel that coats the spoon.
Selecting and Prepping Your Butternut Squash
Peeling a butternut squash can be intimidating because of its awkward shape. Firstly, slice off the top and bottom to create flat surfaces. Use a sharp Y-peeler to remove the skin until you see the bright orange flesh underneath. Once peeled, scoop out the seeds and cut the neck and bulb into uniform 1-inch cubes.
Uniformity is the key to even caramelization. If your pieces vary too much in size, the small ones will burn before the large ones soften. Look for squash with a thick neck and a smaller bulb, as this provides more solid flesh and fewer seeds to deal with during prep.
The Role of Aromatics and Herbs
Yellow onions are the workhorse of this recipe because they provide a mellow sweetness that bridges the gap between the squash and the savory broth. While white onions can be a bit sharp, yellow onions melt into the background. Fresh garlic is also non-negotiable; the powdered stuff lacks the pungent aroma needed to cut through the richness of the cream.
We use dried thyme during the simmering stage because it stands up well to heat. However, fresh sage is reserved for the very end. Frying the sage leaves in the pot before starting the soup infuses the cooking fat with an earthy, peppery scent that lingers in every bite.
Step-by-Step: Achieving the Perfect Roast
Before you even touch the stove, get that squash in the oven. Toss the cubes with olive oil, salt, and pepper directly on the baking sheet. Spread them out so they sit in a single layer. If the pan is crowded, the squash will steam instead of roast, and you’ll miss out on those crispy, browned edges.
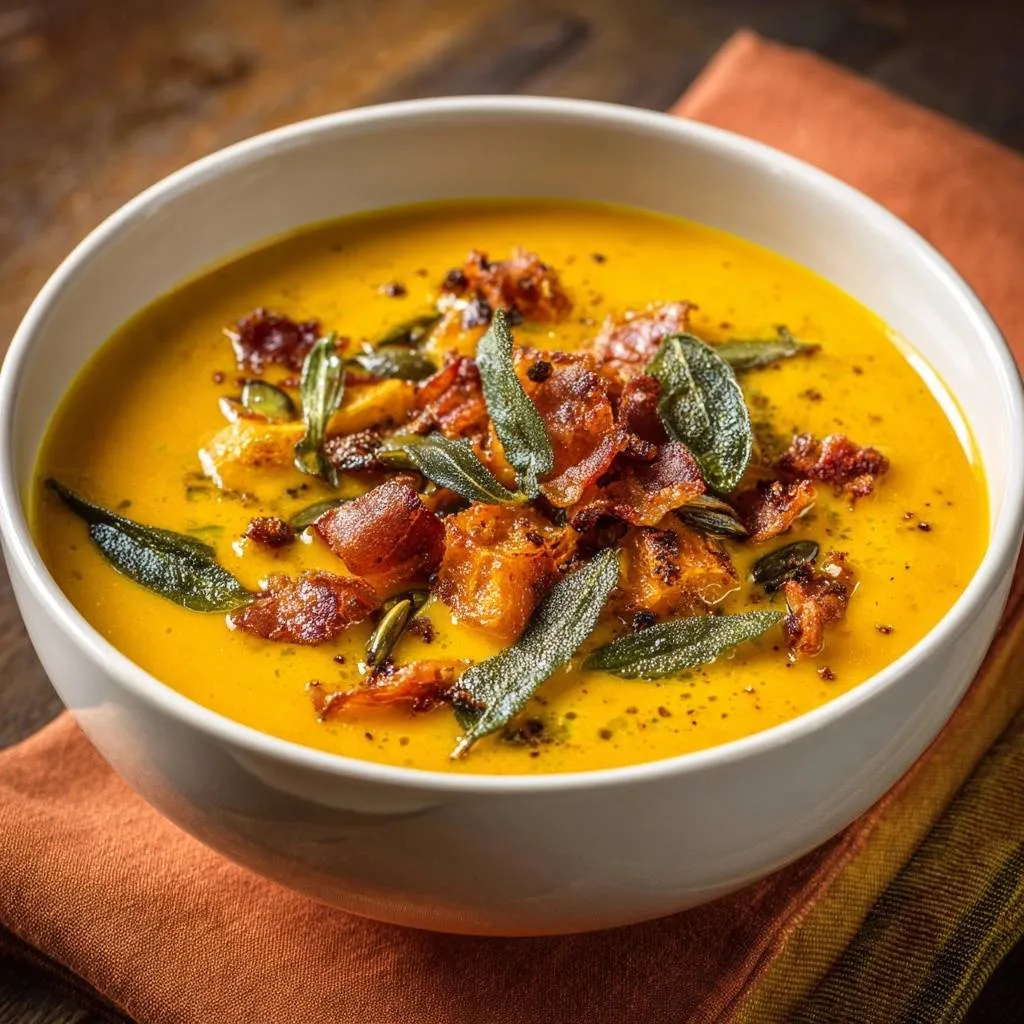
Toss the cubes halfway through the 30-minute roasting time. You’re looking for the bottoms to be dark gold and the centers to be fork-tender. Before you blend everything, set aside about half a cup of the prettiest cubes. These will serve as a garnish, adding a much-needed textural contrast to the smooth soup.
Building the Savory Foundation in One Pot
While the squash is finishing in the oven, start your savory base in a large Dutch oven. Fry your chopped toppings over medium heat until they are perfectly crispy. Once you remove them with a slotted spoon, you’re left with liquid gold in the bottom of the pot. This rendered fat is packed with flavor.
Drop your fresh sage leaves into that hot fat for just about 30 to 45 seconds. They should turn crisp and translucent but stay vibrant green. If they turn dark brown, they’ll taste bitter, so keep a close eye on them. Remove them quickly and set them aside for the final assembly.
The Simmer and Emulsification Process
Once your onions and garlic are soft, add the roasted squash and broth to the pot. Even though the squash is already cooked, a 10-minute simmer is essential. This step allows the caramelized sugars from the roasting pan to marry with the broth, creating a cohesive flavor rather than just “squash in liquid.”
For the smoothest results, an immersion blender is your best friend. You can blend right in the pot without the mess of transferring hot liquid. If you want that ultra-glossy, high-end restaurant look, you can use a high-speed upright blender, but be careful to vent the lid so the steam doesn’t build up pressure.
For an even silkier outcome, explore this creamy butternut squash soup.
Refining the Texture: To Sieve or Not to Sieve?
If you find that your squash was particularly fibrous, you might notice tiny threads in your puree. To achieve an ultra-velvety texture, you can pass the soup through a fine-mesh sieve. Simply place the sieve over a clean pot and use the back of a ladle to push the soup through.
This extra step removes any bits of onion or squash fiber that the blender missed. While it isn’t strictly necessary for a cozy weeknight dinner, it makes a world of difference for a formal holiday meal. The result is a soup that feels like pure silk on the tongue.
Customizing Your Creamy Roasted Butternut Squash Soup
You can easily adapt this recipe to suit different dietary needs. For a dairy-free version, swap the heavy cream for full-fat coconut milk or a homemade cashew cream. The coconut adds a subtle tropical sweetness that pairs beautifully with the roasted squash and thyme.
If you prefer a bit of heat, stir in a half-teaspoon of red pepper flakes or a dash of cayenne pepper during the simmering stage. For a warmer, more spiced profile, a teaspoon of mild curry powder or a pinch of nutmeg can add incredible depth to the finished dish.
Strategic Pairings for a Complete Meal
Because this soup is quite rich and sweet, it pairs best with items that offer acidity or crunch. A sharp arugula salad tossed in a lemon vinaigrette provides a bright contrast. Alternatively, a thick slice of toasted sourdough bread is perfect for swiping up every last drop of the creamy base.
For a similar depth, consider a creamy pumpkin soup that leverages rendered fat for its foundation.
For beverages, consider something with a bit of sparkle. A crisp sparkling apple cider or a chilled white grape juice works wonderfully. The carbonation helps cleanse the palate between spoonfuls of the dense, velvety soup, making each bite feel as fresh as the first.
Troubleshooting Common Soup Consistency Issues
If your soup feels too thick, don’t just add water. Use warm broth to thin it out so you don’t dilute the seasoning. Add the liquid one splash at a time until you reach your desired consistency. It should be thick enough to support the weight of the garnishes on the surface.
On the other hand, if the soup is too thin, let it simmer uncovered for an additional 10 to 15 minutes. This allows excess moisture to evaporate. Remember that the soup will also thicken slightly as it cools, so it’s better to err on the side of a slightly thinner consistency while it’s boiling hot.
Make-Ahead, Storage, and Reheating Protocols
This soup actually tastes better the next day as the flavors have more time to meld. You can store it in an airtight container in the refrigerator for up to 4 days. When you’re ready to eat, reheat it slowly on the stovetop over low heat. Avoid boiling it vigorously once the cream has been added, as this can cause the fats to separate.
If you plan on freezing the soup, it’s best to do so before adding the heavy cream. Dairy can sometimes take on a grainy texture after being frozen and thawed. Freeze the blended squash and broth base for up to 3 months, then stir in the fresh cream while reheating on the stove.
Expert Tips for Professional Plating
Plating is where you turn a simple bowl of soup into a masterpiece. Start by ladling the soup into wide, shallow bowls. Use a spoon to drizzle a swirl of heavy cream over the top. The white contrast against the deep orange soup looks stunning and hints at the richness inside.
Complementary Dishes to Try
To build on the creamy, comforting flavors of your roasted butternut squash soup, consider these dishes.
- For a fresh, vibrant addition, try the creamy green bean and egg salad, offering a delightful contrast.
- If you enjoyed the roasted butternut squash, you might also appreciate the roasted butternut black rice kale bowl, featuring similar seasonal squash flavors.
Place your reserved roasted squash cubes right in the center to create a bit of height. Scatter the crispy toppings and the fried sage leaves around the cubes. Finally, a generous dusting of freshly cracked black pepper adds visual interest and a final pop of flavor that cuts through the cream.
Frequently Asked Questions
Can I use frozen pre-cut squash for this recipe?
You can use frozen squash, but the texture will be slightly different. Frozen squash often contains more water, so it won’t caramelize as deeply in the oven. If you use frozen, roast it directly from frozen at a slightly higher temperature (425°F) to help evaporate that extra moisture as quickly as possible.
How do I make this recipe vegetarian?
To make this vegetarian, simply swap the chicken broth for a high-quality vegetable broth. Instead of using bacon fat, use 2-3 tablespoons of unsalted butter or extra olive oil to sauté your onions and fry the sage. You can add a drop of liquid smoke or a pinch of smoked paprika to the onions to mimic that smoky bacon flavor.
Why does my soup taste slightly bitter?
Bitterness usually comes from two sources: burnt garlic or over-fried sage. Garlic turns bitter the moment it turns dark brown, so only sauté it for about 60 seconds. Similarly, sage should be removed from the oil as soon as it’s crisp. If the soup is already bitter, a tiny pinch of sugar or an extra splash of cream can help balance the flavor.
Can I substitute the butternut squash with other varieties?
Yes, this method works beautifully with Acorn, Kabocha, or even Red Kuri squash. Kabocha is particularly great because it has an even creamier, starchier texture than butternut. Just keep in mind that different squashes have varying levels of sweetness, so you may need to adjust your salt and pepper at the very end.

Butternut Squash Soup
Course: SoupCuisine: AmericanDifficulty: medium4
servings15
minutes45
minutes380
kcal60
MinutesThis restaurant-quality soup avoids the common pitfalls of thin or bland squash soups by roasting the vegetables until caramelized. The result is a thick, savory base enriched with heavy cream and garnished with salty bacon and aromatic sage.
Ingredients
1 large butternut squash (approx. 3 lbs), peeled, seeded, and cut into 1-inch cubes
2 tablespoons olive oil, divided
6 slices thick-cut bacon, chopped
1 small yellow onion, diced
3 cloves garlic, minced
1/2 teaspoon dried thyme
2 1/2 cups low-sodium chicken or vegetable broth (less broth ensures a thicker base)
3/4 cup heavy cream (plus extra for swirling)
1 teaspoon sea salt (plus more to taste)
1 teaspoon freshly cracked black pepper
8-10 fresh sage leaves
Directions
- Roast the Squash: Preheat your oven to 400°F (200°C). Toss the cubed squash with 1 tablespoon of olive oil, salt, and pepper on a large baking sheet. Spread in a single layer. Roast for 30 minutes, tossing halfway through, until the edges are deeply browned and caramelized. Set aside 1/2 cup of the prettiest roasted cubes to use as a garnish.
- Crisp the Bacon: While the squash roasts, place the chopped bacon in a large Dutch oven or heavy-bottomed pot over medium heat. Fry until crispy and the fat has rendered. Use a slotted spoon to remove the bacon and drain on paper towels.
- Fry the Sage: In the remaining bacon fat, add the fresh sage leaves. Fry for 30-45 seconds until crisp but still green. Remove immediately and set aside with the bacon.
- Sauté Aromatics: Leave about 2 tablespoons of fat in the pot (discard excess or add a splash of olive oil if needed). Add the diced onion and sauté for 5-6 minutes until translucent. Stir in the garlic and dried thyme, cooking for 1 minute until fragrant.
- Simmer: Add the remaining roasted squash (except the garnish cubes) and the broth to the pot. Bring to a gentle simmer for 10 minutes. This allows the caramelized sugars from the roasting process to infuse the liquid.
- Blend: Use an immersion blender to puree the soup until completely smooth and thick. For an ultra-velvety texture, you can pass the puree through a fine-mesh sieve, though roasting usually provides enough body.
- Finish: Stir in the heavy cream. Taste and adjust seasoning with additional salt and plenty of cracked black pepper. If the soup is too thick, add a splash more broth; if you prefer the visual in the image, keep it thick enough to support the toppings.
- Assemble: Ladle the soup into bowls. Top each serving with a swirl of heavy cream, a handful of the reserved roasted squash cubes, the crispy bacon, and the fried sage leaves. Finish with an extra dusting of cracked black pepper.
Notes
- Roasting the squash instead of boiling is the key to a thick consistency. For the best presentation, reserve some roasted cubes and fried sage for the garnish.