Imagine dipping a spoon into a bowl of soup that feels like liquid silk. It’s rich, deeply savory, and carries a nutty sweetness that lingers on your tongue. Most people expect cauliflower soup to be a bland, thin, or watery disappointment that tastes more like boiled cabbage than a gourmet meal. However, when you get the technique right, this humble vegetable transforms into something truly spectacular.
For a similar silky texture, consider creamy roasted butternut squash soup.
The secret to a professional-grade result lies in what I call the “Skyscraper” philosophy of soup building. You can’t build a great flavor profile on a weak, watery foundation. By roasting the vegetables first and strictly controlling your liquid-to-solid ratios, you create a concentrated base that doesn’t need heavy flour thickeners to feel indulgent. It’s all about managing moisture and maximizing caramelization.
The real magic happens when you limit the broth. Most recipes tell you to submerge the vegetables in liquid, but that’s a mistake. You want the broth to barely reach the top of the roasted florets. This ensures that when you blend everything together, the natural fibers of the cauliflower create a thick, stable emulsion that stays velvety even after it sits in the fridge overnight.
The Science of Roasting vs. Boiling Vegetables
When you boil cauliflower, you’re essentially hydrating the cells until they burst, which releases a lot of water into your soup base. This often results in that “sulfur” smell that gives cauliflower a bad reputation. Roasting at a high temperature does the exact opposite. It draws moisture out of the vegetable, which concentrates the natural sugars and creates a much more complex flavor profile.
This process is known as the Maillard reaction. As the cauliflower sits in the dry heat of the oven, the proteins and sugars on the surface break down and rearrange. This creates those beautiful brown edges that taste like toasted nuts and butter. If you simply simmered these florets in a pot of water, you’d miss out on that entire spectrum of flavor, leaving you with a one-dimensional dish.
Furthermore, roasting changes the physical structure of the cauliflower. The high heat softens the tough cellulose without making it mushy or waterlogged. This means that when it finally hits the blender, the solids break down into a much finer, smoother puree. You aren’t just making soup; you’re creating a concentrated vegetable essence that provides its own body and thickness.

Why 425°F is the Critical Temperature
Temperature control is everything when you’re trying to avoid a soggy result. If you roast at 350°F or 375°F, the cauliflower will cook through, but it won’t sear. Instead, it will release its internal steam slowly, essentially poaching itself on the baking sheet. This leads to the very “watery” texture we are trying to avoid from the start.
At 425°F, the heat is intense enough to evaporate that moisture the moment it hits the surface. This allows the edges to crisp up and brown before the center becomes too soft. You want that aggressive heat to create a barrier of flavor. This high-heat method ensures the cauliflower stays “dry” enough to absorb the savory broth later without thinning it out.
Essential Components for a Rich Soup Base
To get a soup that tastes like it came from a high-end bistro, you need to be picky about your fats. I use a combination of olive oil for roasting and unsalted butter for the aromatics. Fat is a flavor carrier; it coats the palate and allows the subtle notes of thyme and garlic to linger longer. Using a high-quality extra virgin olive oil for the final drizzle adds a fresh, peppery bite that cuts through the richness of the cream.
The choice of broth is equally important. I always recommend a low-sodium vegetable broth. This gives you total control over the seasoning. Many standard broths are salt bombs, and since we are reducing the liquid to keep the soup thick, that salt can become overwhelming. By starting with a low-sodium base, you can add sea salt in layers, tasting as you go to find that perfect balance.
Don’t overlook the aromatics. Yellow onions provide a foundational sweetness that white onions lack, and fresh garlic is non-negotiable. When these are sautéed slowly in butter, they create a savory “fond” on the bottom of the pot. This golden layer of flavor gets deglazed when you add the broth, ensuring that every drop of the soup is infused with a deep, aromatic complexity.
Selecting the Best Cauliflower Heads
Your soup is only as good as your produce. When you’re at the market, look for cauliflower heads that feel heavy for their size. A heavy head means it’s full of moisture that we can later roast away, leaving behind dense flavor. The curds should be tight and creamy white, with no dark brown spots or “fuzz,” which indicates the vegetable is starting to turn.
The size of your florets matters more than you might think. If you cut them too large, the outsides will burn before the insides are tender. If they’re too small, they’ll turn into mush. Aim for uniform, bite-sized pieces about one inch across. This creates the maximum surface area for caramelization, which is exactly where all that nutty, roasted flavor lives.
The Role of Sourdough in Texture Contrast
A creamy soup needs a crunchy companion to keep things interesting. Sourdough is the ultimate choice for croutons because of its “open crumb” structure. Those little holes and nooks in the bread act like sponges for the butter and olive oil. When you sauté them, the fat penetrates deep into the bread, creating a crunch that goes all the way through.
Unlike standard white bread, which turns into a soggy sponge the second it touches liquid, sourdough has a natural acidity and a sturdy crust. This allows the croutons to maintain their structural integrity for several minutes while sitting atop the soup. That contrast between the velvety, warm puree and the sharp, buttery crunch of the sourdough is what makes this dish feel like a complete meal.
Step-by-Step: Achieving the Perfect Caramelized Roast
Start by preheating your oven to that crucial 425°F. While it’s heating, toss your florets with olive oil and a generous pinch of salt. Don’t crowd the pan! If the cauliflower pieces are touching each other, they will steam instead of roast. Use two baking sheets if you have to. You want plenty of air circulating around every single floret to ensure they get those dark, crispy edges.
About 15 minutes into the roasting process, you must toss the cauliflower. This ensures that the side touching the hot pan doesn’t burn while the top stays pale. You’re looking for a deep golden brown color. When you pull them out, they should smell almost like popcorn. If they just look soft and white, put them back in for another five minutes. That color is your insurance policy against a bland soup.
Building the Aromatic Foundation in One Pot
While the cauliflower is finishing up, grab your Dutch oven. We’re going to use the same pot we used for the croutons. Those little toasted bread crumbs left behind are full of flavor, so don’t wash them out unless they’re actually burnt. Melt your butter and sauté the diced onions over medium heat. You aren’t looking for a hard sear here; you want them translucent and soft, which takes about six minutes.
Once the onions are sweet and tender, add your minced garlic and dried thyme. Be careful here! Garlic can burn in less than a minute, and burnt garlic will make your entire soup taste bitter. Stir it constantly just until you can really smell it. This short “blooming” of the herbs and garlic in the fat wakes up the essential oils, ensuring the flavor is distributed evenly throughout the base.
The Golden Ratio: Liquid to Solid Emulsion
This is the most important part of the entire process. Most recipes call for four or five cups of broth for one head of cauliflower. That is far too much. To get that thick, luxurious texture, we are using only three cups. When you add the roasted cauliflower to the pot and pour in the broth, the liquid should just barely cover the vegetables. It might look like you don’t have enough, but trust the process.
The cauliflower itself will provide the bulk of the body. By keeping the liquid low, you’re creating a high-density emulsion. Think of it like making a fruit smoothie; if you add too much juice, it’s just flavored water. If you keep the liquid tight, you get a thick, creamy consistency that coats the back of a spoon. This ratio is the secret to a soup that feels expensive without needing a roux or cornstarch.
Blending Techniques for a Velvety Finish
If you want the smoothest possible result, a high-speed upright blender is your best friend. The sheer power of the blades can break down the cauliflower fibers into a microscopic puree. However, an immersion blender works great too if you want less cleanup. If you use an upright blender, never fill it more than halfway with hot liquid. The steam can build up pressure and blow the lid off, which is a mess you don’t want to clean up.
Always place a kitchen towel over the lid and hold it down firmly while you start on the lowest speed. Gradually increase the speed until the soup is spinning in a smooth vortex. You’ll see the color lighten as air and fat are whipped into the mixture. This mechanical emulsion is what gives the soup its “velvet” tag. Once it’s smooth, pour it back into the pot to finish with the cream.
Troubleshooting Common Cauliflower Soup Issues
If you find that your soup is actually too thick, don’t panic. This is much easier to fix than a watery soup. Simply whisk in extra broth one tablespoon at a time until you reach your desired consistency. Remember that the soup will continue to thicken as it cools, so aim for a texture that is slightly thinner than you think you want while it’s still on the stove.
If the flavor feels a bit flat or “dull,” it usually needs a hit of acid or salt. Even though we used salt during roasting, the cream can mellow out the flavors significantly. A tiny squeeze of lemon juice or an extra pinch of sea salt can “wake up” the roasted notes. If the texture feels grainy, it usually means the cauliflower wasn’t roasted long enough or the blender didn’t run long enough. Give it another minute of high-speed blending to smooth it out.
Flavor Variations and Dairy-Free Swaps
This recipe is a fantastic canvas for other flavors. If you want to go in a different direction, try adding a teaspoon of curry powder when you sauté the garlic. The warmth of the spices pairs beautifully with the roasted cauliflower. You could also toss a roasted red pepper into the blender for a vibrant orange color and a smoky, sweet undertone that makes the soup feel even heartier.
For those who prefer to skip the dairy, you can easily swap the heavy cream for full-fat coconut milk. It adds a lovely tropical richness that complements the nuttiness of the cauliflower. Another great trick is to blend in half a cup of soaked cashews. They provide an incredible creaminess and extra protein without changing the flavor profile as much as coconut milk does. Both options keep the soup thick and satisfying.
What to Serve with Roasted Cauliflower Soup
Since this soup is quite rich and creamy, you want to pair it with something that has a bit of “zip.” A crisp green salad with a sharp lemon vinaigrette is the perfect palate cleanser. The acidity of the dressing cuts through the heavy cream and butter, making every bite of soup taste as fresh as the first. Bitter greens like arugula or radicchio are especially good here.
If you want something more substantial, a plate of roasted root vegetables or a sharp aged cheddar cheese works wonders. The saltiness of the cheese highlights the sweetness of the roasted cauliflower. Avoid serving this with heavy, creamy pasta or mashed potatoes, as the textures will be too similar. You want contrast—think crunchy, acidic, or salty to balance out the velvety soup.
Storage, Reheating, and Freezing Protocols
This soup actually tastes better the next day. As it sits in the fridge, the garlic, thyme, and roasted flavors have more time to meld together. It will stay fresh in an airtight container for about 3 to 4 days. When you go to reheat it, do it slowly on the stovetop over low heat. If you microwave it on high, the cream might separate, leaving you with an oily film on top.
You can freeze this soup, but be aware that cream-based soups can sometimes change texture after thawing. They might look a bit grainy or separated. To fix this, simply pop the thawed soup back into the blender for 30 seconds or give it a vigorous whisk while it’s heating up. This will re-emulsify the fats and liquids, bringing that velvety texture right back to life. It will keep in the freezer for up to two months.
Expert Tips for Professional Presentation
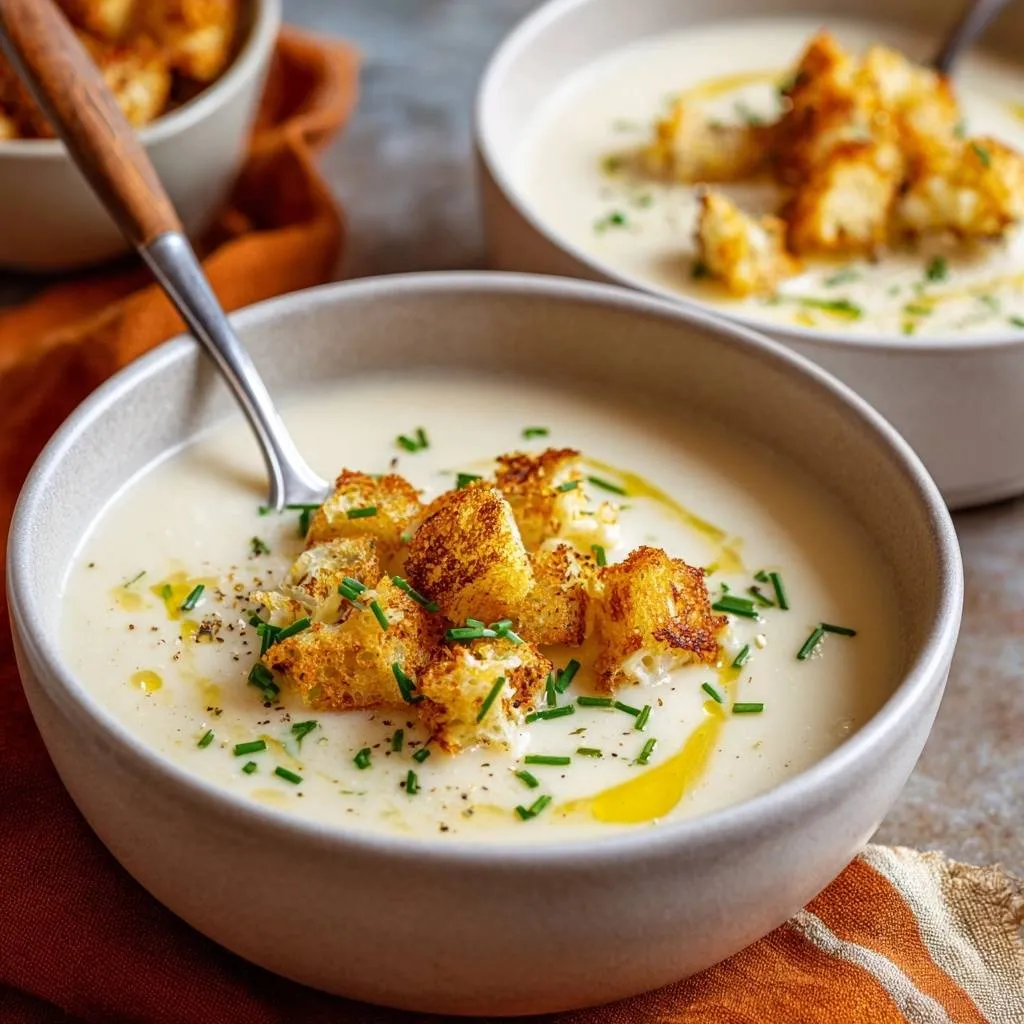
Presentation is the final step in making a meal feel special. When you ladle the soup into bowls, don’t just dump the toppings in the middle. Start with a swirl of high-quality extra virgin olive oil. This adds a beautiful green contrast to the pale soup and a hit of fresh flavor. Then, add a generous crack of black pepper across the surface for visual texture.
Place your chives with intention. The bright green color pops against the cream, and the mild onion flavor complements the roasted base. Finally, nestle a few of those golden sourdough croutons right on top. If you have any leftover roasted cauliflower florets that didn’t make it into the blender, save a few to use as a garnish. It tells the person eating it exactly what’s inside the bowl.
Maintaining Crouton Crunch
The biggest mistake you can make is adding the croutons too early. Even the sturdiest sourdough will eventually succumb to the moisture of the soup. Keep the croutons in a separate bowl on the table and let people add them as they go. This ensures that every single bite has that satisfying, buttery crunch that makes this soup so addictive. It’s a small detail that makes a massive difference in the eating experience.
Frequently Asked Questions
Can I use frozen cauliflower for this soup?
You can, but it is much harder to get the same level of caramelization. Frozen cauliflower is blanched before freezing, so it contains a lot of internal moisture. If you use it, roast it directly from frozen at 450°F and expect it to take a bit longer. You likely won’t get the same deep, nutty flavor as fresh, but the soup will still be tasty. Just be sure to drain any excess water that pools on the baking sheet.
Why did my soup turn out gray instead of creamy white?
A gray tint usually happens for two reasons: overcooking the garlic or using a broth that is very dark. If the garlic browns too much, it can discolor the puree. Similarly, some vegetable broths are made with lots of carrots or dark greens, which can muddy the color. For a bright, creamy look, use a light-colored broth and keep a close eye on your aromatics while sautéing.
How can I make the soup taste even nuttier?
The best way to boost the nuttiness is to “brown” the butter before adding your onions. Melt the butter in the pot and keep cooking it until it stops foaming and starts to smell like toasted hazelnuts and develops little brown specks. This adds a layer of toasted flavor that perfectly mirrors the roasted cauliflower. Just be careful not to let it go from brown to burnt!
Can I make this soup without the heavy cream?
Yes! If you want to skip the cream but keep the thickness, peel and dice one small Yukon Gold potato and roast it right along with the cauliflower. The starch from the potato will create a natural creaminess when blended. You can also use a splash of unsweetened almond milk or just extra broth if you prefer a lighter version, though it won’t be quite as indulgent as the original.
Is it possible to over-blend the soup?
With cauliflower, it’s actually quite hard to over-blend. Unlike potatoes, which can become “gluey” if worked too much due to their high starch content, cauliflower is mostly fiber and water. You can blend it as much as you like to achieve that perfectly smooth, restaurant-style finish. In fact, most people under-blend, leaving small bits that prevent the soup from feeling truly velvety.

Creamy Roasted Cauliflower Soup
Course: SoupCuisine: AmericanDifficulty: medium4
servings15
minutes35
minutes285
kcal50
MinutesA thick and nutty cauliflower soup made by roasting florets to eliminate excess moisture. Blended with vegetable broth and heavy cream, it is served with buttery sourdough croutons and fresh chives.
Ingredients
1 large head cauliflower (approx. 2 lbs), cut into small florets
3 tablespoons olive oil, divided
1 medium yellow onion, diced
3 cloves garlic, minced
3 cups low-sodium vegetable broth (reduced from 4 to ensure thickness)
1/2 cup heavy cream
1/2 teaspoon dried thyme
1 teaspoon sea salt
1/2 teaspoon cracked black pepper
2 cups sourdough bread, torn into 1-inch rustic chunks
2 tablespoons unsalted butter
2 tablespoons fresh chives, finely chopped
Directions
- Preheat your oven to 425°F (220°C). This high heat is essential for the roasting step that prevents a watery soup.
- Toss cauliflower florets with 2 tablespoons of olive oil and a pinch of salt on a large baking sheet. Roast for 25-30 minutes, tossing halfway through, until the edges are deeply browned and caramelized.
- While the cauliflower roasts, prepare the croutons. Melt the butter and the remaining 1 tablespoon of olive oil in a large pot or Dutch oven over medium heat. Add the sourdough chunks and a pinch of salt. Sauté, stirring frequently, until the bread is deeply golden and crisp on all sides. Remove the croutons from the pot and set aside.
- In the same pot (wiping out any burnt crumbs if necessary), sauté the diced onion over medium heat until translucent and soft, about 6 minutes. Add the garlic and dried thyme; cook for 1 minute until fragrant.
- Add the roasted cauliflower to the pot. Pour in 3 cups of vegetable broth-the liquid should just barely cover the cauliflower to maintain a thick, non-watery texture.
- Bring to a gentle simmer for 8-10 minutes to allow the flavors to meld.
- Use a high-speed blender or immersion blender to process the soup until completely smooth and velvety. If using a standard blender, work in batches and do not add extra water; the roasted solids must remain concentrated for a thick emulsion.
- Return the blended soup to the pot over low heat. Stir in the heavy cream and black pepper. Simmer for 2-3 minutes until the soup coats the back of a spoon. Taste and adjust salt if needed.
- Ladle into bowls. Top generously with the buttery sourdough croutons, fresh chives, an extra crack of black pepper, and a bright drizzle of extra virgin olive oil as shown in the image.
Notes
- To ensure a thick and non-watery consistency, do not exceed 3 cups of broth. Roasting at high heat is essential for caramelization and flavor depth.