Nothing ruins a meal faster than biting into breaded chicken only to find a soggy, limp crust that slides right off the meat. Most home cooks struggle with this because they treat breading as a simple coating rather than a structural barrier. When you bake chicken directly on a flat pan, the moisture from the meat has nowhere to go, so it creates steam that turns your golden crust into a mushy mess.
This recipe solves that frustration by using a specific double-crunch technique and a high-heat sear to lock in the cheese while keeping the exterior shatteringly crisp. We aren’t just coating the chicken; we’re engineering a crust that stands up to the moisture of the melted mozzarella inside. By the time this hits your plate, you’ll have a restaurant-quality crunch that holds its integrity from the first bite to the last.
The secret to this success lies in the temperature of your oil and the use of a wire rack. You need that initial high-heat contact to “set” the breading before the chicken ever sees the inside of the oven. If you skip the pan-sear, you’re essentially steaming the breadcrumbs, which is the primary reason most stuffed chicken recipes fail to deliver on their promises. Let’s get into the mechanics of how to make this perfectly every single time.
For more garlic parmesan chicken ideas, consider trying these Garlic Parmesan Chicken Skewers.
The Science of the Double-Crunch Barrier
Achieving a truly crispy exterior requires understanding the physics of moisture and heat. Standard breadcrumbs are finely ground and dense, which often leads to a heavy, doughy texture when they absorb chicken juices. Panko breadcrumbs, however, are flaky and porous, providing a much larger surface area that allows steam to escape while the jagged edges crisp up in the hot oil.
When the chicken hits the shimmering oil in your skillet, the Maillard reaction begins almost instantly. This chemical reaction between amino acids and reducing sugars gives browned food its distinctive flavor and golden-brown color. By shallow frying first, you create a “set” crust that acts as a shield, protecting the meat from drying out while ensuring the breading doesn’t absorb excess moisture during the baking phase.
This initial sear is what we call the “Double-Crunch Barrier.” The first layer of crunch comes from the rapid dehydration of the Panko in the oil, and the second layer develops as the Parmesan cheese in the breading melts and hardens again in the oven. This creates a multi-textured experience that is far superior to simple oven-baked methods. Without this step, the chicken would release its natural juices directly into the breading, resulting in that dreaded pale, wet texture.
Why Wire Racks Prevent Steaming
If you place a breaded chicken breast directly onto a solid baking sheet, you are effectively trapping heat and moisture underneath the meat. As the chicken cooks, it releases steam, and because that steam has no escape route, it gets absorbed back into the bottom layer of breading. This is why the top of your chicken might look great while the bottom is a soggy disaster.
Using a wire rack set over a baking sheet allows for 360-degree heat circulation. The hot air in the oven can move freely under the chicken, drying out any residual moisture and keeping the bottom just as crispy as the top. This airflow is the final piece of the puzzle in preserving the structural integrity of your Panko-Parmesan crust.
Essential Components for Garlic Parmesan Stuffed Chicken
The quality of your ingredients directly impacts the final texture and flavor profile of this dish. For the best results, you must use freshly grated Parmesan cheese rather than the stuff in the green shaker can. Pre-grated or canned Parmesan often contains anti-caking agents like cellulose, which prevents the cheese from melting smoothly and can lead to a gritty, sandy texture in your crust.
Freshly grated Parmesan has a higher moisture content and a lower melting point, allowing it to fuse with the Panko breadcrumbs into a lacy, savory web of flavor. When it comes to the frying oil, choose a neutral oil with a high smoke point like grapeseed or vegetable oil. Avoid extra virgin olive oil for the searing phase, as its low smoke point can lead to a bitter, burnt taste at the temperatures required to set the crust.
Large eggs are essential for the dredging station because they act as the “glue” that binds the flour and the Panko together. If your eggs are too cold, they might not emulsify well with the flour, so letting them sit on the counter for a few minutes can help. Additionally, ensure your spices are fresh; dried garlic and onion powder lose their punch after six months, and you want that aromatic hit to be front and center.
Selecting and Preparing the Chicken Breasts
Uniformity is your best friend when it comes to even cooking. Look for large boneless, skinless chicken breasts that are roughly the same size so they finish in the oven at the same time. If one side of the breast is significantly thicker than the other, you can gently pound it with a meat mallet to even it out before cutting your pocket.
Trimming the chicken is also a vital step. Remove any excess fat or silver skin that can shrink and tighten during cooking, which might cause the chicken to misshapen and squeeze the cheese out of the pocket. Using large breasts provides enough “meat real estate” to house the mozzarella without the walls of the chicken becoming too thin and prone to tearing.
The Panko and Spice Profile
We use a blend of garlic powder, onion powder, and smoked paprika to season the breading rather than fresh aromatics. While fresh garlic is delicious, it burns very quickly in a hot skillet, leaving you with bitter black specks on your chicken. Dry spices distribute more evenly throughout the Panko, ensuring every square inch of the crust is seasoned.
The smoked paprika adds a subtle earthiness and helps achieve that deep, mahogany color during the shallow fry. It complements the saltiness of the Parmesan perfectly. Remember to season your flour layer with salt and pepper as well; if you only season the outside, the meat itself will taste bland once you cut past the crust.
Step-by-Step: Creating the Perfect Pocket
Creating the pocket is a technical task that requires a steady hand and a very sharp knife. Instead of butterflying the chicken (cutting it all the way open), you want to slice into the thickest part of the breast to create a deep, internal pouch. Start your cut about two inches long on the side and wiggle the knife inward, being careful not to pierce through the top, bottom, or the opposite side.
For a different stuffing experience, check out these cranberry spinach stuffed chicken breasts.
Once you’ve created the space, tuck your mozzarella slices inside. If you’re using shredded cheese, pack it in tightly. The “Toothpick Seal” is non-negotiable here. Thread two or three toothpicks through the opening in a “sewing” motion to pull the edges of the meat together. This creates a physical barrier that keeps the melting cheese inside the chicken rather than leaking out into the frying pan.
The Three-Stage Dredging Station Protocol
To keep your kitchen clean and your breading even, use the “Dry Hand/Wet Hand” technique. Designate your left hand for the dry ingredients (flour and Panko) and your right hand for the wet ingredients (eggs). This prevents your fingers from becoming “clubbed” with thick layers of batter, which can lead to messy, uneven coating on the chicken.
The most important part of this process is the “Pressure Phase.” After dipping the chicken in the egg, place it in the Panko-Parmesan mixture and use the palm of your hand to physically press the crumbs into the meat. You want to pack them on firmly to create a dense, shatter-proof shield. If the Panko is just loosely sprinkled on, it will fall off the moment it hits the oil.
Shake off any excess flour before the egg dip. Too much flour creates a barrier that prevents the egg from sticking to the meat, which causes the entire crust to peel off in one piece later. A thin, even dusting is all you need to ensure the egg—and subsequently the Panko—stays exactly where it belongs.
Shallow Frying for Texture and Color
Before you add the chicken to the skillet, you must ensure the oil is at the right temperature. If you don’t have a thermometer, dip the handle of a wooden spoon into the oil. If steady bubbles start to rise around the wood, you’re ready to fry. If the oil is too cold, the breading will soak up the fat and become greasy; if it’s too hot, the outside will burn before the crust is set.
Carefully lay the chicken into the pan, laying it away from you to avoid oil splatters. You are only looking for a deep golden brown color and a firm texture at this stage. This should take about 3 to 4 minutes per side. Do not worry about cooking the chicken all the way through yet; the oven will handle the internal cooking while the stovetop handles the external crunch.
Avoid crowding the pan. If you put all four breasts in at once, the oil temperature will drop significantly, and you’ll end up steaming the meat. Fry in batches if necessary, and let the oil come back up to temperature between each set. Once the crust feels hard to the touch of a spatula, it’s ready to move to the wire rack.
The Oven Finish and Internal Temperature
Transfer the seared chicken to your prepared wire rack and give it a final sprinkle of the remaining Parmesan cheese. This creates a secondary “cheese crust” layer that melts into the Panko as it bakes. The high heat of the 400°F oven will finish cooking the chicken quickly, ensuring the meat stays juicy while the cheese inside reaches a perfect, gooey consistency.
The only way to guarantee success is to use a meat thermometer. You are looking for an internal temperature of 165°F in the thickest part of the meat (not the cheese pocket). Because the chicken was seared first, it usually only needs about 10 to 12 minutes in the oven. Overcooking is the enemy of juicy chicken, so start checking the temperature at the 10-minute mark.
Troubleshooting Common Stuffed Chicken Issues
If you find that your cheese is still leaking out despite the toothpicks, try chilling the stuffed chicken in the fridge for 15 minutes before breading it. This firms up the meat and the cheese, making the seal more effective. Also, ensure you aren’t overstuffing; a little mozzarella goes a long way, and too much pressure will force the cheese through even the smallest gaps.
If your crust is getting too dark before the middle is cooked, your stovetop heat was likely too high. In the future, lower the flame slightly and focus on a steady sizzle rather than a violent fry. Conversely, if the meat is bland, remember that the flour layer needs seasoning. Salt is a flavor enhancer that needs to be in direct contact with the meat to do its job effectively.
Optimal Side Dish Pairings
Since this Garlic Parmesan Stuffed Chicken is quite rich and savory, you want to pair it with sides that offer a bit of acidity or brightness. A simple arugula salad with a lemon vinaigrette is a classic choice that cuts through the richness of the cheese. The peppery greens and citrus notes provide a refreshing contrast to the salty Parmesan crust.
More Chicken Dishes to Try
If you enjoyed this stuffed chicken, you might like these other chicken recipes.
- For a refreshing take on chicken, consider the Garlic Herb Grilled Chicken Salad, featuring bright, fresh flavors.
- If you’re in the mood for something creamy and satisfying, give the Creamy Zesty Chicken and Corn Salad a try.
Roasted asparagus or steamed broccolini with a squeeze of fresh lime also work beautifully. If you want something heartier, a light garlic-butter pasta or a scoop of buttery mashed potatoes can round out the meal. Just avoid anything too heavy or cream-based, as the chicken itself is already the star of the show in terms of decadence.
Safe Storage and Reheating for Maximum Crunch
If you have leftovers, store them in an airtight container in the refrigerator for up to three days. However, whatever you do, stay away from the microwave! Microwaving breaded chicken introduces steam that will immediately turn your hard-earned crispy crust into a rubbery mess. It also tends to overcook the chicken meat, making it tough.
To revive the crunch, use an air fryer or a toaster oven at 350°F for about 5 to 8 minutes. This dry heat will re-crisp the Panko and melt the cheese without drying out the breast. If you’re using a standard oven, place the chicken back on a wire rack to ensure the bottom gets crispy again. This method makes the leftovers taste almost as good as the moment they first came out of the pan.
How do I keep the cheese from leaking out of the chicken?
The most effective way to keep the cheese inside is to use the “sewing” method with toothpicks. Insert the toothpicks across the opening of the pocket to pull the meat together tightly. Additionally, avoid overstuffing the chicken; leave a small margin of meat around the edges of the pocket so the seal has more surface area to grip. Chilling the chicken for 15 minutes after stuffing but before breading also helps the meat hold its shape during the initial sear.
Can I use regular breadcrumbs instead of Panko?
While you can use regular breadcrumbs, the result will not be nearly as crispy. Regular breadcrumbs are much finer and tend to absorb more oil and moisture, which can lead to a heavier, softer crust. Panko is specifically processed into large, airy flakes that resist absorbing grease and provide that signature “shatter” crunch. If you must use regular crumbs, try mixing them with a bit more Parmesan to add some structural integrity.
Why is my chicken dry even though it’s stuffed with cheese?
Dry chicken is almost always a result of overcooking. Because the chicken is seared and then baked, it cooks faster than you might expect. Always use a meat thermometer to pull the chicken out of the oven as soon as it hits 165°F. Furthermore, letting the chicken rest for 5 minutes after baking is crucial. This allows the juices to settle back into the fibers of the meat; if you cut it immediately, all that moisture will run out onto the plate.
What is the best way to store and reheat leftovers?
Store leftovers in an airtight container in the fridge for up to 3 days. To reheat, avoid the microwave at all costs as it will make the breading soggy. Instead, use an air fryer or oven at 350°F for 5-8 minutes. Placing the chicken on a wire rack during reheating allows hot air to circulate, which helps the Panko regain its original crispiness while gently warming the cheese inside.
Can I prepare this dish ahead of time?
You can stuff and bread the chicken up to 4 hours in advance. Keep the prepared breasts on a plate covered loosely with plastic wrap in the refrigerator. Do not sear them until you are ready to cook and serve, as the crust will lose its crunch if it sits in the fridge after being fried. Preparing the dredging station and stuffing the pockets ahead of time is a great way to save time for a dinner party.
Can I use chicken thighs instead of breasts?
Chicken thighs are much harder to stuff because they are smaller and have a more irregular shape. If you prefer dark meat, it is better to “roll” the stuffing into the thigh and secure it with kitchen twine rather than cutting a pocket. Keep in mind that thighs have a higher fat content and may require a few extra minutes in the oven to reach a safe internal temperature, though they are much more forgiving if slightly overcooked.
Stuffed Chicken
Course: Main CourseCuisine: AmericanDifficulty: easy4
servings20
minutes20
minutes480
kcal40
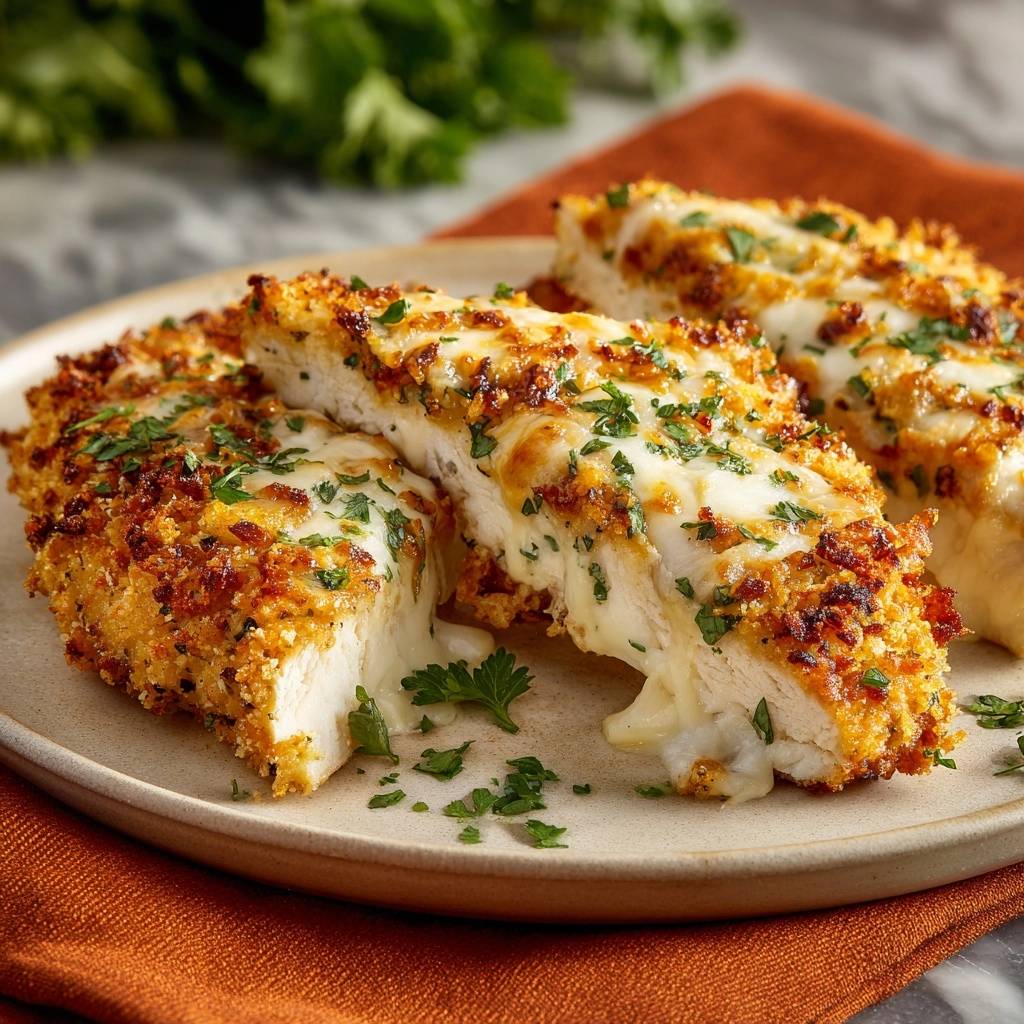
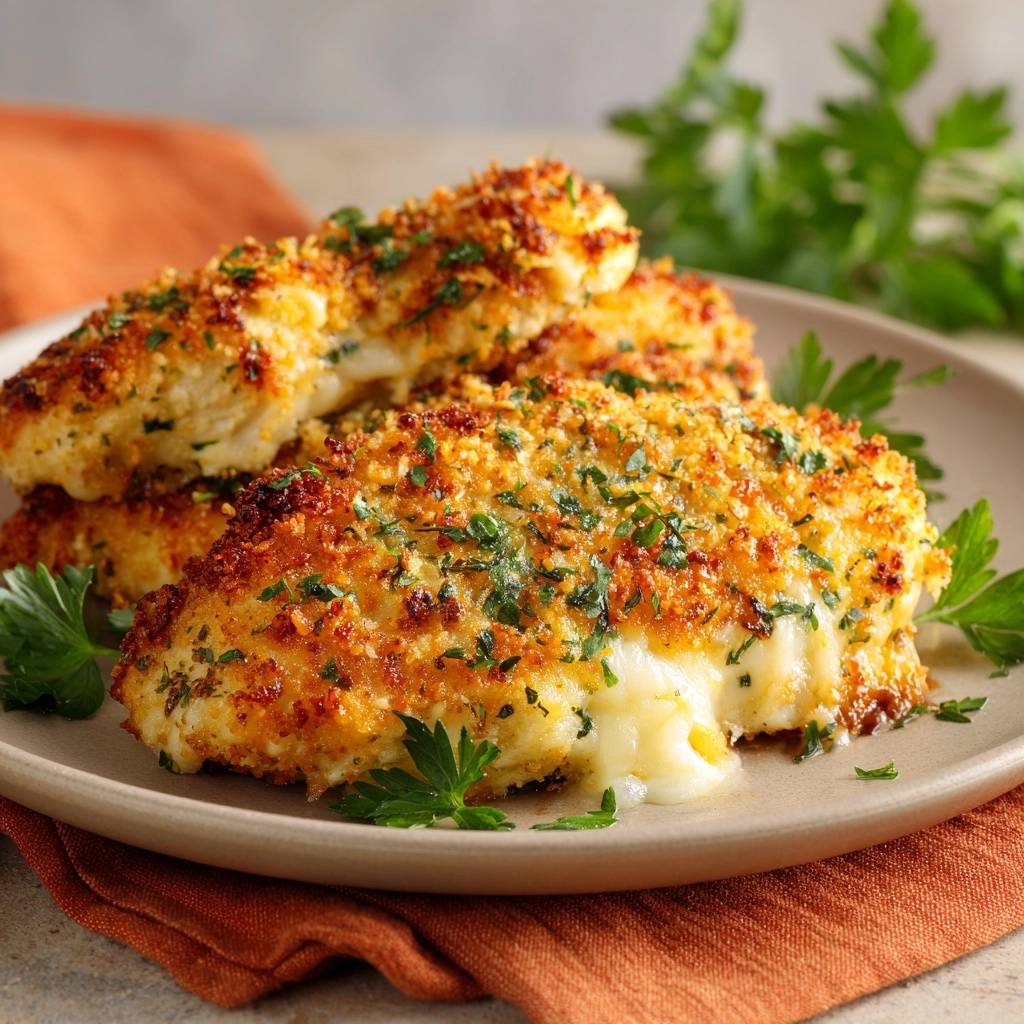
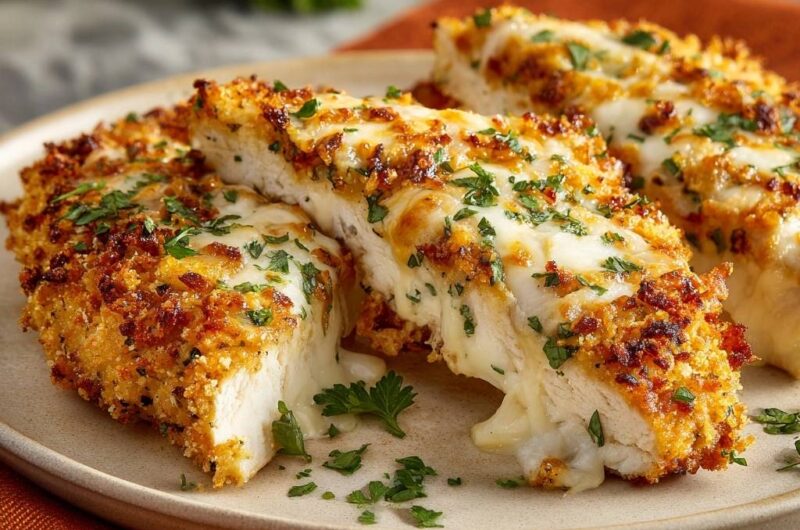
MinutesA high-heat seared and oven-baked chicken breast stuffed with gooey mozzarella cheese, coated in a seasoned Panko and Parmesan crust designed to stay crispy and golden.
Ingredients
4 large boneless skinless chicken breasts
6 slices mozzarella cheese (or 1 cup shredded)
1.5 cups Panko breadcrumbs
3/4 cup freshly grated Parmesan cheese (divided)
1 teaspoon garlic powder
1 teaspoon onion powder
1/2 teaspoon smoked paprika
2 large eggs, beaten
1/2 cup all-purpose flour
1/2 cup neutral oil (grapeseed or vegetable) for shallow frying
Fresh chopped parsley for garnish
Directions
- Preheat your oven to 400°F (200°C). Place a wire rack over a baking sheet. This is the secret to the anti-soggy crust as it allows hot air to circulate under the chicken, preventing the bottom from steaming.
- Use a sharp knife to cut a deep pocket into the thickest part of each chicken breast, being careful not to cut all the way through. Stuff 1.5 slices of mozzarella into each pocket. Secure the opening tightly with 2-3 toothpicks to prevent cheese leakage.
- Set up three shallow bowls:
- Bowl 1: Flour mixed with 1/2 teaspoon salt and 1/4 teaspoon pepper.
- Bowl 2: Beaten eggs.
- Bowl 3: Panko breadcrumbs, 1/2 cup of the Parmesan cheese, garlic powder, onion powder, and smoked paprika.
- Dredge each chicken breast in flour (shake off excess), dip in egg, and then press firmly into the Panko-Parmesan mixture. To ensure the crust stays crispy, press the crumbs in hard with the palm of your hand to create a dense, even barrier.
- Heat the oil in a large skillet over medium-high heat. Once the oil is shimmering, carefully add the chicken. Shallow fry for 3-4 minutes per side until the crust is deep golden brown and “set.” This frying step is essential to achieve the color and texture shown in the image.
- Transfer the seared chicken to the wire rack on the baking sheet. Sprinkle the remaining 1/4 cup of Parmesan cheese over the tops of the chicken.
- Bake for 10-12 minutes until the internal temperature reaches 165°F and the cheese topping has melted into the crust.
- Let the chicken rest for 5 minutes. This allows the juices to redistribute so they don’t soak the crust when sliced. Remove toothpicks, garnish with fresh parsley, and serve.
Notes
- Using a wire rack over a baking sheet is essential to allow air circulation and prevent the bottom of the chicken from becoming soggy. Remember to remove toothpicks before serving.