Nothing ruins a cozy Saturday morning faster than a plate of rubbery, flat pancakes. We’ve all been there, staring at a stack that looks more like a pile of coasters than the cloud-like towers you see at a high-end diner. The difference between a tough pancake and a masterpiece isn’t just luck; it’s about understanding the delicate balance of moisture and air.
These Fluffy Cranberry Maple Pancakes are designed to solve the “rubber pancake syndrome” once and for all. By pairing the tart, vibrant pop of cranberries with the deep, woody sweetness of maple syrup and a hint of citrus zest, you get a breakfast that feels sophisticated yet deeply comforting. It’s a seasonal favorite that brings warmth to the table with every bite.
The secret to that legendary loft is the “Lumpy Batter Rule.” I’ve found that the biggest mistake home cooks make is whisking the batter until it’s perfectly smooth. If you want a tender crumb that melts in your mouth, you have to embrace the lumps. Over-mixing develops gluten, which is great for chewy bread but disastrous for a light, airy pancake.
For a similar tart treat, check out these cranberry cheesecake bars.
The Chemistry of Fluffy Cranberry Maple Pancakes
Achieving a “skyscraper” rise in your pancakes is a matter of chemistry, specifically the reaction between acids and bases. In this recipe, we use a double-leavening approach. The baking powder provides a steady lift, while the baking soda reacts instantly with the lactic acid in the buttermilk. This reaction creates a flurry of carbon dioxide bubbles that get trapped within the batter.
As soon as that batter hits the hot griddle, those tiny bubbles expand rapidly. This is the “lift” you see in the photos—a physical transformation from a liquid pour to a structured, aerated cake. However, this structure is fragile. If you stir the batter too much, you pop those bubbles before they ever have a chance to set in the heat.
Mechanical agitation is the enemy of tenderness. When you whisk vigorously, you align the proteins in the flour to create gluten. While gluten gives pizza crust its chew, it makes pancakes feel like cardboard. By using a gentle folding motion with a spatula, you keep those gluten strands short and the texture incredibly soft.
Why Buttermilk is Non-Negotiable
Buttermilk is the MVP of this recipe because of its unique viscosity. It’s much thicker than standard milk, which serves a very practical purpose: it helps suspend the heavy cranberries. In a thin batter, the berries would sink straight to the bottom and scorch against the pan, but buttermilk keeps them perfectly distributed.
If you don’t have buttermilk on hand, you can create a quick substitute by mixing 1 1/2 cups of milk with a tablespoon of lemon juice. Let it sit for five minutes until it curdles slightly. While this provides the necessary acidity for the rise, real buttermilk is still king for its rich fat content and superior mouthfeel.
The Role of Fat and Sugar in Texture
We use three tablespoons of melted butter in the batter to act as a “shortening” agent. The fat coats the flour proteins, physically preventing them from bonding into tough gluten chains. This ensures that every bite is tender rather than elastic. Make sure your butter is slightly cooled so it doesn’t accidentally cook the egg upon contact.
The small amount of sugar in the batter isn’t just for sweetness. Sugar helps with the Maillard reaction, which is the chemical process that creates that beautiful golden-brown crust. It allows the pancake to caramelize quickly on the outside while the inside stays moist and fluffy, providing a perfect contrast in textures.
Essential Components for the Cranberry Maple Batter
Success starts with your ingredients. Since this recipe relies on a few key flavors, the quality of what you put in the bowl directly impacts the final result. You want a balance of tart, sweet, and aromatic elements that work together rather than competing for attention.
Selecting the Best Cranberries: Fresh vs. Frozen
You can use either fresh or frozen cranberries for this recipe with great results. Fresh berries offer a slightly firmer “pop,” while frozen berries are convenient year-round. If you go the frozen route, do not thaw them before adding them to the saucepan or the batter. Thawing causes the berries to release excess moisture, which can lead to purple streaks and a soggy texture.
Cranberries are also a nutritional powerhouse, packed with antioxidants and Vitamin C. Their natural acidity is the perfect foil for the rich maple syrup. When they hit the heat, they soften just enough to release their juices without losing their iconic shape, creating a beautiful visual on the plate.
For another berry bake, try this rustic cranberry cake.
If you enjoyed the sweet cranberry flavor, you’ll also appreciate this berry bliss layer cake.
The Grade Matters: Choosing Your Maple Syrup
Not all maple syrup is created equal. For this recipe, I highly recommend using Grade A Dark (formerly known as Grade B). This variety has a much more robust, intense maple flavor compared to the lighter “Golden” syrups. When you simmer the syrup with tart cranberries and orange zest, you need that deep flavor profile so the maple doesn’t get overshadowed.
Aromatics: Orange Zest and Vanilla Extract
Orange zest acts as the “flavor bridge” in this dish. The citrus oils found in the peel brighten the entire flavor profile and cut through the richness of the butter. It makes the cranberries taste more like themselves. Always use a microplane to zest your orange, and stop as soon as you reach the white pith, which is incredibly bitter.
Sweet Endings and Rich Bites
If you enjoyed these fluffy cranberry maple pancakes, you might like to explore more rich chocolate baked goods.
- For a deep chocolate cake that’s easy to get out of the pan, consider this moist chocolate bundt cake.
- If you’re keen on preventing cake sinkage, this double chocolate layer cake offers guidance on that technique.
Vanilla extract adds a layer of warmth that rounds out the edges. It’s that subtle “bakery smell” that makes the kitchen feel inviting. Together, the orange and vanilla transform a standard pancake into something that feels like a special occasion meal.
Step-by-Step: Executing the Perfect Rise
Cooking the perfect pancake is a sensory experience. You have to listen to the sizzle, watch the bubbles, and feel the resistance of the batter. Following these phases will ensure you get that diner-style result every single time.
Phase 1: The Dry and Wet Integration
Start by creating a “well” in the center of your dry ingredients. Pour the whisked wet ingredients into that hole. Using a large spatula, gently fold the flour into the liquid. You are looking for a batter that is thick and lumpy. If you see a few small streaks of dry flour, that is actually a good sign! Stop mixing immediately to preserve the air.
Phase 2: The Mandatory 10-Minute Rest
This is the step most people skip, but it’s vital. During these ten minutes, the starch granules in the flour hydrate, and the baking soda begins its initial off-gassing. You will actually see the batter change; it will look aerated, slightly puffed, and thicker than when you first mixed it. This rest period guarantees a tender crumb.
Phase 3: Simmering the Whole-Berry Compote
While the batter rests, get your topping going. Keep the heat at medium-low. You want the maple syrup to gently glaze the cranberries. The goal is “plump and intact.” If the heat is too high, the berries will burst and turn into a jam. You want them to look like little jewels glistening in the syrup when you pour them over your stack.
Phase 4: Griddle Temperature and The Flip
Test your griddle by flicking a few drops of water onto it; they should dance and sizzle before evaporating. Pour your batter and wait for the “bubble rule.” You aren’t just looking for bubbles to appear; you are waiting for them to pop and stay open. When the edges look dry and set, it’s time to flip. The center should feel springy to the touch when done.
Troubleshooting Common Pancake Failures
Even with a great recipe, things can go sideways. If your pancakes aren’t turning out like the pictures, it’s usually a quick fix. Most issues stem from temperature control or the age of your leavening agents.
Why Your Pancakes are Flat or Heavy
If your pancakes are coming out like lead weights, check your baking powder. It loses its potency after six months. Another culprit is over-mixing, which we’ve covered, but also check your heat. If the griddle is too cold, the pancakes won’t get that initial “kick” of steam needed to rise, resulting in a heavy, dense interior.
Preventing the “Soggy Bottom” Effect
Stacking pancakes directly on a plate as you cook the rest of the batch creates steam, which leads to sogginess. If you’re cooking for a crowd, place the finished pancakes on a wire rack set over a baking sheet. This allows air to circulate around the entire pancake, keeping the exterior crisp while you finish the rest of the batter.
Optimal Pairings for a Seasonal Breakfast
These pancakes are quite rich, so I love balancing them with high-protein sides. Soft-scrambled eggs or a few links of turkey sausage provide a savory counterpoint to the sweet maple and tart berries. The saltiness of the meat really makes the maple flavor sing.
For beverages, a bold cold-brew coffee is fantastic to cut through the sweetness. If you want something more festive, sparkling cider is a wonderful pairing. The carbonation cleanses the palate between bites of the fluffy, syrup-soaked cake.
Storage and Reheating for Meal Prep
You can absolutely make these ahead of time. To prevent them from sticking together in the freezer, use the “flash-freeze” method. Lay the cooled pancakes in a single layer on a baking sheet and freeze for an hour before transferring them to a freezer bag. They will stay fresh for up to two months.
When you’re ready to eat, skip the microwave! Microwaving pancakes often makes them rubbery and tough. Instead, pop them into a toaster oven or an air fryer at 350°F for a few minutes. This method revives the crispy edges and keeps the center light and fluffy, just like they were fresh off the griddle.
Expert Tips for Pancake Success
Can I use whole wheat flour for this recipe?
You can substitute up to 50% of the all-purpose flour with whole wheat flour without losing too much fluffiness. Using 100% whole wheat will result in a much denser, heavier pancake that won’t achieve the same “skyscraper” height. If you do use whole wheat, let the batter rest for an extra five minutes to soften the bran.
How do I keep the first batch warm?
The best way to keep pancakes warm without drying them out is to place them in a 200°F (95°C) oven. Use a wire rack set inside a baking sheet rather than a flat pan. This ensures that the bottom of the pancake doesn’t get soggy from trapped steam while you finish cooking the rest of the batter.
What if my cranberry syrup is too thin?
If your syrup looks a bit watery, just keep simmering it for another two to three minutes. Cranberries are naturally high in pectin, which is a thickening agent. As the syrup reduces and the berries release their juices, it will naturally thicken into a glossy glaze. Remember that it will also thicken significantly as it cools slightly.
Can I make the batter the night before?
I don’t recommend making this specific batter the night before. Because we rely on the immediate chemical reaction between the baking soda and the buttermilk, the “lift” will be spent by morning. If you want to save time, mix your dry ingredients in one bowl and your wet ingredients in another, then just combine them when you’re ready to cook.
Cranberry Maple Pancakes
Course: BreakfastCuisine: AmericanDifficulty: easy4
servings10
minutes15
minutes340
kcal25
MinutesA foolproof recipe for airy, tender pancakes topped with a warm cranberry and maple syrup glaze. The key to success is a gentle folding technique and a short rest period for the batter to ensure maximum fluffiness.
Ingredients
2 cups all-purpose flour
2 tablespoons sugar
1 tablespoon baking powder
1/2 teaspoon baking soda
1/2 teaspoon salt
1 1/2 cups buttermilk (or 1 1/2 cups milk mixed with 1 tbsp lemon juice)
1 large egg
3 tablespoons melted butter (slightly cooled)
1 teaspoon vanilla extract
1 1/2 cups fresh or frozen cranberries
3/4 cup pure maple syrup
1 tablespoon orange zest
1 tablespoon butter (for the griddle)
Directions
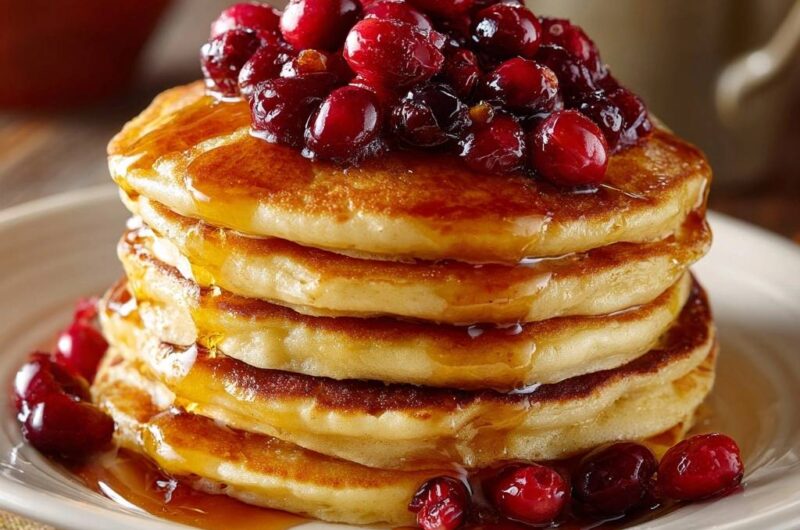
- In a large bowl, whisk together the flour, sugar, baking powder, baking soda, and salt. The addition of baking soda reacts with the buttermilk to create the immediate lift seen in the image.
- In a separate bowl, beat the egg with the buttermilk, melted butter, and vanilla extract.
- Pour the wet ingredients into the dry ingredients. Use a spatula to gently fold the mixture together. Stop as soon as the flour streaks disappear. The batter must remain lumpy. If you mix until smooth, you will lose the fluffiness.
- Let the batter rest for 5 to 10 minutes. This allows the leavening agents to activate and the flour to hydrate, ensuring a tender crumb.
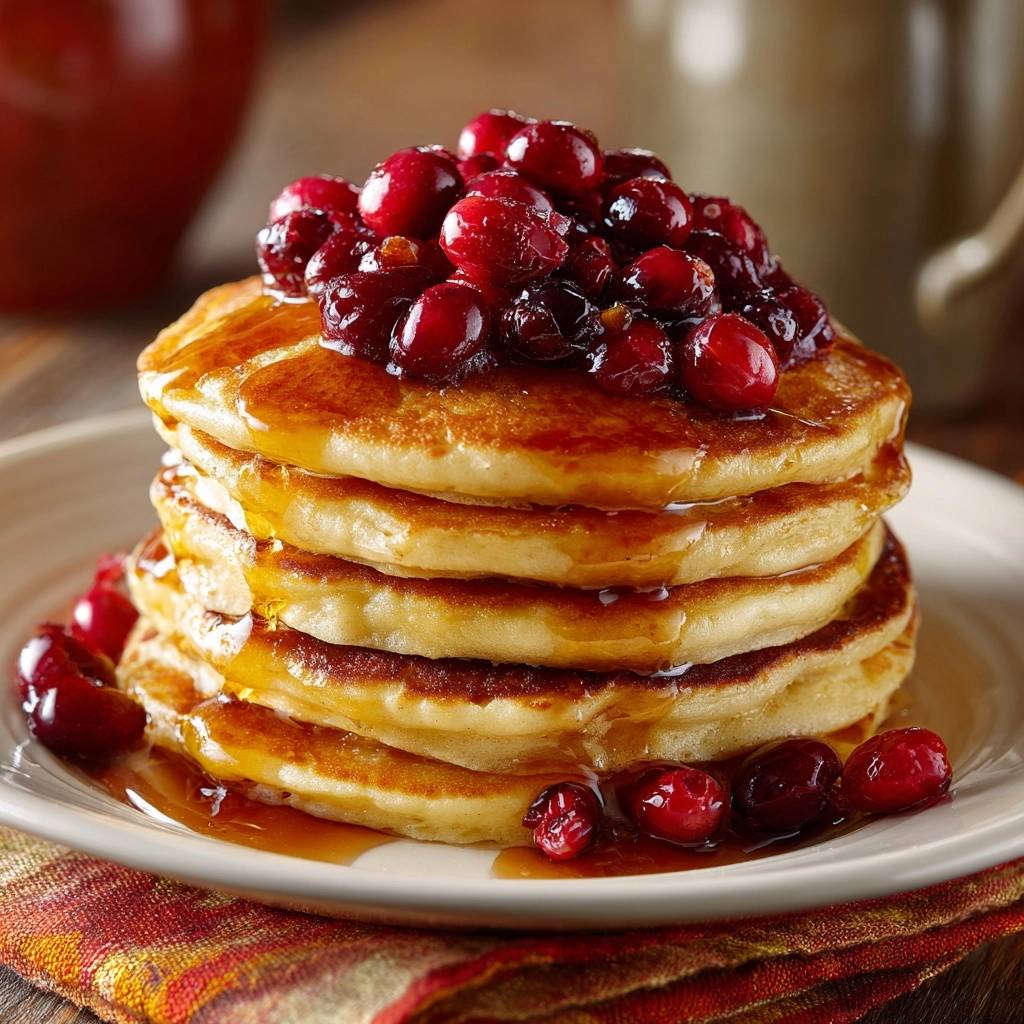
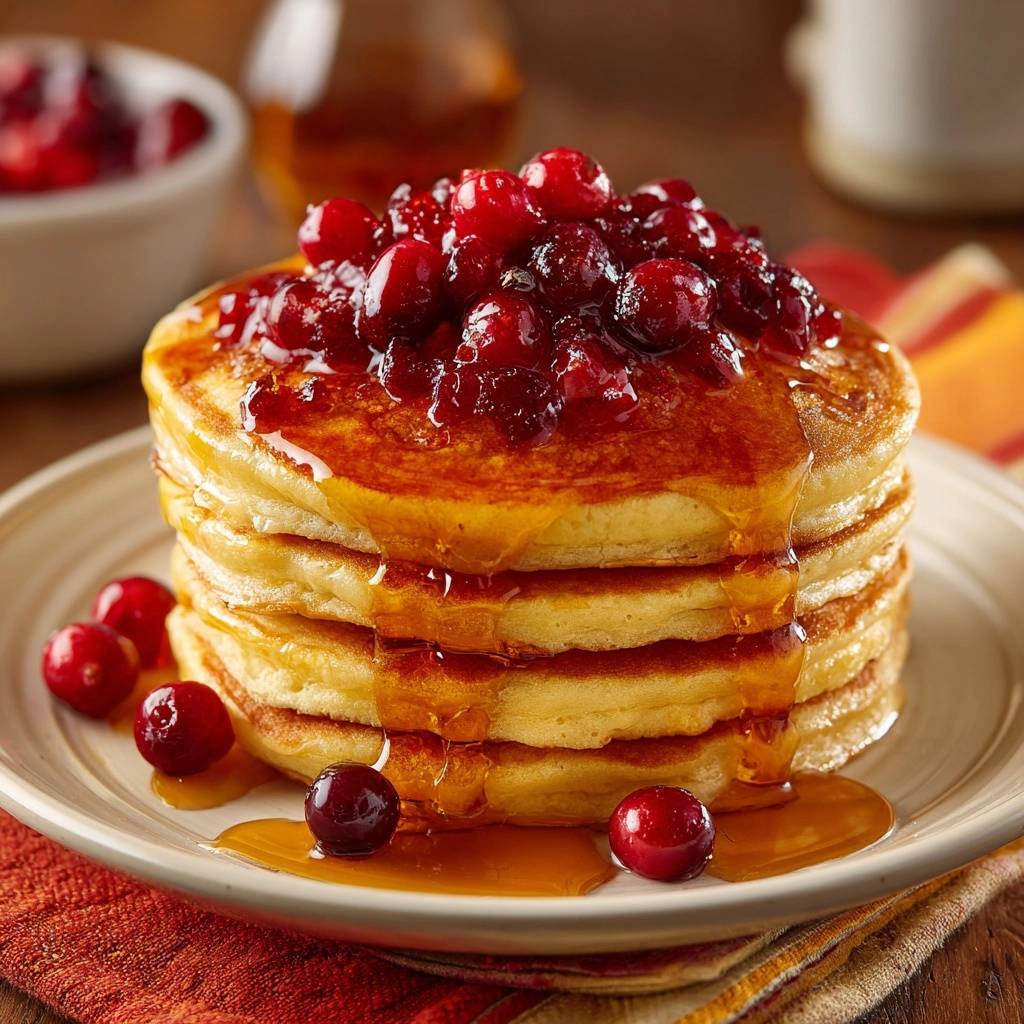
- While the batter rests, prepare the topping: In a small saucepan, combine the cranberries, maple syrup, and orange zest. Simmer over medium-low heat for 5-8 minutes. You want the berries to soften and glaze, but remain whole and plump as shown in the photo, rather than breaking down into a jam.
- Heat a non-stick griddle or large skillet over medium heat. Lightly grease with a thin layer of butter.
- Pour 1/3 cup of batter for each pancake. Cook until large bubbles form on the surface and the edges look dry and set. Flip carefully and cook for another 1-2 minutes until the centers are springy and the exterior is golden brown.
- Stack the pancakes high. Spoon the warm, whole-berry cranberry maple compote generously over the top, allowing the syrup to soak into the layers.
Notes
- The Lumpy Batter Rule is critical: stop mixing as soon as flour streaks disappear to avoid developing gluten. Let the batter rest for 5 to 10 minutes to allow leavening agents to activate for a better rise.