Imagine biting into a cloud of creamy vanilla that suddenly bursts with the bright, zesty punch of a fresh summer orange. These Glazed Orange Creamsicle Cookies deliver that exact nostalgic flavor, mimicking the classic frozen treat but in a warm, soft-baked form. The texture is the real star here, featuring a high-domed, tender center that contrasts beautifully with a crisp, sugary exterior.
However, most citrus cookies suffer from a frustrating structural flaw. Once you apply that beautiful glaze, the moisture typically seeps into the crumb, turning a once-perfect cookie into a soggy, mushy mess within hours. It’s a common disappointment that keeps many bakers from attempting heavily glazed fruit cookies for parties or gifts.
The secret to success lies in a professional “crust seal” technique. By using a specific double-bake cooling method, we create a microscopic barrier on the cookie’s surface. This ensures the glaze sits firmly on top without migrating into the center, keeping your treats fresh and sturdy for days. I’ve found that this small technical adjustment makes the difference between a home-baked snack and a bakery-quality masterpiece.
The Chemistry of Citrus and Cookie Structure
Baking with citrus involves more than just adding flavor; it’s a delicate balancing act of chemistry. Orange juice is naturally acidic, which can weaken the gluten structure in your dough if not handled correctly. When you combine this acidity with the high moisture content of a sugar glaze, the cookie acts like a sponge, drawing liquid into the porous crumb through capillary action.
This moisture migration is why standard recipes often fail by the second day. The sugar in the glaze is hygroscopic, meaning it attracts water from the air and the cookie itself. Without a protective barrier, the starch molecules in the cookie soften too much, leading to that dreaded “cakey” or wet texture that lacks any bite.
The “crust seal” method solves this by utilizing residual heat. When we move the cookies back into a turned-off oven, the dry air evaporates surface moisture rapidly. This process gelatinizes the surface starches into a thin, crisp shell. It’s essentially waterproofing your cookie from the inside out, allowing the heavy cream in the glaze to set into an opaque, firm layer rather than soaking through.
Essential Components for Glazed Orange Creamsicle Cookies
Quality ingredients are non-negotiable when you want that authentic creamsicle punch. You must use fresh orange zest rather than bottled extracts. The essential oils found in the peel provide a deep, floral citrus aroma that juice alone cannot replicate. When these oils hit the butter and sugar, they permeate the entire dough with flavor.
Unsalted butter is another critical component. It allows you to control the exact salt-to-citrus balance, ensuring the salt enhances the orange rather than competing with it. If you use salted butter, the cookies can sometimes take on a savory note that clashes with the delicate vanilla and cream flavors we’re aiming for.
For the glaze, heavy cream is the secret weapon. While many recipes call for milk or water, heavy cream provides a higher fat content. This creates a thick, opaque finish that stays white and bright. It also prevents the glaze from becoming translucent or “weeping” as it sits on the cookie surface.
Selecting the Right Oranges for Zest and Juice
Navel oranges are generally the best choice for this recipe because they have thick, oil-rich skins that are easy to zest. Valencia oranges are excellent for juice but can be trickier to grate. If you want a more sophisticated flavor profile, Blood oranges offer a stunning color and a slightly raspberry-like undertone that pairs beautifully with the vanilla base.
The Role of Leavening Agents in High-Domed Cookies
This recipe utilizes both baking powder and baking soda to achieve its signature look. The baking powder provides the initial lift, while the baking soda reacts with the acidic orange juice. This reaction creates carbon dioxide bubbles that expand rapidly, resulting in the beautiful “cracked top” texture and a thick, substantial dome that doesn’t flatten out during baking.
Step-by-Step: Preparing the Citrus Infused Dough
Start by creaming your softened butter and sugar together for at least three to four minutes. You’re looking for a pale, fluffy texture that looks almost like whipped frosting. This step incorporates the air necessary to support that high-domed shape. If the butter is too cold or you don’t beat it long enough, the cookies will be dense and heavy.
Once you add the dry ingredients, switch to a low speed or mix by hand. You want to stop the moment you no longer see streaks of white flour. Over-mixing at this stage develops the gluten, which will turn your tender creamsicle treats into tough, bread-like pucks. The dough should feel soft but hold its shape when scooped.
The Double-Bake Technique for a Crisp Barrier
This is the defining step for a professional-grade cookie. After the initial 10 to 12 minutes of baking, your cookies will be set at the edges but still very soft in the middle. Move them to a wire rack immediately to stop the bottoms from over-browning on the hot pan. Let them breathe for five minutes so the internal steam can escape.
Now, slide that entire wire rack back into the oven you just turned off. The ambient heat, which should still be around 200-250 degrees, acts as a dehydrator. In just three minutes, the outer layer of the cookie “flash-dries.” This creates the structural seal that prevents the glaze from soaking in later.
This technique is a game-changer for any glazed fruit cookie. It preserves the soft, fudgy interior while giving the exterior enough strength to support a heavy, decorative glaze. You’ll notice the surface feels slightly more matte and firm to the touch after this second “flash-bake” session.
Achieving the Two-Tone Creamsicle Glaze Aesthetic
The visual appeal of these cookies comes from the contrast between the thick white base and the vibrant orange drizzle. Your white glaze should pass the “viscosity test”—it should be thick enough to coat the back of a spoon without running off instantly. If it’s too thin, it will disappear into the cookie; if it’s too thick, it won’t create those beautiful natural drips.
For a similar vibrant visual, explore pink frosting sugar cookie cups.
Spoon the white glaze over the center first, letting it move toward the edges on its own. Once the base is slightly set but still tacky, apply the orange drizzle. This creates a layered, professional look that mimics the appearance of a gourmet bakery item. The addition of orange marmalade to the drizzle adds a glossy sheen and a concentrated burst of fruit flavor.
Straining Marmalade for a Smooth Orange Drizzle
Marmalade often contains large bits of orange peel that will instantly clog a piping bag. To avoid a messy kitchen disaster, warm the marmalade in the microwave for ten seconds until it’s fluid. Press it through a fine-mesh sieve to remove the solids. This leaves you with a smooth, intensely flavored syrup that pipes into perfect, clean lines.
Troubleshooting Common Citrus Baking Issues
If your glaze is too runny, don’t panic; simply whisk in more powdered sugar one tablespoon at a time until it reaches a heavy cream consistency. Conversely, if the cookies spread too thin during baking, your butter might have been too warm. Try chilling the remaining dough for 20 minutes before baking the next batch to help the cookies hold their dome.
Sometimes the orange flavor can feel a bit muted after baking. If this happens, resist the urge to add more juice, as the extra liquid will ruin the dough’s hydration. Instead, increase the amount of fresh zest in your next batch. The zest carries the aromatic oils that provide the “punch” without changing the chemistry of the dough.
Preventing Glaze Bleed and Color Migration
Patience is your best friend when glazing. If you pipe the orange drizzle onto a white base that is too wet, the colors will bleed together and look muddy. Wait about five minutes after the white base is applied before adding the drizzle. If you’re baking in a humid environment, a small kitchen fan can help the glaze set faster and prevent “sweating.”
Storage Solutions and Texture Retention
Because of our anti-soggy seal, these cookies store remarkably well. Place them in a single layer in an airtight container. If you must stack them, place a sheet of parchment paper between the layers to prevent the glazes from sticking to one another. They will stay fresh at room temperature for up to three days.
For long-term storage, I recommend freezing the unglazed dough balls. You can bake them straight from the freezer (just add two minutes to the bake time) and glaze them fresh. While you can freeze the finished cookies, the glaze may lose some of its shine and become slightly tacky upon thawing due to condensation.
Expert Tips for Professional Results
To get those perfectly round, uniform cookies you see in magazines, use a large circular cookie cutter or a wide glass immediately after the cookies come out of the oven. Place the cutter over the hot cookie and gently scoot it in a circular motion. This “rounds out” any uneven edges while the dough is still pliable.
Another pro secret is the “Zest Press.” Before you start creaming your butter, toss your orange zest into the granulated sugar and rub it between your fingertips for a minute. The abrasive sugar crystals will rupture the zest’s oil glands, releasing far more flavor than simply stirring the zest into the batter later.
Always prioritize heavy cream over milk for the glaze. The fat in the cream creates a stable emulsion with the sugar, resulting in a “bakery-style” finish that is bright white and stays put. Finally, ensure your butter is truly “softened” and not “melted.” Melted butter will cause the cookies to lose their structural integrity and spread into flat discs.
How do I store these cookies so they don’t get sticky?
The best way to store these is in a wide, airtight container in a single layer. If you need to stack them, wait at least two hours for the glaze to fully cure, then place a piece of parchment paper between each layer. Avoid using plastic wrap directly on the glaze, as it will peel the beautiful finish right off when you lift it.
Why did my cookies turn out flat instead of domed?
Flat cookies usually happen for two reasons: the butter was too warm or the oven wasn’t fully preheated. When butter is near its melting point before entering the oven, it loses its ability to hold air bubbles, causing the dough to spread. Ensure your butter is cool to the touch but takes a fingerprint when pressed, and always use a scoop to keep the dough in a tall, rounded shape.
Can I use bottled orange juice instead of fresh?
You can use bottled juice in a pinch, but the flavor will be significantly flatter. Freshly squeezed juice contains active enzymes and a bright acidity that bottled versions lose during pasteurization. More importantly, you would miss out on the fresh zest, which is where 80% of the “creamsicle” aroma actually comes from.
What if I don’t have a piping bag for the orange drizzle?
No problem at all! You can use a standard plastic sandwich bag. Simply fill the bag with your strained marmalade glaze, squeeze the air out, and snip a tiny bit off one of the bottom corners. This gives you excellent control for piping those clean, horizontal lines across the white base.
Why do I need to put the cookies back in the oven after they are done?
This is the “Anti-Soggy Trick.” By placing the cookies back into a warm, turned-off oven on a wire rack, you are drying out the very outer layer of the crumb. This creates a “crust seal” that acts as a barrier. Without this step, the moisture from the glaze would soak into the soft cookie, making it mushy within a few hours.
Orange Cookies
Course: DessertCuisine: AmericanDifficulty: easy24
cookies15
minutes12
minutes165
kcal27
MinutesA citrus-infused cookie featuring a unique flash-drying technique to ensure the white base glaze and orange marmalade drizzle set perfectly without soaking into the dough.
Ingredients
1 cup unsalted butter, softened
1 cup granulated sugar
1 large egg
1 teaspoon vanilla extract
2 tablespoons fresh orange zest (divided)
3 tablespoons fresh orange juice (divided)
2.5 cups all-purpose flour
1/2 teaspoon baking powder
1/2 teaspoon baking soda
1/2 teaspoon salt
White Base Glaze:
1.5 cups powdered sugar
2 tablespoons heavy cream
1 tablespoon fresh orange juice
Orange Drizzle:
1/2 cup powdered sugar
1 tablespoon orange marmalade, warmed and strained
1-2 teaspoons orange juice (for consistency)
Directions
- Preheat your oven to 350 degrees F. Line two large baking sheets with parchment paper.
- In a large bowl, cream together the softened butter and granulated sugar until light and fluffy. Beat in the egg, vanilla, 1 tablespoon of orange zest, and 1 tablespoon of orange juice.
- Whisk together the flour, baking powder, baking soda, and salt. Gradually add the dry ingredients to the wet mixture until just combined.
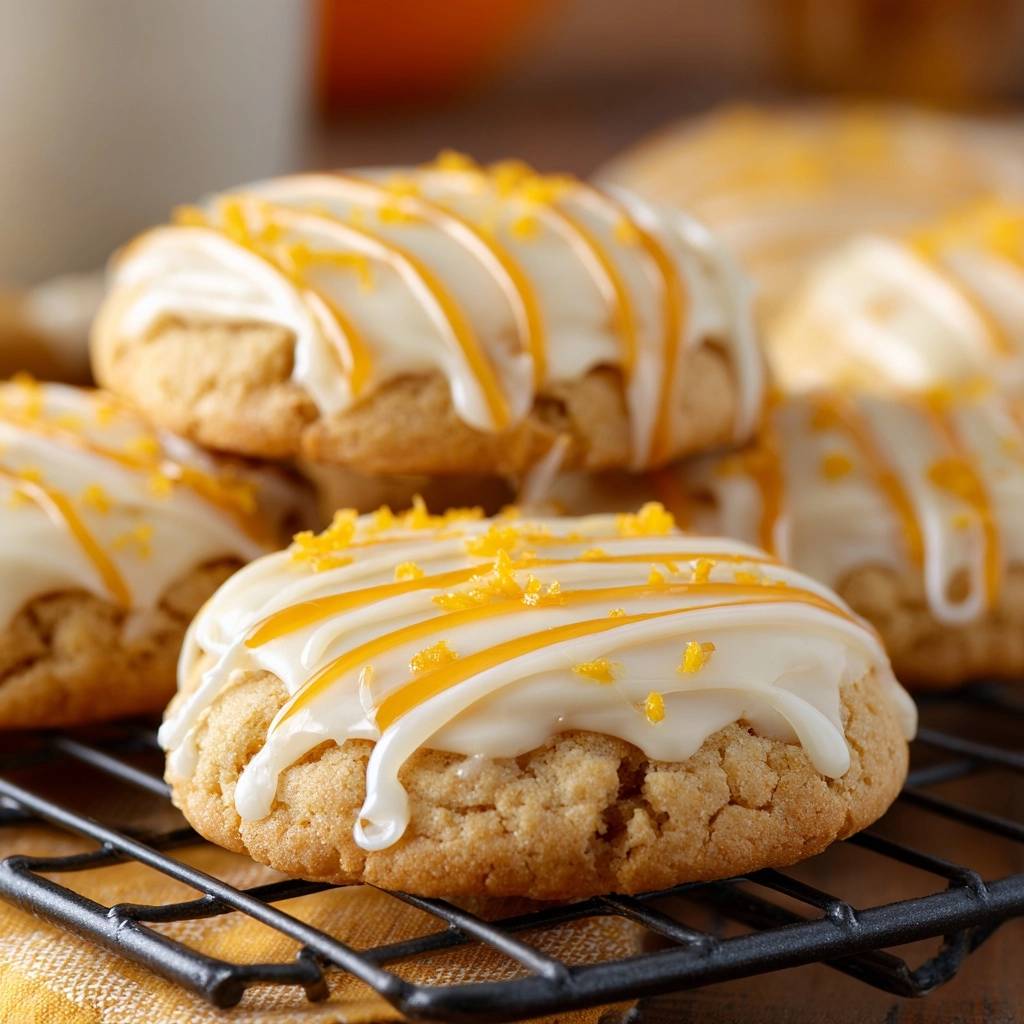
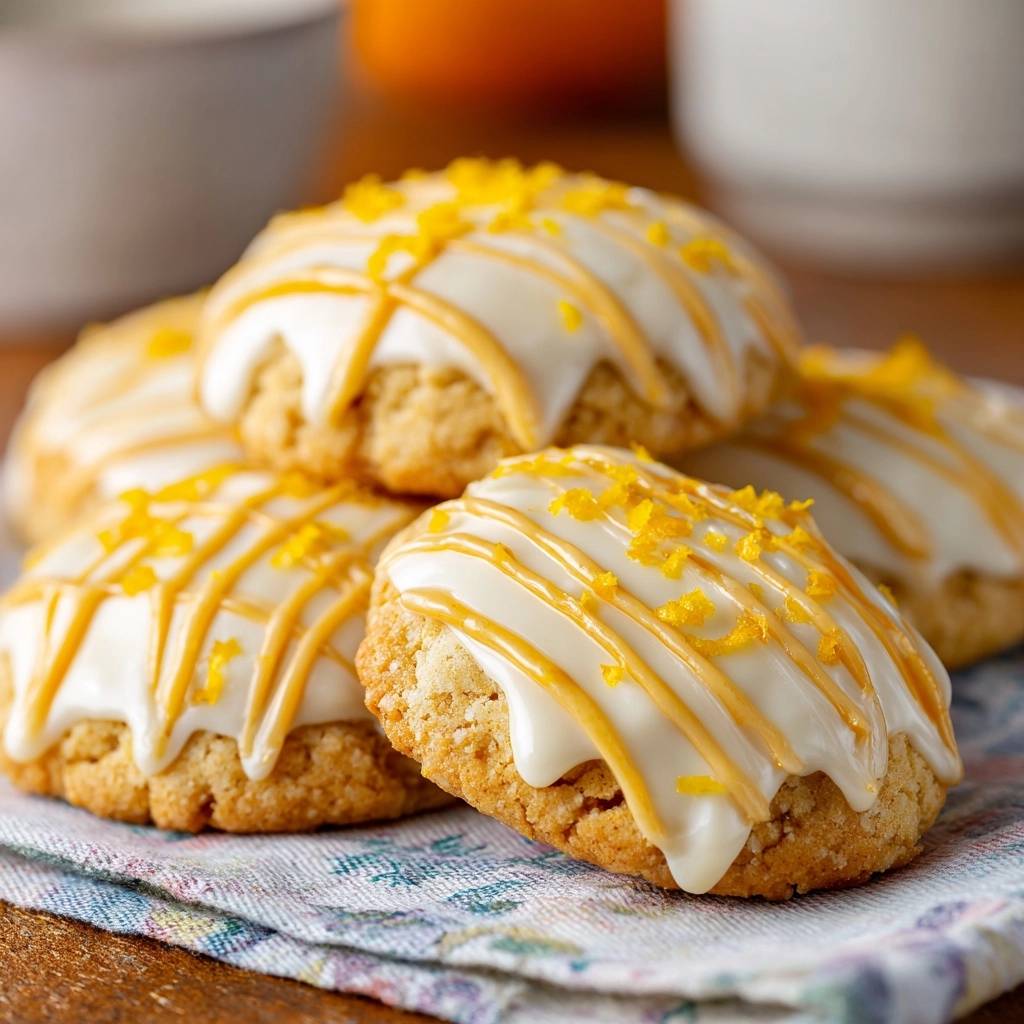
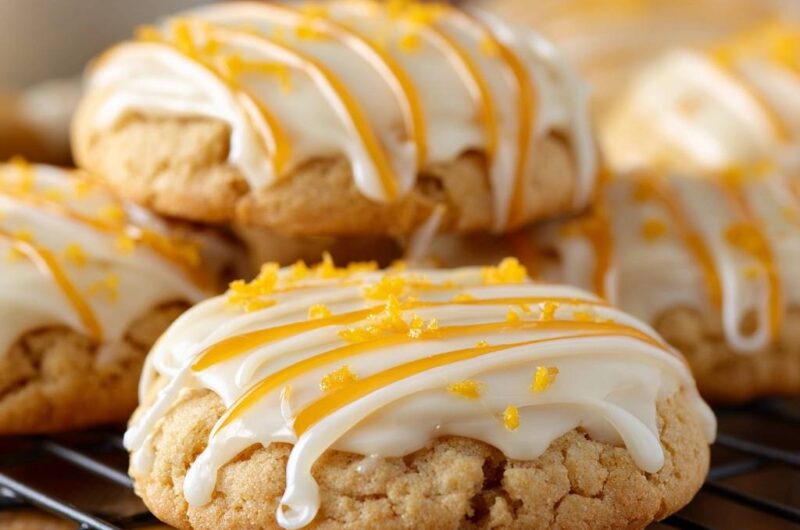
- Scoop rounded tablespoons of dough onto the prepared sheets. Do not flatten; the high-domed shape in the image requires a thick scoop. Bake for 10 to 12 minutes or until the edges are set and the tops show slight cracking.
- The Anti-Soggy Trick: Move the cookies to a wire cooling rack immediately. Let them cool for 5 minutes, then place the entire rack back into the still-warm (but turned off) oven for 3 minutes. This flash-dries the outer crumb, creating a “crust seal” that prevents the glaze moisture from migrating into the soft center.
- Remove from the oven and cool completely.
- White Base Glaze: Whisk the 1.5 cups powdered sugar, heavy cream, and 1 tablespoon orange juice until thick and opaque. Spoon a generous amount over the center of each cookie, allowing it to drip naturally down the sides as seen in the image.
- Orange Drizzle: Whisk the 1/2 cup powdered sugar, strained marmalade, and enough orange juice to reach a piping consistency. Transfer to a small piping bag or sandwich bag with the corner snipped. Pipe clean, horizontal lines across the white glaze.
- Sprinkle the remaining fresh orange zest over the wet glaze. Let the cookies sit for at least 30 minutes to allow the double-glaze to set firmly.
Notes
- The Anti-Soggy Trick involves placing the cooling rack back into a turned-off oven for 3 minutes to create a moisture barrier before glazing.